Go Back
- 1 cup graham cracker crumbs - 1 cup crushed cornflakes - 1/4 cup sugar - 1/2 teaspoon cinnamon - 1/2 cup unsalted butter, melted - 8 oz cream cheese, softened - 1/2 cup powdered sugar - 1 teaspoon vanilla extract - 1 cup heavy whipping cream - 1 cup fresh strawberries, hulled and sliced - 1/4 cup strawberries, finely diced for crunch topping - Mint leaves for garnish These ingredients come together to create a fun dessert. The graham cracker crumbs and cornflakes make the taco shell crunchy. Cream cheese and heavy cream blend for a rich filling. Fresh strawberries add a sweet touch. You can swap some ingredients based on what you have at home. Use digestive biscuits instead of graham crackers. If you prefer, you can try using Rice Krispies instead of cornflakes. For a dairy-free option, consider using vegan cream cheese and coconut cream. Choose fresh strawberries that are bright and firm. They should smell sweet. When picking cream cheese, look for brands with simple ingredients for the best taste. For the whipped cream, use heavy cream with at least 36% fat. This ensures it whips up nicely. Always use unsalted butter to control the salt level in your dessert. {{ingredient_image_1}} To start, gather your ingredients. You will need graham cracker crumbs, crushed cornflakes, sugar, cinnamon, and melted butter. In a large bowl, mix the graham cracker crumbs, cornflakes, sugar, and cinnamon. Stir it well until combined. Then, pour in the melted butter and mix until it looks like wet sand. Next, preheat your oven to 350°F (175°C). You can shape the mixture into taco shells using a taco shell mold or an upside-down muffin tin. Press the mixture firmly into the mold to make it compact. Bake these shells on a tray for 10-12 minutes. They should turn golden brown. Once baked, let them cool completely. Now, let’s make the cheesecake filling. In a mixing bowl, take the softened cream cheese. Beat it until it is smooth and creamy. Gradually add in the powdered sugar and vanilla extract. Keep mixing until everything is well blended. In another bowl, whip the heavy cream until it forms stiff peaks. This means it holds its shape well. Gently fold this whipped cream into the cream cheese mixture. Do this carefully to keep it fluffy. It should look smooth and light. It’s time to put everything together! Carefully take the cooled taco shells out of the molds. Use a spoon to fill each shell with the cheesecake mixture. Be generous but avoid overfilling. Next, add sliced strawberries on top. You can also sprinkle some finely diced strawberries for a nice crunch. If you like, garnish with a mint leaf for a fresh touch. Once assembled, place the tacos in the fridge for at least 30 minutes. This helps the filling firm up before serving. To get a great taco shell, mix the graham cracker crumbs, crushed cornflakes, sugar, and cinnamon well. The melted butter helps bind everything together. When you press the mixture into the shell mold, make sure it is compact. This helps the shells hold their shape when baking. Bake them until golden brown, but watch closely. Overbaking can make them too hard. Let them cool completely before filling. Whipping cream is key to a light cheesecake filling. Start with cold heavy cream. Use a clean bowl and beaters to whip the cream. Whip it until stiff peaks form, but don't overbeat it. If you overbeat, it can become grainy. Fold the whipped cream gently into the cream cheese mixture. This keeps it light and fluffy. These cheesecake tacos look and taste amazing on a platter. You can drizzle honey or chocolate sauce on top for extra sweetness. Fresh mint leaves add a nice touch too. For drinks, serve them with a refreshing lemonade or sweet tea. You might also enjoy pairing them with vanilla ice cream for a special treat. Pro Tips Chill for Best Results: Allow the filled tacos to chill in the refrigerator for at least 30 minutes before serving. This helps the cheesecake filling firm up and makes them easier to eat. Use Fresh Ingredients: For the best flavor and texture, always use fresh strawberries and high-quality cream cheese. This will enhance the overall taste of your cheesecake tacos. Experiment with Flavors: Feel free to add other fruits like blueberries or raspberries, or even a splash of lemon juice to the filling for a zesty twist on the classic cheesecake flavor. Make Ahead: You can prepare the taco shells and cheesecake filling a day in advance. Assemble the tacos right before serving to keep the shells crunchy and the filling fresh. {{image_2}} You can change the cheesecake filling to fit your taste. Here are some ideas: - Chocolate: Add 1/4 cup of cocoa powder to the cream cheese mix. - Vanilla Bean: Use vanilla bean paste instead of vanilla extract. This gives more flavor. - Lemon: Mix in the zest of one lemon for a fresh taste. - Nutella: Swirl in some Nutella for a rich chocolate hazelnut flavor. Each option brings a new twist to the classic cheesecake. You can get creative with flavors! Toppings make your tacos more fun. Here are some tasty suggestions: - Berries: Use blueberries or raspberries for a colorful mix. - Crushed Cookies: Sprinkle crushed Oreos or graham crackers on top. - Nuts: Add chopped nuts like almonds or pecans for crunch. - Sauces: Drizzle with caramel or chocolate sauce for extra sweetness. Mix and match toppings to create your perfect taco! You can enjoy these tacos even with dietary needs. Here are some swaps: - Gluten-Free: Use gluten-free graham crackers or oats for the shells. - Dairy-Free Cream Cheese: Look for plant-based cream cheese for the filling. - Coconut Cream: Use coconut cream instead of heavy cream for a dairy-free whip. These options make it easy to enjoy Strawberry Crunch Cheesecake Tacos no matter your diet! To keep your unassembled strawberry crunch cheesecake tacos fresh, store them correctly. First, let the taco shells cool completely. Once cool, place them in an airtight container. You can stack them with parchment paper in between to prevent sticking. Keep the container in a cool, dry place. The shells can last up to three days this way. If you have leftover cheesecake filling, don't waste it! Store it in an airtight container. Place the container in the fridge. It will stay fresh for about three days. When you're ready to use it again, give it a quick stir. You may need to add a little cream to refresh the texture. Want to save some tacos for later? You can freeze them! First, store unassembled taco shells in a single layer on a tray. Freeze them for about an hour. Once frozen, transfer them to an airtight bag. Make sure to remove as much air as possible. You can freeze the shells for up to a month. Just remember, once you’re ready to eat them, let them thaw in the fridge before serving. You can keep these tacos in the fridge for up to three days. Make sure to store them in an airtight container. This helps keep the shells crispy and the filling fresh. Yes, you can use frozen strawberries. Just thaw them and drain any extra liquid. Fresh strawberries give a better taste, but frozen ones work in a pinch. If you don’t have a taco shell mold, use an upside-down muffin tin. Press the mixture into the cups to create taco shapes. This method works well and gives you the same fun shape. In this blog post, we covered how to make Strawberry Crunch Cheesecake Tacos. We explored key ingredients, substitutions, and tips for the best quality. The step-by-step instructions guide you from crunch shells to the cheesecake filling. Our tips give you the secrets to perfect texture and flavor. We also shared variations and storage advice. Now, you can create a fun, tasty treat with ease. Enjoy every bite and make them your own!

Strawberry Crunch Cheesecake Tacos

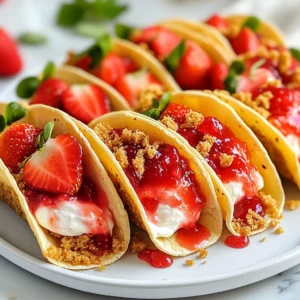
Delicious cheesecake filling in a crunchy taco shell topped with fresh strawberries.
Prep Time 30 minutes
Cook Time 12 minutes
Total Time 1 hour 30 minutes
Course Dessert
Cuisine American
Servings 6
Calories 300 kcal

Ingredients
  

  • 1 cup graham cracker crumbs
  • 1 cup crushed cornflakes
  • 1 quarter cup sugar
  • 1 half teaspoon cinnamon
  • 1 half cup unsalted butter, melted
  • 8 oz cream cheese, softened
  • 1 half cup powdered sugar
  • 1 teaspoon vanilla extract
  • 1 cup heavy whipping cream
  • 1 cup fresh strawberries, hulled and sliced
  • 1 quarter cup strawberries, finely diced for crunch topping
  • none Mint leaves for garnish

Instructions
 

  • Prepare the Crunch Shells: In a bowl, mix together graham cracker crumbs, crushed cornflakes, sugar, and cinnamon. Pour in melted butter and stir until the mixture resembles wet sand.
  • Mold into Taco Shapes: Preheat your oven to 350°F (175°C). Using a taco shell mold or an upside-down muffin tin, press the mixture into the shape of taco shells. Ensure they are compact.
  • Bake: Place the molded taco shells on a baking tray and bake for 10-12 minutes or until they are golden brown. Remove from the oven and allow to cool completely.
  • Make the Cheesecake Filling: In a mixing bowl, beat the softened cream cheese until smooth. Gradually add the powdered sugar and vanilla extract, continuing to mix until all ingredients are well combined.
  • Whip the Cream: In another bowl, beat the heavy whipping cream until stiff peaks form. Gently fold the whipped cream into the cream cheese mixture until smooth and fluffy.
  • Assemble the Tacos: Carefully remove the cooled taco shells from the molds. Spoon the cheesecake filling into each shell.
  • Add Strawberries: Top the cheesecake filling with sliced strawberries and a sprinkle of finely diced strawberries for added crunch.
  • Garnish: Optionally, garnish with a sprig of fresh mint on top of each taco for added flavor and presentation.
  • Chill and Serve: Refrigerate the assembled tacos for at least 30 minutes before serving to firm up the filling.

Notes

Arrange the cheesecake tacos on a serving platter and drizzle with a little honey or chocolate sauce for extra sweetness and visual appeal.
Keyword cheesecake, dessert, strawberries, tacos