Go Back
To make the caramel apple cheesecake cups, gather these simple ingredients: - 1 cup graham cracker crumbs - 1/4 cup unsalted butter, melted - 1 cup cream cheese, softened - 1/2 cup powdered sugar - 1 teaspoon vanilla extract - 1 cup heavy whipping cream - 2 medium apples, diced - 1/2 cup caramel sauce (plus extra for drizzling) - 1 teaspoon lemon juice - Chopped nuts for garnish (optional) These ingredients create a creamy, sweet treat with a crunchy base. When picking apples, choose firm ones. Look for bright colors and smooth skin. Avoid apples with bruises or soft spots. Varieties like Granny Smith and Honeycrisp work great. They add a nice crunch and flavor. You can also try Fuji apples for a sweeter taste. You can change this recipe to match your taste. Use gluten-free graham crackers for a gluten-free option. Swap cream cheese with vegan cream cheese if needed. For a nut-free version, skip the chopped nuts on top. You can also try different fruits, like pears or berries, to switch things up. To make the crust, grab a mixing bowl. Add 1 cup of graham cracker crumbs. Then, pour in 1/4 cup of melted unsalted butter. Mix until the crumbs look wet and sandy. Now, take your serving cups or jars. Spoon the mixture into each cup. Press down gently to form a solid layer. This will be the base for your cheesecake cups. Next, let’s make the filling. In another bowl, add 1 cup of softened cream cheese. Beat it until it is smooth and creamy. Then, add 1/2 cup of powdered sugar and 1 teaspoon of vanilla extract. Mix until combined. In a separate bowl, whip 1 cup of heavy cream. Beat it until stiff peaks form. Carefully fold the whipped cream into the cream cheese mixture. This makes the filling light and fluffy. Now it’s time to layer the cups! Start with a spoonful of the cream cheese mixture. Spread it over the crust layer. Next, take 2 medium apples, diced. Toss them with 1 teaspoon of lemon juice and 1/2 cup of caramel sauce. Add a layer of these caramel-coated apples on top of the cream cheese. Repeat the layers until the cups are full. Finish by drizzling extra caramel sauce on top. If you like, sprinkle some chopped nuts for crunch. Enjoy your tasty no-bake treat! To get the best texture in your cheesecake cups, focus on the cream cheese. Make sure it is soft before mixing. This helps create a smooth filling. When you whip the heavy cream, aim for stiff peaks. This gives your dessert a light, airy feel. Fold the whipped cream into the cream cheese gently. This keeps the mixture fluffy and creamy. For a great presentation, use clear glass cups. This shows off the lovely layers of your cheesecake. You can chill the cups before serving. A cold treat is always refreshing. Consider adding a sprig of mint on top for color. Drizzle extra caramel sauce over each cup for a sweet touch. If you want texture, sprinkle some chopped nuts on top. Cleaning up can be simple. Use a mixing bowl with a pour spout. This makes it easy to fill the cups without spills. Line the work area with parchment paper. It catches any drips or crumbs. After you serve, soak your mixing bowls and utensils in warm, soapy water. This helps loosen any sticky residue. Enjoy your dessert without the stress of a messy kitchen! {{image_2}} You can change the flavor in many fun ways. For a fall twist, add pumpkin spice. Just mix in a teaspoon of pumpkin spice with the cream cheese. It gives a warm taste that is perfect for autumn. If you love chocolate, use cocoa powder. Add two tablespoons of cocoa to the cream cheese mix. You can also top the cups with chocolate shavings for extra flair. If you need a gluten-free option, swap the graham cracker crumbs. Use crushed gluten-free cookies instead. This keeps the base tasty and safe. For a dairy-free treat, try vegan cream cheese. Use coconut cream in place of heavy cream. These changes let everyone enjoy this dessert without worry. You can serve these cheesecake cups in different ways. Mini cups are cute and perfect for parties. Use small shot glasses to make them fun and easy to grab. If you want something bigger, try parfaits. Layer the ingredients in a tall glass. This way, you can see all the yummy layers. Both styles are great for sharing or enjoying on your own! To keep your caramel apple cheesecake cups fresh, use airtight containers. Make sure each cup is sealed well. This helps keep moisture out and flavor in. Store them in the fridge for best results. If you stack the cups, place parchment paper between them. This will prevent sticking. You can keep these cheesecake cups in the fridge for up to three days. After that, the apples may start to lose their crunch. If you notice any changes in texture, it’s best to eat them right away. Always use your senses to check for freshness. Freezing cheesecake cups is possible but needs care. First, freeze the cups without any toppings. Cover them well with plastic wrap or foil. Once frozen, they can last for up to two months. When ready to eat, move them to the fridge to thaw overnight. Add fresh apple pieces and caramel sauce just before serving. This keeps your dessert tasty and appealing! Yes, you can prepare these cheesecake cups a day in advance. Just store them in the fridge. This allows the flavors to blend better. It also makes serving easy. When you're ready to enjoy, just drizzle extra caramel on top. If you don’t have heavy cream, you can use whole milk or half-and-half. Keep in mind that the texture might change. The cups may not be as rich and creamy. You could also use coconut cream for a dairy-free option. This gives a nice flavor twist. To stop apples from browning, toss them in lemon juice. This helps keep their color fresh. You can also use a mix of water and lemon juice. Submerging the apples for a few minutes works too. This step is important for a beautiful presentation. You’ve learned how to make delicious cheesecake cups using fresh apples. We discussed ingredients, step-by-step instructions, and helpful tips. Remember to choose ripe apples for the best flavor. You can customize these treats with many variations and dietary options. Store them properly for longer enjoyment. Enjoy these sweet creations with family or friends. I hope you feel inspired to make your own cheesecake cups!

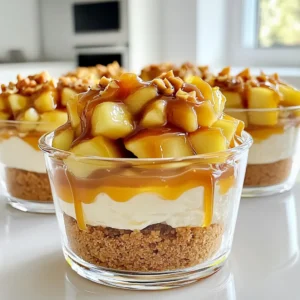
Caramel Apple Cheesecake Cups (No Bake)

Indulge in the creamy goodness of Caramel Apple Cheesecake Cups with this easy recipe! Perfect for dessert lovers, these delightful treats combine a buttery graham cracker crust with smooth cream cheese and luscious caramel-coated apples. Ready in just 20 minutes, they are perfect for any occasion. Click to discover how to create this delicious dessert that will impress your friends and family! #CaramelAppleCheesecake #DessertRecipes #EasyRecipes #SweetTreats

Ingredients
  

1 cup graham cracker crumbs

1/4 cup unsalted butter, melted

1 cup cream cheese, softened

1/2 cup powdered sugar

1 teaspoon vanilla extract

1 cup heavy whipping cream

2 medium apples, diced

1/2 cup caramel sauce (plus extra for drizzling)

1 teaspoon lemon juice

Chopped nuts for garnish (optional)

Instructions
 

In a mixing bowl, combine the graham cracker crumbs and melted butter. Mix until the crumbs are evenly coated.

    Spoon the crumb mixture into the bottom of serving cups or jars, pressing down gently to form a crust layer.

      In a separate bowl, beat the softened cream cheese until smooth. Add the powdered sugar and vanilla extract, and mix until well combined.

        In another bowl, whip the heavy cream until stiff peaks form. Carefully fold the whipped cream into the cream cheese mixture until silky and smooth.

          In a small bowl, toss the diced apples with lemon juice and half of the caramel sauce. This will prevent the apples from browning and add flavor.

            To assemble the cheesecake cups, layer a spoonful of the cream cheese mixture over the graham cracker crust, followed by a layer of the caramel-coated apples. Repeat the layers until the cups are filled.

              Drizzle extra caramel sauce on top of each cup and, if desired, sprinkle chopped nuts for added texture.

                Prep Time: 20 minutes | Total Time: 20 minutes | Servings: 6

                  - Presentation Tips: Serve the cups chilled, and consider adding a sprig of mint on top for a fresh touch. Use clear glass cups to showcase the beautiful layers!