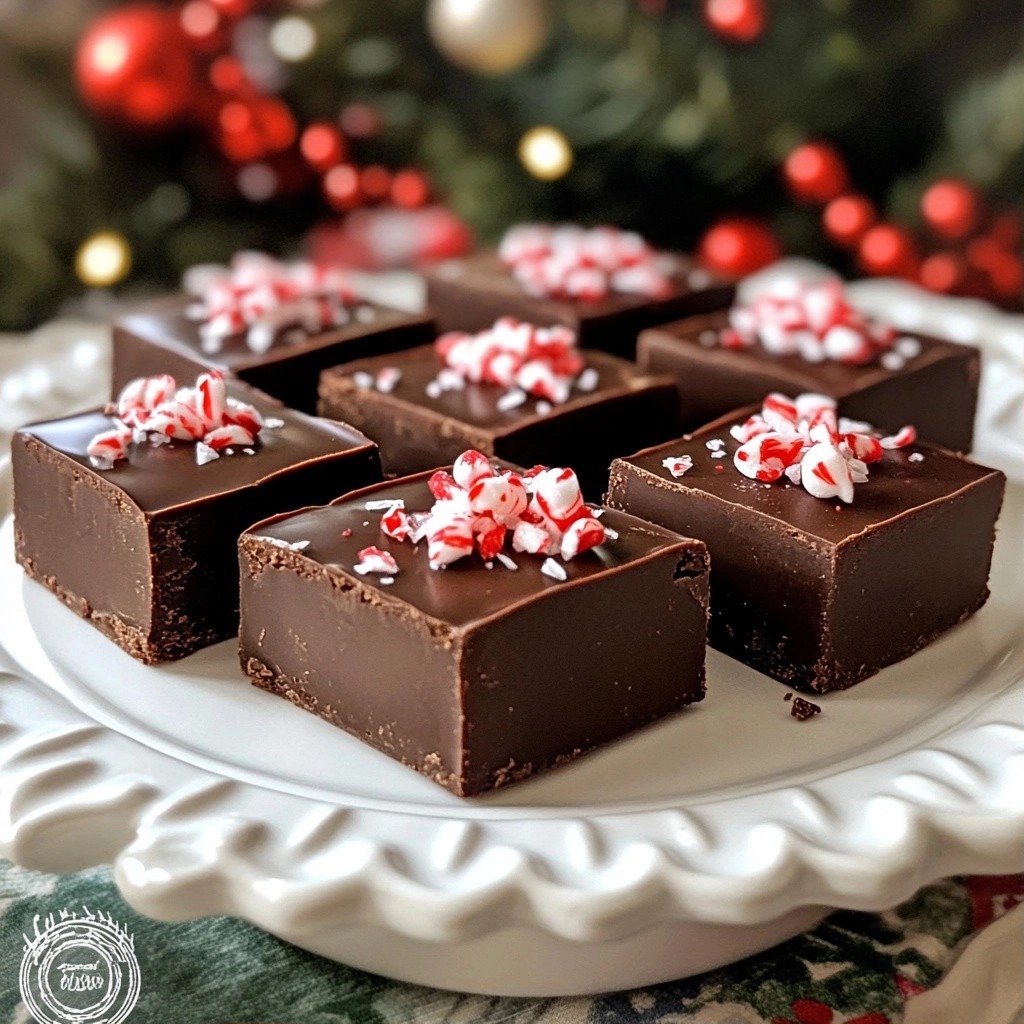
Get ready to indulge in a festive favorite: Peppermint Chocolate Fudge! This easy recipe combines rich chocolate with a refreshing mint twist. Perfect for holiday parties or gift giving, you'll impress everyone with this treat. I’ll guide you through the key ingredients and simple steps to make this tasty fudge. Let’s dive into the sweet world of festive baking and create a delightful treat together!
Why I Love This Recipe
- Rich Chocolate Flavor: This fudge is packed with deep, rich chocolate flavors that melt in your mouth, making it truly indulgent.
- Festive Peppermint Twist: The addition of peppermint gives this treat a refreshing and seasonal touch that is perfect for holiday gatherings.
- Easy to Make: With just a few simple ingredients and minimal steps, this recipe is straightforward and perfect for bakers of all skill levels.
- Great for Gifting: These fudge squares make wonderful homemade gifts during the holidays, beautifully packaged and shared with friends and family.
Ingredients
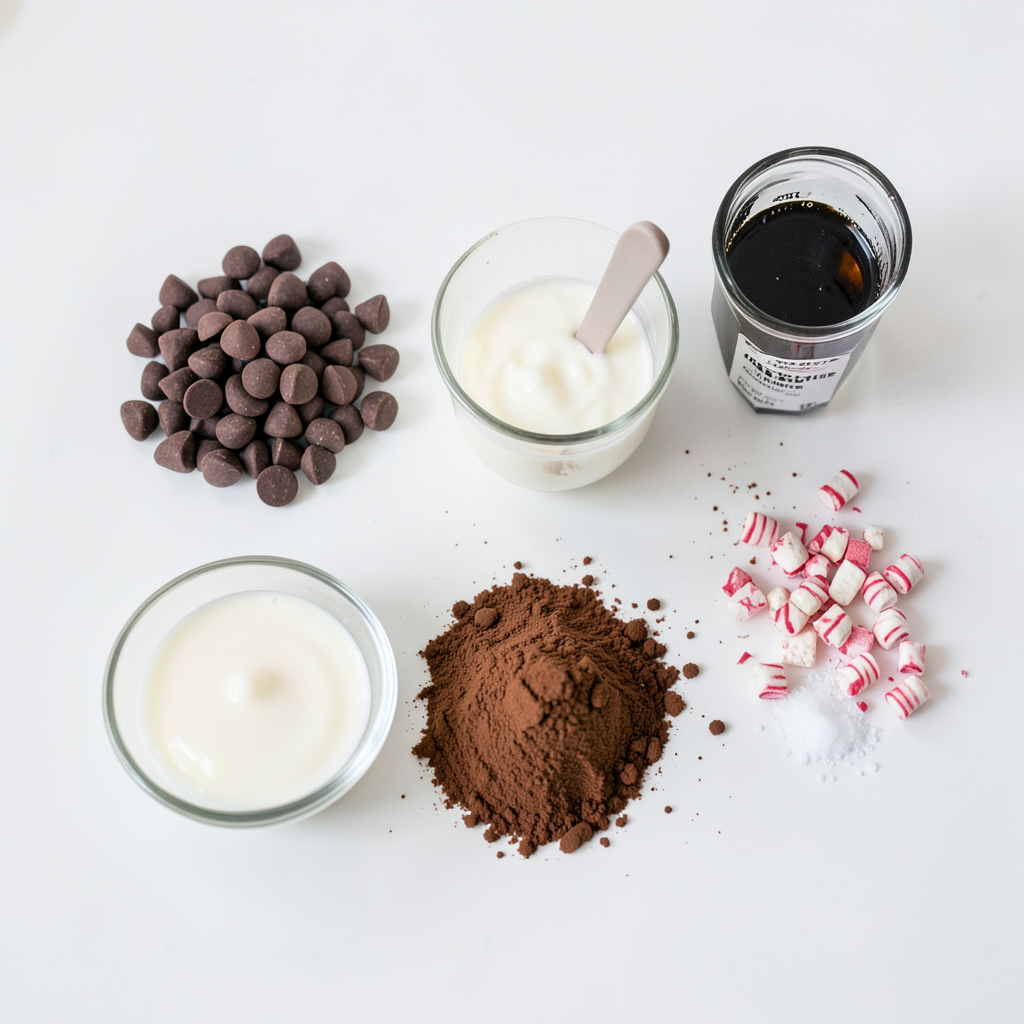
Detailed List of Ingredients
- Chocolate Components
- 2 cups semi-sweet chocolate chips
- ½ cup unsweetened cocoa powder
The base of our fudge is chocolate. I love using semi-sweet chocolate chips. They melt well and give a rich flavor. The cocoa powder adds depth. It enhances the chocolate taste without being too sweet.
- Sweet Binding Elements
- 1 cup sweetened condensed milk
Sweetened condensed milk is key. It binds the fudge and adds creaminess. This gives our fudge that melt-in-your-mouth texture.
- Flavor Enhancements
- 1 teaspoon vanilla extract
- ½ teaspoon peppermint extract
- Pinch of salt
Vanilla extract rounds out the flavor. It adds warmth and depth. Peppermint extract brings that festive twist. A pinch of salt balances the sweetness. It makes every bite pop!
- Toppings and Garnishes
- ½ cup crushed peppermint candies (plus extra for topping)
Crushed peppermint candies add crunch. They give a bright, fresh taste. Plus, they look great on top! I like to sprinkle some extra on the fudge before chilling. This makes it festive and fun.
Step-by-Step Instructions
Preparation of the Baking Pan
To start, I grab an 8x8 inch baking pan. I line it with parchment paper. I let some paper hang over the edges. This helps me remove the fudge easily later on.
Melting the Chocolate Mixture
Next, I take a medium saucepan and place it over low heat. I add 2 cups of semi-sweet chocolate chips and 1 cup of sweetened condensed milk. I stir this mix until the chocolate melts completely. The mixture should be smooth and shiny.
Mixing in Cocoa and Extracts
Once the chocolate is melted, I remove the pan from heat. I whisk in ½ cup of unsweetened cocoa powder. I also add 1 teaspoon of vanilla extract and ½ teaspoon of peppermint extract. A pinch of salt goes in too. I mix everything well until it's smooth.
Incorporating Peppermint
Now, I fold in ½ cup of crushed peppermint candies. I make sure the candies spread evenly in the chocolate mixture. This adds a nice crunch and flavor.
Chilling and Setting the Fudge
I pour the fudge mixture into the prepared pan. I spread it evenly with a spatula. Next, I sprinkle more crushed peppermint candies on top for decoration. I place the pan in the refrigerator for at least 2 hours. This helps the fudge set firm.
Serving Suggestions
After the fudge is set, I lift it out using the parchment paper. I cut it into small squares. I like to arrange the fudge on a festive platter. Adding sprigs of mint or more crushed candy makes it look even better.
Tips & Tricks
Achieving the Perfect Texture
To get smooth and creamy fudge, melt the chocolate slowly. Use low heat and stir all the time. This helps the chocolate blend well with the sweetened condensed milk. If you rush, your fudge can end up grainy. The cocoa powder adds depth, so mix it in well. This step is key for great texture.
Common Mistakes to Avoid
One big mistake is not measuring your ingredients. Each one plays a role in the fudge's taste and texture. If you skip the salt, you may lose some flavor. Also, folding in the peppermint candies gently is important. If you mix too hard, you might break them into dust. Finally, don’t skip the chilling time. It ensures your fudge sets properly.
Equipment Recommendations
For this recipe, you need a few key tools. A medium saucepan is a must for melting chocolate. Use a whisk to mix in the cocoa and extracts smoothly. Don’t forget a spatula for spreading the fudge in the pan. Lastly, an 8x8 inch baking pan is perfect for cutting fudge into squares. These tools make the process easier and more fun!
Pro Tips
- Use High-Quality Chocolate: The type of chocolate you choose greatly affects the flavor of your fudge. Opt for high-quality semi-sweet chocolate chips for the best results.
- Let It Chill Properly: Make sure to let the fudge chill for at least 2 hours to ensure it sets properly. The longer it chills, the firmer and easier it will be to slice.
- Customize Your Toppings: Feel free to get creative with toppings! Add crushed nuts, different types of candy, or even a drizzle of white chocolate for a unique twist.
- Store Correctly: To keep the fudge fresh, store it in an airtight container in the refrigerator. It can last up to two weeks if stored properly.
Variations
Alternative Flavor Additions
You can add different flavors to your fudge. Try swapping peppermint for orange extract. It gives a bright, zesty twist. You could also use almond extract for a nutty flavor. For a richer taste, mix in a bit of espresso powder. Each change adds a unique touch to your fudge!
Dietary Adjustments (Vegan, Gluten-Free)
Making vegan fudge is easy! Use dairy-free chocolate chips and coconut milk instead of sweetened condensed milk. This keeps the fudge creamy and delicious without dairy. For gluten-free options, check your chocolate and cocoa brands. Most are naturally gluten-free. Just ensure no gluten is added during processing.
Creative Serving Ideas
Serve your fudge in fun ways! Cut it into festive shapes with cookie cutters. This makes it more fun for parties. You can also layer the fudge with whipped cream for a tasty dessert. Place fudge squares in clear bags and tie with ribbons for cute gifts. These creative ideas make your fudge stand out!
Storage Info
Best Practices for Storing Fudge
To keep your peppermint chocolate fudge fresh, store it in an airtight container. Line the container with parchment paper to avoid sticking. Place a layer of fudge in the container, then add another layer of parchment. This keeps the fudge from getting too moist. Store it in a cool, dry place away from heat.
Freezing Instructions
You can freeze fudge for longer storage. Cut the fudge into squares and wrap each piece in plastic wrap. Then, place the wrapped fudge in a freezer bag. Make sure to squeeze out as much air as possible. When you want to enjoy it, thaw the fudge in the fridge overnight.
Shelf Life Tips
Homemade fudge lasts about two weeks in the fridge. If stored properly, you can keep it for up to three months in the freezer. Always check for any signs of spoilage, like changes in color or texture. If it looks or smells off, it’s best to toss it out.
FAQs
How do I know when the fudge is set?
The fudge is set when it feels firm to the touch. After chilling for at least two hours, it should hold its shape. You can also test by gently pressing on the surface. If it springs back, it is ready.
Can I use different types of chocolate?
Yes, you can use milk chocolate or dark chocolate. Each type gives a different taste. Milk chocolate makes the fudge sweeter, while dark chocolate adds a rich flavor. Just make sure to keep the chocolate amount the same.
What can I substitute for sweetened condensed milk?
If you need a substitute for sweetened condensed milk, try using coconut milk. You can also mix milk with sugar and heat it to thicken it. This will give you a similar sweet and creamy base.
How long can the fudge be kept?
The fudge can stay fresh for about two weeks. Store it in an airtight container at room temperature. If you want to keep it longer, you can freeze it for up to three months. Just remember to wrap it well to prevent freezer burn.
This blog post shared how to make delicious fudge by using simple ingredients and steps. We explored the key elements, like chocolate, sweeteners, and flavor boosters. I provided tips to help you avoid common mistakes and achieve the perfect texture. You can also try various flavors and dietary options. Finally, we discussed how to store your fudge for freshness. Now you have the tools to create fudge that delights everyone. Enjoy your sweet treat and have fun experimenting!