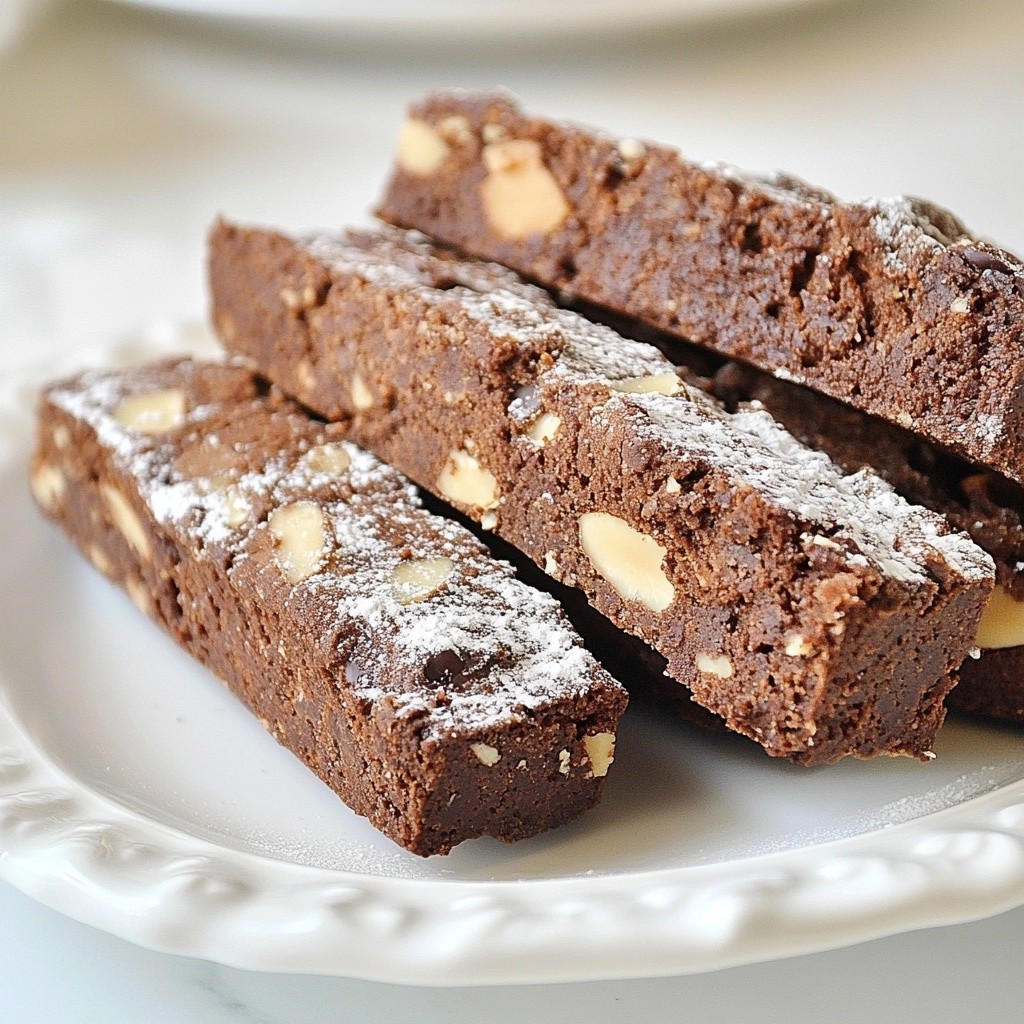
Get ready to bake some crunchy chocolate almond biscotti that will wow your taste buds! This easy recipe combines rich cocoa, crunchy almonds, and sweet chocolate chips. Perfect for dipping in coffee or enjoying as a snack, it’s a treat you’ll want to share. I’ll guide you through each simple step, so you’ll impress friends and family. Let’s dive into this delicious journey of flavors!
Why I Love This Recipe
- Crispy Texture: The double-baking process gives these biscotti their signature crunch, making them perfect for dipping in coffee or tea.
- Chocolate and Almond Delight: The rich combination of cocoa and crunchy almonds creates a deliciously satisfying treat that is hard to resist.
- Easy to Customize: You can easily swap out the almonds for walnuts or add different types of chocolate for a personal touch.
- Perfect for Gifting: These biscotti make a lovely homemade gift, packaged in a jar or box, perfect for any occasion.
Ingredients
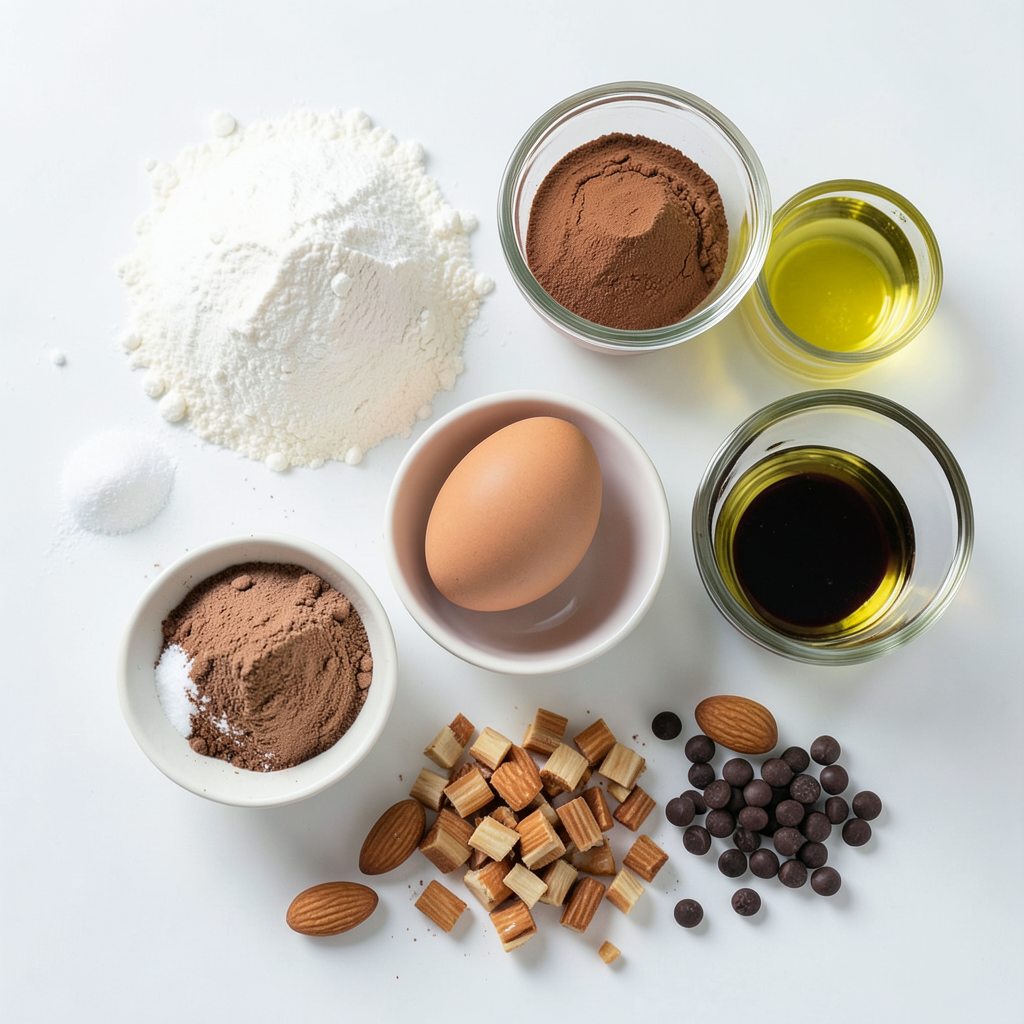
List of Ingredients
- 2 cups all-purpose flour
- 1 teaspoon baking powder
- 1/4 teaspoon salt
- 1/2 cup unsweetened cocoa powder
- 3/4 cup granulated sugar
- 2 large eggs
- 1 teaspoon vanilla extract
- 1 cup whole almonds, coarsely chopped
- 1/2 cup semi-sweet chocolate chips
- 1 tablespoon olive oil
To start, gather all your ingredients. This step makes baking easy and fun. The flour gives the biscotti its structure. Baking powder helps them rise. Salt adds flavor. Cocoa powder gives a rich chocolate taste. Sugar sweetens and helps with texture. Eggs bind the dough together. Vanilla adds warmth, and olive oil keeps it moist. Almonds and chocolate chips bring crunch and sweetness.
Having everything ready is key. It speeds up the process and keeps things organized. Plus, you won’t forget anything important. This simple list makes a big impact on your biscotti. Enjoy the process of measuring and mixing these tasty ingredients!
Step-by-Step Instructions
Preheating the Oven and Preparation
- Preheat your oven to 350°F (175°C).
- Line a baking sheet with parchment paper. This helps with easy cleanup.
Mixing the Ingredients
- In a medium bowl, combine the dry ingredients: flour, baking powder, salt, and cocoa powder.
- In a large bowl, beat the eggs and sugar together. Use a hand mixer or whisk until light and fluffy. This takes about 2-3 minutes.
Forming and Baking the Biscotti
- Add the vanilla extract and olive oil to the egg mixture. Mix until smooth.
- Gradually add the dry mixture to the wet ingredients. Mix until just mixed. The dough will be thick.
- Fold in the chopped almonds and chocolate chips. Use a spatula to mix them evenly.
- Divide the dough in half. Shape each half into a log about 12 inches long and 2 inches wide. Place the logs on the baking sheet with space in between.
- Bake in the preheated oven for 25-30 minutes. They should feel firm to the touch.
- Let them cool for about 10-15 minutes after baking.
- Reduce the oven temperature to 325°F (160°C). Slice the logs diagonally into 1/2-inch pieces. Use a serrated knife for clean cuts.
- Place the sliced biscotti back on the baking sheet, cut side down. Bake for an additional 15-20 minutes, flipping halfway through. This ensures they get crisp and dry.
- After baking, let them cool completely on the baking sheet. Then transfer to a wire rack.
Tips & Tricks
Achieving the Perfect Texture
To get the best texture for your biscotti, watch your baking times closely. Baking them too long can make them too hard. The first bake should be about 25-30 minutes. You want them firm, but not rock hard.
After the first bake, let them cool for 10-15 minutes. This cooling time helps them firm up just right. If you skip this step, your biscotti may crumble when you cut them.
Enhancing Flavor and Presentation
For serving, you can get creative. Place the biscotti in a nice jar or on a decorative platter. This adds a special touch to your table.
You might also want to think about toppings. A light dusting of powdered sugar can make them look fancy. You could even serve them with melted chocolate for dipping. This makes for a delightful treat. Remember, good presentation makes the food even more enjoyable!
Pro Tips
- Chill the Dough: If the dough feels too sticky to handle, refrigerate it for 15-20 minutes before shaping into logs. This will make it easier to work with.
- Choose Quality Chocolate: Use high-quality semi-sweet chocolate chips for a richer flavor. The better the chocolate, the more delicious your biscotti will be.
- Store Properly: Keep biscotti in an airtight container at room temperature to maintain their crunchiness. They can also be frozen for longer shelf life.
- Experiment with Flavors: Feel free to add spices like cinnamon or nutmeg, or substitute the almonds with other nuts such as hazelnuts or pistachios for a unique twist.
Variations
Flavor Variations
You can change the flavors of your biscotti by using different nuts or chocolate types. Instead of almonds, try walnuts or pecans for a new taste. You can also swap semi-sweet chocolate chips for dark or white chocolate, which adds a fun twist.
Adding spices can elevate the flavor. A pinch of cinnamon brings warmth and depth. You could also try nutmeg or cardamom for a unique flavor. These small changes can make your biscotti special and fun.
Dietary Modifications
If you need gluten-free options, you can use almond flour or a gluten-free flour blend. These alternatives will keep your biscotti tasty, while meeting dietary needs.
For those looking to reduce sugar, try using a sugar substitute like stevia or monk fruit. You can also cut down on the sugar in the recipe by 25% without losing much flavor. These adjustments make it easier for everyone to enjoy your delicious biscotti.
Storage Info
Best Practices for Storing Biscotti
To keep your crunchy baking chocolate almond biscotti fresh, use an airtight container. This will protect them from air and moisture. A glass jar works well, as does a plastic container. Make sure the container is sealed tight.
Store the biscotti at room temperature. This way, they will stay crispy for up to two weeks. If you notice any moisture, remove the biscotti and let them dry out.
Freezing Instructions
You can freeze biscotti for longer storage. First, let them cool completely after baking. Then, wrap each piece in plastic wrap. This helps prevent freezer burn. Place the wrapped biscotti in a freezer-safe bag.
To thaw, take the biscotti out and leave them at room temperature for about an hour. You can also warm them in the oven for a few minutes. This will make them crunchy again. Enjoy your delicious biscotti anytime!
FAQs
Common Questions About Biscotti
How long do homemade biscotti last? Homemade biscotti can last for about two weeks if stored correctly. Keep them in an airtight container at room temperature. This helps keep them crunchy and fresh. For longer storage, freeze them. They can last up to three months in the freezer.
Can I make biscotti without eggs? Yes, you can make biscotti without eggs. Use substitutes like applesauce or mashed bananas. These will help bind the dough, though the texture may differ slightly. Experiment with these options to find what you like best.
Troubleshooting Tips
Why did my biscotti crumble? Biscotti can crumble for a few reasons. If the dough is too dry, it won’t hold together well. Ensure you measure your ingredients correctly, especially the flour. Adding a bit of water or more oil can help if the dough feels too crumbly.
How can I make my biscotti less dry? If your biscotti are too dry, try adjusting the baking time. Bake them for a shorter period or lower the oven temperature. Adding a little more oil or chocolate can also help keep them moist. Remember, biscotti should be crunchy but not overly dry.
In this post, we explored the many aspects of making delicious biscotti. We covered ingredients, from flour to chocolate chips, and shared step-by-step instructions. I offered tips for the best texture and flavor, plus variations for every taste. We discussed storage and answered common questions.
Biscotti is a fun treat to make and share. With a few simple steps, you can create something special. Now, you’re ready to bake your own batch. Enjoy the process and the tasty results!