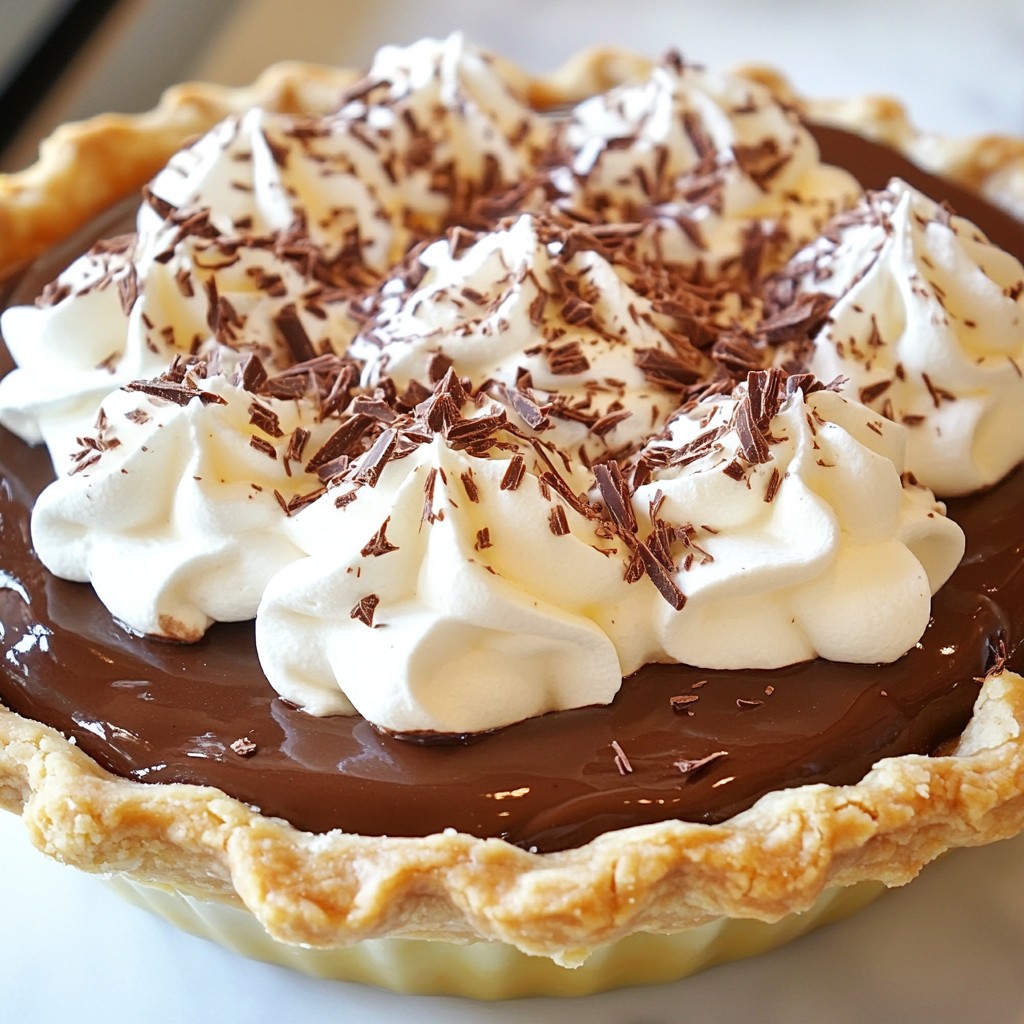
If you love rich, creamy desserts, then you're in for a treat! My Classic Baking Chocolate Cream Pie is a delightful dessert that will have your taste buds dancing. This easy-to-follow recipe will guide you through every step, from mixing the perfect chocolate filling to topping it with fluffy whipped cream. Get ready to impress your friends and family with a pie that's not just delicious but also a fun baking adventure!
Why I Love This Recipe
- Decadent Chocolate Flavor: This pie is rich and indulgent, making it a perfect dessert for chocolate lovers.
- Classic Comfort Dessert: There's something nostalgic about a homemade chocolate cream pie that brings back sweet memories.
- Impressive Presentation: With its glossy chocolate filling and whipped cream topping, it's sure to wow your guests.
- Customizable Toppings: You can easily add your favorite toppings, like nuts or fresh berries, for a personal touch.
Ingredients
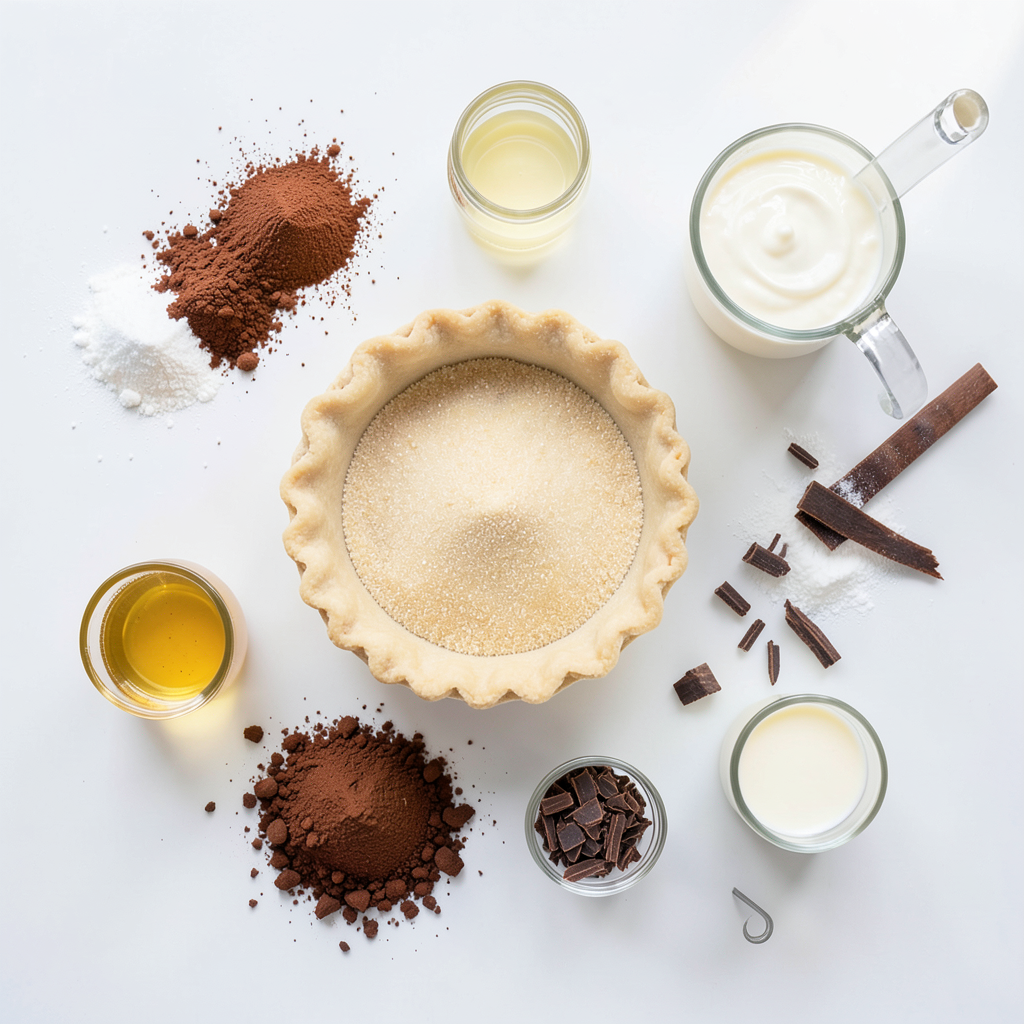
List of Ingredients
- 1 pre-baked 9-inch pie crust
- 1 cup granulated sugar
- 1/4 cup unsweetened cocoa powder
- 1/4 cup cornstarch
- 1/8 teaspoon salt
- 2 cups whole milk
- 4 large egg yolks, beaten
- 2 tablespoons butter
- 1 teaspoon vanilla extract
- 1 cup heavy whipping cream
- 2 tablespoons powdered sugar
- Chocolate shavings or curls for garnish
To add a twist, you can try using dark chocolate instead of cocoa powder. You might also add a pinch of espresso powder to boost the chocolate flavor. If you want a lighter version, consider using a lighter whipping cream or a dairy-free alternative.
Step-by-Step Instructions
Preparing the Chocolate Filling
To start, grab a medium saucepan. In it, you will whisk together the following dry ingredients:
- 1 cup granulated sugar
- 1/4 cup unsweetened cocoa powder
- 1/4 cup cornstarch
- 1/8 teaspoon salt
Mix these well until they are fully combined. This step ensures a smooth filling. Next, slowly add 2 cups of whole milk while whisking. Be careful to avoid lumps; this is key for a creamy texture. If you whisk slowly and steadily, you will have a perfect base.
Cooking the Mixture
Now, place the saucepan over medium heat. Stir the mixture constantly for about 8 to 10 minutes. You’ll notice it thickens and starts to bubble. This thickening process is crucial. It shows your filling is coming together. Keep stirring to prevent it from burning or sticking to the bottom.
Incorporating Egg Yolks and Finishing the Filling
Once the mixture is thick, remove it from heat. Take a small amount of the hot mixture and add it to 4 beaten egg yolks. This process is called tempering. Whisk constantly while doing this. It helps warm the yolks without cooking them. Then, whisk the yolk mixture back into the saucepan. Return it to low heat and cook for another 2-3 minutes, stirring all the time. Finally, add 2 tablespoons of butter and 1 teaspoon of vanilla extract. Stir until both melt and blend into the filling.
Assembling the Pie
Now it’s time to pour your rich chocolate filling into the pre-baked 9-inch pie crust. Use a spatula to smooth the top evenly. This step makes your pie look nice. To prevent a skin from forming, cover it with plastic wrap. Chill it in the fridge for at least 4 hours or until it sets perfectly.
Preparing and Topping with Whipped Cream
While the pie cools, let’s prepare the whipped cream. In a mixing bowl, combine 1 cup of heavy whipping cream with 2 tablespoons of powdered sugar. Use an electric mixer to whip on medium-high speed until soft peaks form. This part is fun! Once your filling is set, remove the pie from the fridge. Spread the whipped cream over the chocolate filling evenly. Create peaks if you like for a beautiful look. Finish by adding chocolate shavings or curls on top for a tasty touch.
Tips & Tricks
Perfecting the Chocolate Cream Pie
Common mistakes can lead to a less-than-perfect pie. One mistake is not whisking the dry ingredients well. If you skip this step, lumps may form. Always mix the sugar, cocoa, cornstarch, and salt until they are fully combined.
Another mistake is cooking the filling too fast. Stir constantly over medium heat to thicken the mixture evenly. If you rush this step, the pie won't set properly. Adjusting sweetness is easy. If you prefer a sweeter pie, add a bit more sugar. For a richer taste, add more cocoa powder.
Essential Tools and Equipment
For this recipe, you need some basic kitchen tools. A medium saucepan is crucial for cooking the filling. A whisk helps blend the ingredients smoothly. A mixing bowl and an electric mixer are key for whipping cream.
To make the perfect pie crust, use a pie dish that is 9 inches wide. Make sure your crust is pre-baked. This adds a crisp texture to your pie. If you want a flaky crust, use cold butter when mixing. This keeps the crust light and airy.
Pro Tips
- Chill Your Tools: For fluffier whipped cream, chill your mixing bowl and beaters in the freezer for 10-15 minutes before whipping the cream.
- Perfect Pie Crust: Ensure your pre-baked pie crust is completely cool before adding the filling to prevent it from becoming soggy.
- Tempering Eggs: When adding the hot mixture to the egg yolks, do it slowly to prevent the eggs from scrambling. This process is key for a smooth filling.
- Garnish Wisely: For a stunning finish, use a vegetable peeler to create chocolate shavings or curls from a chocolate bar, adding a professional touch to your pie.
Variations
Alternative Chocolate Options
You can switch up the chocolate to change the taste. Dark chocolate gives a rich flavor. Use semi-sweet chocolate for a sweeter pie. Both options work well in this recipe.
If you need a dairy-free version, try using coconut milk. Almond milk also works. For the filling, use dairy-free butter. This way, you can enjoy the pie without dairy.
Seasonal Variations
Add seasonal flavors to make your pie unique. For winter, mix in peppermint extract. This gives a fun twist for the holidays. In spring, try adding orange zest for a bright taste.
When it comes to toppings, think about the season. In summer, fresh berries look great on top. You can also use crushed cookies for a crunchy texture. For fall, sprinkle some cinnamon or nutmeg on the whipped cream. Each season, you can create a new look and flavor for your chocolate cream pie.
Storage Info
How to Store Leftover Pie
To keep your pie fresh, store it in the fridge. Use a pie dish with a lid or cover it tightly with plastic wrap. This helps prevent the pie from drying out and keeps it tasty. Place it in the coldest part of your fridge. Eat the leftover pie within 3 to 4 days for the best flavor.
Freezing Instructions
You can also freeze chocolate cream pie. First, let the pie cool completely. Wrap it well in plastic wrap, then in aluminum foil. This helps keep out air and protects the pie from freezer burn. You can freeze it for up to 2 months.
When you're ready to enjoy your pie, thaw it in the fridge overnight. Avoid thawing at room temperature, as this can make the filling watery. Once thawed, enjoy your pie within a couple of days for the best taste.
FAQs
Can I make Chocolate Cream Pie without Egg Yolks?
Yes, you can. Use cornstarch or arrowroot as thickening agents. You can also use silken tofu for a creamy texture. Both options give you a rich filling without egg yolks.
How long does Chocolate Cream Pie last in the fridge?
Chocolate cream pie lasts about three to four days in the fridge. To keep it fresh, cover it tightly with plastic wrap. This helps prevent the pie from drying out or absorbing odors.
Can I use a store-bought pie crust?
Yes, you can use a store-bought pie crust. It saves time and effort. However, homemade crust often tastes better. Store-bought crusts may be less flaky and flavorful. Choose a high-quality brand for best results.
What is the best way to slice a chocolate cream pie?
To slice the pie neatly, use a sharp, non-serrated knife. Dip the knife in warm water before each cut. Wipe the knife clean after each slice for a tidy look. This helps keep the filling intact.
Can I make this pie vegan?
Absolutely! Replace the egg yolks with cornstarch or silken tofu. Use non-dairy milk, like almond or coconut milk. For the whipped topping, use coconut cream or a store-bought vegan whip. These swaps create a rich, creamy pie.
This blog post covered how to make a rich chocolate cream pie. We explored the ingredients, step-by-step instructions, and tips for perfecting your pie. Remember to avoid common mistakes and adjust flavors to your liking. You can also try variations based on the season or dietary needs. Storing and freezing your pie is easy with the right methods. Now, you have all the tools needed to impress friends and family with this delicious dessert. Happy baking!