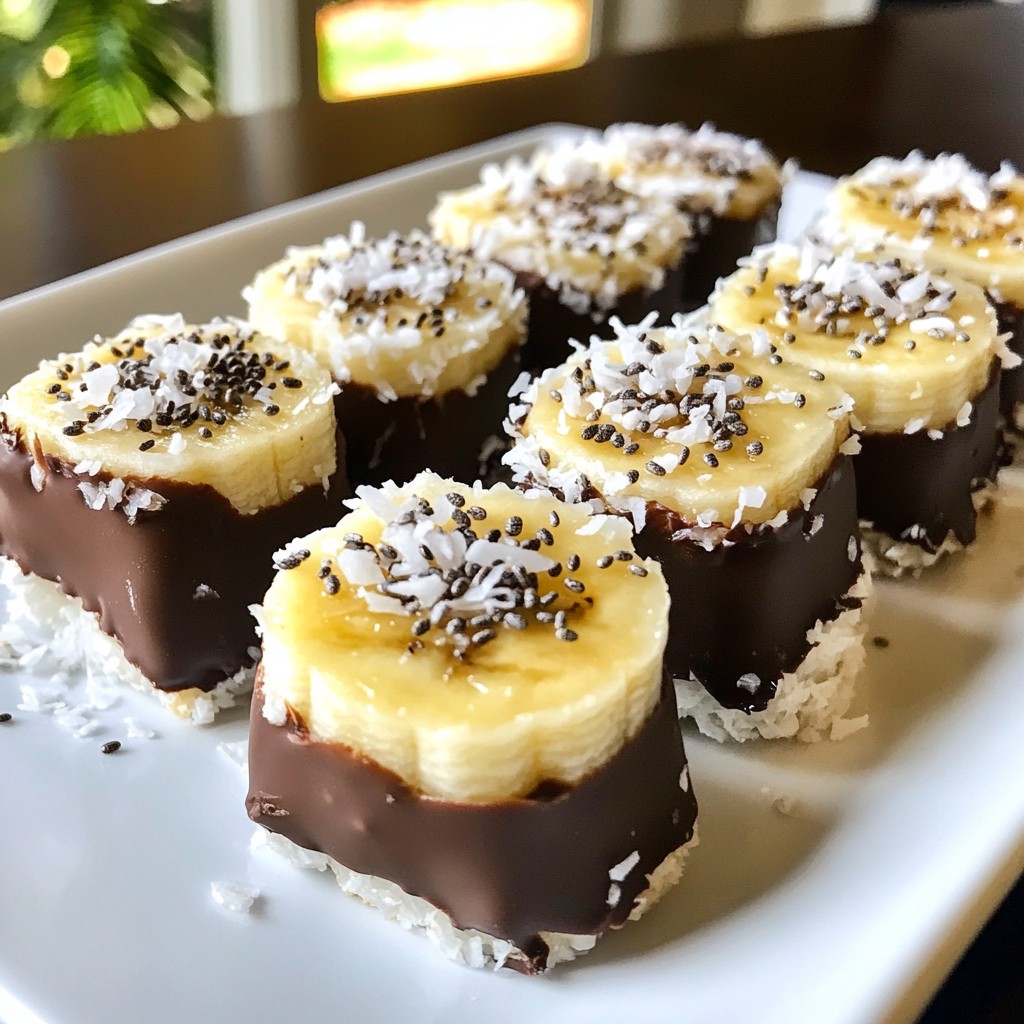
Looking for a fun and tasty treat? Try making Chocolate Covered Banana Sushi! This no-bake delight is easy and perfect for any snack time. With just ripe bananas, nut butter, and chocolate, you can create a sweet, creamy roll that satisfies cravings. Plus, you can customize it with toppings like coconut or nuts. Ready to learn how to whip up this delicious treat? Let's dive in and make something great!
Why I Love This Recipe
- Quick and Easy: This recipe requires minimal preparation time, making it a perfect snack or dessert for busy days.
- Healthy Indulgence: With bananas, nut butter, and dark chocolate, this treat is a delicious way to satisfy your sweet tooth while enjoying nutritious ingredients.
- Customizable: You can easily swap out nut butter, chocolate, and toppings to suit your taste preferences or dietary needs.
- Fun Presentation: The sushi-style presentation makes these treats visually appealing, perfect for parties or family gatherings.
Ingredients
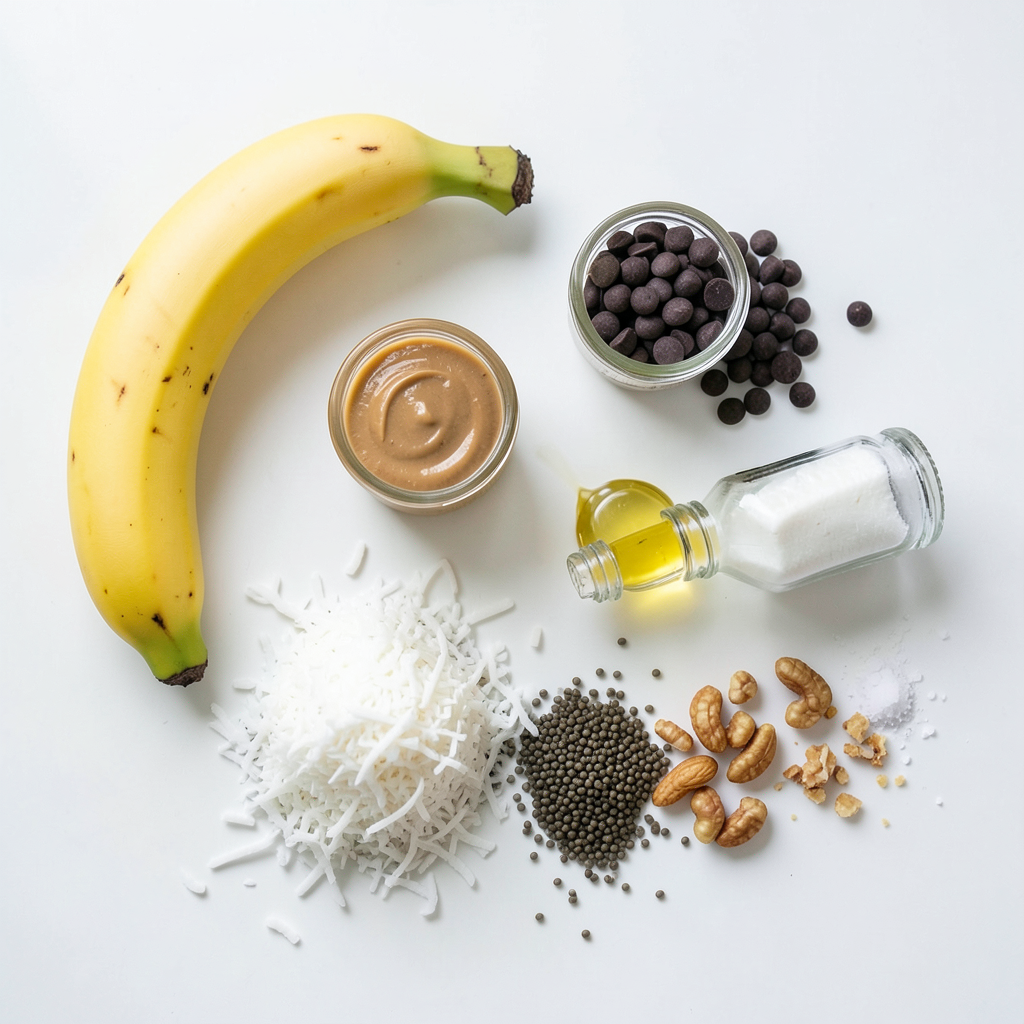
Main Ingredients
- 2 ripe bananas
- 2 tablespoons almond butter (or any nut/seed butter of your choice)
- ½ cup dark chocolate chips
- 1 tablespoon coconut oil
Toppings and Flavor Enhancers
- 1 cup shredded coconut (unsweetened)
- 1 teaspoon chia seeds
- 1 tablespoon crushed nuts (e.g., peanuts or almonds)
- A pinch of sea salt
Equipment Needed
- Microwave-safe bowl
- Parchment-lined tray or plate
- Cutting board and knife
For this fun treat, you need just a few basic ingredients. Start with ripe bananas. They should be sweet and soft, perfect for our chocolate-covered sushi. Next, choose a nut or seed butter. I love using almond butter, but feel free to use peanut butter or sunflower seed butter.
Dark chocolate chips are a must for that rich taste. You can also use milk chocolate if you prefer. A little coconut oil helps make the chocolate smooth and shiny.
Don't forget your toppings! Unsweetened shredded coconut adds a nice crunch. Chia seeds bring a healthy touch, and crushed nuts give extra flavor. A little sea salt on top enhances the sweetness of the chocolate.
Lastly, gather your equipment. A microwave-safe bowl is key for melting the chocolate. You’ll need a cutting board and knife to prepare your bananas. A parchment-lined tray or plate will keep your sushi from sticking. With all these items ready, you’re set to create a delicious treat!
Step-by-Step Instructions
Preparing the Bananas
First, take your ripe bananas. Peel them carefully, so they stay whole. Place each banana on a cutting board. Cut each banana in half to make four equal segments. This ensures each piece is perfect for coating. Try to keep the segments similar in size. This helps them set evenly in chocolate.
Making the Chocolate Mixture
Now, let’s melt the chocolate. In a microwave-safe bowl, add your dark chocolate chips and coconut oil. Microwave them in 20-second intervals. Stir the mixture after each interval. This keeps the chocolate smooth and prevents burning. Keep going until the chocolate is fully melted and creamy.
Coating the Banana Segments
Next, dip each banana segment into the melted chocolate. Make sure to coat each piece well. Let the excess chocolate drip off. After that, roll the chocolate-covered bananas in your choice of toppings. Use shredded coconut, chia seeds, or crushed nuts for extra flavor and crunch. Place the coated pieces on a parchment-lined tray. Finish by sprinkling a tiny pinch of sea salt on each piece. This adds a nice touch to the sweet chocolate.
Once you coat all the banana pieces, refrigerate them for about 15 to 20 minutes. This helps the chocolate set and makes each bite a delight.
Tips & Tricks
Achieving the Perfect Chocolate Coat
To get a smooth chocolate coat, avoid chocolate seizing. Here are a few ways to prevent this:
- Use a dry bowl: Make sure your bowl is completely dry before adding chocolate chips.
- Avoid water: Even a drop of water can cause chocolate to clump. Keep it away.
- Microwave carefully: Heat chocolate in short bursts. Stir well between each interval.
To ensure even coverage, follow these tips:
- Dip slowly: Lower each banana piece gently into the chocolate.
- Let excess drip: Hold the banana over the bowl to let extra chocolate fall back in.
- Use a spoon: Help the chocolate cover all sides with a spoon if needed.
Serving Suggestions
For a fun and creative presentation, try these ideas:
- Colorful platter: Arrange the banana sushi on a bright plate for visual appeal.
- Garnish artfully: Sprinkle extra chia seeds or crushed nuts around the sushi.
- Drizzle chocolate: Add a light drizzle of leftover melted chocolate on top.
You can also add these garnishes to enhance flavor:
- Fresh mint leaves: Place a few leaves next to the sushi for a pop of color.
- Fruit slices: Decorate with fresh strawberries or kiwi for a fresh touch.
Timing for Best Results
Refrigeration is key for the best results. Here’s how long you should chill them:
- Optimal time: Chill the banana sushi for about 15-20 minutes. This helps the chocolate set fully.
- Check firmness: The chocolate should feel firm to the touch when ready.
For serving:
- Serve immediately: Enjoy them fresh from the fridge for a cool treat.
- Store for later: If you wait to serve, keep them refrigerated to maintain texture.
Pro Tips
- Choose the Right Bananas: Opt for ripe bananas that are firm yet slightly soft, as they will be easier to spread with almond butter and provide a naturally sweet flavor.
- Melting Chocolate Perfectly: When melting chocolate, be sure to stir frequently and use a microwave-safe bowl to prevent scorching. This ensures a smooth and glossy finish.
- Experiment with Toppings: Feel free to mix and match toppings! Try adding hemp seeds, crushed pretzels, or even a drizzle of honey for unique flavor combinations.
- Storage Tips: Keep any leftover chocolate-covered banana sushi in an airtight container in the refrigerator for up to a week for a quick and healthy snack.
Variations
Flavor Combinations
You can change flavors in your chocolate-covered banana sushi. Swap almond butter for other nut or seed butters. Peanut butter adds a strong taste. Sunflower seed butter is great for allergies. Use different types of chocolate too. Milk chocolate gives a sweeter flavor, while white chocolate adds creaminess. Dark chocolate is rich and tasty. Mix and match these options to find your favorite!
Creative Add-Ins
You can make your sushi even more fun by adding fruit slices. Strawberries are a great choice. Their sweetness pairs well with bananas. You can also try kiwi or mango for a tropical twist. Experiment with toppings too. Instead of coconut, use crushed graham crackers or sprinkles. Each option adds a new texture and taste!
Seasonal Adaptations
Seasonal changes can inspire new ideas. For holidays, add festive toppings like red and green sprinkles. During summer, use fresh berries or nuts for a fruity touch. In fall, try pumpkin spice or chopped apples. This way, you make your chocolate-covered banana sushi special for any time of year!
Storage Info
How to Store Leftover Chocolate Covered Banana Sushi
To keep your chocolate covered banana sushi fresh, store it in the fridge. This method helps maintain its taste and texture. Use a covered container to prevent the bananas from drying out. If you want to save them for longer, consider freezing them. Just place the sushi in a freezer bag, and make sure to remove excess air.
Shelf Life
Chocolate covered banana sushi stays fresh for about three days in the fridge. If frozen, it can last up to two months. Watch for signs of spoilage, such as brown spots on the bananas or a change in the chocolate's texture. If it looks or smells off, it's best to throw it away.
Reheating Instructions
You don’t really need to reheat this treat. If you want to enjoy leftovers, simply take them out of the fridge. Let them sit at room temperature for a few minutes before eating. If the chocolate has lost its shine, you can drizzle a bit of melted chocolate over the top to refresh the coating.
FAQs
Can I use chocolate alternatives?
Yes, you can! If you need dairy-free options, try using dark chocolate made from coconut or rice milk. For a sugar-free choice, look for sugar-free chocolate chips made with erythritol or stevia. These options will still give you that sweet, chocolatey flavor without the dairy or sugar.
What if I don’t have coconut oil?
No worries! If you don't have coconut oil, you can use vegetable oil or butter. Both work well for melting chocolate. Just make sure to use a small amount. This keeps the chocolate smooth and shiny.
How can I make this a healthier snack?
To make this snack healthier, you can reduce the amount of chocolate. Try using just a light coat. You can also add seeds or nuts for extra nutrients. Chia seeds add fiber, while crushed nuts give you healthy fats. This way, you enjoy a tasty treat that is also good for you!
In this post, we explored how to make chocolate-covered banana sushi. We covered the main ingredients like ripe bananas, almond butter, and dark chocolate. Next, we detailed the step-by-step process for preparing and coating your bananas. I shared helpful tips for achieving the best chocolate coat and storage methods to keep leftovers fresh.
Experiment with variations to delight your taste buds. This fun treat is easy to make and perfect for any occasion. Enjoy making your own chocolate-covered banana sushi!