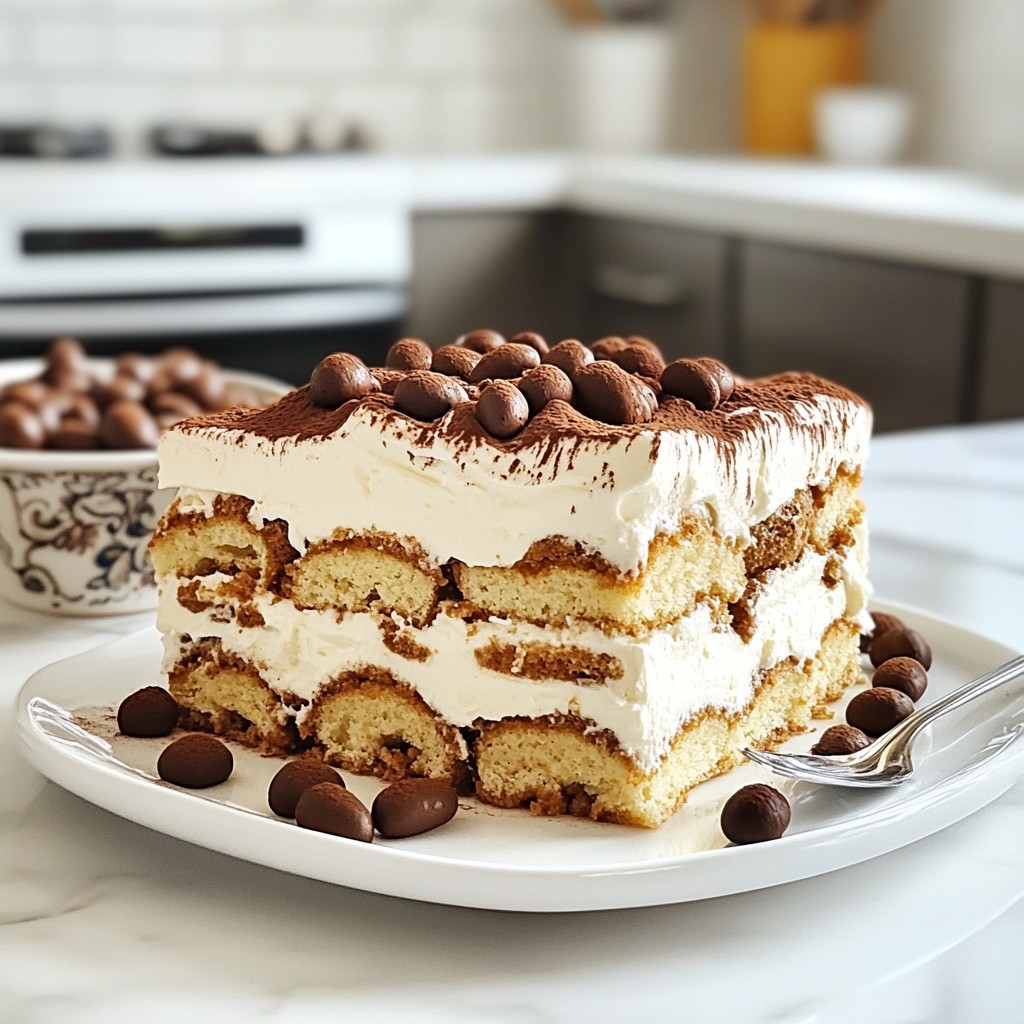
Are you ready to impress your friends and family with a delightful dessert? The Tiramisu Icebox Cake is not only easy to make, but it's also a creamy, dreamy treat that captures the rich flavors of classic tiramisu. With layers of whipped cream, mascarpone, and coffee-soaked ladyfingers, this cake offers a taste that leaves everyone wanting more. Let's dive into this delightful recipe and elevate dessert time together!
Why I Love This Recipe
- Decadent Flavor: This Tiramisu Icebox Cake combines layers of creamy mascarpone and rich coffee, making for a truly indulgent dessert experience.
- No-Bake Convenience: With no baking required, this recipe is perfect for hot days or when you want a quick, delicious treat without the oven.
- Impressive Presentation: The layers of cream and chocolate dusting create an elegant dessert that’s sure to impress guests at any gathering.
- Customizable Garnish: Feel free to add your favorite toppings, like chocolate-covered espresso beans or fresh berries, to personalize this dessert to your taste.
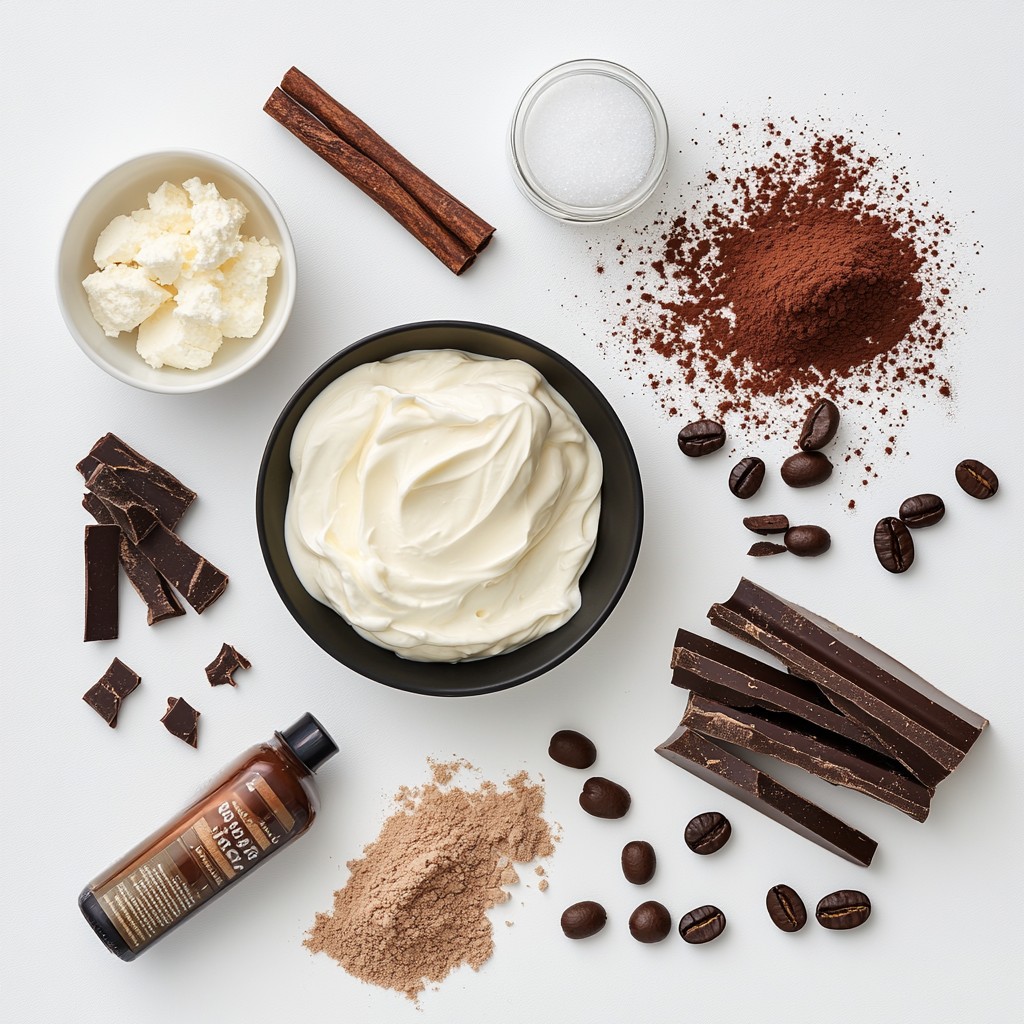
Ingredients
For the Tiramisu Icebox Cake, you will need these simple ingredients:
- 2 cups heavy whipping cream
- 1 cup mascarpone cheese
- 1/2 cup powdered sugar
- 1 teaspoon vanilla extract
- 1 ½ cups strong brewed coffee, cooled
- 24 to 30 ladyfinger cookies
- 2 tablespoons cocoa powder (for dusting)
- Dark chocolate shavings (for garnish)
- Optional: chocolate-covered espresso beans (for garnish)
Each ingredient plays a key role in this dessert. The heavy whipping cream adds fluffiness. Mascarpone cheese gives it a creamy, rich flavor. Powdered sugar adds sweetness, while vanilla extract brings warmth. Brewed coffee adds depth and a nice kick.
Ladyfinger cookies are crucial; they soak up the coffee and soften. Cocoa powder creates a lovely finish on top. Dark chocolate shavings and espresso beans add a nice touch.
Gathering these ingredients is the first step to making a delightful treat. You’ll enjoy every bite of this easy dessert!
Step-by-Step Instructions
Preparation of the Cream Mixture
1. Start by beating 2 cups of heavy whipping cream in a large bowl. Use an electric mixer. Beat until you see soft peaks form. This step adds lightness to the cake.
2. Next, add 1 cup of mascarpone cheese, 1/2 cup of powdered sugar, and 1 teaspoon of vanilla extract. Mix until the cream is smooth and you see stiff peaks. This makes a rich and creamy filling.
Soaking the Ladyfingers
1. Pour 1 ½ cups of cooled, strong brewed coffee into a shallow dish. This is where we soak the ladyfingers.
2. Take each ladyfinger cookie and dip it into the coffee for about 1-2 seconds. Make sure they soak but don't get mushy. This adds flavor without making them soggy.
Assembling the Icebox Cake
1. In a rectangular baking dish, layer half of the soaked ladyfingers. Place them in a single layer at the bottom.
2. Spread half of the mascarpone cream mixture evenly over the ladyfingers. This creates a delicious layer.
3. Repeat the layering process with another layer of soaked ladyfingers and the remaining mascarpone cream. Smooth the top layer for a nice finish.
Refrigeration and Serving Preparation
1. Cover the dish with plastic wrap and refrigerate the cake. Let it chill for at least 4 hours, or overnight for the best results.
2. Once set, dust the top with 2 tablespoons of cocoa powder. Add dark chocolate shavings and optional chocolate-covered espresso beans for a lovely garnish. This final touch makes it look stunning!
Tips & Tricks
Best Practices for Cream Consistency
To achieve stiff peaks in whipped cream, start with cold cream. Use a chilled bowl too. Beat the cream at medium speed. Watch closely as soft peaks form. Once you see stiff peaks, stop mixing. Over-mixing makes the cream grainy. Just keep an eye on the texture.
Ladyfinger Soaking Techniques
Soak ladyfingers for about 1 to 2 seconds. If you soak too long, they get mushy. Quickly dip each cookie in the coffee. Turn them to coat both sides. This will keep them soft yet firm in the cake.
Make-Ahead Tips
You can make this cake a day ahead. It allows the flavors to blend well. Store the cake in the fridge, covered with plastic wrap. This keeps it fresh and tasty. If you have leftovers, keep them in an airtight container. Enjoy your dessert for days!
Pro Tips
- Use Fresh Coffee: For the best flavor, use freshly brewed coffee. The aroma and taste will enhance the overall dish significantly.
- Don’t Over-soak the Ladyfingers: Dip the ladyfingers in coffee for just 1-2 seconds. Over-soaking can lead to a soggy cake.
- Chill Overnight: Allowing the cake to set overnight in the refrigerator will improve the texture and flavor, making it even more delicious.
- Experiment with Flavors: Feel free to add a splash of coffee liqueur or flavored extracts to the mascarpone mixture for an extra twist.
Variations
Flavor Enhancements
You can make this dessert even more special. Try adding liqueurs like Kahlua or Rum. Just mix a few tablespoons into your coffee. This gives your Tiramisu Icebox Cake a rich and bold flavor. You can also use flavored coffee. Vanilla or hazelnut coffee adds a unique taste. Choose whatever suits your mood!
Healthier Alternatives
If you want a lighter version, you can substitute some ingredients. Use low-fat or dairy-free products, like coconut cream, instead of heavy cream. This keeps the taste while cutting down on fat. You can also use sugar substitutes. Options like stevia or agave syrup work well. This allows you to enjoy the cake with less sugar.
Presentation Variations
Presentation can make your cake stand out! Try different garnishing options. You can use fresh berries or a sprinkle of nuts for a fun twist. Serving in individual cups or parfaits is another idea. It looks great and makes it easy for guests to enjoy. Get creative with how you show off this dessert!
Storage Info
Best Storage Practices
To keep your Tiramisu Icebox Cake fresh, use an airtight container. A glass or plastic container works well. Make sure the cake is covered tightly. This step prevents drying out and keeps flavors intact. Store the cake in the fridge for up to four days. If you want longer storage, consider freezing it.
Freezing Guidelines
You can freeze Tiramisu Icebox Cake for up to three months. To freeze, wrap the cake tightly in plastic wrap. Then, place it in a freezer-safe container or bag. This extra layer helps prevent freezer burn.
When you are ready to serve, take the cake out of the freezer. Let it thaw in the fridge overnight. This slow thawing keeps the texture great. After it's thawed, dust with cocoa powder and add any garnishes. Now, you are ready to enjoy a delicious dessert!
FAQs
How long does Tiramisu Icebox Cake last in the fridge?
Tiramisu Icebox Cake stays fresh for about 3 to 4 days in the fridge. Keep it covered to maintain moisture. After that, the texture may change, and it may not taste as good.
Can I use instant coffee instead of brewed?
Yes, you can use instant coffee. Just mix it with hot water to dissolve it. Let it cool before dipping the ladyfingers. Instant coffee gives a strong flavor, just like brewed coffee.
What can I substitute for mascarpone cheese?
If you can't find mascarpone, use cream cheese mixed with a bit of heavy cream. This mix will give a similar creamy texture. You can also try ricotta cheese, but it may change the taste slightly.
Is it necessary to use the espresso beans for garnish?
Using espresso beans is not necessary. They add a nice touch but can be optional. You can skip them and use dark chocolate shavings instead for a lovely look.
How can I make it gluten-free?
To make a gluten-free Tiramisu Icebox Cake, use gluten-free ladyfinger cookies. Many brands offer these, and they work just as well in the recipe. Enjoy your dessert without worries!
In this blog post, I shared how to make Tiramisu Icebox Cake, from ingredients to assembly and storage. You learned about key ingredients like heavy whipping cream and ladyfinger cookies. I explained the steps for prepping the cream and soaking the cookies.
Using tips for perfect cream and variations for flavors can elevate your cake. Remember, making this dessert ahead of time enhances flavor. With careful storage, you can enjoy it longer. I hope you feel ready to try this delicious recipe!