Peanut Butter Chocolate Rice Krispie Bars No Bake Treat

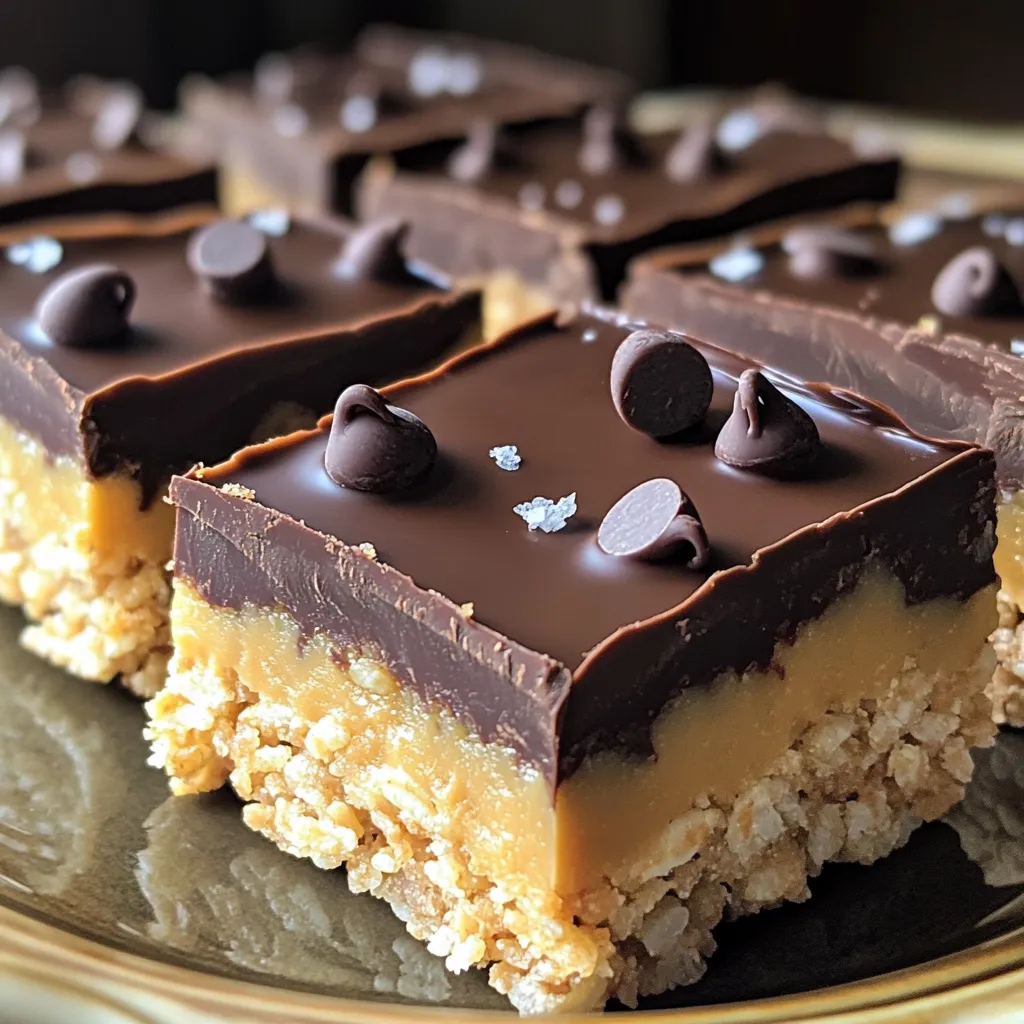
Calling all dessert lovers! If you crave an easy, delicious treat, you’re in the right place. These Peanut Butter Chocolate Rice Krispie Bars require no baking and are perfect for any occasion. With just a few simple steps, you can whip up a batch that’ll impress your family and friends. Let’s dive into this sweet adventure and make a delightful snack that everyone will enjoy!

To make Peanut Butter Chocolate Rice Krispie Bars, gather these ingredients: - 2 cups Rice Krispies - 1 cup creamy peanut butter - 1 cup powdered sugar - 1 teaspoon vanilla extract - 1 cup milk chocolate chips - ½ cup mini chocolate chips (for topping) - A pinch of sea salt You can swap some ingredients if needed. Use crunchy peanut butter for added texture. You may also try almond butter for a different flavor. If you need a lower-sugar option, you can replace powdered sugar with a sugar substitute like erythritol. For a dairy-free version, pick dark chocolate chips. When measuring, use dry measuring cups for the Rice Krispies and powdered sugar. For peanut butter, a liquid measuring cup works well. To get peanut butter out easily, lightly coat the cup with oil first. This makes it simpler to pour. For chocolate chips, you can use a kitchen scale for accuracy. One cup of chips weighs around 6 ounces. Gather your ingredients first. You need Rice Krispies, peanut butter, powdered sugar, vanilla, and chocolate chips. A pinch of sea salt is nice for contrast. Get an 8x8 inch baking dish and some parchment paper. This helps with easy removal later. In a large bowl, mix the creamy peanut butter and powdered sugar. Stir until it is smooth. Next, add the vanilla extract. Then, gently fold in the Rice Krispies. Make sure the cereal gets covered well. This gives each bite a rich peanut butter flavor. Once mixed, press the mixture into the lined baking dish. Use a spatula to spread it evenly. Grab a microwave-safe bowl. Add the milk chocolate chips. Heat in the microwave for 30 seconds. Take it out and stir. Repeat until the chocolate is smooth. Once melted, pour the chocolate over the Rice Krispies layer. Spread it evenly to cover every corner. For extra fun, sprinkle mini chocolate chips on top. Add a pinch of sea salt for a tasty finish. After that, place the dish in the fridge for at least 30 minutes. This helps the bars set up nicely. To get the best texture, use creamy peanut butter. It mixes well and coats the Rice Krispies. If you prefer a crunchier bite, add some chopped nuts or even crispy rice cereal. Remember, you want a mix that holds together yet is not too hard. After you press the mixture into your dish, chill it for at least 30 minutes. This helps the bars set properly. If you want firmer bars, leave them in the fridge longer. Also, using parchment paper makes it easy to lift the bars out later. When serving, cut the bars into neat squares. Place them on a pretty plate. You can drizzle extra melted chocolate on top for a nice touch. A sprinkle of sea salt adds a great flavor contrast, too. Enjoy them as a sweet snack or dessert after dinner! {{image_2}} You can make these bars healthier while keeping them tasty. Swap out the creamy peanut butter for natural peanut butter. This lets you cut sugar without losing flavor. Use honey or maple syrup instead of powdered sugar for sweetness. You can also add in some ground flaxseed or chia seeds. This adds fiber and nutrients without changing the taste much. If you want more taste, try adding extras. Mix in a pinch of cinnamon for warmth. You can also add a splash of almond extract for a nutty twist. If you love coconut, stir in some shredded coconut flakes. For a fun crunch, add chopped nuts like almonds or walnuts. These mix-ins can take your bars to a whole new level. You can easily adjust these bars for different diets. For a vegan version, use dairy-free chocolate chips and maple syrup. If you need them gluten-free, just make sure your Rice Krispies are gluten-free. You can also try using sunflower seed butter for a nut-free option. These swaps keep the bars delicious for everyone. To keep your Peanut Butter Chocolate Rice Krispie Bars fresh, store them in an airtight container. This helps prevent them from drying out. You can stack the bars with parchment paper between layers. This way, they won’t stick together. Place the container in a cool, dry place away from sunlight. If you live in a warm area, consider putting them in the fridge. These bars freeze well for longer storage. Cut them into squares and wrap each piece in plastic wrap. Then, place the wrapped bars in a freezer-safe bag or container. Make sure to remove as much air as possible. They can stay fresh in the freezer for up to three months. When you want to enjoy them, just take out the desired amount and let them thaw at room temperature. When stored properly, Peanut Butter Chocolate Rice Krispie Bars last about one week at room temperature. In the fridge, they can last up to two weeks. Freezing extends their life to about three months. Keep an eye on them for any signs of spoilage like strange smells or changes in texture. This way, you always enjoy them at their best! These bars need at least 30 minutes in the fridge to set. This gives the chocolate a chance to harden and the bars a chance to firm up. If you want a firmer texture, you can leave them in longer. Yes, you can use white chocolate if you like. Just melt it the same way as the milk chocolate. White chocolate adds a sweet and creamy flavor, which pairs well with peanut butter. Yes, these bars can be gluten-free. Just make sure to use gluten-free Rice Krispies. Most brands now offer a gluten-free option, so check the label before buying. Absolutely! You can add chopped nuts or seeds for extra crunch. Almonds or sunflower seeds work well. Mix them in with the Rice Krispies for a tasty twist. Use a sharp knife to cut the bars. It helps to warm the knife slightly under hot water first. This makes cutting easier and keeps the bars looking neat. You can make them vegan by using dairy-free chocolate and a plant-based peanut butter. Make sure your chocolate chips are dairy-free to keep the bars vegan-friendly. Store any leftover bars in an airtight container. They can sit at room temperature for a few days. For longer storage, keep them in the fridge. If you need a substitute, try almond butter or sunflower seed butter. These options offer a similar texture and flavor, making them great alternatives. Yes, you can mix in some protein powder. Add a scoop to the peanut butter mixture to boost the protein content. This is great for a post-workout snack! This blog post covered key ingredients, preparation steps, and helpful tips for your recipe. I shared how to measure, mix, and melt chocolate, ensuring tasty results. You learned about substitutions for different diets and how to store your bars well. With these steps, you can create the perfect treat. Don’t hesitate to experiment with flavors and textures. Happy cooking!

Ingredients

Complete Ingredient List

To make Peanut Butter Chocolate Rice Krispie Bars, gather these ingredients:

– 2 cups Rice Krispies

– 1 cup creamy peanut butter

– 1 cup powdered sugar

– 1 teaspoon vanilla extract

– 1 cup milk chocolate chips

– ½ cup mini chocolate chips (for topping)

– A pinch of sea salt

Ingredient Substitutions

You can swap some ingredients if needed. Use crunchy peanut butter for added texture. You may also try almond butter for a different flavor. If you need a lower-sugar option, you can replace powdered sugar with a sugar substitute like erythritol. For a dairy-free version, pick dark chocolate chips.

Measurement Tips

When measuring, use dry measuring cups for the Rice Krispies and powdered sugar. For peanut butter, a liquid measuring cup works well. To get peanut butter out easily, lightly coat the cup with oil first. This makes it simpler to pour. For chocolate chips, you can use a kitchen scale for accuracy. One cup of chips weighs around 6 ounces.

Step-by-Step Instructions

Preparation Steps Overview

Gather your ingredients first. You need Rice Krispies, peanut butter, powdered sugar, vanilla, and chocolate chips. A pinch of sea salt is nice for contrast. Get an 8×8 inch baking dish and some parchment paper. This helps with easy removal later.

Detailed Mixing Instructions

In a large bowl, mix the creamy peanut butter and powdered sugar. Stir until it is smooth. Next, add the vanilla extract. Then, gently fold in the Rice Krispies. Make sure the cereal gets covered well. This gives each bite a rich peanut butter flavor. Once mixed, press the mixture into the lined baking dish. Use a spatula to spread it evenly.

Melting and Pouring Chocolate

Grab a microwave-safe bowl. Add the milk chocolate chips. Heat in the microwave for 30 seconds. Take it out and stir. Repeat until the chocolate is smooth. Once melted, pour the chocolate over the Rice Krispies layer. Spread it evenly to cover every corner. For extra fun, sprinkle mini chocolate chips on top. Add a pinch of sea salt for a tasty finish. After that, place the dish in the fridge for at least 30 minutes. This helps the bars set up nicely.

Tips & Tricks

Perfecting the Texture

To get the best texture, use creamy peanut butter. It mixes well and coats the Rice Krispies. If you prefer a crunchier bite, add some chopped nuts or even crispy rice cereal. Remember, you want a mix that holds together yet is not too hard.

Setting Tips for Best Results

After you press the mixture into your dish, chill it for at least 30 minutes. This helps the bars set properly. If you want firmer bars, leave them in the fridge longer. Also, using parchment paper makes it easy to lift the bars out later.

Serving Suggestions

When serving, cut the bars into neat squares. Place them on a pretty plate. You can drizzle extra melted chocolate on top for a nice touch. A sprinkle of sea salt adds a great flavor contrast, too. Enjoy them as a sweet snack or dessert after dinner!

Variations

Healthier Alternatives

You can make these bars healthier while keeping them tasty. Swap out the creamy peanut butter for natural peanut butter. This lets you cut sugar without losing flavor. Use honey or maple syrup instead of powdered sugar for sweetness. You can also add in some ground flaxseed or chia seeds. This adds fiber and nutrients without changing the taste much.

Flavor Additions

If you want more taste, try adding extras. Mix in a pinch of cinnamon for warmth. You can also add a splash of almond extract for a nutty twist. If you love coconut, stir in some shredded coconut flakes. For a fun crunch, add chopped nuts like almonds or walnuts. These mix-ins can take your bars to a whole new level.

Dietary Modifications

You can easily adjust these bars for different diets. For a vegan version, use dairy-free chocolate chips and maple syrup. If you need them gluten-free, just make sure your Rice Krispies are gluten-free. You can also try using sunflower seed butter for a nut-free option. These swaps keep the bars delicious for everyone.

Storage Info

Best Storage Practices

To keep your Peanut Butter Chocolate Rice Krispie Bars fresh, store them in an airtight container. This helps prevent them from drying out. You can stack the bars with parchment paper between layers. This way, they won’t stick together. Place the container in a cool, dry place away from sunlight. If you live in a warm area, consider putting them in the fridge.

Freezing Options

These bars freeze well for longer storage. Cut them into squares and wrap each piece in plastic wrap. Then, place the wrapped bars in a freezer-safe bag or container. Make sure to remove as much air as possible. They can stay fresh in the freezer for up to three months. When you want to enjoy them, just take out the desired amount and let them thaw at room temperature.

Shelf Life

When stored properly, Peanut Butter Chocolate Rice Krispie Bars last about one week at room temperature. In the fridge, they can last up to two weeks. Freezing extends their life to about three months. Keep an eye on them for any signs of spoilage like strange smells or changes in texture. This way, you always enjoy them at their best!

FAQs

How long does it take to set?

These bars need at least 30 minutes in the fridge to set. This gives the chocolate a chance to harden and the bars a chance to firm up. If you want a firmer texture, you can leave them in longer.

Can I use white chocolate instead?

Yes, you can use white chocolate if you like. Just melt it the same way as the milk chocolate. White chocolate adds a sweet and creamy flavor, which pairs well with peanut butter.

Are these bars gluten-free?

Yes, these bars can be gluten-free. Just make sure to use gluten-free Rice Krispies. Most brands now offer a gluten-free option, so check the label before buying.

Can I add nuts or seeds?

Absolutely! You can add chopped nuts or seeds for extra crunch. Almonds or sunflower seeds work well. Mix them in with the Rice Krispies for a tasty twist.

How should I cut the bars?

Use a sharp knife to cut the bars. It helps to warm the knife slightly under hot water first. This makes cutting easier and keeps the bars looking neat.

Can I make these bars vegan?

You can make them vegan by using dairy-free chocolate and a plant-based peanut butter. Make sure your chocolate chips are dairy-free to keep the bars vegan-friendly.

How do I store leftover bars?

Store any leftover bars in an airtight container. They can sit at room temperature for a few days. For longer storage, keep them in the fridge.

What can I use instead of peanut butter?

If you need a substitute, try almond butter or sunflower seed butter. These options offer a similar texture and flavor, making them great alternatives.

Can I add protein powder?

Yes, you can mix in some protein powder. Add a scoop to the peanut butter mixture to boost the protein content. This is great for a post-workout snack!

This blog post covered key ingredients, preparation steps, and helpful tips for your recipe. I shared how to measure, mix, and melt chocolate, ensuring tasty results. You learned about substitutions for different diets and how to store your bars well.

With these steps, you can create the perfect treat. Don’t hesitate to experiment with flavors and textures. Happy cooking!

To make Peanut Butter Chocolate Rice Krispie Bars, gather these ingredients: - 2 cups Rice Krispies - 1 cup creamy peanut butter - 1 cup powdered sugar - 1 teaspoon vanilla extract - 1 cup milk chocolate chips - ½ cup mini chocolate chips (for topping) - A pinch of sea salt You can swap some ingredients if needed. Use crunchy peanut butter for added texture. You may also try almond butter for a different flavor. If you need a lower-sugar option, you can replace powdered sugar with a sugar substitute like erythritol. For a dairy-free version, pick dark chocolate chips. When measuring, use dry measuring cups for the Rice Krispies and powdered sugar. For peanut butter, a liquid measuring cup works well. To get peanut butter out easily, lightly coat the cup with oil first. This makes it simpler to pour. For chocolate chips, you can use a kitchen scale for accuracy. One cup of chips weighs around 6 ounces. Gather your ingredients first. You need Rice Krispies, peanut butter, powdered sugar, vanilla, and chocolate chips. A pinch of sea salt is nice for contrast. Get an 8x8 inch baking dish and some parchment paper. This helps with easy removal later. In a large bowl, mix the creamy peanut butter and powdered sugar. Stir until it is smooth. Next, add the vanilla extract. Then, gently fold in the Rice Krispies. Make sure the cereal gets covered well. This gives each bite a rich peanut butter flavor. Once mixed, press the mixture into the lined baking dish. Use a spatula to spread it evenly. Grab a microwave-safe bowl. Add the milk chocolate chips. Heat in the microwave for 30 seconds. Take it out and stir. Repeat until the chocolate is smooth. Once melted, pour the chocolate over the Rice Krispies layer. Spread it evenly to cover every corner. For extra fun, sprinkle mini chocolate chips on top. Add a pinch of sea salt for a tasty finish. After that, place the dish in the fridge for at least 30 minutes. This helps the bars set up nicely. To get the best texture, use creamy peanut butter. It mixes well and coats the Rice Krispies. If you prefer a crunchier bite, add some chopped nuts or even crispy rice cereal. Remember, you want a mix that holds together yet is not too hard. After you press the mixture into your dish, chill it for at least 30 minutes. This helps the bars set properly. If you want firmer bars, leave them in the fridge longer. Also, using parchment paper makes it easy to lift the bars out later. When serving, cut the bars into neat squares. Place them on a pretty plate. You can drizzle extra melted chocolate on top for a nice touch. A sprinkle of sea salt adds a great flavor contrast, too. Enjoy them as a sweet snack or dessert after dinner! {{image_2}} You can make these bars healthier while keeping them tasty. Swap out the creamy peanut butter for natural peanut butter. This lets you cut sugar without losing flavor. Use honey or maple syrup instead of powdered sugar for sweetness. You can also add in some ground flaxseed or chia seeds. This adds fiber and nutrients without changing the taste much. If you want more taste, try adding extras. Mix in a pinch of cinnamon for warmth. You can also add a splash of almond extract for a nutty twist. If you love coconut, stir in some shredded coconut flakes. For a fun crunch, add chopped nuts like almonds or walnuts. These mix-ins can take your bars to a whole new level. You can easily adjust these bars for different diets. For a vegan version, use dairy-free chocolate chips and maple syrup. If you need them gluten-free, just make sure your Rice Krispies are gluten-free. You can also try using sunflower seed butter for a nut-free option. These swaps keep the bars delicious for everyone. To keep your Peanut Butter Chocolate Rice Krispie Bars fresh, store them in an airtight container. This helps prevent them from drying out. You can stack the bars with parchment paper between layers. This way, they won’t stick together. Place the container in a cool, dry place away from sunlight. If you live in a warm area, consider putting them in the fridge. These bars freeze well for longer storage. Cut them into squares and wrap each piece in plastic wrap. Then, place the wrapped bars in a freezer-safe bag or container. Make sure to remove as much air as possible. They can stay fresh in the freezer for up to three months. When you want to enjoy them, just take out the desired amount and let them thaw at room temperature. When stored properly, Peanut Butter Chocolate Rice Krispie Bars last about one week at room temperature. In the fridge, they can last up to two weeks. Freezing extends their life to about three months. Keep an eye on them for any signs of spoilage like strange smells or changes in texture. This way, you always enjoy them at their best! These bars need at least 30 minutes in the fridge to set. This gives the chocolate a chance to harden and the bars a chance to firm up. If you want a firmer texture, you can leave them in longer. Yes, you can use white chocolate if you like. Just melt it the same way as the milk chocolate. White chocolate adds a sweet and creamy flavor, which pairs well with peanut butter. Yes, these bars can be gluten-free. Just make sure to use gluten-free Rice Krispies. Most brands now offer a gluten-free option, so check the label before buying. Absolutely! You can add chopped nuts or seeds for extra crunch. Almonds or sunflower seeds work well. Mix them in with the Rice Krispies for a tasty twist. Use a sharp knife to cut the bars. It helps to warm the knife slightly under hot water first. This makes cutting easier and keeps the bars looking neat. You can make them vegan by using dairy-free chocolate and a plant-based peanut butter. Make sure your chocolate chips are dairy-free to keep the bars vegan-friendly. Store any leftover bars in an airtight container. They can sit at room temperature for a few days. For longer storage, keep them in the fridge. If you need a substitute, try almond butter or sunflower seed butter. These options offer a similar texture and flavor, making them great alternatives. Yes, you can mix in some protein powder. Add a scoop to the peanut butter mixture to boost the protein content. This is great for a post-workout snack! This blog post covered key ingredients, preparation steps, and helpful tips for your recipe. I shared how to measure, mix, and melt chocolate, ensuring tasty results. You learned about substitutions for different diets and how to store your bars well. With these steps, you can create the perfect treat. Don’t hesitate to experiment with flavors and textures. Happy cooking!

Peanut Butter Chocolate Rice Krispie Bars No Bake

Indulge in the ultimate treat with these irresistible Peanut Butter Chocolate Cloud Bars! Perfectly combining creamy peanut butter, crunchy Rice Krispies, and rich chocolate, these no-bake bars are quick and easy to make. With just a few simple ingredients and 45 minutes of your time, you can create a delicious dessert that everyone will love. Click to discover the full recipe and whip up a batch of these delightful bars today!

Ingredients
  

2 cups Rice Krispies

1 cup creamy peanut butter

1 cup powdered sugar

1 teaspoon vanilla extract

1 cup milk chocolate chips

½ cup mini chocolate chips (for topping)

A pinch of sea salt

Instructions
 

In a large mixing bowl, combine the creamy peanut butter and powdered sugar; mix until smooth.

    Stir in the vanilla extract and Rice Krispies, ensuring the cereal is evenly coated with the peanut butter mixture.

      Line an 8x8 inch baking dish with parchment paper. Press the Rice Krispies mixture firmly into the dish, spreading it evenly with a spatula.

        In a microwave-safe bowl, melt the milk chocolate chips in 30-second intervals, stirring in between until completely smooth.

          Pour the melted chocolate over the pressed Rice Krispies, spreading evenly to cover the entire surface. Sprinkle mini chocolate chips on top for added texture and decoration.

            Finish with a light sprinkle of sea salt for a delightful contrast to the sweetness.

              Place the dish in the refrigerator for at least 30 minutes to set before cutting into bars.

                Prep Time: 15 minutes | Total Time: 45 minutes | Servings: 12 bars

                  - Presentation Tips: Cut into squares and serve on a beautiful plate; drizzle melted chocolate over the top for an elegant touch. Optionally, sprinkle extra sea salt to enhance the appeal.