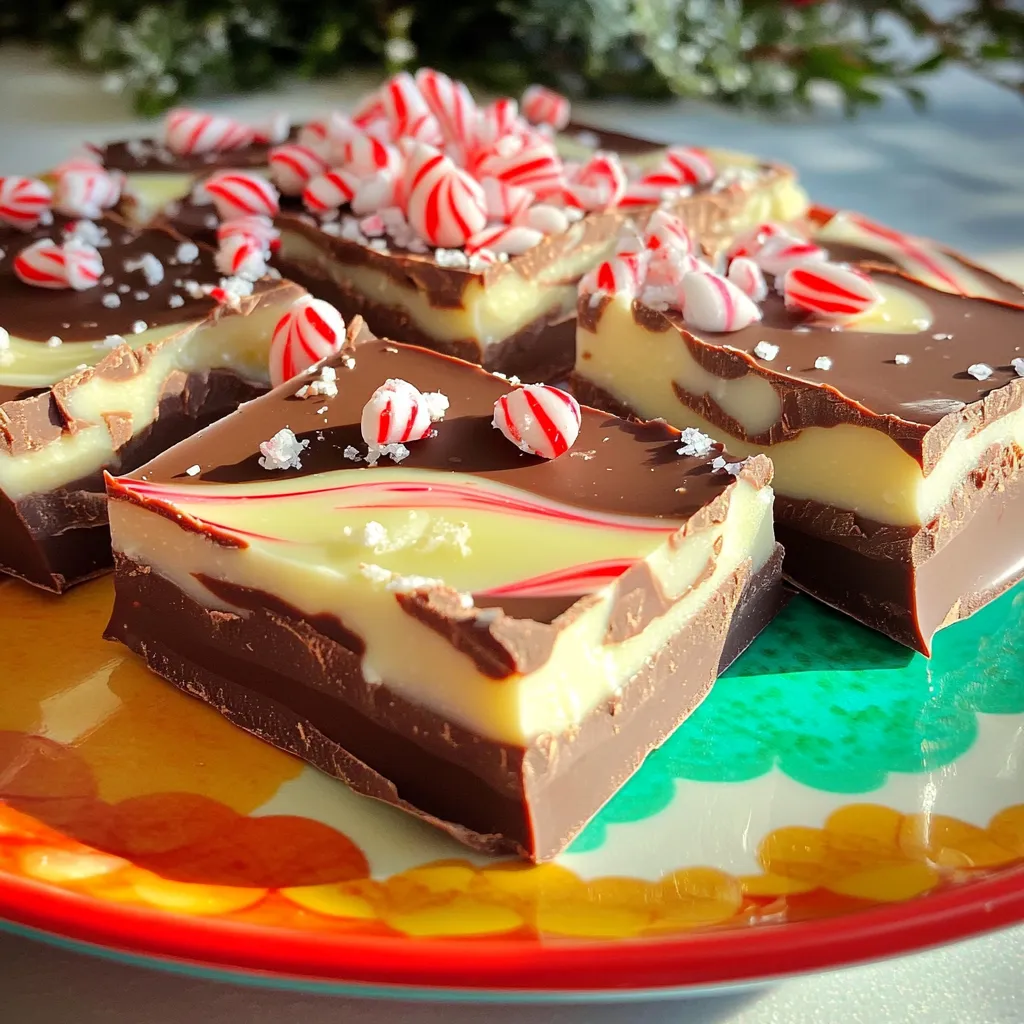
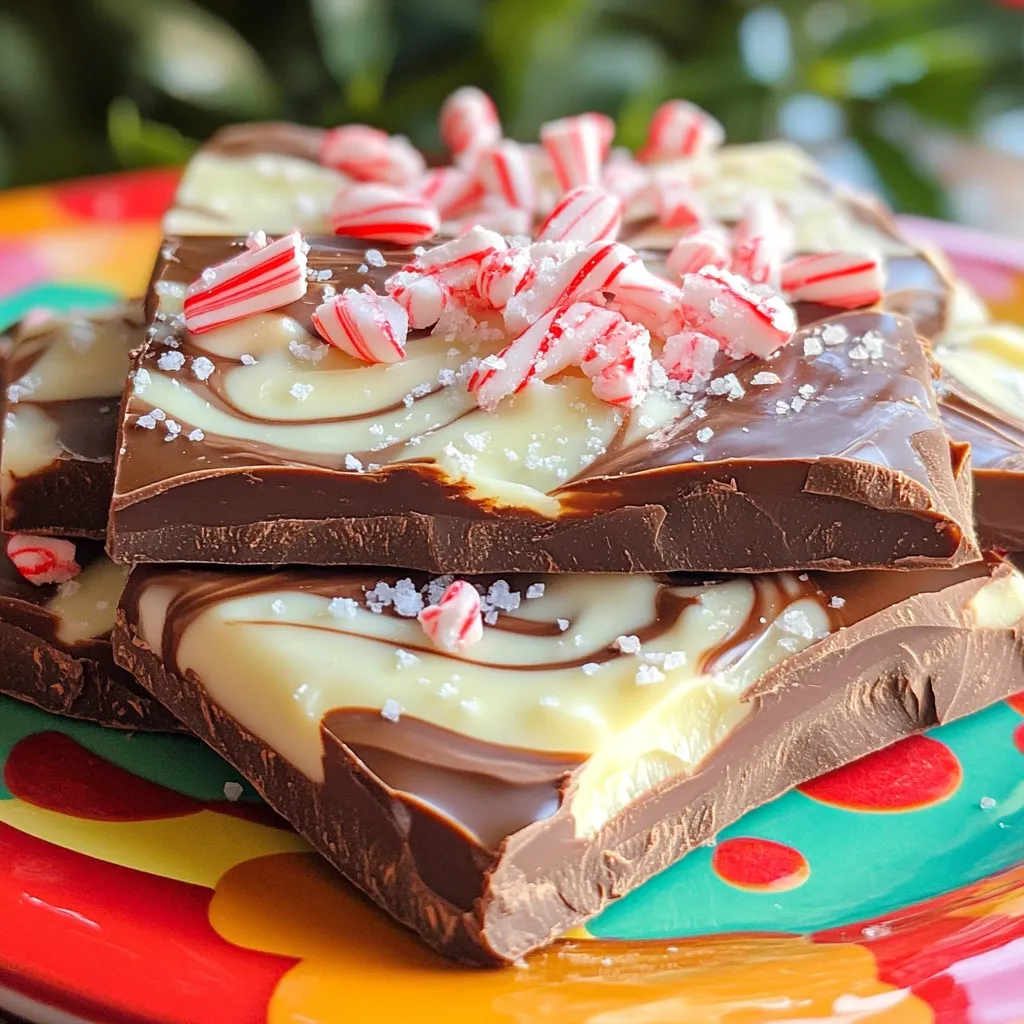
Are you ready to whip up a festive treat that requires zero baking? My No-Bake Peppermint Bark combines rich chocolate, creamy white chocolate, and refreshing peppermint. With just a few easy steps, you can create a holiday favorite that dazzles your friends and family. Perfect for gift-giving or indulging yourself, this simple recipe is full of joy. Let’s dive into the sweet world of peppermint goodness!
Ingredients
List of Ingredients
– 12 ounces semi-sweet chocolate chips
– 12 ounces white chocolate chips
– 1 teaspoon peppermint extract
– 1/2 cup crushed candy canes (plus extra for garnish)
– Pinch of sea salt
For this no-bake peppermint bark, you need just a few simple ingredients. First, you will use semi-sweet chocolate chips. They give a rich, deep flavor. Next, grab some white chocolate chips. These will add creaminess and sweetness.
Add peppermint extract for that festive kick. The crushed candy canes bring a nice crunch and holiday feel. Don’t forget the pinch of sea salt. It helps balance the sweetness and enhances all the flavors.
Make sure to have extra crushed candy canes on hand. You will want to sprinkle them on top for a pretty finish. This treat is not just easy to make but also fun to share.
Step-by-Step Instructions
Preparation Steps
– Line an 8×8-inch baking dish with parchment paper.
– In a bowl, melt 12 ounces of semi-sweet chocolate chips.
– Stir in a pinch of sea salt. Spread the mixture in the dish.
Pouring and Layering
– Chill the semi-sweet layer in the fridge for about 10-15 minutes.
– Melt 12 ounces of white chocolate chips in the microwave.
– Stir in 1 teaspoon of peppermint extract once melted.
– Spread the white chocolate over the semi-sweet layer.
Final Touches
– Sprinkle 1/2 cup of crushed candy canes on top. Press them gently into the chocolate.
– Chill the dish again until set, about 30-45 minutes.
– Use the parchment to lift the bark out. Cut into squares or break into pieces.
Tips & Tricks
Melting Chocolate Successfully
To melt chocolate well, use microwave-safe bowls. Heat in 30-second intervals. Stir after each time. This helps keep the chocolate smooth. If it looks lumpy, keep stirring. The heat will help it melt evenly.
Achieving the Perfect Texture
Chilling is key for good texture. After you pour the semi-sweet layer, chill it for 10-15 minutes. This helps it harden before the next layer. Aim for a thickness of about a half-inch for each layer. This way, each bite has a nice balance of flavors.
Presentation Suggestions
To make the bark look special, arrange pieces on a fun platter. You can sprinkle more crushed candy canes around the bark for color. Try using different shapes when cutting the bark. Fun shapes make it more festive and appealing!
Variations
Flavor Customizations
You can change up the flavor of your peppermint bark. Adding nuts can give it a nice crunch. Try using chopped almonds or walnuts. Dried fruits also work well. Dried cherries or cranberries can add a fruity twist.
You can also mix in different types of chocolate. Dark chocolate gives a rich taste. Milk chocolate creates a sweeter bark. You can even try a mix of chocolates for a unique flavor.
Dietary Adaptations
For those on a vegan diet, you can use vegan chocolate. Look for brands that offer dairy-free options. They melt just as well and taste great.
If you need gluten-free options, this recipe is already safe. Just make sure the chocolate you use has no gluten. Always check the labels to be sure.
Seasonal Variations
You can modify this treat for different holidays. For Halloween, use orange and black sprinkles. For Easter, try pastel colors.
Using seasonal sprinkles or toppings can make it festive. Red and green for Christmas add a nice touch. You can also use themed candies or chocolate shapes to fit the season.
Storage Info
Best Storage Practices
Store your peppermint bark in an airtight container. This keeps it fresh and tasty. You can use plastic wrap, foil, or a sealed jar. Keep your bark away from heat and moisture. The ideal storage temperature is between 60°F and 75°F.
Shelf Life
Peppermint bark stays fresh for about two weeks at room temperature. To maximize its life, always check for signs of melting or moisture. If it looks good, it should taste great! You can also extend freshness by storing it in the fridge, where it lasts up to a month.
Freezing Options
Yes, you can freeze peppermint bark! To do this, wrap it tightly in plastic wrap or foil. Place it in a freezer-safe container. When ready to enjoy, take it out and let it thaw in the fridge for a few hours. This helps maintain its texture and taste.
FAQs
Can I use chocolate melts instead of chips?
Yes, you can use chocolate melts. They melt easily and give a nice shine. Just follow the same melting steps as with chocolate chips.
How do I make this recipe with dark chocolate?
To use dark chocolate, simply swap the semi-sweet chips for dark chocolate chips. Melt them like before. The peppermint flavor will still shine through.
What can I do if my chocolate seizes?
If your chocolate seizes, add a small amount of vegetable oil or shortening. Stir until smooth. This can help bring it back to a usable state.
How long does it take for peppermint bark to set?
Peppermint bark takes about 30 to 45 minutes to set in the fridge. Make sure it is completely firm before cutting.
Can I use flavored extracts instead of peppermint?
Yes, you can use other extracts. Try vanilla or almond for a fun twist. Just use the same amount as the peppermint extract.
Making peppermint bark is fun and simple. You’ll need chocolate chips, peppermint extract, and crushed candy canes. Follow the steps to melt, layer, and chill your ingredients for a tasty treat.
Remember the tips for perfect texture and display. Feel free to customize with nuts or dried fruits. Store it well to enjoy later, and use my answers for any questions. Try out these ideas and enjoy your homemade peppermint bark!