No-Bake Chocolate Coconut Protein Balls Delight

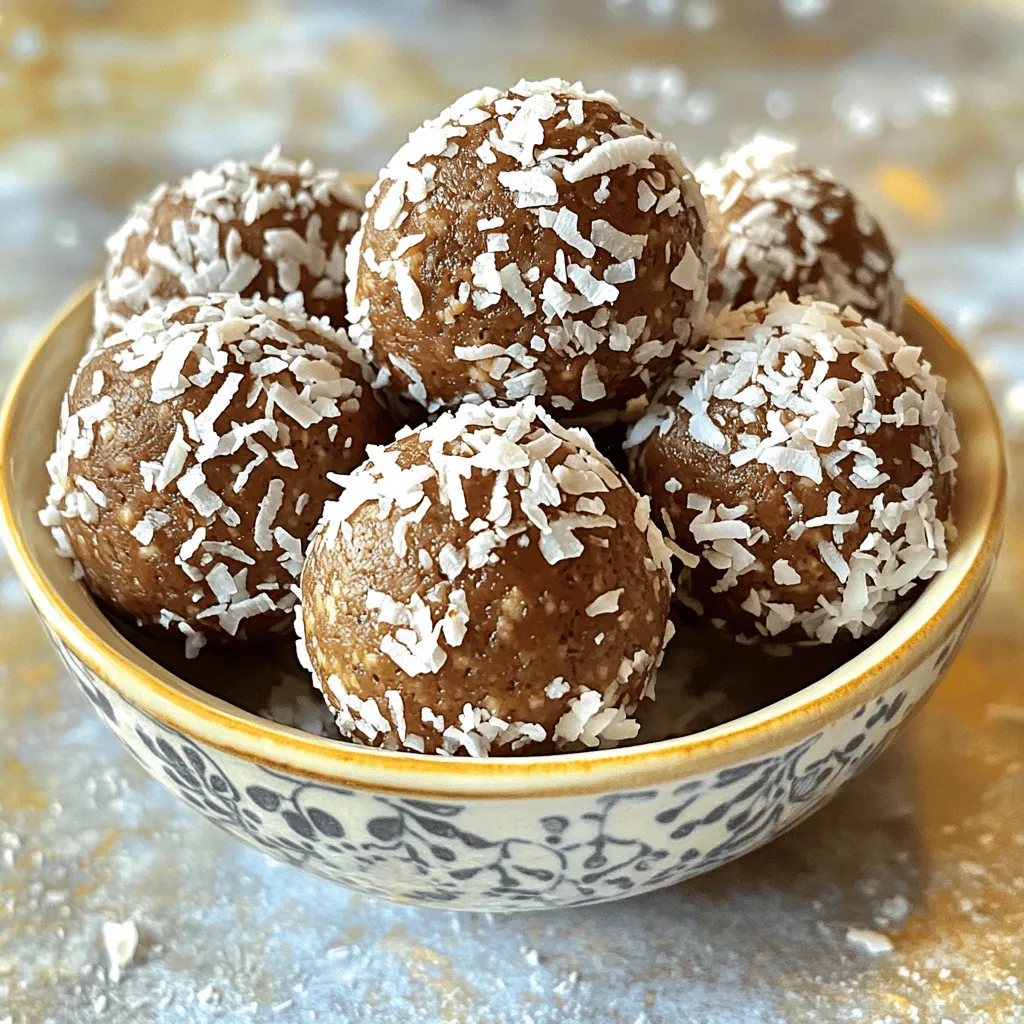
Are you ready to satisfy your sweet tooth with a healthy twist? In this post, I’ll guide you through making No-Bake Chocolate Coconut Protein Balls. These tasty bites provide the perfect mix of flavor and nutrition. Packed with protein and rich in cocoa, they are quick to prepare and fun to eat. Let’s dive into the easy steps and secret tips for creating your new favorite snack!

- 1 cup rolled oats - 1/2 cup almond butter (or any nut butter of your choice) - 1/3 cup honey or maple syrup - 1/2 cup unsweetened cocoa powder - 1 cup shredded unsweetened coconut (plus extra for rolling) - 1/2 cup protein powder (chocolate or vanilla flavor works well) - 1/4 teaspoon salt - 1 teaspoon vanilla extract Each ingredient plays a key role in making these protein balls tasty and healthy. Rolled oats give a nice texture and help fill you up. They are also a good source of fiber. Almond butter adds creaminess and healthy fats. You can swap it for peanut butter if you prefer. Honey or maple syrup serves as a natural sweetener, helping to bind the mix. Cocoa powder brings rich chocolate flavor. It also has antioxidants, making it a guilt-free treat. Shredded coconut adds a delightful chewiness and tropical flair. Plus, it looks great when you roll the balls in extra coconut! Protein powder boosts the protein content. Choose chocolate or vanilla based on your taste. Salt enhances all the flavors. Just a pinch makes a big difference. Vanilla extract adds warmth and depth. This simple ingredient elevates the whole dish. These ingredients combine to create a delicious treat. You can enjoy them as a snack or post-workout boost. - Mixing the dry ingredients Start by taking a large mixing bowl. Add 1 cup of rolled oats, 1/2 cup of almond butter, 1/3 cup of honey or maple syrup, 1/2 cup of cocoa powder, and 1/2 cup of protein powder. Stir these dry ingredients together well. You want to make sure they blend smoothly. - Incorporating wet ingredients Next, add 1 cup of shredded coconut, 1/4 teaspoon of salt, and 1 teaspoon of vanilla extract to the bowl. Mix everything together until it looks even. The mix should feel slightly sticky but still hold its shape. - Tips for rolling evenly-sized balls Take small portions of the mixture in your hands. Aim for about 1 inch in diameter for each ball. Roll them gently in your palms to form a smooth shape. This keeps them looking nice and makes them easy to eat. - Excess mixture cleanup If the mixture gets on your hands, just rinse them with water. This keeps your workspace clean and makes rolling easier. - Recommended chilling time Once all the balls are rolled, place them on a parchment-lined baking sheet. Chill them in the fridge for at least 30 minutes. This helps them firm up, making them perfect for snacking. - Storing in an airtight container After chilling, you can enjoy them right away or store them. Keep the protein balls in an airtight container in the fridge. They will stay fresh for up to a week. To get the right texture for your protein balls, you want a mix that is sticky but holds together. If your mixture feels too dry, add a bit more almond butter or honey. This will help bind it better. If it feels too wet, sprinkle in a little extra rolled oats or protein powder. Mix well and check the consistency again. You want it moldable for rolling. For a fun way to serve your protein balls, try placing them in a colorful bowl. You can also put them on a nice platter and add a sprinkle of shredded coconut on top. This makes them look extra tasty. They work great as a snack on their own or alongside fresh fruit. Pairing with slices of apple or banana adds a nice crunch. You can make your protein balls even tastier by adding nuts or spices. Chopped almonds or walnuts give a nice crunch. If you like a bit of heat, try adding a dash of cinnamon or nutmeg. For nut butter, almond butter works well, but peanut or sunflower seed butter is also great. Each nut butter will change the taste slightly, so feel free to experiment! {{image_2}} You can change the flavor of your protein balls in fun ways. Try using coconut almond butter instead of plain almond butter. This adds a nice twist. Other nut butters like cashew or peanut work great too. You can also mix in dried fruits like raisins or cranberries for some natural sweetness. Chia seeds are another great add-in. They boost nutrition and add a nice crunch. When it comes to sweeteners, you have choices. Honey gives a rich flavor, while maple syrup offers a lighter taste. Both work well in this recipe. If you're looking for sugar-free options, consider using stevia or erythritol. These sweeteners keep your protein balls sweet without the sugar spike. Just remember to adjust the quantity to match your taste. If you’re gluten-free, this recipe already fits the bill! Just ensure your oats are certified gluten-free. For vegan options, swap honey for maple syrup. You can also choose a plant-based protein powder. Almond butter, peanut butter, or sunflower seed butter are great nut butter swaps. This way, you can enjoy tasty protein balls no matter your diet! To keep your no-bake chocolate coconut protein balls fresh, use an airtight container. This helps prevent moisture and keeps them tasty. You can use glass or plastic containers with tight lids. Make sure to store them in the refrigerator. This will keep them firm and ready to eat. To extend shelf life, try wrapping each ball in parchment paper before placing them in the container. This adds an extra layer of protection and makes them easy to grab. If you want to store your protein balls for longer, freezing is a great option. To freeze them, first, place them on a baking sheet in a single layer. Make sure they do not touch each other. Freeze them for about 1-2 hours until solid. Then, transfer them to a freezer-safe bag or container. Be sure to squeeze out any air before sealing. When you're ready to eat, simply take out the desired amount and let them thaw in the fridge. This keeps their texture nice and smooth. These tasty protein balls are best when eaten within a week. After a week, they may dry out or lose flavor. You can tell they are spoiled if they have an off smell or mold. Always check for any signs of spoilage before enjoying. With proper storage, you can enjoy your no-bake chocolate coconut protein balls for several days! No-bake chocolate protein balls last about one week in the fridge. Store them in an airtight container. If you keep them sealed, they will stay fresh and tasty. After a week, they may lose their texture and flavor. Always check for any signs of spoilage before eating. Yes, you can use different nut butters. Almond butter gives a nice flavor, but peanut butter works great too. Cashew or sun butter are also good choices. Each nut butter will change the taste a bit, so pick what you like best. You can substitute protein powder with ground seeds or nuts. Chia seeds or hemp seeds offer good nutrition. Unsweetened cocoa powder can also work if you want chocolate flavor. Just remember that the texture might change a little. Yes, these protein balls are gluten-free. Use rolled oats that are certified gluten-free. Most other ingredients are naturally gluten-free too. This makes them a great snack for those with gluten sensitivities. Yes, you can freeze these protein balls. Place them in an airtight container or freezer bag. They can last for up to three months in the freezer. When ready to eat, let them thaw in the fridge for a few hours. In this post, we explored how to make no-bake chocolate protein balls. We covered the key ingredients, detailed preparation steps, and helpful tips for achieving the perfect texture. You learned about variations to fit your taste and dietary needs, plus storage tips to keep your protein balls fresh. Remember, these snacks are not just tasty; they are also packed with nutrients. Enjoy experimenting with flavors and have fun making your own healthy treats!

Ingredients

Detailed Ingredient List

– 1 cup rolled oats

– 1/2 cup almond butter (or any nut butter of your choice)

– 1/3 cup honey or maple syrup

– 1/2 cup unsweetened cocoa powder

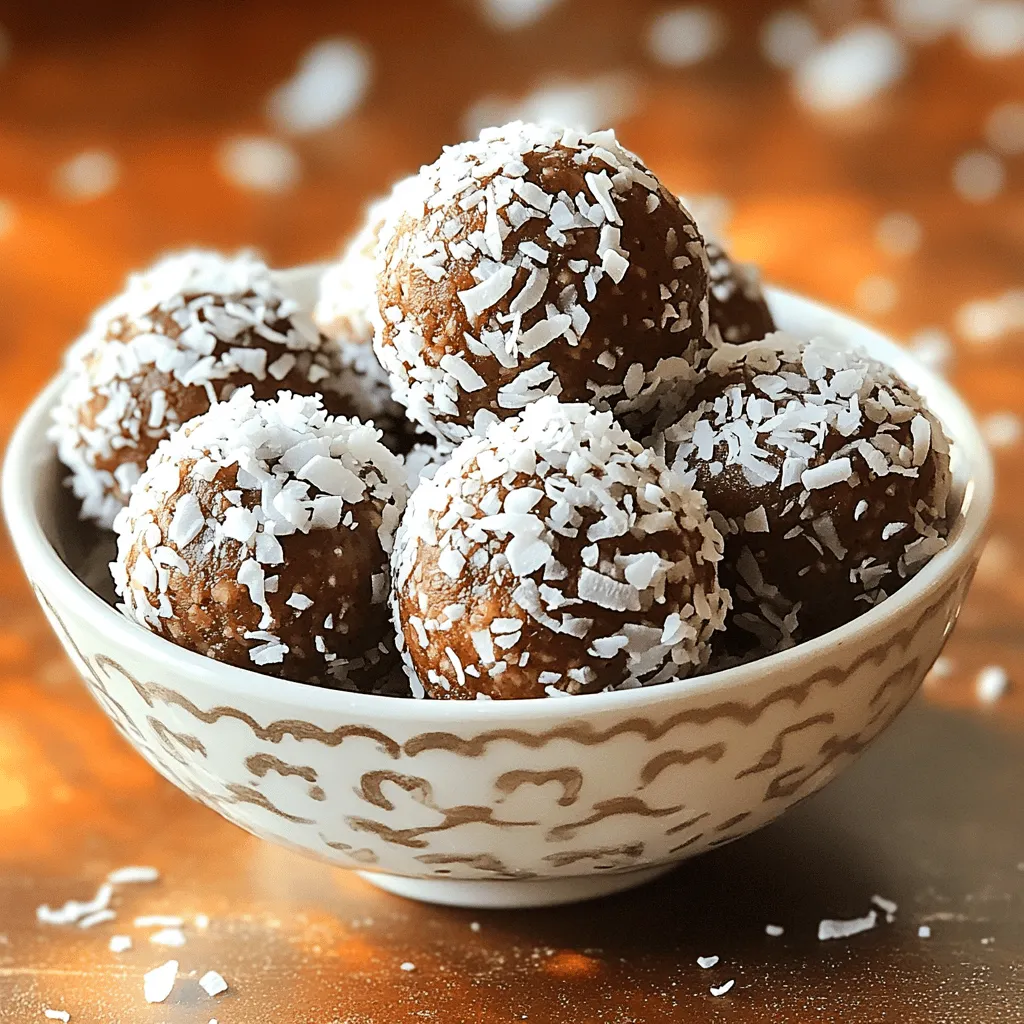
– 1 cup shredded unsweetened coconut (plus extra for rolling)

– 1/2 cup protein powder (chocolate or vanilla flavor works well)

– 1/4 teaspoon salt

– 1 teaspoon vanilla extract

Each ingredient plays a key role in making these protein balls tasty and healthy.

Rolled oats give a nice texture and help fill you up. They are also a good source of fiber.

Almond butter adds creaminess and healthy fats. You can swap it for peanut butter if you prefer.

Honey or maple syrup serves as a natural sweetener, helping to bind the mix.

Cocoa powder brings rich chocolate flavor. It also has antioxidants, making it a guilt-free treat.

Shredded coconut adds a delightful chewiness and tropical flair. Plus, it looks great when you roll the balls in extra coconut!

Protein powder boosts the protein content. Choose chocolate or vanilla based on your taste.

Salt enhances all the flavors. Just a pinch makes a big difference.

Vanilla extract adds warmth and depth. This simple ingredient elevates the whole dish.

These ingredients combine to create a delicious treat. You can enjoy them as a snack or post-workout boost.

Step-by-Step Instructions

Preparation Steps

Mixing the dry ingredients

Start by taking a large mixing bowl. Add 1 cup of rolled oats, 1/2 cup of almond butter, 1/3 cup of honey or maple syrup, 1/2 cup of cocoa powder, and 1/2 cup of protein powder. Stir these dry ingredients together well. You want to make sure they blend smoothly.

Incorporating wet ingredients

Next, add 1 cup of shredded coconut, 1/4 teaspoon of salt, and 1 teaspoon of vanilla extract to the bowl. Mix everything together until it looks even. The mix should feel slightly sticky but still hold its shape.

Shaping the Protein Balls

Tips for rolling evenly-sized balls

Take small portions of the mixture in your hands. Aim for about 1 inch in diameter for each ball. Roll them gently in your palms to form a smooth shape. This keeps them looking nice and makes them easy to eat.

Excess mixture cleanup

If the mixture gets on your hands, just rinse them with water. This keeps your workspace clean and makes rolling easier.

Chilling and Storage

Recommended chilling time

Once all the balls are rolled, place them on a parchment-lined baking sheet. Chill them in the fridge for at least 30 minutes. This helps them firm up, making them perfect for snacking.

Storing in an airtight container

After chilling, you can enjoy them right away or store them. Keep the protein balls in an airtight container in the fridge. They will stay fresh for up to a week.

Tips & Tricks

Achieving the Best Texture

To get the right texture for your protein balls, you want a mix that is sticky but holds together. If your mixture feels too dry, add a bit more almond butter or honey. This will help bind it better. If it feels too wet, sprinkle in a little extra rolled oats or protein powder. Mix well and check the consistency again. You want it moldable for rolling.

Serving Suggestions

For a fun way to serve your protein balls, try placing them in a colorful bowl. You can also put them on a nice platter and add a sprinkle of shredded coconut on top. This makes them look extra tasty. They work great as a snack on their own or alongside fresh fruit. Pairing with slices of apple or banana adds a nice crunch.

Flavor Enhancements

You can make your protein balls even tastier by adding nuts or spices. Chopped almonds or walnuts give a nice crunch. If you like a bit of heat, try adding a dash of cinnamon or nutmeg. For nut butter, almond butter works well, but peanut or sunflower seed butter is also great. Each nut butter will change the taste slightly, so feel free to experiment!

Variations

Flavor Variations

You can change the flavor of your protein balls in fun ways. Try using coconut almond butter instead of plain almond butter. This adds a nice twist. Other nut butters like cashew or peanut work great too. You can also mix in dried fruits like raisins or cranberries for some natural sweetness. Chia seeds are another great add-in. They boost nutrition and add a nice crunch.

Alternative Sweeteners

When it comes to sweeteners, you have choices. Honey gives a rich flavor, while maple syrup offers a lighter taste. Both work well in this recipe. If you’re looking for sugar-free options, consider using stevia or erythritol. These sweeteners keep your protein balls sweet without the sugar spike. Just remember to adjust the quantity to match your taste.

Gluten-Free and Vegan Options

If you’re gluten-free, this recipe already fits the bill! Just ensure your oats are certified gluten-free. For vegan options, swap honey for maple syrup. You can also choose a plant-based protein powder. Almond butter, peanut butter, or sunflower seed butter are great nut butter swaps. This way, you can enjoy tasty protein balls no matter your diet!

Storage Info

Best Practices for Storage

To keep your no-bake chocolate coconut protein balls fresh, use an airtight container. This helps prevent moisture and keeps them tasty. You can use glass or plastic containers with tight lids. Make sure to store them in the refrigerator. This will keep them firm and ready to eat. To extend shelf life, try wrapping each ball in parchment paper before placing them in the container. This adds an extra layer of protection and makes them easy to grab.

Freezing Protein Balls

If you want to store your protein balls for longer, freezing is a great option. To freeze them, first, place them on a baking sheet in a single layer. Make sure they do not touch each other. Freeze them for about 1-2 hours until solid. Then, transfer them to a freezer-safe bag or container. Be sure to squeeze out any air before sealing. When you’re ready to eat, simply take out the desired amount and let them thaw in the fridge. This keeps their texture nice and smooth.

Use-By Timeline

These tasty protein balls are best when eaten within a week. After a week, they may dry out or lose flavor. You can tell they are spoiled if they have an off smell or mold. Always check for any signs of spoilage before enjoying. With proper storage, you can enjoy your no-bake chocolate coconut protein balls for several days!

FAQs

How long do no-bake chocolate protein balls last?

No-bake chocolate protein balls last about one week in the fridge. Store them in an airtight container. If you keep them sealed, they will stay fresh and tasty. After a week, they may lose their texture and flavor. Always check for any signs of spoilage before eating.

Can I use different nut butters?

Yes, you can use different nut butters. Almond butter gives a nice flavor, but peanut butter works great too. Cashew or sun butter are also good choices. Each nut butter will change the taste a bit, so pick what you like best.

What can I substitute for protein powder?

You can substitute protein powder with ground seeds or nuts. Chia seeds or hemp seeds offer good nutrition. Unsweetened cocoa powder can also work if you want chocolate flavor. Just remember that the texture might change a little.

Are these protein balls gluten-free?

Yes, these protein balls are gluten-free. Use rolled oats that are certified gluten-free. Most other ingredients are naturally gluten-free too. This makes them a great snack for those with gluten sensitivities.

Can I freeze no-bake chocolate coconut protein balls?

Yes, you can freeze these protein balls. Place them in an airtight container or freezer bag. They can last for up to three months in the freezer. When ready to eat, let them thaw in the fridge for a few hours.

In this post, we explored how to make no-bake chocolate protein balls. We covered the key ingredients, detailed preparation steps, and helpful tips for achieving the perfect texture. You learned about variations to fit your taste and dietary needs, plus storage tips to keep your protein balls fresh. Remember, these snacks are not just tasty; they are also packed with nutrients. Enjoy experimenting with flavors and have fun making your own healthy treats!

- 1 cup rolled oats - 1/2 cup almond butter (or any nut butter of your choice) - 1/3 cup honey or maple syrup - 1/2 cup unsweetened cocoa powder - 1 cup shredded unsweetened coconut (plus extra for rolling) - 1/2 cup protein powder (chocolate or vanilla flavor works well) - 1/4 teaspoon salt - 1 teaspoon vanilla extract Each ingredient plays a key role in making these protein balls tasty and healthy. Rolled oats give a nice texture and help fill you up. They are also a good source of fiber. Almond butter adds creaminess and healthy fats. You can swap it for peanut butter if you prefer. Honey or maple syrup serves as a natural sweetener, helping to bind the mix. Cocoa powder brings rich chocolate flavor. It also has antioxidants, making it a guilt-free treat. Shredded coconut adds a delightful chewiness and tropical flair. Plus, it looks great when you roll the balls in extra coconut! Protein powder boosts the protein content. Choose chocolate or vanilla based on your taste. Salt enhances all the flavors. Just a pinch makes a big difference. Vanilla extract adds warmth and depth. This simple ingredient elevates the whole dish. These ingredients combine to create a delicious treat. You can enjoy them as a snack or post-workout boost. - Mixing the dry ingredients Start by taking a large mixing bowl. Add 1 cup of rolled oats, 1/2 cup of almond butter, 1/3 cup of honey or maple syrup, 1/2 cup of cocoa powder, and 1/2 cup of protein powder. Stir these dry ingredients together well. You want to make sure they blend smoothly. - Incorporating wet ingredients Next, add 1 cup of shredded coconut, 1/4 teaspoon of salt, and 1 teaspoon of vanilla extract to the bowl. Mix everything together until it looks even. The mix should feel slightly sticky but still hold its shape. - Tips for rolling evenly-sized balls Take small portions of the mixture in your hands. Aim for about 1 inch in diameter for each ball. Roll them gently in your palms to form a smooth shape. This keeps them looking nice and makes them easy to eat. - Excess mixture cleanup If the mixture gets on your hands, just rinse them with water. This keeps your workspace clean and makes rolling easier. - Recommended chilling time Once all the balls are rolled, place them on a parchment-lined baking sheet. Chill them in the fridge for at least 30 minutes. This helps them firm up, making them perfect for snacking. - Storing in an airtight container After chilling, you can enjoy them right away or store them. Keep the protein balls in an airtight container in the fridge. They will stay fresh for up to a week. To get the right texture for your protein balls, you want a mix that is sticky but holds together. If your mixture feels too dry, add a bit more almond butter or honey. This will help bind it better. If it feels too wet, sprinkle in a little extra rolled oats or protein powder. Mix well and check the consistency again. You want it moldable for rolling. For a fun way to serve your protein balls, try placing them in a colorful bowl. You can also put them on a nice platter and add a sprinkle of shredded coconut on top. This makes them look extra tasty. They work great as a snack on their own or alongside fresh fruit. Pairing with slices of apple or banana adds a nice crunch. You can make your protein balls even tastier by adding nuts or spices. Chopped almonds or walnuts give a nice crunch. If you like a bit of heat, try adding a dash of cinnamon or nutmeg. For nut butter, almond butter works well, but peanut or sunflower seed butter is also great. Each nut butter will change the taste slightly, so feel free to experiment! {{image_2}} You can change the flavor of your protein balls in fun ways. Try using coconut almond butter instead of plain almond butter. This adds a nice twist. Other nut butters like cashew or peanut work great too. You can also mix in dried fruits like raisins or cranberries for some natural sweetness. Chia seeds are another great add-in. They boost nutrition and add a nice crunch. When it comes to sweeteners, you have choices. Honey gives a rich flavor, while maple syrup offers a lighter taste. Both work well in this recipe. If you're looking for sugar-free options, consider using stevia or erythritol. These sweeteners keep your protein balls sweet without the sugar spike. Just remember to adjust the quantity to match your taste. If you’re gluten-free, this recipe already fits the bill! Just ensure your oats are certified gluten-free. For vegan options, swap honey for maple syrup. You can also choose a plant-based protein powder. Almond butter, peanut butter, or sunflower seed butter are great nut butter swaps. This way, you can enjoy tasty protein balls no matter your diet! To keep your no-bake chocolate coconut protein balls fresh, use an airtight container. This helps prevent moisture and keeps them tasty. You can use glass or plastic containers with tight lids. Make sure to store them in the refrigerator. This will keep them firm and ready to eat. To extend shelf life, try wrapping each ball in parchment paper before placing them in the container. This adds an extra layer of protection and makes them easy to grab. If you want to store your protein balls for longer, freezing is a great option. To freeze them, first, place them on a baking sheet in a single layer. Make sure they do not touch each other. Freeze them for about 1-2 hours until solid. Then, transfer them to a freezer-safe bag or container. Be sure to squeeze out any air before sealing. When you're ready to eat, simply take out the desired amount and let them thaw in the fridge. This keeps their texture nice and smooth. These tasty protein balls are best when eaten within a week. After a week, they may dry out or lose flavor. You can tell they are spoiled if they have an off smell or mold. Always check for any signs of spoilage before enjoying. With proper storage, you can enjoy your no-bake chocolate coconut protein balls for several days! No-bake chocolate protein balls last about one week in the fridge. Store them in an airtight container. If you keep them sealed, they will stay fresh and tasty. After a week, they may lose their texture and flavor. Always check for any signs of spoilage before eating. Yes, you can use different nut butters. Almond butter gives a nice flavor, but peanut butter works great too. Cashew or sun butter are also good choices. Each nut butter will change the taste a bit, so pick what you like best. You can substitute protein powder with ground seeds or nuts. Chia seeds or hemp seeds offer good nutrition. Unsweetened cocoa powder can also work if you want chocolate flavor. Just remember that the texture might change a little. Yes, these protein balls are gluten-free. Use rolled oats that are certified gluten-free. Most other ingredients are naturally gluten-free too. This makes them a great snack for those with gluten sensitivities. Yes, you can freeze these protein balls. Place them in an airtight container or freezer bag. They can last for up to three months in the freezer. When ready to eat, let them thaw in the fridge for a few hours. In this post, we explored how to make no-bake chocolate protein balls. We covered the key ingredients, detailed preparation steps, and helpful tips for achieving the perfect texture. You learned about variations to fit your taste and dietary needs, plus storage tips to keep your protein balls fresh. Remember, these snacks are not just tasty; they are also packed with nutrients. Enjoy experimenting with flavors and have fun making your own healthy treats!

No-Bake Chocolate Coconut Protein Balls

Indulge in the deliciousness of No-Bake Chocolate Coconut Protein Balls! These easy-to-make snacks are packed with wholesome ingredients like rolled oats, almond butter, and protein powder, making them perfect for a quick energy boost. In just 15 minutes, you can create about 20 delightful bites that are not only healthy but also irresistibly tasty. Click to explore the full recipe and elevate your snack game today!

Ingredients
  

1 cup rolled oats

1/2 cup almond butter (or any nut butter of your choice)

1/3 cup honey or maple syrup

1/2 cup unsweetened cocoa powder

1 cup shredded unsweetened coconut (plus extra for rolling)

1/2 cup protein powder (chocolate or vanilla flavor works well)

1/4 teaspoon salt

1 teaspoon vanilla extract

Instructions
 

In a large mixing bowl, combine the rolled oats, almond butter, honey (or maple syrup), cocoa powder, and protein powder. Mix well until everything is fully incorporated.

    Add the shredded coconut, salt, and vanilla extract to the bowl. Stir until all ingredients are evenly distributed. The mixture should be slightly sticky and moldable.

      Using your hands, take small portions of the mixture and roll them into bite-sized balls (about 1 inch in diameter).

        Roll each ball in additional shredded coconut until evenly coated.

          Place the finished protein balls on a parchment-lined baking sheet or plate.

            Refrigerate the protein balls for at least 30 minutes to help them firm up.

              Once set, enjoy immediately or store in an airtight container in the refrigerator for up to a week.

                Prep Time, Total Time, Servings: 15 minutes | 45 minutes (including chilling) | Makes about 20 protein balls.

                  - Presentation Tips: Serve the protein balls in a small decorative bowl or on a platter, garnished with a sprinkle of shredded coconut for an appealing look. They make a great snack for sharing or meal prep!