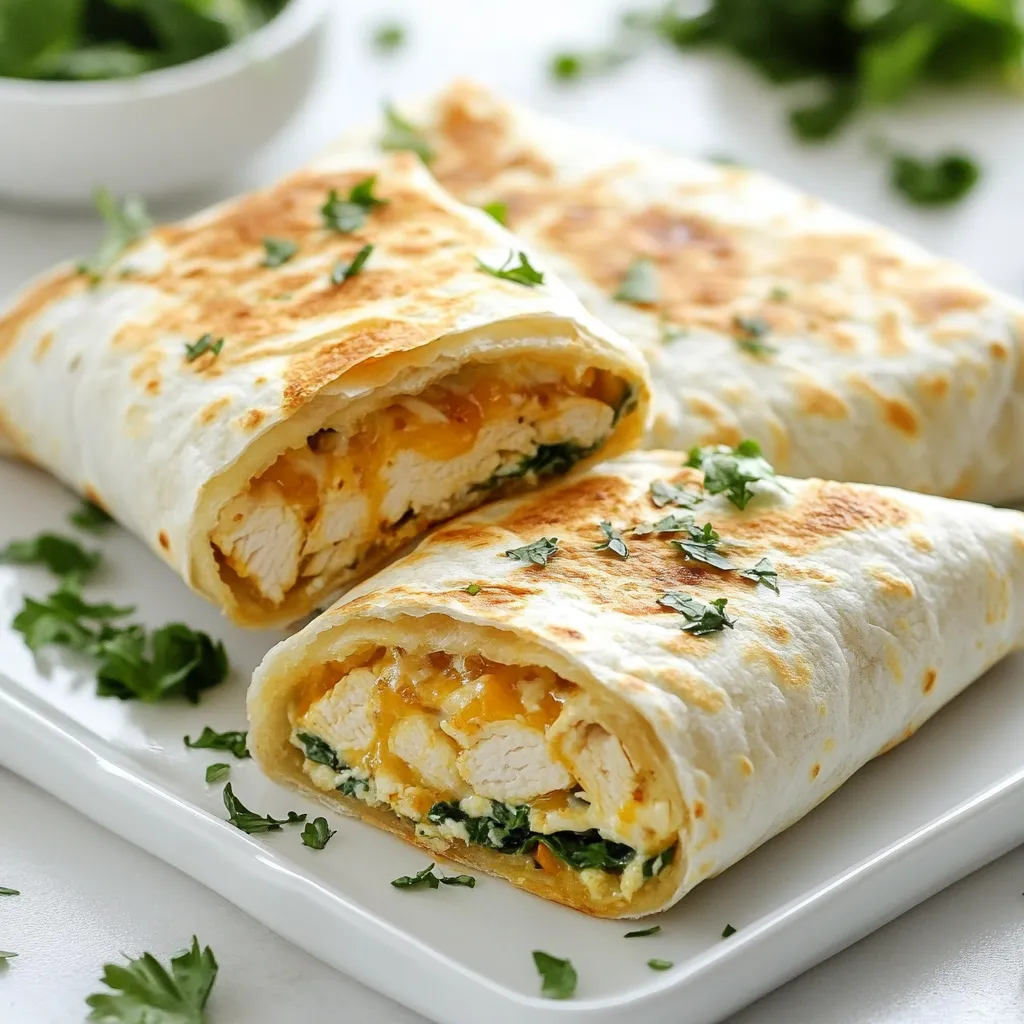
Are you ready for a tasty treat? Melty Garlic Chicken Wraps are a game-changer! Packed with flavor and perfect for any meal, they will delight your taste buds. In this guide, I’ll share simple steps, helpful tips, and variations to suit your style. Soon, you’ll impress your family and friends with this easy, delicious dish. Let’s dive in and get cooking together!
Why I Love This Recipe
- Quick and Easy: This recipe comes together in just 20 minutes, making it perfect for a busy weeknight dinner or a last-minute meal.
- Flavor-Packed: The combination of garlic, oregano, and melty mozzarella creates an irresistible flavor that will have everyone coming back for more.
- Customizable: You can easily swap out the chicken for other proteins or add more veggies to suit your taste preferences or dietary needs.
- Kid-Friendly: These wraps are not only delicious but also fun to eat, making them a hit with kids and adults alike!
Ingredients
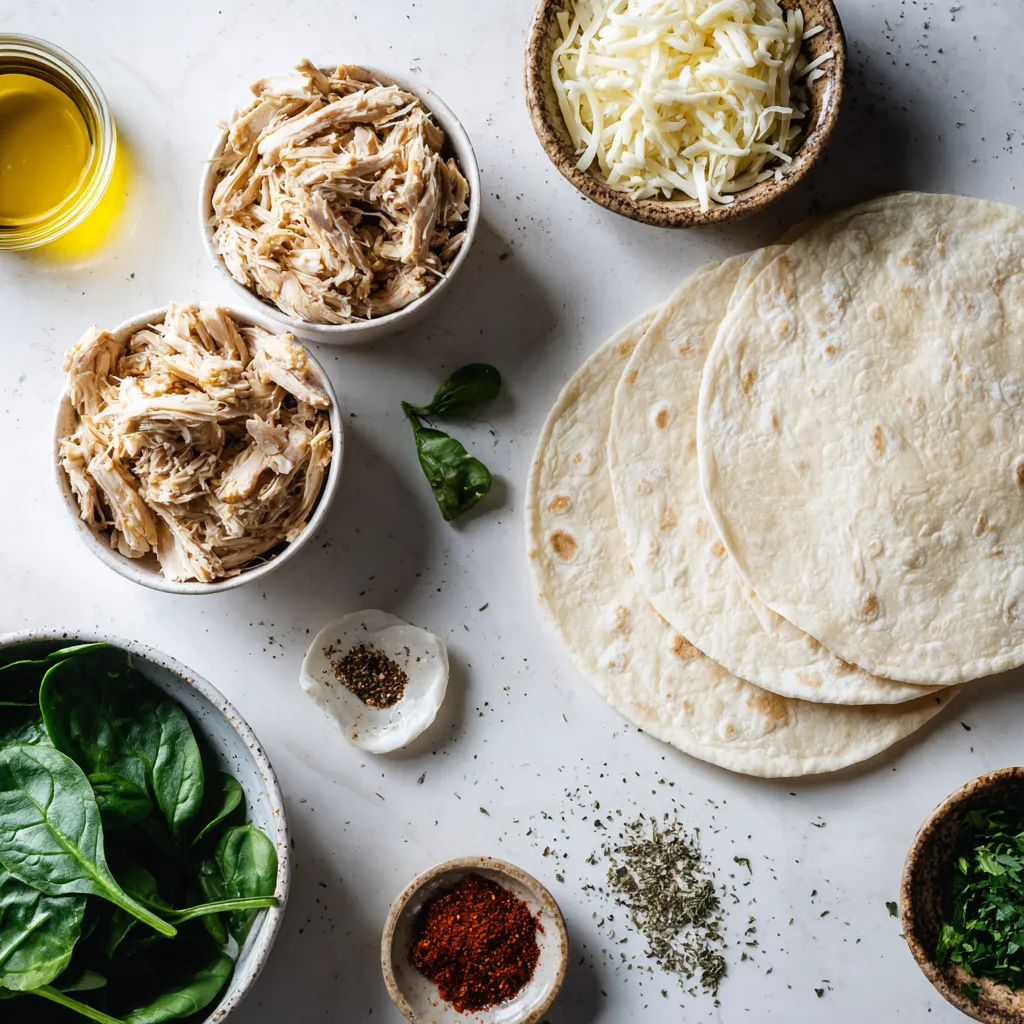
List of Ingredients
– 2 cups cooked chicken, shredded
– 1 cup mozzarella cheese, shredded
– 4 large flour tortillas
– 4 cloves garlic, minced
– 1 tablespoon olive oil
– 1 teaspoon dried oregano
– 1/2 teaspoon red pepper flakes (optional)
– 1/2 cup spinach leaves
– Salt and pepper to taste
– Fresh parsley, chopped (for garnish)
Ingredient Substitutions
You can swap a few ingredients for a different taste. Use cooked turkey instead of chicken. If you want a creamy twist, try using cream cheese instead of mozzarella. For a lighter option, use whole wheat or corn tortillas. If you don’t have fresh spinach, you can use arugula or kale. If you want to skip the heat, leave out the red pepper flakes.
Cooking Tools Needed
To make these wraps, you’ll need a few tools. Grab a medium skillet for cooking. You’ll also need a spatula for stirring. Use a cutting board and knife to chop garlic and parsley. A large platter helps serve the wraps nicely. Lastly, get a clean surface for assembling your wraps.
Step-by-Step Instructions
Detailed Cooking Process
First, heat one tablespoon of olive oil in a medium skillet over medium heat. Add four cloves of minced garlic. Sauté the garlic for about one minute until it smells great. Next, add two cups of shredded cooked chicken to the skillet. Sprinkle in one teaspoon of dried oregano, and if you like spice, add half a teaspoon of red pepper flakes. Season with salt and pepper to taste. Stir everything well and cook for about three to four minutes until heated through.
After that, take the skillet off the heat. Stir in one cup of shredded mozzarella cheese. Mix until the cheese melts and combines with the chicken. This step is key for that melty goodness!
Now, lay a large flour tortilla flat on a clean surface. Put a portion of the chicken mix right in the center. Add a few fresh spinach leaves on top for some crunch and color.
Tips for Melting Cheese
To get the best melt, use fresh mozzarella. It melts beautifully and gives a nice stretch. If you want extra flavor, try mixing in a bit of cream cheese with the mozzarella. This adds creaminess and richness to your wraps. Always remove the skillet from heat before adding cheese. This helps the cheese melt evenly without burning.
Folding and Rolling Techniques
To fold your tortilla, start by folding the sides over the filling. Then, roll it up tightly from the bottom. This keeps the filling secure inside. Make sure to roll it snug but not too tight. If it’s too tight, the wrap might burst while cooking. Repeat this with the other tortillas until you use all the filling. Once rolled, place each wrap seam side down in a hot skillet for cooking.
Tips & Tricks
Enhancing Flavor with Seasonings
To boost the taste of your melty garlic chicken wraps, focus on seasonings. Garlic is key, but you can add more. Try fresh herbs like basil or thyme for a bright flavor. A squeeze of lemon juice adds a nice zing, too. For heat, use red pepper flakes. Adjust the amount to match your spice level. Always taste as you go. This will help you find the perfect blend that you love.
Recommended Cooking Methods
You can cook the chicken wraps in a skillet or an air fryer. A skillet gives a nice, crispy finish. Heat oil in the skillet, then cook the wraps seam side down. Flip them after a few minutes. If you use an air fryer, set it to 375°F. Cook for about 6-8 minutes. This method makes them extra crispy. Make sure to check often to avoid burning.
Presentation Tips for Serving
How you serve your wraps matters. Place them on a large platter for a fun look. Add a side of ranch or garlic aioli for dipping. A sprinkle of fresh parsley makes the dish pop. You can also cut the wraps in half for easy eating. This way, guests can see the melty goodness inside. Enjoy the smiles when you present this tasty dish!
Pro Tips
- Use Fresh Garlic: Freshly minced garlic enhances the flavor significantly compared to pre-minced versions.
- Don’t Overfill the Wraps: To prevent bursting, fill the tortillas moderately to ensure a secure roll.
- Perfectly Crispy Wraps: For extra crunch, brush the outside of the wraps with a little olive oil before cooking.
- Experiment with Cheese: While mozzarella is delicious, try adding some cheddar or pepper jack for a unique twist!
Variations
Vegetarian Options
You can easily make these melty garlic chicken wraps vegetarian. Simply swap the chicken for a mix of veggies. Use bell peppers, mushrooms, and zucchini for a colorful filling. Sauté the veggies with garlic like you would with chicken. They will absorb the great garlic flavor and still taste amazing.
Alternative Protein Sources
For those who want different proteins, try using shredded beef or turkey. You can even use canned beans as a protein source. Black beans or chickpeas work well. Just make sure to season them well with garlic and herbs. They will add a nice twist to your wraps.
Flavor Customizations with Sauces
Adding sauces can take your wraps to the next level. Try ranch, garlic aioli, or a spicy sriracha sauce. You can drizzle these sauces inside the wrap or serve them on the side. These additions can change the flavor and make each bite exciting.
Storage Info
How to Store Leftovers
To keep your Melty Garlic Chicken Wraps fresh, store them in the fridge. Place the wraps in an airtight container. This helps prevent them from drying out. They will stay good for about 3 to 4 days. Make sure to cool them down first. This keeps the texture nice.
Reheating Tips
When it’s time to eat, you can reheat the wraps easily. Use a skillet for the best results. Heat it over medium-low heat. Place the wrap in the skillet seam side down. Cook for 2-3 minutes on each side. This makes the wrap warm and crispy again. You can also use a microwave. Heat them for about 30 seconds. Just know, the wrap might get a little soft.
Freezing Instructions
If you want to save some for later, freezing works great. Wrap each Melty Garlic Chicken Wrap in plastic wrap. Then, place them in a freezer bag. Squeeze out the air to avoid freezer burn. They can last up to 2 months in the freezer. When you are ready to eat, thaw them in the fridge overnight. After that, reheat them in a skillet or microwave. Enjoy the melty goodness!
FAQs
Can I use leftover rotisserie chicken?
Yes, you can use leftover rotisserie chicken. It saves time and adds great flavor. Just shred the chicken into bite-sized pieces. Then, follow the same steps in the recipe. The garlic and cheese will blend well with the seasoned chicken.
What type of cheese works best?
I love using mozzarella cheese for this wrap. It melts beautifully and adds a creamy texture. You can also try cheddar or pepper jack for a different flavor. Just remember to shred the cheese for easy melting.
How do I make this dish gluten-free?
To make this dish gluten-free, swap out the flour tortillas for gluten-free ones. Many brands offer great options. Check the label to ensure they are certified gluten-free. The rest of the ingredients are naturally gluten-free. Enjoy your wraps without worry!
We explored key ingredients and tools to prepare your dish. You learned cooking steps and tips for melting cheese. I shared ways to enhance flavors with seasonings and variations for different diets. We also covered storage tips for leftovers and answered common questions.
With this knowledge, you can experiment and make the dish your own. Enjoy cooking and sharing your creatio