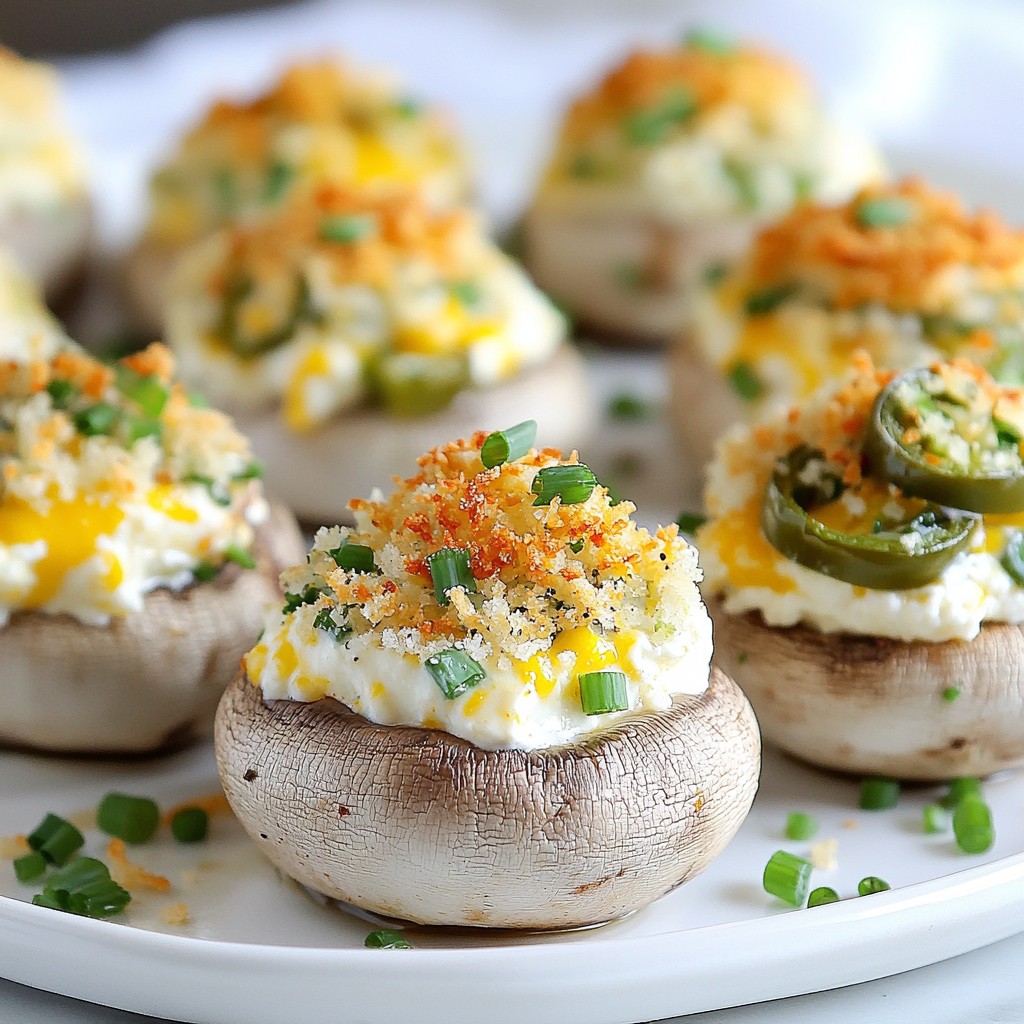
If you're craving a delicious appetizer that packs a flavorful punch, you've hit the jackpot! Jalapeño Popper Stuffed Mushrooms combine creamy cheese and zesty jalapeños, creating a treat that's hard to resist. These bite-sized delights are perfect for parties or a cozy night in. In this guide, I'll walk you through each step, from ingredients to baking, plus tips to customize your mushrooms. Let's dive in and make your taste buds sing!
Error: Connection error.
Ingredients
Main Ingredients for Jalapeño Popper Stuffed Mushrooms
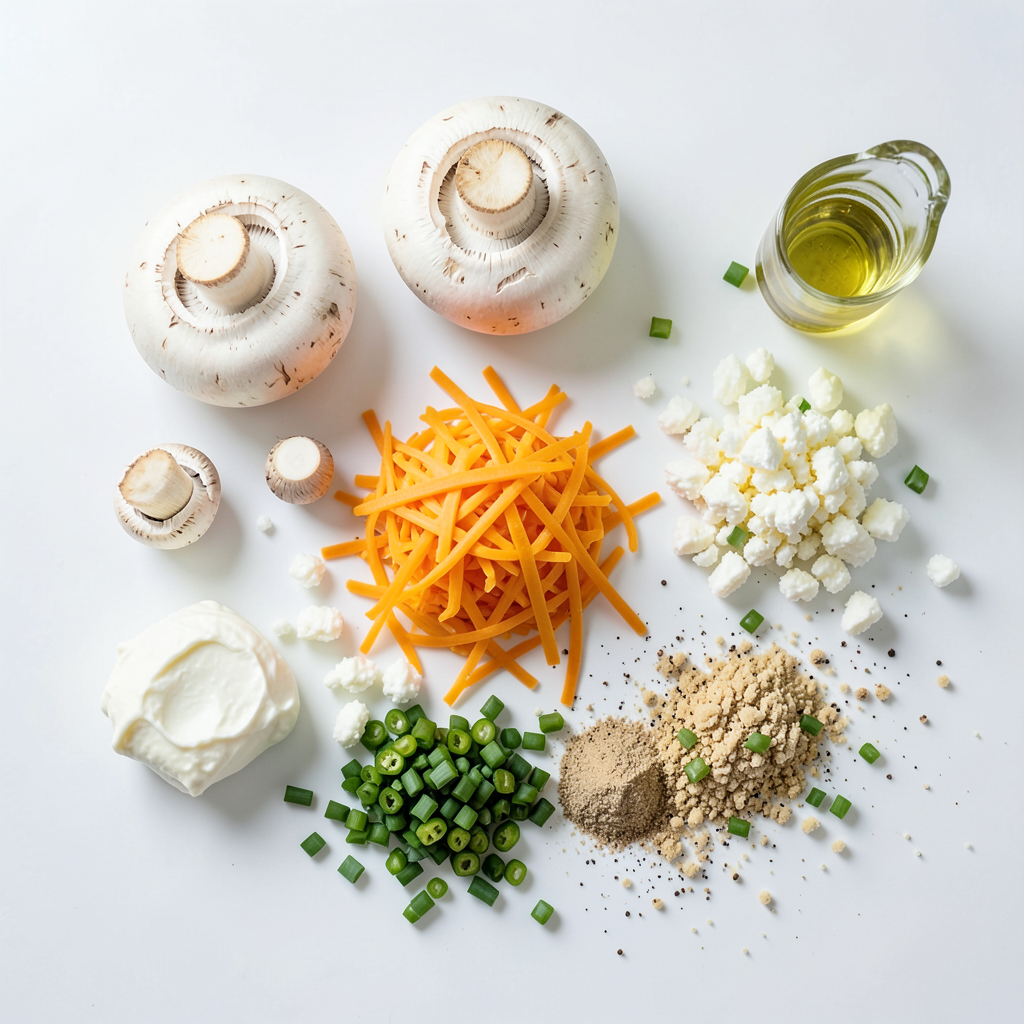
To make these tasty jalapeño popper stuffed mushrooms, you will need:
- 12 large white mushrooms, stems removed
- 4 oz cream cheese, softened
- ½ cup shredded cheddar cheese
- ¼ cup crumbled feta cheese
- 2-3 jalapeños, finely diced (seeds removed for less heat)
- 2 tablespoons fresh chives, chopped
- 1 teaspoon garlic powder
- Salt and pepper to taste
- ¼ cup breadcrumbs (for topping)
- Olive oil for drizzling
Each ingredient plays a big role in the flavor. The mushrooms serve as the perfect base, while the cheese brings creaminess. The jalapeños add heat, and the breadcrumbs give a nice crunch.
Cheese Types Used (Cream Cheese, Cheddar, Feta)
I love using a mix of cheeses in this recipe. Cream cheese is rich and smooth. It helps bind everything together. Cheddar cheese adds a sharp flavor that balances well with the heat from jalapeños. Feta cheese gives a briny taste that brightens the dish. Together, these cheeses create a creamy and flavorful filling.
Optional Ingredients (for flavor enhancements)
You can customize the recipe with optional ingredients. Consider adding:
- Cooked bacon bits for a smoky flavor
- Diced bell peppers for sweetness
- A sprinkle of chili powder for extra kick
- Fresh herbs like parsley for freshness
These additions can enhance the flavors and give you more options for your stuffed mushrooms.
Step-by-Step Instructions
Prepping the Mushrooms
First, you need to clean the mushrooms. Use a damp paper towel to wipe them down. This helps remove dirt without soaking them. Next, remove the stems carefully. Set the caps aside and chop the stems finely. This adds extra flavor to your filling.
Mixing the Filling
In a mixing bowl, combine the chopped mushroom stems with other ingredients. Add 4 oz of softened cream cheese. Then, mix in ½ cup of shredded cheddar cheese and ¼ cup of crumbled feta cheese. Now, finely dice 2-3 jalapeños, removing the seeds for less heat. Toss in the jalapeños, 2 tablespoons of chopped fresh chives, 1 teaspoon of garlic powder, and salt and pepper to taste. Stir everything until it is well mixed. The filling should be creamy and flavorful.
Assembling and Baking the Stuffed Mushrooms
Now it’s time to assemble! Take the mushroom caps and spoon the filling into each one. Press it down slightly to pack it in well. Place the stuffed mushrooms on a baking sheet lined with parchment paper. Sprinkle ¼ cup of breadcrumbs on top for a crispy finish. Drizzle a little olive oil over the tops. Preheat your oven to 375°F (190°C) and bake for about 20 minutes. Watch for the mushrooms to turn tender and the tops to become golden brown. Once done, let them cool a bit before serving. Enjoy this tasty treat hot!
Tips & Tricks
Best Practices for Cleaning Mushrooms
To start, clean mushrooms with care. Use a damp paper towel. Wipe off any dirt gently. Never soak mushrooms in water. They can become soggy and lose flavor. Remove the stems with ease. This helps create a nice pocket for filling.
How to Customize Heat Levels
Adjust the heat to your liking. If you want less spice, remove jalapeño seeds. For more heat, use more jalapeños or leave the seeds in. You can also add a pinch of cayenne pepper to the cheese mix. This gives a nice kick without overpowering the dish.
Achieving the Perfect Golden Brown Top
To get that golden brown top, sprinkle breadcrumbs evenly on the mushrooms. Drizzle a little olive oil over them. This helps the topping crisp up in the oven. Bake until the mushrooms are tender and the tops are golden. This usually takes about 20 minutes at 375°F. Enjoy the crunchy texture along with the creamy filling!
Error: Connection error.
Variations
Vegetarian Variations
You can easily make Jalapeño Popper Stuffed Mushrooms vegetarian. Just skip any meat. Use more veggies in the filling. Try adding bell peppers or corn. Both add nice texture and flavor. You can also use a mix of cheeses. This gives a rich and creamy taste. You can even add some spinach for a healthy twist!
Adding Proteins (Bacon or Chicken)
If you want to add protein, bacon is a great choice. Cook it until crispy, then chop it up. Mix it into the cheese filling. The smoky flavor of bacon pairs well with the heat. You can also use chicken. Cook it and shred it before adding to the mix. This makes the dish heartier and more filling.
Alternative Cheeses or Toppings
Experiment with different cheeses for unique flavors. Gouda or pepper jack cheese can add a nice twist. They bring a creamy texture and extra flavor. For toppings, try crushed tortilla chips instead of breadcrumbs. This gives a nice crunch. You can also top with fresh herbs like cilantro for freshness. Each variation can change the whole taste of the dish!
Storage Info
How to Store Leftover Stuffed Mushrooms
After enjoying your Jalapeño Popper Stuffed Mushrooms, store any leftovers in an airtight container. Keep them in the fridge for up to three days. If you want to keep them fresh longer, consider freezing them. Just ensure they cool completely before packing.
Reheating Tips for Best Results
When it's time to reheat, the oven is your best friend. Preheat your oven to 350°F (175°C). Place the mushrooms on a baking sheet. Heat them for about 10-15 minutes or until warm. This method helps maintain their crispy topping and delicious filling. Avoid using the microwave, as it can make the mushrooms soggy.
Freezing for Future Enjoyment
To freeze your stuffed mushrooms, place them on a baking sheet and freeze until solid. Then, transfer them to a freezer bag. They can stay in the freezer for up to three months. When you're ready to enjoy them, bake from frozen at 375°F (190°C) for about 25-30 minutes. This way, you’ll have a tasty treat ready whenever you want.
FAQs
Can I make Jalapeño Popper Stuffed Mushrooms in advance?
Yes, you can prepare these stuffed mushrooms ahead of time. Stuff the mushrooms and place them in a baking dish. Cover the dish with plastic wrap and refrigerate. You can bake them later, just add a few minutes to the baking time if they are cold.
What can I substitute for cream cheese?
If you want to replace cream cheese, try using sour cream or Greek yogurt. Both give a creamy texture. You can also use cottage cheese for a lighter option. Just blend it until smooth.
How can I make these mushrooms spicier?
To add more heat, you can leave the seeds in the jalapeños. You can also use hotter peppers, like serranos or habaneros. Adding a dash of hot sauce to the filling works well too.
Are Jalapeño Popper Stuffed Mushrooms gluten-free?
Yes, these stuffed mushrooms can be gluten-free. Just be sure to use gluten-free breadcrumbs. Check labels on all other ingredients to ensure they are gluten-free too.
How do I know when they are cooked properly?
The mushrooms are done when they are tender and the tops are golden brown. You can test them with a fork. If it goes in easily, they are ready. Enjoy them warm for the best flavor!
Jalapeño Popper Stuffed Mushrooms offer rich flavors and easy preparation. We explored key ingredients, like tasty cheeses, and optional extras. I shared step-by-step instructions for prepping, mixing, assembling, and baking these delicious bites.
With tips to clean mushrooms and customize heat, you'll impress every guest. Consider fun variations with proteins or other cheeses to mix it up.
Store leftovers correctly or freeze them for later. Enjoy making and sharing these stuffed mushrooms again and again!