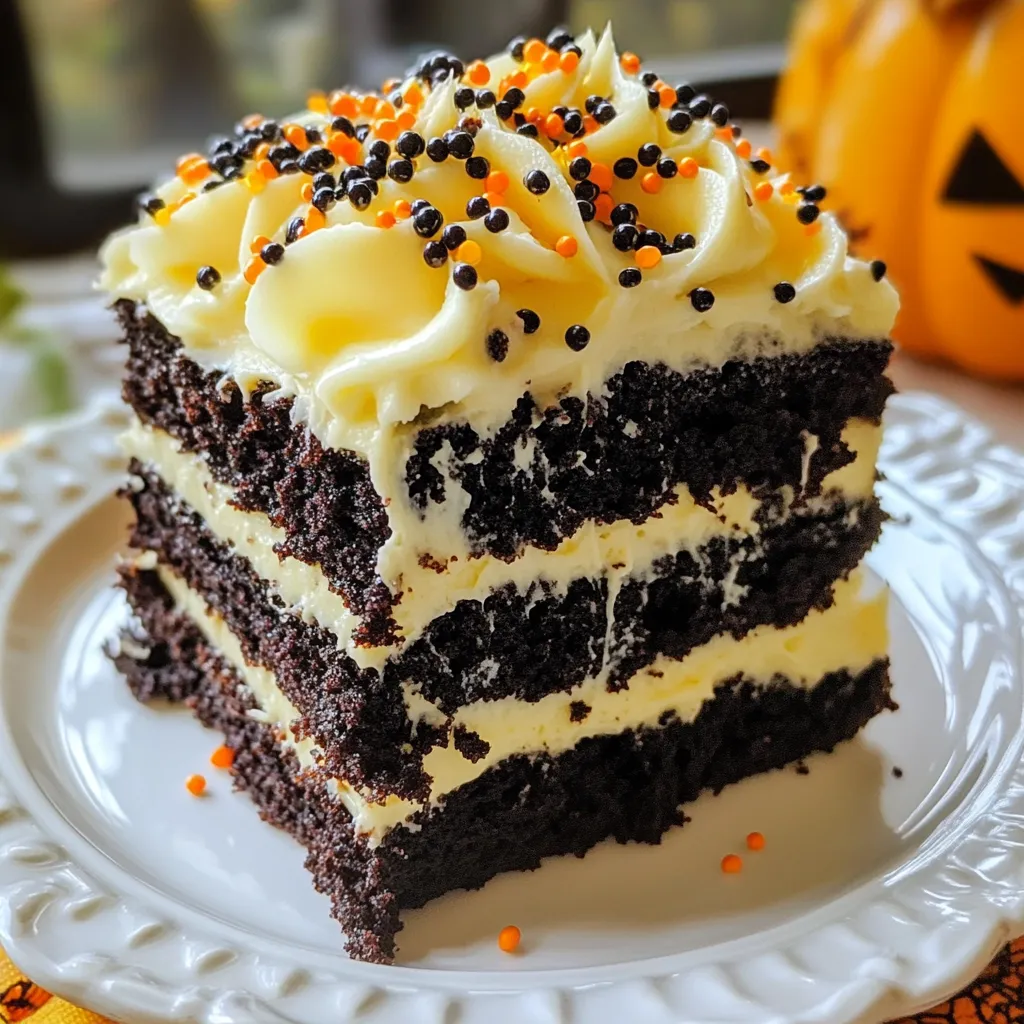
Get ready to wow your guests with a rich and spooky Halloween treat! This Halloween Black Velvet Cake is not just a dessert; it’s a showstopper. In this guide, I’ll share my favorite recipe along with tips, tricks, and easy substitutions. Whether you’re a baking pro or a novice, you’ll find everything you need to create a spooktacular cake that dazzles and delights. Let’s dive in and bake some magic!
Why I Love This Recipe
- Spooky Aesthetic: This cake is the perfect centerpiece for any Halloween celebration, with its striking black color that adds an eerie touch to your dessert table.
- Rich Flavor: The combination of cocoa powder and buttermilk creates a moist and flavorful cake that will satisfy any chocolate lover.
- Easy to Make: With simple ingredients and straightforward steps, this recipe is accessible even for beginner bakers.
- Customizable Toppings: Dress it up with cream cheese frosting and fun Halloween decorations to make it uniquely yours!
Ingredients
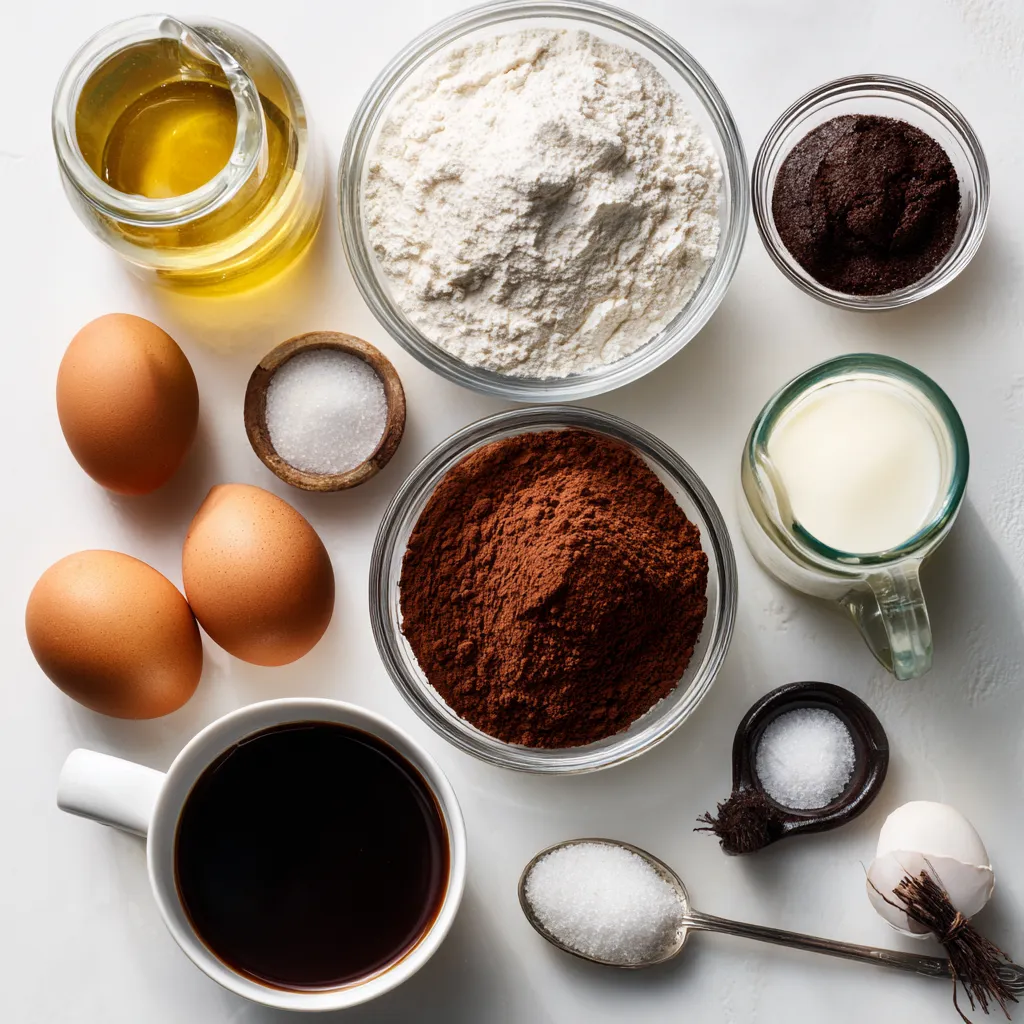
List of Ingredients
– 2 cups all-purpose flour
– 1 ½ cups granulated sugar
– ¾ cup unsweetened cocoa powder
– 1 teaspoon baking soda
– ½ teaspoon salt
– 1 cup buttermilk, room temperature
– ½ cup vegetable oil
– 2 large eggs, room temperature
– 2 teaspoons vanilla extract
– 1 tablespoon black food coloring
– 1 cup boiling water
Ingredient Substitutions
You can swap some ingredients if needed. For a dairy-free version, use almond milk instead of buttermilk. Add a tablespoon of vinegar to the almond milk to mimic buttermilk. For eggs, use flax eggs. Mix 1 tablespoon of ground flaxseed with 2.5 tablespoons of water. Let it sit for five minutes to thicken. You can also use a gluten-free flour blend instead of all-purpose flour. This keeps the cake just as tasty!
Equipment Required
To make this cake, gather these tools:
– Two 9-inch round cake pans
– Mixing bowls (one large and one medium)
– Whisk or electric mixer
– Measuring cups and spoons
– Rubber spatula
– Cooling rack
– Parchment paper (optional, for easy cake removal)
With these ingredients and tools, you’re set to make a spooky and delicious Halloween Black Velvet Cake!
Step-by-Step Instructions
Preparation of Cake Batter
Gather all your ingredients first. This makes it easy to mix. In a large bowl, combine:
– 2 cups all-purpose flour
– 1 ½ cups granulated sugar
– ¾ cup unsweetened cocoa powder
– 1 teaspoon baking soda
– ½ teaspoon salt
Whisk the dry ingredients well. In another bowl, mix:
– 1 cup buttermilk, room temperature
– ½ cup vegetable oil
– 2 large eggs, room temperature
– 2 teaspoons vanilla extract
– 1 tablespoon black food coloring
Whisk until smooth. Pour the wet mix into the dry mix. Stir until just combined. Then, add 1 cup boiling water. The batter will be thin, but that’s okay.
Baking Instructions
Next, preheat your oven to 350°F (175°C). Prepare two 9-inch round cake pans by greasing and flouring them. Pour the cake batter evenly into the pans. Bake for 30-35 minutes. To check if it’s done, insert a toothpick in the center. If it comes out clean, the cakes are ready.
Cooling and Preparing for Frosting
Once baked, let the cakes cool in the pans for 10 minutes. Carefully remove them from the pans and place them on a wire rack. Let them cool completely. This step is key, as frosting on warm cakes can melt. Once cool, you’re ready to frost and decorate your Halloween Black Velvet Cake!
Tips & Tricks
Achieving the Perfect Texture
To get a soft and moist cake, use room temperature ingredients. This helps them mix better. The buttermilk adds moisture and a nice tang. When you add boiling water, it helps the cocoa bloom. This makes the cake rich in flavor. Don’t overmix the batter. Mix just until combined to keep the cake light.
Decorating Ideas for a Spooky Touch
For a fun look, use cream cheese frosting. You can mix in some black food coloring for a spooky vibe. Use black and orange sprinkles to give it a festive touch. Adding small toy spiders or ghosts on top adds to the fun. Place the cake on a dark plate to enhance the Halloween theme.
Frosting Techniques
Spread the frosting evenly on the cake layers. Use a spatula to get smooth edges. If you want a textured look, use the back of a spoon or a fork. You can pipe the frosting for a more fancy design. Practice makes perfect! Enjoy the process and let your creativity shine.
Pro Tips
- Use Room Temperature Ingredients: Let your buttermilk, eggs, and other refrigerated items come to room temperature before mixing. This helps create a smoother batter and ensures even baking.
- Don’t Overmix the Batter: Mix the wet and dry ingredients until just combined. Overmixing can lead to a dense cake rather than a light and fluffy texture.
- Check for Doneness: Start checking your cakes a few minutes before the suggested baking time. Insert a toothpick in the center; if it comes out clean or with a few moist crumbs, the cakes are done.
- Chill Your Frosting: If using cream cheese frosting, chill it for about 30 minutes before frosting the cake. This makes it easier to spread and helps it hold its shape better.
Variations
Flavor Additions
You can spice up your Halloween Black Velvet Cake with fun flavors. Try adding a teaspoon of cinnamon for warmth. You can also add a pinch of nutmeg for a cozy flavor. If you love citrus, mix in some orange zest. This gives a nice contrast to the rich chocolate taste. Each of these flavors adds a unique twist to the cake. Feel free to experiment with your favorite spices!
Different Frosting Options
While cream cheese frosting is classic, consider other options too. A dark chocolate ganache pairs well with the cake’s richness. You can make it by melting chocolate with cream. For a lighter touch, use whipped cream frosting. It adds a nice, airy bite. You can also try a simple vanilla buttercream for a sweet contrast. Mix in some black cocoa powder for a darker color. Don’t forget to add sprinkles or spooky decorations on top!
Mini Halloween Black Velvet Cakes
Want to serve cake in a fun way? Try making mini Halloween Black Velvet Cakes! Use a muffin tin or small cake pans. Pour the batter into each cup, filling them halfway. Bake as usual, checking for doneness. These mini cakes are cute and easy to serve. You can frost them individually. This makes them perfect for parties or gatherings. Everyone will love these personal-sized treats!
Storage Info
Best Practices for Storing Cake
To keep your Halloween Black Velvet Cake fresh, store it at room temperature. Place the cake in an airtight container or wrap it tightly with plastic wrap. This helps prevent it from drying out. If you use cream cheese frosting, keep it in the fridge. Just let it sit out for a bit before serving.
Freezing Instructions
You can freeze this cake for later use. First, let the cake cool completely. Wrap each layer in plastic wrap tightly. Then, place the wrapped layers in a freezer bag. Label the bag with the date. You can freeze it for up to three months. When you’re ready, thaw the cake in the fridge overnight.
How Long the Cake Stays Fresh
When stored properly, the cake stays fresh for about 3-5 days at room temperature. If kept in the fridge, it can last up to a week. If you freeze it, remember to use it within three months for the best flavor. Enjoy your spooky treat!
FAQs
Can I use regular food coloring instead of black?
Yes, you can use regular food coloring. However, the cake may not look as spooky. A mix of blue and red can create a dark hue. But it won’t give you that perfect black color. For the best results, I recommend sticking with black food coloring. It gives the cake its signature look and vibe.
How do I make the cake more moist?
To make the cake more moist, add a little extra buttermilk. You can also try using cake flour instead of all-purpose flour. Another tip is to ensure you do not overmix the batter. Mixing just until combined keeps the cake light and fluffy. Adding a simple syrup after baking can also help with moisture.
What are some pairing suggestions for this cake?
This cake pairs well with cream cheese frosting. The tanginess balances the sweetness. You can also top it with vanilla ice cream for a fun twist. Dark chocolate ganache is another great choice for a richer flavor. For drinks, a spiced cider or hot cocoa works well too.
Can I make this cake in advance?
Yes, you can make this cake in advance. Bake the cake, then let it cool completely. Wrap it tightly in plastic wrap. Store it in the fridge for up to three days. You can also freeze the cakes for up to a month. Just thaw them in the fridge before frosting.
Are there gluten-free options for this recipe?
Definitely! You can use a gluten-free flour blend. Just make sure it is a 1:1 blend for best results. You might need to add a bit of xanthan gum for better texture. Always check the labels of your ingredients to ensure they are gluten-free.
This blog post covered everything you need to create a spooky black velvet cake. You learned about key ingredients and useful substitutions. I shared step-by-step instructions for baking and cooling. We explored tips for perfecting texture and adding festive décor. You also discovered flavor variations and storage tips to keep your cake fresh.
Remember, baking should be fun! Experiment and make this cake your own. Enjoy every bit