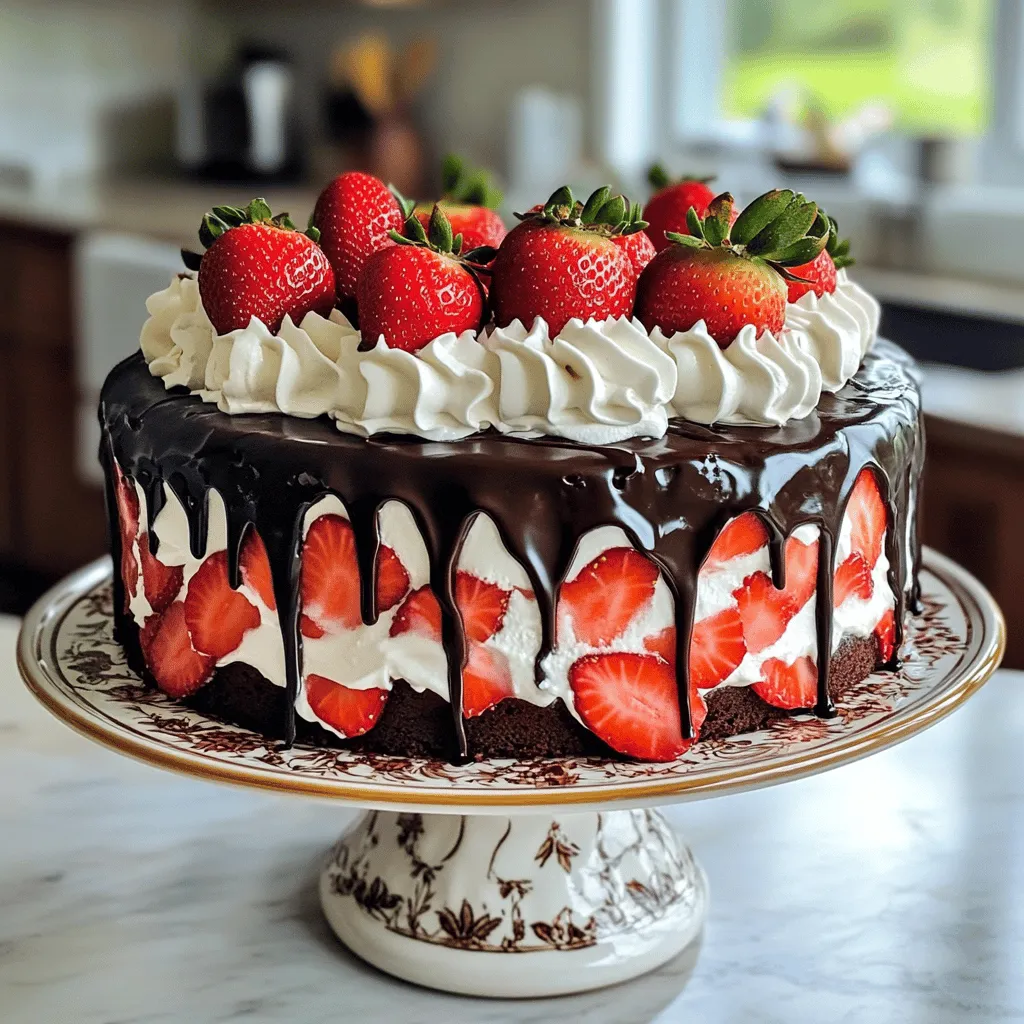
If you’re looking for a show-stopping dessert, you’ve found it! This Chocolate Covered Strawberry Cake is rich, decadent, and bursting with flavor. Layers of moist chocolate cake combine perfectly with fresh strawberries and silky ganache. Whether it’s for a special occasion or a sweet treat, this cake will impress anyone. Let me guide you through the easy steps to create this delightful dessert that will have everyone coming back for seconds!
Ingredients
Dry Ingredients
– 1 ½ cups all-purpose flour
– 1 cup granulated sugar
– ½ cup unsweetened cocoa powder
– 1 ½ teaspoons baking powder
– ½ teaspoon baking soda
– ½ teaspoon salt
Wet Ingredients
– 2 large eggs
– ½ cup whole milk
– ½ cup vegetable oil
– 2 teaspoons vanilla extract
Additional Ingredients
– 1 cup boiling water
– 1 cup fresh strawberries, hulled and sliced
– 1 cup heavy cream
– 8 ounces semi-sweet chocolate, chopped
– 2 tablespoons powdered sugar
– Fresh strawberries for topping
To make the best Chocolate Covered Strawberry Cake, you need the right mix of ingredients. The dry ingredients form the base of the cake. First, gather your flour, sugar, cocoa powder, baking powder, baking soda, and salt. Each plays a key role in taste and texture.
Next, we have the wet ingredients. You will use eggs, milk, vegetable oil, and vanilla extract. These ingredients help bind everything and add moisture.
Finally, we add some fun with additional ingredients. Boiling water brings out the rich cocoa flavor. Fresh strawberries are a must for that fruity touch. The heavy cream and semi-sweet chocolate come together to form a decadent ganache. Lastly, we finish with powdered sugar and more strawberries for a lovely topping.
Having these ingredients ready makes the baking process smooth and enjoyable.
Step-by-Step Instructions
Preparing the Cake
1. Preheat your oven to 350°F (175°C). Grease and flour a 9-inch cake pan. You can also use parchment paper.
2. In a large bowl, mix together:
– 1 ½ cups all-purpose flour
– 1 cup granulated sugar
– ½ cup unsweetened cocoa powder
– 1 ½ teaspoons baking powder
– ½ teaspoon baking soda
– ½ teaspoon salt
3. Next, add the wet ingredients. Include:
– 2 large eggs
– ½ cup whole milk
– ½ cup vegetable oil
– 2 teaspoons vanilla extract
Beat this mixture on medium speed for 2 minutes until smooth.
4. Carefully stir in:
– 1 cup boiling water
This will make your batter thin, but that’s okay!
Baking the Cake
1. Now, pour the batter into your prepared pan.
2. Bake it for 30-35 minutes. Check doneness by inserting a toothpick in the center. If it comes out clean, your cake is done!
Cooling and Layering
1. Let the cake cool in the pan for 10 minutes. Then, transfer it to a wire rack to cool completely.
2. Once cooled, slice the cake into two equal layers horizontally. Place the bottom layer on a serving plate.
3. Spread a layer of sliced strawberries over the bottom layer. Then, add a layer of chocolate ganache.
4. Place the second layer on top. Pour the remaining ganache over the cake, letting it drizzle down the sides. Use a spatula to smooth it out if needed.
Now, you have a rich and decadent Chocolate Covered Strawberry Cake ready to impress!
Tips & Tricks
Baking Perfect Cake Layers
Measuring ingredients is key for a great cake. Use dry measuring cups for flour and sugar. For liquids, use a clear liquid measuring cup. This helps ensure your cake turns out just right.
To keep your cake moist, do not overmix the batter. Mix just until combined. Also, using boiling water in the batter adds moisture. This step is crucial for a rich texture.
Making Smooth Ganache
To melt chocolate, use low heat. This helps avoid burning. Stir the chocolate slowly as it melts. You want it smooth and glossy.
Once melted, let the ganache cool slightly. This helps it thicken. If it’s too hot, it may run off the cake. A good consistency is thick but pourable.
Decoration Techniques
When garnishing with strawberries, cut them into thin slices. You can arrange them in a circle on top. This adds a pop of color and looks fancy.
For whipped cream, use a chilled bowl and beaters. This helps the cream whip up nicely. Pipe it around the edges for a pretty finish. You can also spread it on top for a fluffy look.
Variations
Flavor Enhancements
You can boost the flavor of your Chocolate Covered Strawberry Cake in fun ways. Try adding different extracts. Almond or orange extract adds a unique twist. A hint of almond gives a sweet and nutty flavor. Orange extract brightens the cake with a citrus touch.
You can also mix in nuts or other fruits. Chopped walnuts or pecans add crunch. Diced bananas or blueberries can give a fruity surprise. Experimenting with flavors lets you create a cake just for you.
Dietary Adjustments
If you need gluten-free options, you can swap the flour. Use a gluten-free blend that measures cup for cup. This keeps the texture light and fluffy. You can also check labels to ensure no gluten sneaks in.
For a vegan cake, replace eggs with flax eggs. Mix one tablespoon of ground flaxseed with three tablespoons of water. Let it sit until thick. Use plant-based milk and oil instead of dairy. This way, everyone can enjoy a slice of your cake.
Presentation Styles
You can get creative with how you present your cake. A multi-layer cake looks stunning. Stack more layers for height, and add more strawberries and ganache between each layer. This makes each slice a showstopper.
Miniature versions are also a hit. Bake the batter in cupcake liners for easy serving. These little treats are cute and perfect for parties. You can also decorate them just like the big cake. The choices are endless!
Storage Info
Short-term Storage
To keep your Chocolate Covered Strawberry Cake fresh, let it cool completely. Wrap any leftovers tightly in plastic wrap. This keeps moisture in and prevents the cake from drying out. Use an airtight container for best results. Store it in the fridge for up to three days.
Long-term Storage
If you want to save the cake for later, you can freeze it. Slice the cake into portions and wrap each piece in plastic wrap. Place the wrapped slices in a freezer bag or container. The cake can last for up to three months in the freezer. When you’re ready to enjoy it, thaw it in the fridge overnight. Serve it cold or at room temperature for the best taste.
Shelf Life
Your cake stays fresh in the fridge for about three days. If frozen, it remains safe to eat for up to three months. Always check for signs of spoilage, like off smells or changes in texture, before serving. Enjoy your delicious cake while it’s at its best!
FAQs
Can I make Chocolate Covered Strawberry Cake ahead of time?
Yes, you can make this cake ahead of time. Bake and cool the cake a day before. Store it in the fridge to keep it fresh. This allows the flavors to blend. Just add the ganache and strawberries before serving.
What type of chocolate is best for ganache?
I recommend using semi-sweet chocolate for the ganache. It gives a rich taste without being too sweet. You can also use dark chocolate if you prefer a stronger flavor. Just chop it finely for even melting.
How can I prevent my cake from collapsing?
To prevent collapsing, measure your ingredients carefully. Make sure to bake the cake fully. A toothpick should come out clean when it’s done. Let the cake cool completely before slicing. This helps keep it stable.
Can I use frozen strawberries instead of fresh?
You can use frozen strawberries, but fresh is best. Frozen strawberries can add extra moisture. This might make your cake soggy. If using frozen, thaw and drain them well before adding to the cake.
What should I serve with Chocolate Covered Strawberry Cake?
This cake pairs well with coffee or tea. You can also serve it with whipped cream or vanilla ice cream. Fresh mint leaves add a nice touch too. They bring out the flavors of the cake.
You now have the tools to create a delicious Chocolate Covered Strawberry Cake. We covered all the key ingredients, steps for baking, and tips for perfecting the recipe. Remember to adjust for dietary needs and store your cake properly for the best taste. With a little practice, you can impress anyone with this treat. Enjoy experimenting with flavors and techniques to make it your own. Happy baking!