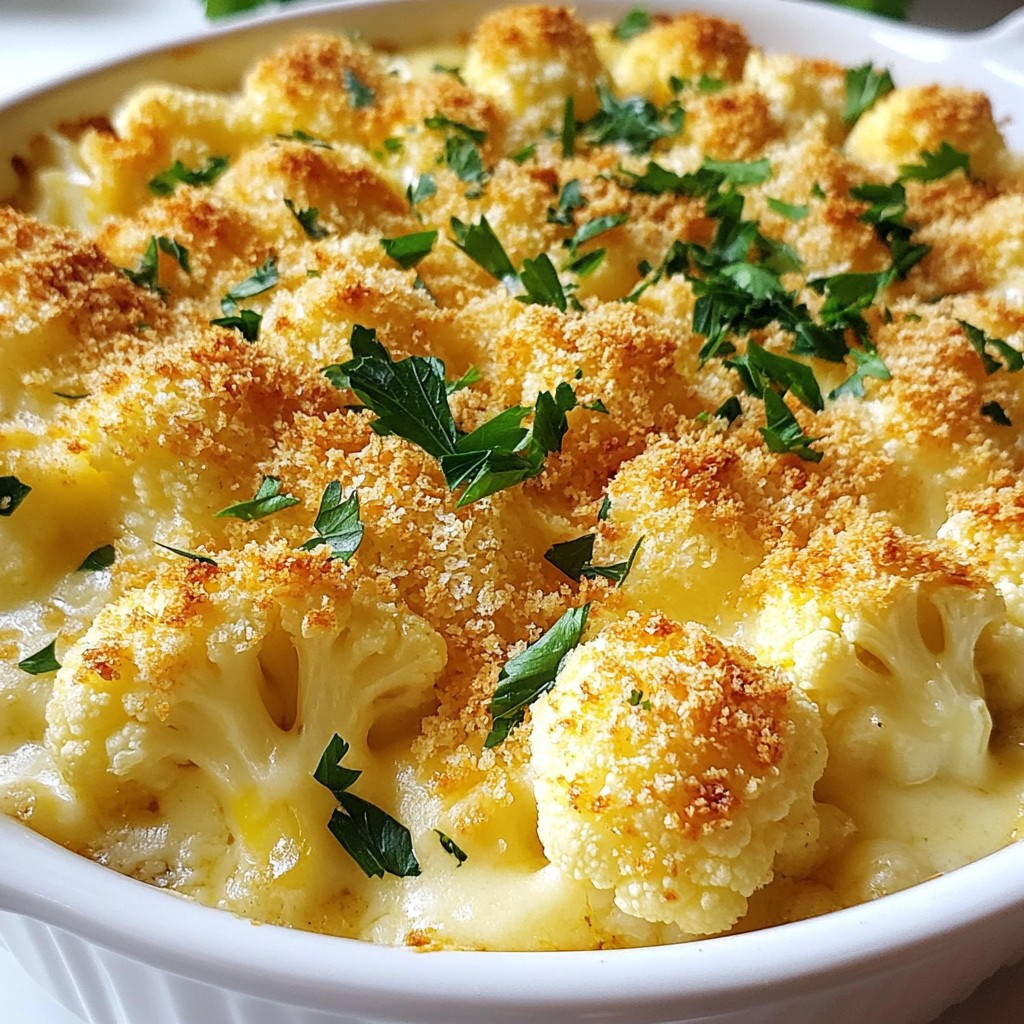
If you're looking for a simple and tasty dish, look no further! Cheesy Cauliflower Au Gratin is your answer. This creamy delight captures the rich flavors of cheese while keeping things light with fresh cauliflower. Whether you want a comforting side or a main dish, this recipe has it all. Join me as we dive into the ingredients, step-by-step instructions, and expert tips to make this dish a hit at your next meal!
Why I Love This Recipe
- Comforting Flavor: This Cheesy Cauliflower Au Gratin is the perfect blend of creamy cheese and tender cauliflower, making it an ultimate comfort food.
- Easy to Make: With simple ingredients and straightforward steps, this recipe is accessible for cooks of all skill levels.
- Great for Sharing: This dish serves 6, making it an ideal choice for family dinners or gatherings with friends.
- Customizable: Feel free to add your favorite spices or vegetables to make this recipe your own!
Ingredients
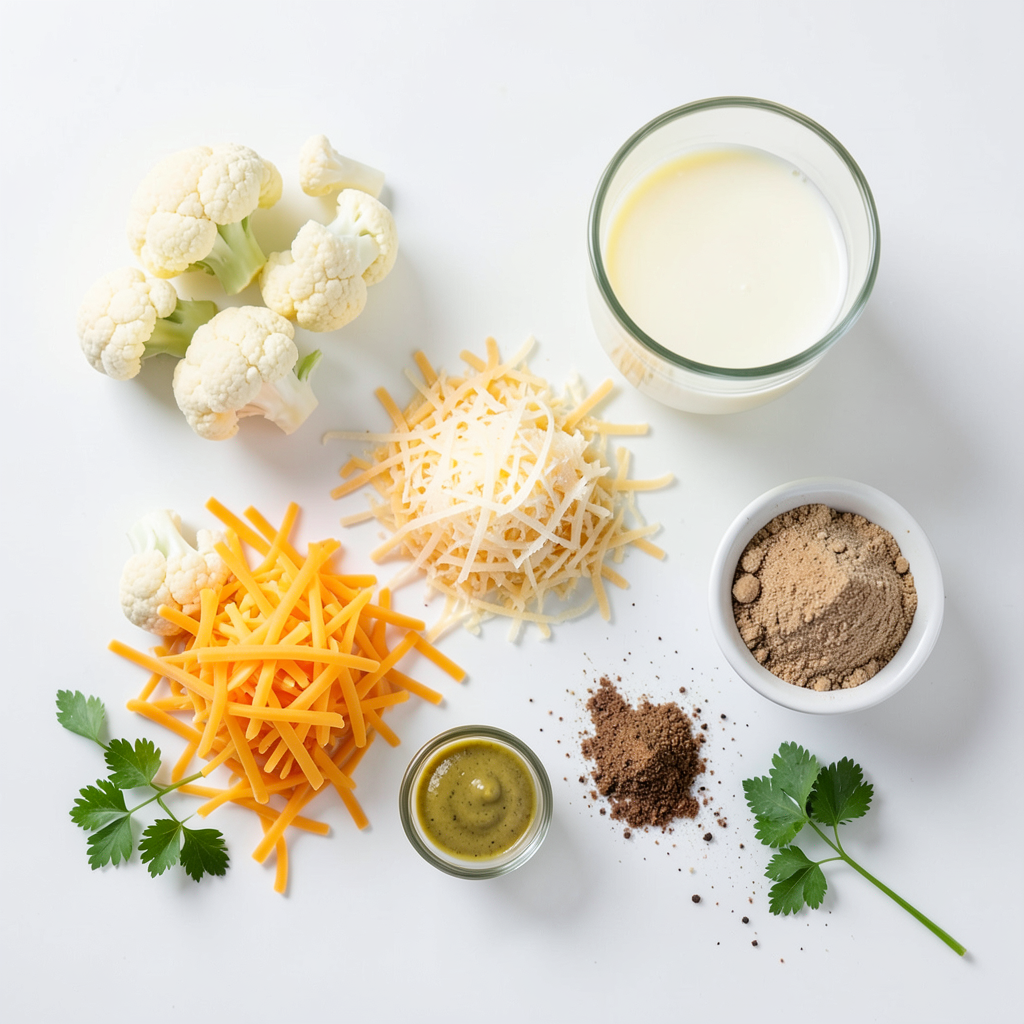
List of Ingredients
- 1 large head of cauliflower, cut into florets
- 2 cups shredded sharp cheddar cheese
- 1 cup grated Parmesan cheese
- 2 cups whole milk
- 1/4 cup unsalted butter
- 1/4 cup all-purpose flour
- 3 cloves garlic, minced
- 1 teaspoon Dijon mustard
- 1/2 teaspoon nutmeg
- Salt and pepper to taste
- 1/2 cup breadcrumbs (optional, for topping)
- Fresh parsley, chopped (for garnish)
Nutritional Information
This dish serves six people. Each serving has about:
- Calories: 360
- Protein: 20g
- Carbohydrates: 18g
- Fat: 25g
- Fiber: 2g
This recipe offers a tasty way to enjoy vegetables while getting protein from cheese and milk.
Potential Substitutions
If you want to change things up, here are some good swaps:
- Use low-fat milk instead of whole milk for a lighter option.
- Swap sharp cheddar for mild cheddar if you prefer a milder taste.
- For a gluten-free version, use gluten-free flour or omit the flour.
- Add other vegetables like broccoli or spinach for extra nutrition.
These substitutions keep the dish delicious while fitting your needs.
Step-by-Step Instructions
Preparation Steps
Start by preheating your oven to 375°F (190°C). Grease a 9x13-inch baking dish. Next, bring a large pot of salted water to a boil. Cut your large head of cauliflower into florets. Once the water boils, add the florets. Cook them for about 5 minutes until they are just tender. Drain the cauliflower and set it aside.
Cooking Techniques
In a separate saucepan, melt 1/4 cup of unsalted butter over medium heat. Add 3 cloves of minced garlic and sauté for 1 to 2 minutes. The garlic should smell nice but not brown. Now, stir in 1/4 cup of all-purpose flour. Whisk it constantly for about 1 minute until it looks like a roux. Gradually pour in 2 cups of whole milk while whisking. This helps avoid lumps. Cook this mixture until it thickens and bubbles, which takes about 5 minutes.
Once thick, remove the saucepan from heat. Stir in 1 teaspoon of Dijon mustard, 1/2 teaspoon of nutmeg, and salt and pepper to taste. Add 1 cup of shredded sharp cheddar cheese and 1 cup of grated Parmesan cheese. Stir until the cheese melts and the sauce is smooth.
Baking Instructions
In the greased baking dish, combine the cooked cauliflower florets with the cheese sauce. Mix gently to coat all the florets. Sprinkle the remaining 1 cup of cheddar cheese over the top. If you like a crunchy topping, you can add 1/2 cup of breadcrumbs. Bake the dish in the preheated oven for about 25 to 30 minutes. It should be golden brown and bubbly when done. Once out of the oven, let it cool slightly. Garnish with chopped parsley before you serve it warm.
Tips & Tricks
Perfecting the Cheese Sauce
To make the best cheese sauce, start with a roux. Cook equal parts butter and flour. Whisk them together until smooth. This step helps thicken your sauce. After adding milk, whisk constantly to avoid lumps. Let it cook until it thickens. Then, add your cheeses. Sharp cheddar gives a bold taste. Parmesan adds depth. Stir until melted and smooth. Don’t forget salt and pepper for flavor. A pinch of nutmeg enhances the cheese taste too.
Choosing Cauliflower
Choose a fresh, large head of cauliflower. Look for bright white florets. Avoid any brown spots or soft spots. It's key to cut them into even florets. This ensures they cook evenly. You can also steam the florets instead of boiling them if you prefer. This method helps retain more nutrients.
Ensuring a Crispy Topping
To achieve a crispy topping, sprinkle breadcrumbs on your dish before baking. Use fresh breadcrumbs for the best texture. For extra flavor, mix breadcrumbs with melted butter and herbs. This adds a nice crunch and taste. Bake until golden brown and bubbly. Keep an eye on it to avoid burning. Let it cool slightly before serving to let the cheese set.
Pro Tips
- Use Fresh Cauliflower: Ensure your cauliflower is fresh and firm for the best texture and flavor in your au gratin.
- Experiment with Cheeses: Feel free to mix different cheeses like Gruyère or Fontina for a unique flavor profile.
- Add More Veggies: Incorporate other vegetables like broccoli or spinach for added nutrition and variety.
- Let It Rest: Allow the dish to cool for a few minutes before serving to let the cheese sauce set, making it easier to serve.
Variations
Adding Different Cheeses
You can change the flavor of your Cheesy Cauliflower Au Gratin by using various cheeses. Try using gouda for a smoky twist. A blend of mozzarella adds stretchiness. Cream cheese brings creaminess and richness. You can mix and match to find your favorite combo!
Incorporating Additional Vegetables
Boost the nutrition and color with other veggies. Broccoli florets add a nice crunch. Carrots can bring sweetness and bright color. You can also add spinach for a pop of green. Just make sure to cook any extra veggies, so they blend well with the cauliflower.
Spicy or Herb Variations
Want a kick? Add some red pepper flakes or jalapeños for heat. Fresh herbs like thyme or rosemary can add great flavor. You can even use a sprinkle of smoked paprika for depth. Adjust the spice to match your taste, and enjoy!
Storage Info
How to Store Leftovers
To store leftovers, let the dish cool. Once cool, cover it tightly with plastic wrap or foil. You can also place it in an airtight container. Make sure to keep it in the fridge. Leftovers will stay fresh for up to four days.
Reheating Tips
When reheating, I recommend using the oven. Preheat your oven to 350°F (175°C). Place the dish in the oven for about 15-20 minutes. This helps to heat it evenly and keep the cheese nice and melty. You can also use the microwave, but the texture may change. Heat in short bursts, stirring in between, to avoid hot spots.
Freezing Instructions
If you want to freeze it, use a freezer-safe container. Be sure to cool the dish completely first. You can freeze Cheesy Cauliflower Au Gratin for up to three months. When you’re ready to eat, let it thaw in the fridge overnight. Then, reheat it in the oven for the best taste and texture.
FAQs
Can I make Cheesy Cauliflower Au Gratin ahead of time?
Yes, you can make Cheesy Cauliflower Au Gratin ahead of time. Prepare the dish up to the baking step. Cover it and store it in the fridge for up to two days. When ready to bake, let it sit at room temp for about 30 minutes. Then, bake as directed until hot and bubbly.
What can I serve with this dish?
This dish pairs well with many foods. You can serve it as a side with meat, like roast chicken or steak. It also works well with a fresh salad or crusty bread. For a complete meal, add a protein like grilled fish or tofu. You can also serve it with other veggies for balance.
Is it possible to make this recipe gluten-free?
Yes, you can easily make this recipe gluten-free. Simply replace the all-purpose flour with a gluten-free flour blend. You can also skip the breadcrumbs or use gluten-free breadcrumbs for a crispy topping. The rest of the ingredients are naturally gluten-free, so you can enjoy this dish worry-free.
This article covered everything you need to make Cheesy Cauliflower Au Gratin. We discussed key ingredients, nutritional facts, and useful substitutions. I shared step-by-step prep and cooking steps to guide your cooking. You learned how to perfect the cheese sauce and achieve that crispy topping. Variations let you customize the dish with different cheeses and veggies. Lastly, I included smart storage tips and answers to common questions. Enjoy making this dish, knowing you can adapt it to fit your taste!