Looking for a fun and easy treat? I’ve got just the thing: Caramel Apple Cheesecake Dip! This sweet and creamy dip mixes the rich flavors of cheesecake with the freshness of apples and the sweetness of caramel. Perfect for parties, movie nights, or just a tasty snack, you'll love how simple it is to make. Let's dive into the ingredients and start creating this mouthwatering dip together!
Why I Love This Recipe
- Easy to Prepare: This caramel apple cheesecake dip is simple to make, requiring only 15 minutes of prep time. Perfect for last-minute gatherings!
- Delicious Flavor Combination: The mix of tart and sweet apples, creamy cheesecake, and rich caramel creates a delightful flavor profile that everyone loves.
- Versatile Serving Options: This dip pairs well with apple slices and graham crackers, making it a versatile treat for various occasions.
- Great for Sharing: With servings for 6-8, it's a perfect addition to parties, potlucks, or family gatherings, encouraging everyone to dig in and enjoy!
Ingredients
List of Ingredients
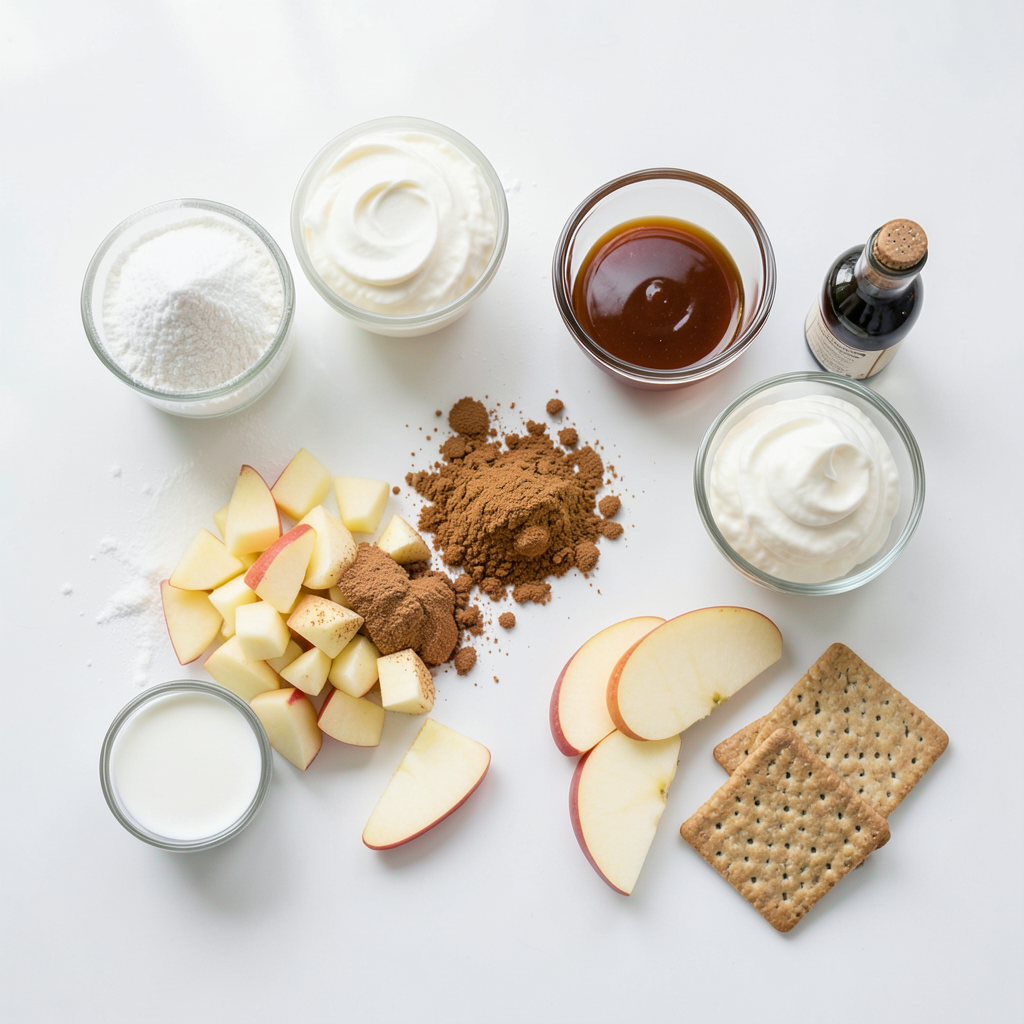
To make this tasty caramel apple cheesecake dip, you will need:
- 8 oz cream cheese, softened
- 1/2 cup powdered sugar
- 1/2 teaspoon vanilla extract
- 1/2 cup caramel sauce (store-bought or homemade)
- 1 cup apples, finely chopped
- 1/2 teaspoon cinnamon
- 1/2 cup whipped cream (optional for topping)
- Apple slices and graham crackers for serving
Each ingredient plays a key role. The cream cheese gives it that rich base. The powdered sugar adds sweetness, while the vanilla brings warmth. Caramel sauce adds a sweet, sticky layer on top. The chopped apples give a nice crunch and freshness. Cinnamon enhances the flavor and makes it cozy.
Optional Ingredients for Topping
You can make your dip even better with these toppings:
- Whipped cream for fluffiness
- Extra caramel drizzle for more sweetness
- Chopped nuts for a nice crunch
- A sprinkle of cinnamon for extra flavor
These toppings add fun and flavor. You can mix and match based on what you like.
Suggestion for Apple Varieties
For the best taste, use a mix of apples. I recommend:
- Granny Smith for tartness
- Honeycrisp for sweetness
- Fuji for a juicy bite
Using a mix of apples makes your dip more exciting. Each type brings its own flavor, making every bite delicious!
Step-by-Step Instructions
Preparation Method
Start by gathering all your ingredients. You need 8 oz of softened cream cheese. Make sure it's soft to mix well. Next, get 1/2 cup of powdered sugar. This will add sweetness. You will also need 1/2 teaspoon of vanilla extract for flavor. Don't forget about 1 cup of finely chopped apples. Choose a mix of tart and sweet apples for balance. Next, grab 1/2 teaspoon of cinnamon. This spice will give warmth to the dip. Lastly, you can have 1/2 cup of whipped cream if you want to add fluff.
Mixing and Combining Ingredients
In a medium bowl, beat the softened cream cheese with an electric mixer. Mix until it’s smooth and creamy. Slowly add in the powdered sugar while mixing. Keep going until the mix is fluffy. Now, stir in the vanilla extract. Make sure it is fully blended in. Next, gently fold in the chopped apples and cinnamon. Mix until everything is evenly combined.
Serving Tips
Once your dip is ready, transfer it to a nice serving dish. Create a small well in the center of the dip. Pour caramel sauce into the well. Watch it cascade around the dip. For extra fluffiness, top with whipped cream if you are using it. Serve the dip with apple slices and graham crackers. To make it look great, use a small bowl in the center of a large platter. Surround it with apple slices and graham crackers. Drizzle extra caramel on top for a beautiful finish.
Tips & Tricks
How to Soften Cream Cheese Quickly
To soften cream cheese fast, cut it into small cubes. Place the cubes in a microwave-safe bowl. Heat it in the microwave for about 10 to 15 seconds. Check if it’s soft. If not, heat for a few more seconds. Be careful not to melt it. Softened cream cheese mixes better, giving your dip a smooth texture.
Perfecting the Texture
To get the best texture, beat the cream cheese well. Use an electric mixer for a fluffy feel. Gradually add the powdered sugar while mixing. This helps blend it evenly. When you fold in the apples, do it gently. This keeps the apples intact and adds a nice crunch. You want a dip that is creamy but still has bits of apple.
Enhancing Flavor with Additional Spices
Spices can take your dip to the next level. Besides cinnamon, try adding a pinch of nutmeg for warmth. You can also add a bit of ginger for a spicy kick. If you want more sweetness, mix in some brown sugar. Always taste as you go to find your perfect balance.
Pro Tips
- Choose Your Apples Wisely: For the best flavor, use a mix of tart Granny Smith apples and sweet Fuji or Honeycrisp apples to create a balanced taste.
- Make It Ahead: Prepare the dip a few hours in advance and refrigerate it. This allows the flavors to meld together beautifully.
- Customization Options: Feel free to add chopped nuts or toffee bits for an additional crunch and flavor dimension to your dip.
- Serving Suggestions: Besides apple slices and graham crackers, consider serving with pretzel sticks or mini cookies for a fun dipping experience.
Variations
Different Sweeteners
You can switch up the sweetener in this dip. Try honey or maple syrup for a twist. Both add a unique flavor. For a lower-calorie option, use a sugar substitute like Stevia. Adjust the amount to your taste. Each sweetener brings its own charm.
Alternative Dipping Options
Apple slices and graham crackers are great, but don’t stop there! Try vanilla wafers or pretzels for a fun crunch. You can also use fruit skewers with strawberries or bananas. Fresh veggies, like carrot sticks, can add a surprising twist too. Experimenting keeps it exciting!
Seasonal Fruit Additions
Seasonal fruits take this dip to new heights. In fall, add pears or figs for extra flavor. In summer, try berries for a fresh twist. You could even mix in pomegranate seeds for a pop of color. Each fruit complements the caramel and cream cheese well.
Storage Info
Storing Leftovers
After enjoying your caramel apple cheesecake dip, store any leftovers in an airtight container. This helps keep it fresh. Place the container in the fridge. The dip will stay good for about three days. Before serving again, check the taste and texture. If it seems too thick, mix in a bit of cream or milk.
Freezing and Thawing Tips
You can freeze this dip if you have a lot left. Use a freezer-safe container. Make sure to leave some space at the top. The dip may expand when frozen. When ready to eat, thaw it in the fridge overnight. After thawing, stir the dip well. It may need a splash of cream for smoothness.
Best Practices for Serving After Storage
When serving leftovers, check for freshness first. If the dip looks good, serve it chilled or at room temperature. You can add a drizzle of caramel sauce on top for a fresh touch. Pair it again with apple slices and graham crackers for a fun snack. Enjoy it just like the first time!
FAQs
How long can I store caramel apple cheesecake dip?
You can store caramel apple cheesecake dip for up to three days. Keep it in an airtight container in the fridge. This helps keep it fresh and tasty. If you see any change in color or smell, it’s best to toss it.
Can I make this dip ahead of time?
Yes, you can make this dip a day in advance. Just mix everything, but add the caramel sauce right before serving. This keeps the dip creamy and delicious. It also saves you time on the day of your event.
What can I use instead of cream cheese?
If you need a substitute for cream cheese, try Greek yogurt. It gives a similar texture and tangy flavor. Cottage cheese is another option; just blend it until smooth. You can also use vegan cream cheese for a dairy-free dip.
You now know how to make a great caramel apple cheesecake dip. We covered the key ingredients, easy steps, and helpful tips to perfect it. Don’t forget about variation ideas to keep it fresh and fun. Proper storage will keep your dip tasty for later. With these insights, you'll impress friends and family with this treat. Enjoy every bite and share this recipe for smiles all around!