FREE DINNER EBOOK! Get your copy!
  • Cookie Policy
  • GDPR Policy
  • Disclaimer
  • Terms Of Use
  • Visit my other site: Fun Cookie Recipes
meal twig
  • Home
  • Dinner
  • Desserts
  • Drinks
  • Appetizers
  • Contact
  • About
  • Privacy Policy
  • Home
  • Dinner
  • Desserts
  • Drinks
  • Appetizers
  • Contact
  • About
  • Privacy Policy
  • Cookie Policy
  • GDPR Policy
  • Disclaimer
  • Terms Of Use
Visit my other site: Fun Cookie Recipes

HOME / CATEGORIES /

Latest

To make a great stuffed Italian meatloaf, you'll need: - 1 lb ground beef - 1 lb ground pork - 1 cup breadcrumbs - 1/2 cup grated Parmesan cheese - 1/4 cup fresh parsley, chopped - 2 cloves garlic, minced - 1 tsp dried oregano - 1 tsp dried basil - 2 large eggs, beaten - 1/2 cup marinara sauce (plus extra for topping) - 1 cup mozzarella cheese, shredded - Salt and pepper to taste These ingredients work well together. The mix of beef and pork gives it a rich flavor. The breadcrumbs help bind everything. The cheeses add creaminess and depth. You can customize your meatloaf with extra ingredients. Here are some ideas: - Chopped bell peppers for crunch - Spinach for color and nutrition - Sliced olives for a salty kick - Red pepper flakes for heat These add-ins can make your meatloaf unique. Feel free to mix and match based on your taste. Having the right tools can make cooking easier. For this recipe, you should have: - A large mixing bowl for combining the meat - A lined baking sheet for shaping the meatloaf - A spatula for mixing - A meat thermometer to ensure it’s cooked right These tools help you create the best stuffed Italian meatloaf. They make the process smooth and fun! {{ingredient_image_1}} To start, preheat your oven to 350°F (175°C). Grab a large bowl and add 1 lb of ground beef and 1 lb of ground pork. These meats blend well, giving your meatloaf great flavor. Next, toss in 1 cup of breadcrumbs and 1/2 cup of grated Parmesan cheese. The breadcrumbs keep your meatloaf moist. Add 1/4 cup of chopped fresh parsley for freshness. Then, mix in 2 cloves of minced garlic for aroma. Add 1 teaspoon of dried oregano and 1 teaspoon of dried basil for Italian flair. Don’t forget to season with salt and pepper to taste. Finally, add 2 large beaten eggs and 1/2 cup of marinara sauce. Mix everything until it’s well combined. Now, take the meat mixture and shape it on a lined baking sheet. Form it into a rectangle, about 1 inch thick. In the center, create a well for the filling. Here comes the fun part: layer 1 cup of shredded mozzarella cheese evenly in the well. Carefully fold the sides of the meatloaf over the cheese. Make sure to seal it well so the cheese stays inside. Shape the meatloaf to ensure it looks nice. Once sealed, spread a layer of marinara sauce over the top. This adds a tasty touch and keeps it moist. Place the meatloaf in the preheated oven. Bake for 45 to 50 minutes. Use a meat thermometer to check. The internal temperature should reach 160°F (70°C). Once done, take it out and let it rest for 10 minutes. This helps the cheese settle and makes cutting easier. For serving, slice the meatloaf and present it on a platter. Garnish with fresh basil leaves and serve with extra marinara sauce for dipping. A sprinkle of grated Parmesan cheese on top adds a nice finishing touch! To get that perfect texture, combine the ground beef and pork well. Mixing these meats adds depth. Use breadcrumbs to bind the mixture. They help hold everything together. Be sure to avoid over-mixing; this can make the meatloaf tough. Aim for a smooth, even consistency. Resting the meatloaf after baking is key too. Letting it sit for ten minutes allows juices to settle. For more flavor, use fresh herbs like parsley. They add brightness to the dish. Don't skip the garlic; it gives a nice kick. Incorporate marinara sauce into the meat mixture. This adds moisture and taste. Topping the meatloaf with marinara is a great idea. It keeps the meatloaf juicy and flavorful. Remember to season with salt and pepper generously. A well-seasoned meatloaf makes a big difference. One big mistake is not sealing the meatloaf well. If you leave gaps, the cheese may leak out. Another error is skipping the resting time. Cutting too early can result in a dry meatloaf. Don’t forget to check the internal temperature. It should reach 160°F (70°C) for safety. Lastly, avoid using too much cheese inside. It can overwhelm the other flavors. Keep it balanced for the best taste. Pro Tips Resting Time: Let the meatloaf rest for 10 minutes after baking. This allows the juices to redistribute, making each slice tender and flavorful. Cheese Variations: Experiment with different cheeses like provolone or fontina for a unique flavor. Mixing cheeses can enhance the richness of the filling. Herb Freshness: Use fresh herbs instead of dried for a burst of flavor. Fresh parsley, basil, or oregano can elevate the taste profile of the meatloaf. Meat Mixture: Mixing ground beef with ground pork adds moisture and flavor. You can also try adding ground turkey or chicken for a lighter version. {{image_2}} You can use many types of cheese in stuffed Italian meatloaf. Mozzarella is a favorite for its meltiness. But you can try provolone or fontina for a sharper taste. Cheddar adds a nice twist, too. For a creamy touch, consider using ricotta. Mixing two or more cheeses can create a fun flavor blend. Just remember, the cheese should melt well for the best results. While beef and pork make a great base, you can mix things up. Ground turkey or chicken is leaner but still tasty. If you like lamb, it adds a rich flavor. You can even use a mix of meats for more depth. Just keep the same ratios to maintain texture. Each meat brings its own unique taste to the dish. For gluten-free meatloaf, swap breadcrumbs for gluten-free options. You can use crushed cornflakes or ground oats. Almond flour works well for low-carb diets. It helps bind the meat without adding carbs. You can also add grated vegetables like zucchini for moisture. These swaps keep the meatloaf delicious while catering to dietary needs. To keep leftover meatloaf fresh, let it cool first. Then, wrap it tightly in plastic wrap or aluminum foil. You can also place it in an airtight container. Store it in the fridge for up to four days. This way, it remains moist and flavorful for your next meal. If you want to save some for later, freezing is a great option. Slice the meatloaf into portions. Wrap each slice in plastic wrap, then place them in a freezer bag. Make sure to squeeze out as much air as possible. You can freeze it for up to three months. When you’re ready to enjoy it, simply thaw it in the fridge overnight. To reheat, you can use the oven or microwave. For the oven, preheat it to 350°F (175°C). Place the meatloaf slices in a baking dish, cover with foil, and heat for about 20 minutes. In the microwave, place a slice on a plate and cover it with a damp paper towel. Heat in 30-second intervals until warm. Enjoy it with extra marinara sauce for added flavor! Yes, you can prepare stuffed Italian meatloaf ahead of time. Mix the meat and stuff it. Shape the meatloaf and wrap it in plastic. Store it in the fridge for up to 24 hours. This makes it easy to bake when you are ready. The meatloaf should be cooked to an internal temperature of 160°F (70°C). This ensures the meat is safe to eat. Use a meat thermometer to check the temperature in the center. You know the meatloaf is done when it reaches 160°F (70°C). The meatloaf should be firm and not jiggly. If you cut into it, the juices should run clear and not pink. Yes, you can make mini stuffed meatloaves! Use the same recipe, but shape smaller portions. Bake them for about 25-30 minutes. This is a fun way to serve individual portions. Stuffed meatloaf pairs well with many sides. Consider mashed potatoes, green beans, or a fresh salad. Garlic bread or roasted veggies also make great choices. These sides complement the rich flavors of the meatloaf well. You now know how to make a delicious stuffed Italian meatloaf. We covered all the key ingredients, step-by-step instructions, and helpful tips. You can customize it with different meats and cheeses to fit your taste. Remember to store leftovers properly to keep them fresh. With these simple methods, you'll impress everyone at dinner. Have fun experimenting with flavors and enjoy your tasty creation!

Stuffed Italian Meatloaf Flavorful and Hearty Dish

To make a tasty Blackstone Cowboy Stir Fry, gather these key items: - 1 lb flank steak, thinly sliced - 2 cups bell peppers (red, green, and yellow), sliced - 1 medium onion, sliced - 2 cups fresh snap peas - 3 cloves garlic, minced - 1 inch ginger, grated - 1/4 cup soy sauce - 2 tablespoons hoisin sauce - 1 tablespoon sesame oil - 1 tablespoon vegetable oil - 1 teaspoon black pepper These ingredients create a great mix of flavors and textures. The flank steak gives you a nice bite, while the veggies add crunch. You can add more to your stir fry for extra flavor. Here are some ideas: - Mushrooms, sliced - Carrots, julienned - Broccoli florets - Zucchini, sliced - Red pepper flakes, for heat These add-ins let you customize the dish to your taste. Feel free to mix and match! Garnishes make your dish look and taste better. Here are some tasty options: - 1/4 cup green onions, chopped - Sesame seeds Sprinkling these on top adds color and flavor. They also give your stir fry a gourmet touch that will impress anyone you serve it to! {{ingredient_image_1}} Start with 1 pound of flank steak. Slice it thinly for quick cooking. In a medium bowl, mix the steak with soy sauce, hoisin sauce, black pepper, and minced garlic. Let it marinate for at least 15 minutes. This step boosts the flavor and tenderizes the meat. You can marinate longer if you want an even richer taste. Next, heat your Blackstone griddle over medium-high heat. Add 1 tablespoon of vegetable oil to the griddle. Ensure the oil coats the surface well. Once the oil is hot, place the marinated steak on the griddle. Stir-fry for about 3 to 4 minutes. You want the steak browned and cooked to your liking. Once done, remove it from the griddle and set it aside. Now, it's time to cook the veggies. In the same griddle, add 1 tablespoon of sesame oil. Toss in 2 cups of sliced bell peppers, 1 sliced onion, and 2 cups of fresh snap peas. Stir-fry these for about 5 to 6 minutes. You want them tender-crisp, not mushy. Once the veggies are ready, return the cooked flank steak to the griddle. Add grated ginger and mix everything well. Cook for an additional 1 to 2 minutes to let the flavors blend. This combination makes every bite tasty and satisfying. To cook the steak just right, slice it thin. Thin slices cook faster. Marinate it for at least 15 minutes. This step adds great flavor. Use high heat when you cook the steak. It should take about 3-4 minutes to brown well. Keep an eye on it to avoid overcooking. You want juicy, tender bites. For crisp-tender veggies, keep the heat high. Add the bell peppers, onion, and snap peas after the steak. Stir-fry these for about 5-6 minutes. You want them bright and colorful, not mushy. A quick stir helps maintain that crunch. Freshness is key, so use fresh veggies whenever you can. The Blackstone griddle is great for this stir fry. It heats evenly and cooks fast. Use a spatula to toss the food around. This keeps everything cooking evenly. If you don’t have a griddle, a large skillet works too. Just ensure it gets hot before adding the oil. Cooking in batches can help manage the heat better, too. Pro Tips Marinate for Maximum Flavor: Letting the steak marinate longer than 15 minutes will enhance the flavor, so if time allows, consider marinating it for up to an hour. High Heat is Key: Cooking on a preheated Blackstone griddle over medium-high heat will give you a beautiful sear on the steak and keep the vegetables crisp. Fresh Ingredients Matter: Use fresh, vibrant vegetables for the best texture and flavor in your stir fry, and don’t be afraid to mix in your favorites! Garnish for Presentation: A sprinkle of sesame seeds and chopped green onions not only adds flavor but also enhances the dish’s visual appeal. {{image_2}} You can switch the flank steak for other proteins. Chicken breast works great in this dish. Just cut it thin and marinate the same way. Shrimp is another tasty option. Cook it for just a few minutes until it turns pink. If you want a plant-based meal, try using tofu. Press and cube the tofu, then marinate it. Sauté it until it gets a nice golden crust. Feel free to get creative with your veggies. Broccoli florets add a nice crunch. Zucchini slices cook quickly and soak up flavor well. Carrots bring a sweet touch when sliced thin. If you prefer leafy greens, try adding spinach or bok choy. Just toss them in at the end to keep them bright and crisp. To amp up the taste, you can add extra spices. A pinch of red pepper flakes gives heat. Try adding chili paste for a bolder kick. For a sweet twist, drizzle some honey or maple syrup. Using different sauces can also change the flavor. Teriyaki sauce will add sweetness and depth. A splash of rice vinegar can brighten up the dish too. Experiment to find your perfect mix! To keep your Blackstone Cowboy Stir Fry fresh, let it cool down. Store it in an airtight container. You can place it in the fridge for up to three days. This method keeps the flavors intact and the meat tender. If you want to enjoy it later, follow the next steps for freezing. Reheat your stir fry on the stove. Use a medium heat to warm it up. Add a splash of water to keep it moist. Stir it often to heat evenly. You can also use the microwave. Place it in a microwave-safe bowl and cover it. Heat for one to two minutes, stirring halfway through. This keeps the veggies from getting soggy. To freeze your stir fry, first cool it completely. Next, pack it in freezer-safe bags or containers. Squeeze out any extra air before sealing. You can freeze it for up to three months. When you're ready to eat, thaw it overnight in the fridge. Then, reheat it on the stove for the best taste and texture. This makes meal prep easy and fun! Blackstone Cowboy Stir Fry is a quick and tasty meal. It features thin flank steak, colorful bell peppers, and fresh snap peas. The dish gets its bold flavor from soy sauce, hoisin sauce, and garlic. You can whip it up in around 30 minutes. This meal is perfect for busy weeknights. The Blackstone griddle gives it a nice sear, adding depth to the taste. It’s a fun way to enjoy a stir fry with a cowboy twist. Yes, you can make Blackstone Cowboy Stir Fry in a regular pan. Just follow the same steps as the griddle. Heat your pan over medium-high heat and add vegetable oil. Then, cook the marinated steak for 3-4 minutes. After that, sauté the veggies until they are tender-crisp. Using a regular pan will work, but the griddle adds a nice char that you might miss. To adjust the spice level, you can add or reduce black pepper. For more heat, add red pepper flakes or sriracha sauce. If you prefer mild flavors, skip the pepper altogether. You can also change the soy sauce to a lower sodium option. Another tip is to serve it with a side of rice, which can tone down the spice. Making it just right for your taste is easy! This blog covered how to make Blackstone Cowboy Stir Fry. It shared key ingredients, from main picks to garnishes. I explained step-by-step marinating and cooking on a Blackstone griddle. Also, I offered tips for perfect steak and crisp veggies. You can switch proteins or add spices for taste. To save leftovers, I outlined storage and reheating. Try this dish for a tasty meal any night! Enjoy your cooking journey!

Blackstone Cowboy Stir Fry Perfect for Weeknight Meals

- 2 cups all-purpose flour - 1 ½ cups granulated sugar - 1 teaspoon baking powder - 1 teaspoon baking soda - 1 teaspoon ground cinnamon - ½ teaspoon salt - ½ cup unsalted butter, softened - 1 cup unsweetened applesauce - 3 large eggs - 1 teaspoon vanilla extract - 2 cups apples, peeled, cored, and diced (preferably Granny Smith or Honeycrisp) - ½ cup chopped walnuts or pecans (optional) - Powdered sugar for dusting (optional) - Chopped walnuts or pecans add crunch. - Powdered sugar helps with presentation. - You can use whole wheat flour for a healthier option. - Swap granulated sugar with brown sugar for a richer flavor. - Applesauce can be replaced with mashed bananas for a twist. - Use any baking nut you like, such as almonds or hazelnuts. - If you want a dairy-free cake, try coconut oil instead of butter. {{ingredient_image_1}} 1. Start by preheating your oven to 350°F (175°C). This step is key for even baking. 2. Next, grease and flour a 9x13 inch baking pan. You can also line it with parchment paper for easy removal. 3. In a large bowl, mix together the dry ingredients. Combine 2 cups of all-purpose flour, 1 ½ cups of granulated sugar, 1 teaspoon of baking powder, 1 teaspoon of baking soda, 1 teaspoon of ground cinnamon, and ½ teaspoon of salt. Use a whisk to blend everything well. 4. In a separate bowl, mix ½ cup of softened unsalted butter with 1 cup of unsweetened applesauce until it’s nice and smooth. 5. Add 3 large eggs and 1 teaspoon of vanilla extract to the butter mixture. Beat it all together until it’s well blended. 6. Gradually add the wet ingredients to the dry mix. Stir until just combined. Be careful not to overmix; a few lumps are okay. 7. Now, fold in 2 cups of diced apples. If you like, add ½ cup of chopped walnuts or pecans for extra crunch. The batter will be thick and chunky with apple pieces. 8. Pour the batter into the prepared pan and spread it evenly. 9. Bake in your preheated oven for 35-40 minutes. Check if it’s done by inserting a toothpick in the center. If it comes out clean, it’s ready! 10. After baking, let the cake cool in the pan for about 15 minutes. This helps it set. 11. Carefully transfer the cake to a wire rack to cool completely. 12. For a nice touch, dust the top with powdered sugar before serving. You can also add a dollop of whipped cream or a scoop of vanilla ice cream to elevate your dessert! To make your cake moist, use applesauce. It adds moisture without extra fat. Use fresh, sweet apples like Granny Smith. These apples keep their shape and add texture. Also, don’t overmix your batter. Mix just until combined. This keeps the cake light and airy. Another tip is to bake the cake at the right temperature. Too hot can dry it out. Make sure your oven is set to 350°F (175°C) for the perfect bake. Enhance your cake’s flavor with spices. Adding a bit of nutmeg or ginger can make a big difference. Use fresh vanilla extract instead of imitation. It gives a richer taste. You can also add a splash of lemon juice. This brightens the flavors and balances the sweetness. If you like nuts, try adding walnuts or pecans. They add a nice crunch and flavor. Avoid common mistakes to ensure a great cake. First, always measure your ingredients correctly. Too much flour can make the cake dense. Second, check your baking powder and soda. They should be fresh. Old leavening agents won't make your cake rise. Lastly, don’t skip the cooling step. Let the cake cool before slicing. This helps it set and stay moist. Following these tips will help you create a delicious moist cinnamon apple cake every time. Pro Tips Choose the Right Apples: For the best flavor and texture, use tart apples like Granny Smith or Honeycrisp. They hold their shape well during baking and complement the sweetness of the cake. Don't Overmix the Batter: To ensure a tender cake, mix the wet and dry ingredients until just combined. Overmixing can lead to a dense texture. Check for Doneness: Every oven is different, so start checking the cake at around 35 minutes. A toothpick should come out clean or with a few moist crumbs when the cake is done. Customize Your Add-ins: Feel free to experiment with different nuts or even add raisins or dried cranberries for extra flavor and texture. Just keep the total volume of add-ins similar to the original recipe. {{image_2}} You can easily swap some ingredients in this cake. If you want to reduce sugar, use less granulated sugar or try a sugar substitute. For a rich taste, you can use brown sugar instead. Need a dairy-free option? Substitute unsalted butter with coconut oil or a dairy-free spread. Applesauce is a great moisture booster, but you could also use pureed bananas or pumpkin if you like. Choosing the right apple makes a big difference. Granny Smith apples give a nice tartness that balances the sweetness. Honeycrisp apples are juicy and sweet, making them a favorite for this cake. You can also try Fuji or Gala apples for a sweeter flavor. Mixing different types of apples can add depth to the taste. Making this cake gluten-free is simple. Just swap all-purpose flour for a gluten-free blend. Ensure the blend is suitable for baking. To make it vegan, replace eggs with flax eggs. Mix one tablespoon of flaxseed meal with two and a half tablespoons of water for each egg. You can also use almond milk or oat milk in place of regular milk. This way, you can enjoy this cake while meeting dietary needs! After you bake your cake, let it cool completely. Once cool, cover it tightly with plastic wrap or foil. You can also place it in an airtight container. Storing it this way keeps the cake moist. It will stay fresh for about 3 to 5 days at room temperature. If you want it to last longer, consider freezing. To freeze your cake, slice it first. Wrap each slice in plastic wrap, then place the slices in a freezer bag. Be sure to remove as much air as possible. This helps prevent freezer burn. Your cake can last up to 3 months in the freezer. When you are ready to enjoy it, just take out a slice! To reheat, place the slice in the microwave for about 15 to 20 seconds. This warms it nicely without drying it out. If you prefer, you can also use an oven. Preheat the oven to 350°F (175°C). Wrap the slice in foil and heat for about 10 minutes. Enjoy it warm, and maybe add a dollop of whipped cream! To make your cake more flavorful, try adding spices. You can use nutmeg or allspice. These spices pair well with apples. You can also mix in some lemon zest for a fresh taste. Adding a splash of caramel sauce will give it a sweet twist. Using high-quality vanilla extract can improve the flavor too. Yes, you can use different types of nuts in the cake. Walnuts and pecans are great choices. If you want a crunchier texture, try almonds. You can even skip the nuts if you prefer. The cake will still taste amazing without them. Just remember to adjust the baking time if you add more ingredients. The cake stays fresh for about three days at room temperature. Keep it in an airtight container to keep it moist. You can also store it in the fridge for up to a week. If you want to keep it longer, freeze individual slices. They can last for up to three months in the freezer. Just thaw them in the fridge before serving. In this post, we covered key ingredients, step-by-step baking instructions, and tips for great results. You learned about ingredient substitutions and tricks to avoid common mistakes. We explored different variations, storage methods, and answered your burning questions. Baking can be simple and fun if you follow these guidelines. Remember, practice makes perfect, so don’t hesitate to try new ideas. Your baking journey starts here, and I’m excited for what you’ll create next!

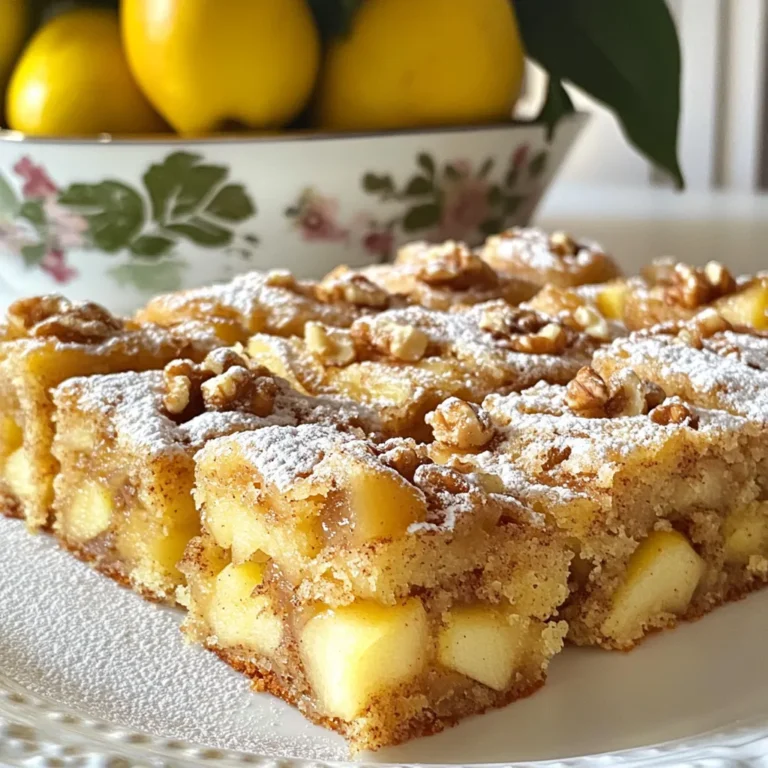
Moist Cinnamon Apple Cake Delightful and Easy Recipe

- 1 cup canned pumpkin puree - 1 cup cream cheese, softened - 1/2 cup powdered sugar - 1 teaspoon ground cinnamon The main ingredients in this dip are simple and easy to find. Canned pumpkin puree gives the dip a rich flavor and smooth texture. You can use any brand you like. Cream cheese adds creaminess. It should be softened to mix easily. Powdered sugar sweetens the dip. You can adjust the amount to your taste. Ground cinnamon brings warmth and spice. This spice makes the dip feel cozy and festive. - Graham crackers - Apple slices - Vanilla wafer cookies Now, let’s talk about what to dip in this tasty pumpkin dip. Graham crackers are a great choice. They add crunch and sweetness. Apple slices are fresh and crisp. They balance the creamy dip. Vanilla wafer cookies are another fun option. They bring a light vanilla flavor. You can choose one or mix them all for a fun experience. Enjoy the dip with your favorite dippers! {{ingredient_image_1}} 1. Start by mixing the cream cheese and powdered sugar. 2. Place them in a bowl and beat together. Use an electric mixer for best results. Keep mixing until smooth and creamy. 3. Next, add the canned pumpkin puree to the mix. Beat again until the mixture is fully combined. It should be smooth and rich. 4. Now, sprinkle in the ground cinnamon. Mix it well until everything is evenly blended. Taste it to see if you need more sweetness. 1. Once mixed, transfer the dip to a serving bowl. 2. Cover it and refrigerate for at least 30 minutes. This helps the flavors blend perfectly. 3. When ready to serve, take it out and enjoy it chilled. I love pairing it with graham crackers, apple slices, or vanilla wafer cookies. Each dip brings a lovely crunch! To get the best texture for your dip, start with room temperature cream cheese. Cold cream cheese can make it hard to blend well. Softened cream cheese mixes smoothly with the pumpkin. This gives your dip a creamy and light feel. Next, beat the mixture until it is well combined. Use an electric mixer on medium speed. This helps achieve the right consistency. You want it to be smooth, not too thick or too runny. It should hold its shape when you scoop it out. You might want to adjust the sweetness of your dip. Taste it after mixing and see if it needs more sugar. If you like it sweeter, add a little more powdered sugar. Start with a tablespoon and mix again. Taste it to see if it’s just right. Adding spices or extracts can really boost the flavor. Besides cinnamon, consider adding a pinch of nutmeg or ginger. These spices bring warmth and depth. You could also stir in a splash of vanilla extract. This extra flavor makes your pumpkin dip even more special. Pro Tips Use Fresh Pumpkin: For an extra depth of flavor, try using fresh roasted pumpkin instead of canned puree. Simply roast the pumpkin, scoop out the flesh, and blend until smooth. Chill Before Serving: Allowing the dip to chill for at least 30 minutes enhances its flavors. The wait is worth it for a creamier and more flavorful dip. Customize the Spices: Feel free to experiment with spices like nutmeg or ginger. These can add a unique twist to the traditional pumpkin flavor. Perfect Dippers: Besides graham crackers and apple slices, consider using pretzels for a sweet and salty combination that pairs beautifully with the dip. {{image_2}} You can make your pumpkin dip even tastier by adding a few twists. One easy way is to include vanilla extract. Just add a teaspoon when mixing in the pumpkin. This gives the dip a warm, sweet flavor. Another fun option is to use different spices. Try adding a pinch of nutmeg or ginger. Nutmeg adds a cozy taste, while ginger brings a bit of zing. Each spice changes the dip's flavor and makes it unique. If you want to make this dip dairy-free, swap the cream cheese with a dairy-free cream cheese. Many brands offer good options that taste great. You can still enjoy the dip without the dairy! For those who need sugar substitutes, you can use options like stevia or erythritol. These sweeteners work well in place of powdered sugar. Just keep tasting as you mix to get the sweetness just right. To keep your pumpkin dip fresh, store it in the fridge. Place it in an airtight container. This helps keep the dip from drying out. You can also cover it tightly with plastic wrap. Make sure it touches the dip to lock in moisture. The dip will stay good for about 3 to 5 days in the fridge. If you notice any changes in smell or color, it's best to throw it out. You won’t need to heat this dip. It tastes great cold! If the dip seems too thick after chilling, stir in a little cream cheese or pumpkin puree. This will help restore the creamy texture. Serve it chilled with your favorite dippers like apple slices or graham crackers. You can also add a sprinkle of cinnamon on top for a nice touch. Enjoy your tasty treat! You can store pumpkin dip in the fridge for up to five days. Make sure to keep it in an airtight container. This will help keep it fresh and tasty. Before serving, give it a quick stir. If the dip seems too thick, add a little cream cheese or pumpkin puree. Yes, you can freeze pumpkin dip, but it may change in texture. To freeze, place it in a freezer-safe container. Leave some space for expansion. When you want to use it, thaw the dip in the fridge overnight. Mix it well before serving. You can get creative with your pumpkin dip! Try using it as a spread for toast or bagels. It also works well with pancakes or waffles. You can even swirl it into yogurt for a tasty breakfast. This blog covered how to make a tasty pumpkin dip. We explored the main ingredients, like pumpkin puree and cream cheese. You learned step-by-step instructions for prepping and chilling your dip. I also shared tips for perfecting the texture and enhancing flavors. We looked at fun variations and how to store your dip well. In the end, making pumpkin dip is simple and fun. Enjoy sharing it at your next gathering!

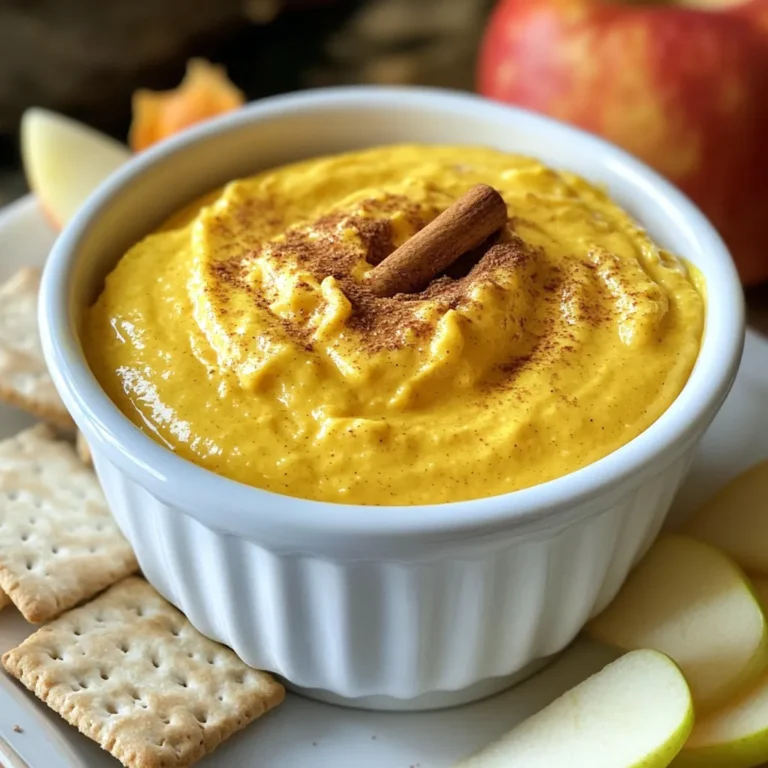
Four Ingredient Pumpkin Dip Simple and Tasty Treat

PREV 1 … 56 57
meal twig

explore

DessertsDinnerAppetizersDrinks

Our Policies

  • Cookie Policy
  • Copyright Policy
  • Disclaimer
  • GDPR Policy
  • Terms Of Use
Back to Top
  • About
  • Contact Us
  • Privacy Policy
© 2025 meal twig