FREE DINNER EBOOK! Get your copy!
  • Cookie Policy
  • GDPR Policy
  • Disclaimer
  • Terms Of Use
  • Visit my other site: Fun Cookie Recipes
meal twig
  • Home
  • Dinner
  • Desserts
  • Drinks
  • Appetizers
  • Contact
  • About
  • Privacy Policy
  • Home
  • Dinner
  • Desserts
  • Drinks
  • Appetizers
  • Contact
  • About
  • Privacy Policy
  • Cookie Policy
  • GDPR Policy
  • Disclaimer
  • Terms Of Use
Visit my other site: Fun Cookie Recipes

HOME / CATEGORIES /

Latest

- 4 boneless, skinless chicken breasts - 1 cup basmati rice - 2 cups chicken broth - 1 medium onion, finely chopped - 3 cloves garlic, minced - 1 lemon (juiced and zested) - 2 tablespoons olive oil - 1 tablespoon fresh thyme leaves (or 1 teaspoon dried thyme) - 1 tablespoon fresh parsley, chopped - 1 teaspoon dried oregano - Salt and pepper to taste - Optional: Lemon wedges and fresh herb sprigs for garnish To make Lemon Herb Chicken and Rice, you will need: - A large skillet - A sharp knife - A cutting board - A mixing bowl - Measuring cups and spoons - A fork for fluffing rice Each serving of Lemon Herb Chicken and Rice provides: - Calories: 410 - Protein: 35g - Carbohydrates: 40g - Fat: 13g - Fiber: 2g - Sodium: 600mg This dish is packed with flavor and nutrition. The chicken offers lean protein. The rice gives you energy. Fresh herbs add vitamins and minerals. Enjoy this meal knowing it's good for you! {{ingredient_image_1}} To make the chicken tasty, start by mixing olive oil, lemon juice, lemon zest, thyme, oregano, salt, and pepper in a bowl. This mix is the marinade. Add the chicken breasts and coat them well. Let the chicken sit for at least 30 minutes. If you have time, let it rest in the fridge for up to 2 hours. This step makes the chicken juicy and full of flavor. Next, heat a large skillet over medium heat. Add a splash of olive oil. Take the chicken out of the marinade and throw away the leftover marinade. Cook the chicken for 5-7 minutes on each side. You want the chicken to be golden brown and reach an internal temp of 165°F. Once done, remove the chicken from the skillet and let it rest for a few minutes. Resting helps keep the juices inside. In the same skillet, add the finely chopped onion and minced garlic. Sauté them for about 3-4 minutes. You want the onions to be soft and clear. This adds great flavor to the rice. After that, stir in the basmati rice. Toast the rice for about 1-2 minutes. This step adds a nutty taste. Now, pour in the chicken broth and bring everything to a boil. Once boiling, lower the heat, cover the skillet, and let it simmer for about 15 minutes. This cooks the rice until it is tender and absorbs all the liquid. After the time is up, fluff the rice with a fork. Check if it needs more salt or pepper. Slice the rested chicken and place it on top of the rice. Finish by sprinkling fresh parsley over the dish. Serve your lemon herb chicken and rice hot, with lemon wedges on the side if you like. To get juicy chicken, marinate it well. Use lemon juice, olive oil, and herbs. Let the chicken soak for at least 30 minutes. If you have time, marinate for two hours. This step helps the flavors seep in. When cooking, don’t crowd the pan. Give each piece space to sear nicely. Sear for 5-7 minutes on each side. Check the internal temperature. It should reach 165°F for safety. For fluffy rice, rinse the basmati rice first. This removes excess starch and prevents stickiness. After rinsing, toast the rice in the skillet. Sauté it with onions and garlic for about 2 minutes. Then, add the chicken broth. Bring it to a boil, then cover and reduce the heat. Let it simmer for 15 minutes. Don’t lift the lid too soon; this traps steam. Once done, fluff it gently with a fork. Adjusting seasoning can elevate your dish. Taste the rice before serving. If it needs more flavor, add a pinch of salt or pepper. Fresh herbs like parsley and thyme brighten the dish. You can also add a splash of extra lemon juice for zesty flavor. For more depth, consider adding spices like paprika or cumin. If you want a kick, try a dash of red pepper flakes. Pro Tips Marinate for Maximum Flavor: Allow the chicken to marinate for at least 2 hours to enhance the flavors. The longer it marinates, the more delicious it will be! Check Chicken Temperature: Use a meat thermometer to ensure your chicken is cooked to the safe internal temperature of 165°F for juicy and safe results. Fluff the Rice: After cooking, let the rice sit for a few minutes and then fluff it with a fork to keep the grains separate and light. Garnish for Freshness: Always add fresh herbs and lemon wedges on top before serving to elevate the dish with a burst of freshness and color. {{image_2}} You can easily adapt this dish for gluten-free needs. Use quinoa instead of basmati rice. Quinoa cooks fast and adds a nutty flavor. For a healthier option, swap olive oil for a light spray of cooking oil. This keeps the taste while cutting calories. Adding veggies boosts taste and nutrition. Try bell peppers, peas, or spinach. These add color and nutrients. You can also spice it up. A pinch of red pepper flakes gives a nice kick. If you want a smoky flavor, add smoked paprika. It pairs well with lemon and herbs. Serve lemon herb chicken and rice with a side salad. A fresh green salad with lemon vinaigrette works great. You can also pair this with roasted vegetables. They add texture and more flavors. For a touch of creaminess, serve with a dollop of yogurt or tzatziki sauce. These suggestions enhance the meal and make it more filling. To store leftovers, let the chicken and rice cool down first. Place them in an airtight container. Keep the container in the fridge. It will stay fresh for up to three days. Make sure to label it with the date. This helps you remember when you made it. When you are ready to eat, take the leftovers out of the fridge. You can reheat them in the microwave or on the stove. If using the microwave, place the food in a safe dish. Heat it in short bursts, stirring in between. This helps it heat evenly. If using the stove, add a splash of chicken broth to keep it moist. Cover the pan to trap steam, which helps warm it up. If you want to save it for later, freezing works well too. Divide the chicken and rice into portions. Use freezer-safe bags or containers. Squeeze out as much air as possible. This helps prevent freezer burn. You can freeze it for up to three months. When you want to eat it, thaw it in the fridge overnight before reheating. Enjoy your meal without losing that fresh flavor! Yes, you can use brown rice. Brown rice is heartier and has a nutty flavor. It takes longer to cook than basmati. Adjust the cooking time to about 40-45 minutes. Use 2 ½ cups of chicken broth for best results. To make this dish in a slow cooker, start by marinating the chicken as usual. Sear the chicken in a skillet for flavor, then place it in the slow cooker. Add sautéed onions, garlic, and rice. Pour in the chicken broth and cook on low for about 4 hours. You can try herbs like rosemary, basil, or dill. These herbs add different flavor notes. Mix and match to find your favorite combination that pairs well with lemon. Fresh herbs give the best results, but dried herbs work too. Store leftovers in an airtight container in the fridge. They will last for about 3-4 days. Reheat in the microwave or on the stove for the best taste. Yes, bone-in chicken works well too. It adds more flavor to the dish. Just adjust the cooking time to ensure the chicken cooks all the way through. Aim for an internal temperature of 165°F. In this post, we explored how to make Lemon Herb Chicken and Rice. We discussed key ingredients, tools, and important nutrition facts. I provided easy steps for marinating and cooking the chicken, preparing fluffy rice, and combining them for a delicious meal. We also shared storage tips and common questions for clarity. By using these tips, you can make a tasty dish that fits your needs. Enjoy your cooking adventure!

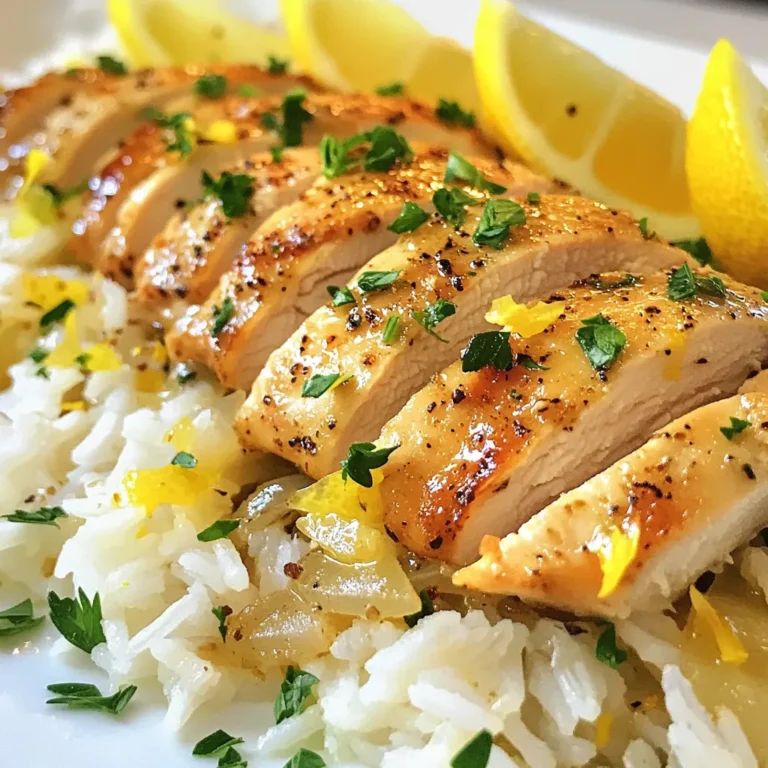
Lemon Herb Chicken and Rice Flavors that Delight

- 1 lb ground beef - 1/2 lb ground turkey - 1 cup breadcrumbs - 1/2 cup grated Parmesan cheese - 1/2 cup chopped fresh parsley - 1 egg, beaten - 3 cloves garlic, minced - 1 teaspoon onion powder - 1 teaspoon dried oregano - 1 teaspoon salt - 1/2 teaspoon black pepper - 1 cup marinara sauce - 8 oz fresh mozzarella cheese, cut into sticks - 1/4 cup extra virgin olive oil (for drizzling) Using fresh ingredients makes a big difference. Choose ground meats that are lean but not too dry. Look for bright red beef and light pink turkey. Fresh parsley adds great flavor. If you can, use fresh mozzarella. It melts better and tastes richer than other types. Grated Parmesan should be fresh, too. Pre-grated cheese often has additives that affect flavor. You can switch up the meats in this recipe. Ground pork works well if you want a richer taste. If you prefer a leaner option, ground chicken is a good choice. For a plant-based version, try using lentils or a meat substitute made from soy or pea protein. Just make sure the texture can hold together like meat. {{ingredient_image_1}} To make mozzarella stuffed meatloaf, start by gathering all your ingredients. You need ground beef, ground turkey, breadcrumbs, parmesan cheese, and fresh parsley. Don't forget the egg, garlic, onion powder, oregano, salt, black pepper, marinara sauce, mozzarella cheese, and olive oil. This recipe takes about 20 minutes to prep and 60 minutes to bake. 1. Preheat your oven to 350°F (175°C). This step is key for even cooking. 2. In a large bowl, combine the ground beef and turkey. Add breadcrumbs, parmesan cheese, parsley, and the beaten egg. 3. Mix in minced garlic, onion powder, oregano, salt, and black pepper. Use your hands for the best mix. 4. Shape the meat mixture into a rectangle, about 1-inch thick. Flatten it out on a clean surface. 5. Place mozzarella sticks in the center, leaving space at the edges. 6. Roll the meat mixture around the cheese. Tuck in the sides to seal it well. Shape it into a loaf. 7. Place the meatloaf in a baking dish. Pour marinara sauce over the top and drizzle olive oil. 8. Bake for 50-60 minutes. Check that the internal temperature reaches 160°F (70°C). 9. Let it rest for 10 minutes before slicing. This helps the cheese set and makes it easier to cut. Monitoring the temperature is crucial. Use a meat thermometer to check the internal temp. This ensures your meatloaf is safe to eat and cooked just right. If it's undercooked, it may not taste good and could be unsafe. Always aim for that 160°F (70°C) mark for perfect results. To get the best texture in your meatloaf, mix your ingredients well. Use your hands for a better blend. Don’t overwork the meat; it can make it tough. Keep the meat mixture moist by adding enough breadcrumbs and cheese. The cheese inside gives it a soft feel. Baking it at 350°F helps cook it evenly. One common mistake is not letting the meatloaf rest. Resting helps the juices settle. Another mistake is cutting it too soon. This can make it fall apart. Always make sure your meatloaf is shaped well. Avoid packing it too tightly. Too much moisture can also cause it to fall apart. I love serving my meatloaf with extra marinara sauce on the side. Fresh parsley adds a nice touch. Pair it with mashed potatoes or a green salad for balance. You can also serve it with crusty bread to soak up the sauce. If you have leftovers, try making meatloaf sandwiches for lunch! Pro Tips Use a Meat Thermometer: To ensure perfect doneness, use a meat thermometer. The internal temperature should reach 160°F (70°C) for safe consumption. Chill the Cheese: For a gooey cheese center, freeze the mozzarella sticks for about 15-20 minutes before using them in the meatloaf. Rest Before Slicing: Allow the meatloaf to rest for 10 minutes after baking. This helps the cheese set and prevents it from oozing out when sliced. Experiment with Herbs: Feel free to mix and match herbs in the meat mixture. Fresh basil or thyme can add a delightful twist to the flavor. {{image_2}} You can use many kinds of cheese in your meatloaf. Mozzarella is great, but try other options. Cheddar adds a sharp taste. Gouda brings a smoky flavor. Cream cheese makes it rich and creamy. Mix and match to find your favorite cheese. Add-ins can make your meatloaf special. You might try chopped bell peppers for crunch. Diced onions add sweetness. Mushrooms give a nice earthiness. You can even use cooked bacon for a smoky twist. Just remember to keep the balance, so the meat holds together. For a low-carb version, swap breadcrumbs for almond flour. This keeps the meatloaf moist without carbs. For gluten-free, look for gluten-free breadcrumbs. You can also use oats instead. Just make sure they are certified gluten-free. These swaps keep your meatloaf tasty for everyone! To keep your mozzarella stuffed meatloaf fresh, let it cool completely. Wrap it tightly in plastic wrap or aluminum foil. You can also place it in an airtight container. Store it in the fridge for up to four days. This keeps it safe and tasty. When you're ready to enjoy leftovers, preheat your oven to 350°F (175°C). Place the meatloaf in a baking dish. Cover it with foil to keep it moist. Heat for about 20-25 minutes, or until it reaches 165°F (74°C). This helps the cheese stay gooey and delicious. If you want to save some for later, freezing is a great option. Slice the meatloaf first, then wrap each piece in plastic wrap. Place the slices in a freezer bag or container. Label it with the date. You can freeze it for up to three months. When you’re ready to eat, thaw in the fridge overnight and reheat as mentioned above. This way, you always have a cheesy treat on hand! Bake mozzarella stuffed meatloaf for about 50-60 minutes. It should reach 160°F (70°C) inside. You want to see a nice, golden crust on top. Always check the center with a meat thermometer. This ensures it's fully cooked and safe to eat. Yes, you can make meatloaf ahead of time. Mix the ingredients and shape the loaf. Wrap it tightly in plastic wrap, then store it in the fridge for up to 24 hours. You can also freeze it before baking. Just thaw it in the fridge overnight before baking. Serve mozzarella stuffed meatloaf with a side of marinara sauce for dipping. A fresh salad pairs well, too. You can also serve it with mashed potatoes or roasted vegetables. These sides balance the flavors and add color to your plate. We explored the key ingredients for a great meatloaf and noted the importance of quality. You learned step-by-step cooking instructions, highlighting temperature management. I shared tips for texture, common mistakes, and creative serving ideas. You can also customize your meatloaf with cheese options and low-carb adjustments. Lastly, we covered proper storage and reheating methods. With this knowledge, you can make a delicious meatloaf that everyone will enjoy. Happy cooking!

Mozzarella Stuffed Meatloaf Delicious and Simple Recipe

To make this dish, you need some key ingredients: - 1 lb boneless, skinless chicken breasts, diced - 2 cans (15 oz each) white beans (cannellini or navy), drained and rinsed - 1 medium onion, finely chopped - 3 cloves garlic, minced - 1 green bell pepper, diced - 2 cups low-sodium chicken broth - 1 cup coconut milk - 1 tablespoon olive oil - 1 tablespoon ground cumin - 1 teaspoon chili powder - 1/2 teaspoon smoked paprika - Salt and pepper, to taste These ingredients blend together to create a smooth and tasty chili. The chicken provides protein, while the white beans add fiber and heartiness. Coconut milk makes the chili creamy and rich. Garnishes add fun and flavor: - Fresh cilantro, for garnish - Sliced jalapeños, for serving (optional) - Lime wedges, for serving These toppings enhance the dish. Cilantro gives a fresh taste, while lime adds a zesty kick. If you like heat, jalapeños bring that extra spice. You can swap some ingredients if needed: - Use chicken thighs instead of breasts for a juicier bite. - Try vegetable broth instead of chicken broth for a vegetarian version. - Coconut milk can be replaced with heavy cream for a different texture. These substitutions still keep the dish tasty. Feel free to adapt the recipe to fit your pantry or dietary needs. {{ingredient_image_1}} Start by gathering your ingredients. You need chicken, beans, onion, garlic, and bell pepper. Heat one tablespoon of olive oil in a large pot over medium heat. Add the chopped onion and green bell pepper. Sauté them for about five minutes, until they soften. This step builds a strong base for your chili. Stir in three minced garlic cloves, one tablespoon of ground cumin, one teaspoon of chili powder, and half a teaspoon of smoked paprika. Cook these spices for one to two minutes. This will bring out their flavors. Next, add one pound of diced chicken breast to the pot. Cook it for five to seven minutes. Stir the chicken often to ensure it cooks evenly. You want to see no pink in the chicken. Once it’s cooked, pour in two cups of low-sodium chicken broth. Increase the heat to bring the mixture to a boil. After it boils, reduce the heat to low. Let it simmer for ten to fifteen minutes. This helps the flavors blend well. Now, it’s time to add the beans and coconut milk. Stir in two cans of drained and rinsed white beans. Then, add one cup of coconut milk for creaminess. Mix everything well and let it simmer for another ten minutes. This final simmer melds all the flavors together. Season the chili with salt and pepper to taste. If you want more heat, add sliced jalapeños. Remove the pot from heat and let it rest for a few minutes. This makes serving easier. To get a creamy texture in your chili, coconut milk is key. I use one cup of coconut milk. It adds a rich, velvety feel. If you want it creamier, you can add a bit more. Blend some of the white beans ahead of time. This helps thicken the chili without adding extra fat. Just mash half a can of beans before adding them into the pot. It works wonders. Spiciness is all about your taste. If you like it mild, skip the jalapeños. For a medium kick, add one or two sliced jalapeños when cooking. For more heat, use a pinch of cayenne pepper. You can also add a few dashes of hot sauce at the end. Always taste before serving to ensure it meets your heat preference. Using an electric pressure cooker can save time. After sautéing your veggies and chicken, add all the ingredients at once. Seal the lid and cook on high for about 10 minutes. Make sure to let the steam release naturally for best results. This method keeps the chili moist and flavorful while speeding up the cooking process. Pro Tips Cook the Chicken Thoroughly: Ensure the chicken is cooked all the way through to avoid any food safety issues. It should reach an internal temperature of 165°F (75°C). Adjust the Spice Level: If you prefer a milder chili, leave out the jalapeños or use mild chili powder. For extra heat, consider adding some chopped serrano peppers. Use Fresh Herbs: Garnishing with fresh cilantro at the end enhances the flavor and adds a pop of color. You can also try adding a sprinkle of fresh lime juice for brightness. Make it Ahead: This chili tastes even better the next day! Make a big batch and store leftovers in the fridge for up to 3 days or freeze for later use. {{image_2}} You can make this chili vegetarian. Swap the chicken for tofu or tempeh. Both options absorb flavors well. Use vegetable broth instead of chicken broth. This keeps the taste rich and hearty. Add a splash of lemon juice for brightness. You can still enjoy the creamy texture with coconut milk. Feel free to add more veggies. Zucchini, carrots, or corn work great in this chili. Chop them into small pieces to cook evenly. Add them at the same time as the chicken. This way, they soften and enhance the dish. You can also use frozen veggies for ease. Just toss them in the pot and let them heat through. Want more heat? You have options! Add sliced jalapeños during cooking. You can also sprinkle in red pepper flakes. For a milder version, use less chili powder. Adjusting the spice lets you personalize each bowl. Your guests will love the ability to choose their heat level. To store your white bean chicken chili, let it cool first. Once cool, transfer it to an airtight container. Make sure to seal it well. This helps keep the chili fresh and tasty. Store it in the fridge if you plan to eat it within a few days. Chili can last in the fridge for about 3 to 4 days. When you’re ready to enjoy your chili again, reheat it on the stove. Pour the chili into a pot over medium heat. Stir it often to warm it evenly. You can also use the microwave. Place the chili in a microwave-safe bowl and cover it. Heat in short bursts, stirring in between until hot. Check the temperature before serving to ensure it’s safe to eat. If you have extra chili, freezing is a great option. Use freezer-safe containers or resealable bags. Make sure to leave some space for expansion. Label the bags with the date for your reference. Chili can stay fresh in the freezer for up to 3 months. When you want to eat it, thaw it overnight in the fridge. Then, reheat it on the stove or in the microwave as noted above. Enjoy your warm chili anytime! Yes, you can use canned chicken. Drain the liquid from the can first. Canned chicken saves time and still tastes great. Just add it in with the beans and coconut milk. This makes your chili quick and easy. White Bean Chicken Chili lasts about 3 to 4 days in the fridge. Store it in a sealed container for best results. Make sure it cools before putting it away. To enjoy it longer, freeze it. Freezing keeps it fresh for up to 3 months. You can serve it with cornbread or tortilla chips for a delightful crunch. Lime wedges add a zesty kick. Fresh cilantro brings a fresh taste. If you like heat, try sliced jalapeños on top. This makes every bowl even better! This blog post covered how to make tasty White Bean Chicken Chili. You learned the main ingredients, optional garnishes, and how to swap items. I shared steps for prepping, cooking, and finishing your chili. You also received tips for creaminess, spice, and cooking times. In the end, experiment with variations to find what you love. Store extras well, and enjoy every bowl. Cooking can bring joy and warmth to your table.

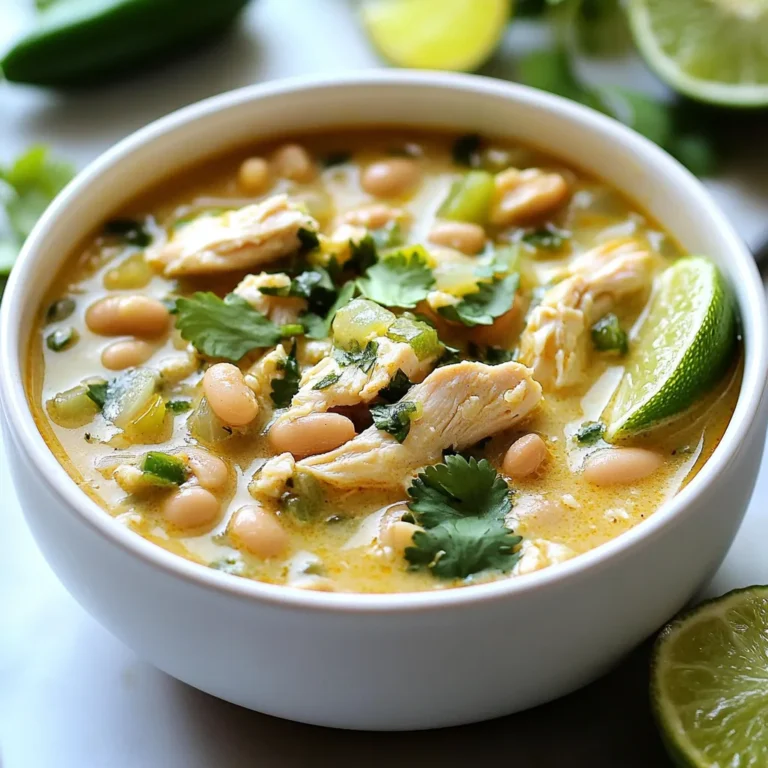
Flavorful White Bean Chicken Chili Easy to Make

- Pasta: I recommend using 12 oz of penne or fusilli. Both shapes hold sauce well. They give each bite a creamy taste. You can use other pasta types, but these are my favorites. - Dairy: For this dish, you need 1 cup of crumbled feta cheese. It adds a salty flavor that brightens the meal. You will also need 1 cup of heavy cream. This makes the sauce rich and smooth. - Fresh Ingredients: Use 2 lemons for zest and juice. They add a fresh, tangy taste. You can also use fresh basil or parsley for garnish. They make the dish look pretty and tasty. - Seasoning: Include 1/2 teaspoon of red pepper flakes for a little heat. You will also need salt and black pepper to taste. These seasonings bring all the flavors together. This ingredient list is simple but powerful. Each part works together to create a dish that is fresh and creamy. {{ingredient_image_1}} To get that perfect al dente texture, follow these steps: - Boil a large pot of salted water. - Add 12 oz of penne or fusilli pasta. - Cook according to the package for 8-10 minutes. - Test by tasting a piece; it should be firm but not hard. Don't forget to reserve 1 cup of pasta water before you drain it. This water helps make the sauce creamy later. Now, let’s make the sauce that brings everything together. - In the same pot, heat 1/4 cup of olive oil over medium heat. - Add 3 minced garlic cloves and sauté for 1-2 minutes. Watch closely to avoid burning. - Lower the heat and stir in 1 cup of crumbled feta cheese and 1 cup of heavy cream. - Mix until the feta melts and the sauce is creamy. This is where the magic happens. - Add the zest and juice of 2 lemons into the sauce. - If the sauce feels too thick, mix in some reserved pasta water until you reach your desired creaminess. - Stir in 1/2 teaspoon of red pepper flakes, along with salt and black pepper to taste. - Let the sauce simmer for a couple of minutes. Now, toss the drained pasta into the sauce. Make sure every piece of pasta is coated. Serve hot, and garnish with fresh basil or parsley and grated Parmesan cheese if you like. Enjoy your delightful meal! To make your creamy lemon feta pasta shine, start with fresh ingredients. Fresh lemons and herbs bring bright notes to the dish. Use high-quality feta cheese for a rich taste. You can adjust the seasoning to fit your palate. I suggest tasting as you go. A little salt and black pepper can enhance the flavors. Be careful not to overcook the garlic. If you burn it, the dish will taste bitter. Sauté it just until fragrant. Another mistake is using too much pasta water. Adding a little at a time helps you control the sauce's thickness. Remember, it's easy to add more, but hard to take it out. Having the right tools makes cooking easier. Use a large pot for boiling pasta. A sturdy wooden spoon is great for mixing. A microplane works well for zesting lemons. Ensure you have a good knife for chopping garlic and herbs. A measuring cup is key for keeping track of your ingredients. Pro Tips Use Fresh Lemons: Freshly squeezed lemon juice and zest will provide a brighter and more vibrant flavor compared to bottled options. Adjust the Creaminess: If you prefer a lighter sauce, you can substitute half of the heavy cream with low-fat milk or Greek yogurt. Customize the Heat: Adjust the amount of red pepper flakes to control the spiciness of the dish according to your taste. Perfect Pasta Timing: Make sure to drain the pasta just before it reaches al dente, as it will continue to cook when tossed with the sauce. {{image_2}} If you want a dairy-free dish, try using cashew cream instead of heavy cream. Soak raw cashews in water for a few hours, then blend them into a smooth cream. For feta, use crumbled tofu mixed with nutritional yeast and lemon juice. This will give you a similar flavor without dairy. You can make this pasta even better with tasty add-ins. Fresh spinach or cherry tomatoes add color and nutrition. For extra protein, consider grilled chicken or shrimp. Both options work well and make the meal more filling. You can even add cooked chickpeas for a vegetarian protein boost. Pair your creamy lemon feta pasta with a light salad. A simple green salad with olive oil and lemon works well. For drinks, consider a crisp white wine like Sauvignon Blanc. It complements the lemon flavor nicely. You can also serve sparkling water with lemon slices for a refreshing touch. To keep your Creamy Lemon Feta Pasta fresh, store it in the fridge. Use an airtight container. This helps prevent the pasta from drying out. Make sure the pasta cools before you seal it. It will last for about 3-4 days in the fridge. If you want to keep it longer, consider freezing it. Just know that freezing may change the texture a bit. When reheating, you can use a microwave or stove. For the microwave, place the pasta in a bowl. Add a splash of water or cream to keep it moist. Heat it in short bursts, stirring in between. On the stove, gently warm it in a pan. Again, add a little water or cream to keep it from drying. This way, you enjoy the same great flavor and texture! Yes, you can use whole wheat or gluten-free pasta! Whole wheat pasta adds a nutty flavor and extra fiber. Gluten-free pasta works well too. Just make sure to cook it according to the package's instructions for the best texture. To thicken the sauce, you have a few options. First, reduce the sauce by simmering it longer. This cooks off some liquid and makes it thicker. You can also add more feta cheese. As it melts, it will create a creamier sauce. If you want a rich touch, consider adding a bit of cream cheese. I love serving this pasta with a simple green salad. A salad with fresh greens and a light vinaigrette pairs well. You can also serve garlic bread or roasted vegetables on the side. These options round out the meal nicely. Yes, you can make this recipe ahead of time! Cook the pasta and sauce separately. Store them in the fridge. When you're ready to eat, heat them together. If the sauce is too thick, add a bit of pasta water to loosen it. This saves time on busy nights! This blog post covered how to make a delicious Creamy Lemon Feta Pasta. We explored important ingredients, cooking steps, and useful tips. Remember, fresh ingredients enhance flavor. Avoid common mistakes, like overcooking garlic or using too much pasta water. You can customize the dish with various add-ins or alternatives. Don’t forget about proper storage and reheating to keep your pasta tasty. Enjoy trying this recipe, making it your own with every twist!

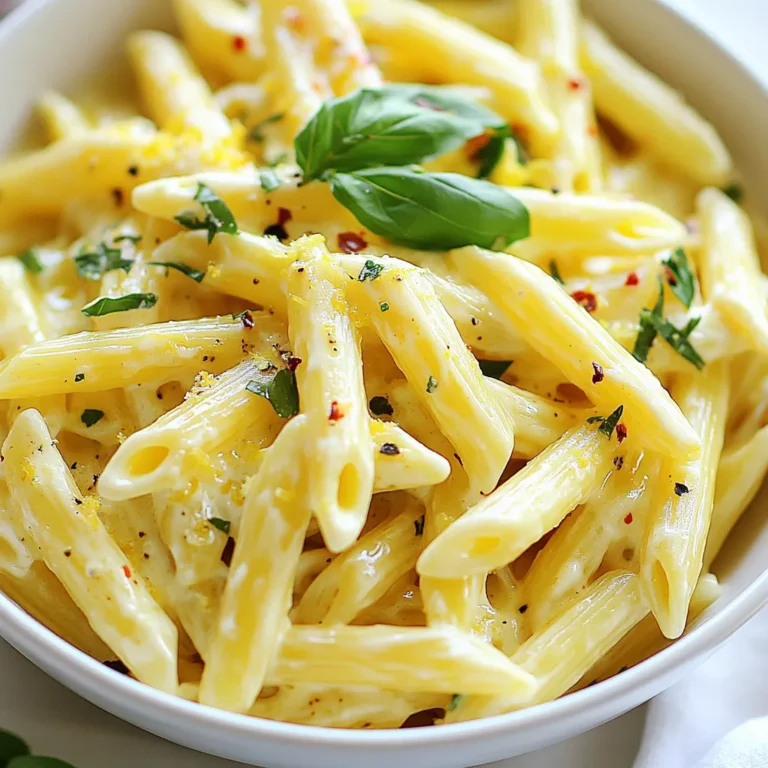
Creamy Lemon Feta Pasta Irresistible Quick Meal

- 4 boneless, skinless chicken thighs - 2 tablespoons olive oil - 3 cloves garlic, minced - 1 cup cherry tomatoes, halved - 1 cup baby spinach - 1 cup heavy cream - 1/2 cup chicken broth - 1 teaspoon Italian seasoning - 1/2 teaspoon red pepper flakes (optional) - Salt and pepper to taste - Fresh basil leaves, for garnish - Grated Parmesan cheese, for serving To make this dish, you will need: - A large skillet - A wooden spoon - A cutting board - A sharp knife - Measuring cups and spoons - A serving platter Using fresh ingredients makes a big difference. Here are some tips: - Chicken Thighs: Choose thighs that are pink and firm, with no spots. - Garlic: Use fresh garlic. It has a stronger flavor than pre-minced. - Tomatoes: Look for ripe cherry tomatoes. They should be bright and firm. - Spinach: Choose baby spinach that is bright green and crisp. - Basil: Fresh basil adds a nice touch. Look for deep green leaves without browning. - Cream: Use heavy cream for a rich, velvety sauce. Avoid low-fat options for this dish. These tips help make your One Pan Tuscan Chicken taste amazing! {{ingredient_image_1}} Start by heating 2 tablespoons of olive oil in a large skillet over medium heat. While the oil warms, season 4 boneless, skinless chicken thighs with salt and pepper. Once the oil is hot, add the chicken to the pan. Cook each side for 6-7 minutes, until they turn golden brown. Remove the chicken from the pan and set it aside on a plate. In the same skillet, add 3 cloves of minced garlic. Sauté for about 30 seconds until the garlic smells great. Be careful not to let it burn! Next, add 1 cup of halved cherry tomatoes. Cook them for 2-3 minutes until they start to soften. This adds a fresh and juicy burst of flavor. Pour in 1/2 cup of chicken broth to the skillet. Use a wooden spoon to scrape up any tasty bits stuck to the pan. Turn the heat down low, then stir in 1 cup of heavy cream, 1 teaspoon of Italian seasoning, and 1/2 teaspoon of red pepper flakes if you like some heat. Mix everything well until it's smooth. Return the chicken thighs to the pan, spooning the creamy sauce over each piece. Let this simmer for about 5 minutes for the chicken to finish cooking. Finally, stir in 1 cup of baby spinach and cook for an additional 2 minutes until it wilts. Taste the sauce and add more salt or pepper if needed. Enjoy this rich and flavorful dish! To cook chicken thighs just right, pick even-sized pieces. This helps them cook evenly. Heat your skillet well before adding the chicken. A hot pan gives a nice sear. Cook for 6-7 minutes on each side. Look for a golden-brown color. Use a meat thermometer; chicken should reach 165°F. Let it rest a few minutes before slicing. This keeps the juices in, making it tender. You can change the sauce to fit your taste. Want more zing? Add lemon juice or zest. For a richer flavor, throw in some white wine before the cream. If you like garlic, add more minced cloves. For a spicy kick, mix in extra red pepper flakes. Fresh herbs like thyme or oregano can also brighten the sauce. Always taste and adjust the seasoning as you go. Pair your Tuscan chicken with simple sides. A fresh green salad with a light vinaigrette works well. Roasted vegetables add color and flavor. Creamy mashed potatoes or pasta soak up the sauce nicely. Crusty bread is perfect for dipping. You can also serve it with rice for a filling meal. These sides balance the richness of the chicken and sauce. Pro Tips Perfectly Cooked Chicken: Ensure that the chicken thighs are at room temperature before cooking for even cooking and better searing. Garlic Flavor Boost: Add the minced garlic after browning the chicken to prevent it from burning and to enhance its flavor in the sauce. Thickening the Sauce: If you prefer a thicker sauce, let it simmer a bit longer after adding the cream until it reaches your desired consistency. Fresh Spinach Substitute: Feel free to substitute baby spinach with kale or arugula for a different flavor profile and added nutrients. {{image_2}} You can switch out chicken thighs for other proteins. Try boneless chicken breasts for a leaner option. If you prefer seafood, shrimp works great too. Just cook the shrimp for about 3-4 minutes until pink. For a plant-based choice, use firm tofu. Press and cube the tofu, then sauté it until golden brown. Feel free to mix in your favorite seasonal veggies. Zucchini and bell peppers add color and flavor. You can also use asparagus in spring or butternut squash in fall. Just make sure to add heartier veggies early in the cooking process. This way, they soften nicely without losing their crunch. If you want a dairy-free version, swap heavy cream for coconut cream or a nut-based cream. This will keep the dish creamy without dairy. You can also use unsweetened almond milk with a little cornstarch for thickness. Adjust the seasoning to balance the flavors, and enjoy a rich meal without the dairy. After enjoying One Pan Tuscan Chicken, you might have some leftovers. Store them in an airtight container. This helps keep the chicken moist and the sauce tasty. Make sure to refrigerate your leftovers within two hours of cooking. They will last for about 3 to 4 days in the fridge. If you want to enjoy them longer, consider freezing instead. When you’re ready to eat the leftovers, reheat them gently. You can use a skillet over medium heat. Add a splash of chicken broth or water to keep the sauce creamy. Stir occasionally until hot. You can also use the microwave. Put the chicken in a microwave-safe dish and cover it. Heat in short bursts, stirring in between, until warm. To freeze the dish, let it cool completely first. Once cool, divide it into portions. Use freezer-safe containers or bags for best results. Label each container with the date. You can freeze it for up to 3 months. When you’re ready to eat, thaw it overnight in the fridge. Then reheat as described above for a quick meal. Yes, you can use bone-in chicken. Bone-in chicken adds more flavor. Just adjust the cooking time. Cook it longer to ensure it reaches a safe temperature. You may need about 10 minutes more on each side. Keep an eye on the internal temperature. It should be 165°F for safe eating. If you need a substitute for heavy cream, try using half-and-half. You can also mix milk with butter. For a dairy-free option, use coconut milk. Remember, these alternatives change the dish's creaminess. Adjust the seasoning to your taste for the best flavor. The spice level with red pepper flakes is mild to medium. You can control the heat by adjusting the amount. If you prefer less spice, use less than half a teaspoon. For more heat, add more. Taste as you go to find your perfect balance. We covered the key ingredients and equipment needed for a great dish. I shared cooking tips for using fresh ingredients. You learned step-by-step how to cook chicken thighs and make a creamy sauce. We explored tips for perfect chicken, sauce tweaks, and side dish ideas. There are also tasty variations, storage tips, and answers to your questions. Remember, cooking is about creativity and fun. Enjoy the process and make this dish your own. Happy cooking!

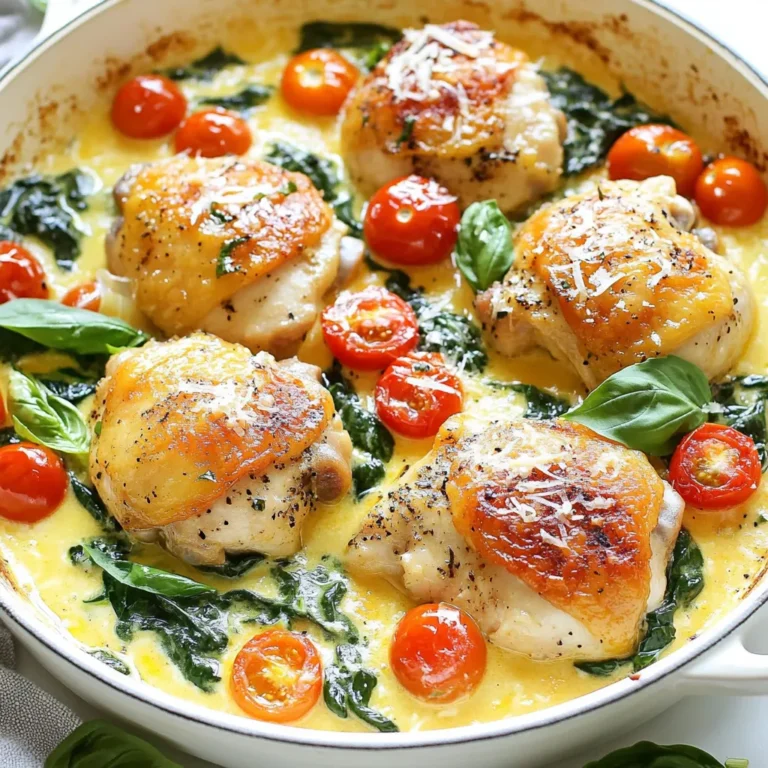
One Pan Tuscan Chicken Easy and Flavorful Meal

- 500g flank steak, thinly sliced - 1 red bell pepper, sliced - 1 green bell pepper, sliced - 3 garlic cloves, minced - 1 inch piece of ginger, minced - 1 tablespoon soy sauce - 1 tablespoon sesame oil - 2 tablespoons cornstarch - 2 tablespoons chili paste (adjust to taste) - 1 tablespoon honey - Sesame seeds for garnish Crispy chilli beef starts with fresh, high-quality ingredients. I love using flank steak because it’s tender and tasty. Slice it thinly to help it cook fast and evenly. Bell peppers add color and crunch. Use both red and green for a nice mix. Garlic and ginger elevate the dish with deep, warm flavors. For the marinade, soy sauce and sesame oil are key. They give the beef a rich taste. Cornstarch is essential too; it helps the beef get that perfect crispy coating. For seasoning, I use chili paste for heat and honey for sweetness. Finally, sprinkle sesame seeds on top. They add a lovely crunch and look great on the plate. {{ingredient_image_1}} Start by slicing the flank steak thinly. This helps it cook fast and stay tender. In a bowl, mix the beef with soy sauce, sesame oil, salt, and pepper. Make sure all the slices get coated. Let it sit for about 15 to 20 minutes. This marination adds flavor and helps the beef stay juicy. After marinating, add cornstarch to the beef. Sprinkle it evenly over the slices. The cornstarch is key for that crispy texture we all love. It creates a nice crust when we fry the beef. Make sure each slice is well-coated for the best results. Heat a good amount of vegetable oil in a large pan over medium-high heat. You want enough oil to cover the bottom. Once hot, carefully add the coated beef in batches. Don’t overcrowd the pan! Fry each batch for about 3 to 4 minutes until golden brown and crispy. Once done, remove and drain on paper towels to get rid of excess oil. In the same pan, you should have a bit of oil left. If there’s too much, pour some out. Add minced garlic and ginger first. Sauté them for about 30 seconds until they smell great. Then toss in the sliced bell peppers. Stir-fry for about 2 to 3 minutes. You want them tender but still a bit crisp. Now it’s time to bring it all together! Add the crispy beef back into the pan with the veggies. Stir in the chili paste and honey. Mix everything well until every piece is coated. Cook for just another minute to warm it up. Finally, transfer your crispy chilli beef to a serving plate. For a nice touch, sprinkle sesame seeds on top. This adds a bit of crunch and looks great! Enjoy your meal, and don't forget to share the recipe! To make your crispy chilli beef extra crunchy, use cornstarch. After marinating the beef, coat it well with cornstarch. This creates a great barrier for frying. Make sure the oil is hot enough before you add the beef. If the oil is too cool, the beef will not crisp up. Fry in small batches to avoid overcrowding the pan. Each piece should have space to fry and get crispy. If you like heat, adjust the chili paste in your dish. Start with 2 tablespoons for a nice kick. If you want more spice, add more chili paste a teaspoon at a time. Taste as you go to find your perfect spice level. This way, you can enjoy the dish just how you like it. Crispy chilli beef pairs well with many sides. Serve it over steamed rice or noodles for a filling meal. You can also add a fresh salad or some pickled vegetables for crunch. For drinks, try a light beer or a sweet iced tea. These options will balance the spice of the beef nicely. Pro Tips Marinate for Flavor: Allowing the beef to marinate for at least 20 minutes not only enhances the flavor but also tenderizes the meat. Temperature is Key: Ensure the oil is hot enough before frying to achieve that perfect crispy texture. A good test is to drop in a small piece of beef; if it sizzles immediately, the oil is ready. Batch Frying: Fry the beef in batches to avoid overcrowding the pan, which can lower the oil temperature and result in soggy beef. Adjust Spice Levels: Feel free to adjust the amount of chili paste based on your heat preference. Start with less and gradually add more to suit your taste. {{image_2}} You can swap beef for other proteins. Chicken works great here. Use thin slices of chicken breast. Tofu is another option. It absorbs flavor well and stays tender. Make sure to press tofu to remove extra water. This helps it crisp nicely when cooked. Add more veggies for color and taste. Broccoli, carrots, or snap peas add crunch. You can also try mushrooms for a unique twist. Mix and match your favorites. Just remember to cut them into similar sizes for even cooking. This keeps all your veggies tender-crisp. If you need a gluten-free dish, use tamari instead of soy sauce. It has the same rich flavor without gluten. For the cornstarch, ensure it’s labeled gluten-free. You can also use rice flour for a different texture. This keeps your dish safe and tasty. To keep your crispy chilli beef fresh, follow these steps: - Allow the dish to cool to room temperature. - Store in an airtight container. - Place it in the fridge. - Consume within 2-3 days for the best taste. Keeping the beef in a single layer helps avoid sogginess. If you have more than one serving, separate layers with parchment paper. To reheat crispy chilli beef while keeping it crispy, use these methods: - Oven Method: Preheat your oven to 350°F (175°C). Spread the beef on a baking sheet. Bake for 10-15 minutes until heated through and crispy. - Skillet Method: Heat a non-stick skillet over medium heat. Add the beef in a single layer. Cook for 3-5 minutes, flipping once until warmed and crisp. Avoid using a microwave, as it can make the beef soggy. If you want to freeze crispy chilli beef, follow these steps: - Let the beef cool completely. - Place it in a freezer-safe bag or container. - Remove as much air as possible before sealing. - Label with the date and freeze for up to 3 months. To thaw, move it to the fridge overnight. Reheat as described above for the best results. The best cut is flank steak. It is tender and has good flavor. Flank steak slices thinly and cooks quickly. You can also use sirloin if you prefer. Both cuts work well for this dish. Yes, you can prep it ahead. Marinate the beef in the fridge for up to 24 hours. This adds more flavor. You can also cook the beef and veggies in advance. Just store them separately in airtight containers. When ready to eat, reheat them on the stove. This dish pairs well with rice or noodles. You can serve it with steamed white rice or fried rice. For a fresh touch, try a simple salad on the side. You can also add some spring rolls for extra crunch. The spice level depends on the chili paste used. Two tablespoons give it a nice kick. If you prefer a milder dish, reduce the chili paste. You can always add more spice later if you like it hot. Adjust the heat to fit your taste! Crispy chilli beef is a fun and tasty dish. We started with the main ingredients like flank steak, bell peppers, and garlic. Then, we mixed a delicious marinade and seasoned the dish for extra flavor. I shared tips for cooking and serving it perfectly. Remember, you can switch proteins or veggies to suit your taste. With the right steps, you can enjoy this dish anytime. Try it out and make it your own!

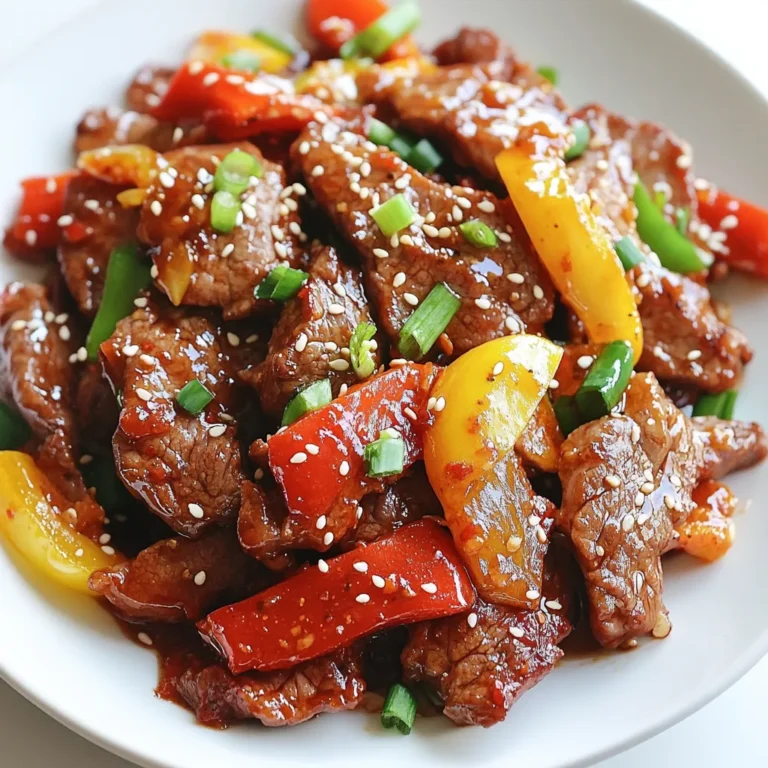
Crispy Chilli Beef Quick and Flavorful Dinner Dish

- 4 boneless, skinless chicken breasts - 2 tablespoons Cajun seasoning - Salt and pepper to taste - 2 tablespoons olive oil - 1 medium onion, chopped - 3 cloves garlic, minced - 1 cup heavy cream - 1 cup chicken broth - 1 cup bell peppers, sliced (mix of red, yellow, and green) - 1 tablespoon fresh parsley, chopped (for garnish) To create Creamy Cajun Chicken, you need quality ingredients. Start with four boneless, skinless chicken breasts. These will be your main protein source. Cajun seasoning is essential for that bold flavor. You’ll need two tablespoons, plus salt and pepper for taste. Next, use two tablespoons of olive oil for cooking. It helps to sear the chicken and adds richness. For vegetables, have one medium onion, three cloves of minced garlic, and a mix of bell peppers. I suggest using red, yellow, and green for color and taste. For the creamy sauce, you’ll need one cup of heavy cream and one cup of chicken broth. These two create a rich and smooth sauce that brings everything together. Lastly, don’t forget the fresh parsley for garnish. It adds a nice touch of color and freshness to your dish. With these ingredients, you’ll make a flavorful and satisfying meal that is sure to impress. {{ingredient_image_1}} To start, you need to season the chicken breasts. Pat them dry with paper towels. This helps the seasoning stick better. Sprinkle Cajun seasoning on both sides. Add salt and pepper to taste. Make sure every inch of the chicken is coated well for great flavor. For even seasoning, use your hands to rub the spices into the meat. This ensures that every bite bursts with flavor. Let the chicken sit for a few minutes. This helps the spices soak in. Next, it’s time to sear the chicken. Heat olive oil in a large skillet over medium-high heat. Once hot, add the chicken breasts. Cook for about 5-7 minutes on each side. You want them golden brown and fully cooked. Use a meat thermometer to check if they reach 165°F. When done, remove them from the skillet and set aside. A tip here is not to overcrowd the skillet. If needed, cook in batches. This way, all pieces get that nice sear. Now, let’s make the creamy sauce. In the same skillet, lower the heat to medium. Add the chopped onions and sauté for about 3-4 minutes. You want them soft and clear. Then, add minced garlic and sauté for another minute. This step adds a rich aroma to your dish. Pour in the chicken broth next. Scrape the bottom of the pan to get all the tasty bits. Bring it to a simmer. Once it simmers, add the heavy cream. Stir until the sauce thickens, which takes about 3-5 minutes. It's time to add the bell peppers. Stir them into the sauce and return the seared chicken to the skillet. Let everything simmer together for another 4-5 minutes. This warms the chicken and makes the peppers tender-crisp. Before serving, taste the sauce. Adjust the seasoning if needed. A final touch of fresh parsley on top adds a nice color and flavor. Enjoy your creamy Cajun chicken! To achieve perfectly cooked chicken, start with even thickness. Use a meat mallet to pound the chicken breasts. This helps them cook evenly. Season the chicken well. Make sure to cover all sides with Cajun seasoning, salt, and pepper. Sear the chicken on medium-high heat for about 5-7 minutes per side. Look for a golden brown color to know it's done. Always check the center for doneness; it should be 165°F. For a creamy sauce, start by cooking the onions until soft. This brings out their sweetness. Add garlic and cook until fragrant. Then, pour in the chicken broth. Scrape any brown bits from the bottom. This adds flavor. When you add the heavy cream, let it simmer gently. This helps the sauce thicken and become rich. To enhance flavor, consider adding smoked paprika or thyme. Both spices complement Cajun seasoning well. Fresh herbs like basil or cilantro also add brightness. If you want a kick, try adding cayenne pepper or hot sauce. If you have dietary preferences, you can substitute heavy cream with coconut milk or cashew cream. This makes the dish dairy-free. You can also swap chicken for shrimp or tofu for a different protein option. For ideal accompaniments, serve creamy Cajun chicken over rice or pasta. Both soak up the sauce nicely. You can also pair it with crusty bread to enjoy every drop of sauce. When plating, use a shallow bowl. Place the chicken in the center and pour the sauce over it. Add a sprinkle of fresh parsley for color. This makes the dish look appetizing and inviting. Pro Tips Perfectly Seasoned Chicken: Ensure the chicken breasts are patted dry before seasoning to allow the Cajun spices to adhere better, resulting in a more flavorful dish. Use Fresh Ingredients: Opt for fresh bell peppers and herbs for enhanced flavor and vibrant color in your creamy sauce. Control the Heat: Adjust the amount of Cajun seasoning based on your heat preference; start with less and add more if desired for a spicier dish. Let it Rest: After cooking, allow the chicken to rest for a few minutes before slicing to retain its juices, ensuring a tender and moist result. {{image_2}} You can switch the chicken in this dish. Shrimp works great and cooks fast. Just sauté shrimp for 2-3 minutes until pink. Tofu is also a good choice. Press it to remove water, then cube it. Sauté it until golden brown for a nice texture. To make a creamy Cajun vegetable dish, skip the meat. Use a mix of your favorite veggies. Bell peppers, zucchini, and mushrooms are great. Cook them just like you would the chicken. Use vegetable broth instead of chicken broth for flavor. You can control the heat in this dish. For a milder version, use half the Cajun seasoning. You can add a pinch of sugar to balance the flavors. If you like it spicy, double the seasoning or add some cayenne pepper. Always taste and adjust the spice to your liking. To store leftovers, place them in an airtight container. Make sure to cool the dish to room temperature first. This keeps the creamy Cajun chicken fresh. Store it in the fridge for up to three days. When ready to eat, check for any off smells or changes in color. You can freeze creamy Cajun chicken for longer storage. Use a freezer-safe container or heavy-duty freezer bag. Remove as much air as possible to prevent freezer burn. It can stay good for up to three months. To reheat, thaw overnight in the fridge. Heat on the stove over low heat, stirring gently until warmed through. Creamy Cajun chicken lasts about three days in the fridge. If you freeze it, expect a shelf life of three months. Always check for signs of spoilage before eating. Proper storage keeps the flavors strong and the chicken safe. Enjoy your dish at its best! You can make Cajun seasoning at home easily. Here is a simple recipe: - 1 tablespoon paprika - 1 tablespoon onion powder - 1 tablespoon garlic powder - 1 teaspoon cayenne pepper - 1 teaspoon dried thyme - 1 teaspoon dried oregano - 1 teaspoon black pepper - 1 teaspoon salt Mix all these spices together in a bowl. Store your seasoning in a jar. This blend adds warmth and flavor to your dishes. Adjust cayenne for more or less heat. Yes, you can use dairy-free substitutes for heavy cream. Here are some options: - Coconut cream - Cashew cream - Almond milk mixed with cornstarch - Soy milk with a bit of oil These options will give your dish a creamy texture without dairy. Experiment with these to find what you like best. Many sides complement creamy Cajun chicken well. Here are some ideas: - Steamed rice - Garlic bread - Mashed potatoes - Roasted vegetables - Simple green salad These sides enhance the meal and provide balance. Choose one or mix a few for a delightful dinner. In this article, we explored a tasty creamy Cajun chicken dish. I covered key ingredients, step-by-step cooking instructions, and helpful tips. You learned how to season and cook chicken, make a rich sauce, and serve it well. Remember, you can swap proteins or adjust spice levels for your taste. With these skills, you can enjoy flavorful meals any day. So, gather your ingredients and start cooking. Happy eating!

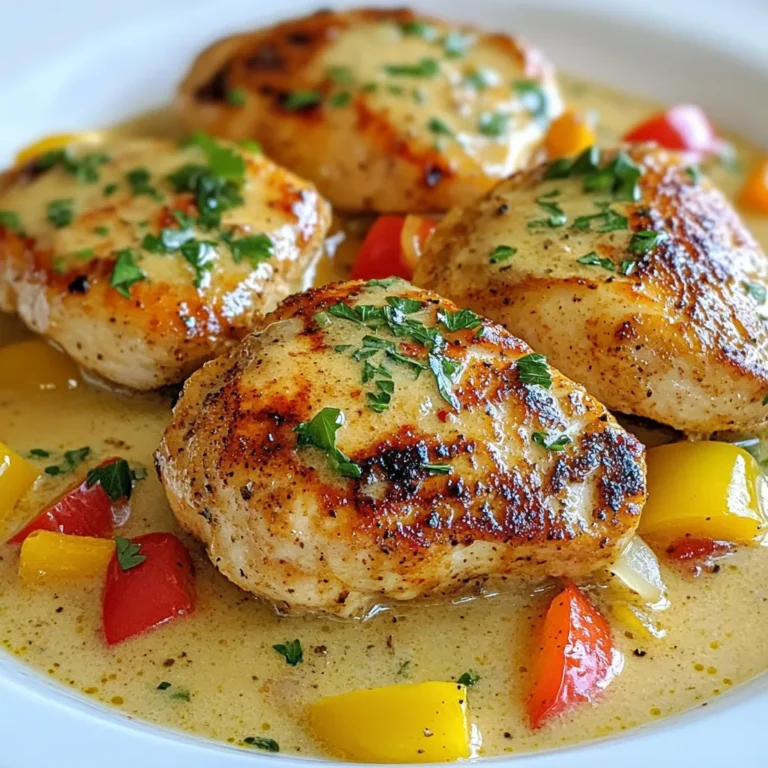
Creamy Cajun Chicken Flavorful and Easy Recipe

The perfect Creamy Bean Soup with Sausage starts with fresh, simple ingredients. Each one adds flavor and texture to this warm dish. - 1 cup dried white beans (cannellini or navy), soaked overnight - 1 tablespoon olive oil - 1 medium onion, diced - 2 cloves garlic, minced - 1 carrot, diced - 1 celery stalk, diced - 2 medium potatoes, diced - 4 cups vegetable broth - 1 cup cooked Italian sausage, sliced (or plant-based sausage for a vegetarian option) - 1 cup heavy cream or coconut cream - Salt and black pepper to taste - 1 teaspoon smoked paprika - ½ teaspoon dried thyme - 2 cups fresh spinach, roughly chopped - Fresh parsley for garnish This ingredient list gives you a hearty, flavorful soup. The dried beans are vital; they create a creamy base. Olive oil and fresh veggies add depth. The sausage makes it filling and adds a nice kick. Heavy cream (or coconut cream) enriches the soup, making it velvety. Spinach adds a pop of color and nutrients. Fresh parsley on top brightens the dish and looks great. With these ingredients, you’re ready to create a comforting meal that warms the soul. {{ingredient_image_1}} Start by soaking your dried white beans overnight. This step is key for getting the right texture. Rinse the beans well after soaking to remove any dirt. Soaking makes the beans easier to cook and digest. If you skip this step, the beans will take much longer to become tender. In a large pot, heat one tablespoon of olive oil over medium heat. Add diced onion, minced garlic, diced carrot, and diced celery. Sauté these veggies for about 5-7 minutes. You want them soft and fragrant. This base adds a rich flavor to the soup. Next, stir in the diced potatoes and the rinsed beans. Cook this mix for another 3 minutes. Then, pour in 4 cups of vegetable broth. Add smoked paprika, dried thyme, salt, and black pepper. Bring everything to a boil and then lower the heat to simmer for 30-40 minutes. This will make the beans tender and let the flavors blend. Once the beans are tender, add in one cup of cooked Italian sausage and one cup of heavy cream or coconut cream. Stir gently to combine. Let it simmer for about 10 minutes. This allows the flavors to meld together nicely, creating a creamy and rich soup. Now, stir in 2 cups of roughly chopped spinach. Cook for another 2-3 minutes until the spinach wilts. Taste the soup and adjust the seasoning if needed. This adds a fresh touch and boosts the color. When ready to serve, ladle the soup into bowls. Garnish with fresh parsley for a pop of color. You can also drizzle a bit of olive oil on top and sprinkle freshly cracked pepper. This makes it look even more inviting and delicious. Enjoy your creamy bean soup! To change the thickness of your soup, you can adjust the cream. If you want it thicker, add less cream. For a thinner soup, add more broth or cream. If you like a rich flavor, use heavy cream. Coconut cream adds a nice twist and keeps it dairy-free too. To enhance the flavor, you can add more spices. A little extra smoked paprika can deepen the taste. Fresh herbs like thyme or parsley also brighten the soup. Taste often. This way, you can tweak the seasonings just how you like them. Soaking beans overnight saves time. But if you're in a rush, use a quick soak. To do this, boil the beans for about 5 minutes, then let them sit for an hour. This helps them soften faster. Chop your veggies ahead of time. You can do this the night before. This way, when you're ready to cook, you simply toss everything in the pot. Garnishes can make your soup look fancy. Fresh parsley adds color and a fresh taste. You can also drizzle a little olive oil on top for a rich finish. A sprinkle of black pepper can add a nice touch too. For more flair, consider croutons or a dollop of sour cream. These add texture and extra flavor to your creamy bean soup. Enjoy making it your own! Pro Tips Soak Beans Properly: Ensure you soak your dried beans overnight to reduce cooking time and enhance their texture. Flavor Boost: For an extra layer of flavor, consider adding a bay leaf while simmering the soup and remove it before serving. Texture Variation: To achieve a creamier consistency, blend a portion of the soup before adding the cream and sausage. Garnish Smart: Fresh herbs like basil or chives can add a burst of freshness when sprinkled on top before serving. {{image_2}} To make this soup vegetarian, switch out the sausage for plant-based sausage. You can also use coconut cream instead of heavy cream. This keeps the soup rich and creamy. Add more vegetables like zucchini or bell peppers for extra flavor and nutrients. These changes make the dish heartier without losing its comforting essence. If you love heat, try using spicy sausage or adding diced jalapeños. This will give your soup a nice kick. You can also sprinkle in red pepper flakes to adjust the spice levels. Start with a little, then taste and add more if needed. This way, you can control the heat to suit your taste. You can vary the beans for different textures and flavors. Black beans, pinto beans, or even chickpeas work well. Each bean brings its unique taste and nutritional benefits. For example, black beans add a rich flavor, while chickpeas offer a nutty taste. Experiment with what you have on hand to find your favorite combo. To store your creamy bean soup, let it cool first. Place it in an airtight container. This keeps the flavors fresh. The best practice is to refrigerate it within two hours of cooking. Your soup can last in the fridge for about three to four days. Make sure to label the container with the date. This helps you know when to eat it. You can freeze the soup for longer storage. Use freezer-safe containers or bags. Leave some space at the top because soup expands when frozen. It’s best to freeze the soup without the cream. This keeps the texture smooth. When you reheat, add the cream later. The soup can last for about three months in the freezer. To reheat, use the stovetop for best results. Pour the soup into a pot and heat it slowly. Stir it often to avoid sticking. If the soup seems too thick, add a little broth or water. You can also use the microwave. Heat in short bursts, stirring in between. This keeps the flavor and consistency just right. Enjoy your creamy bean soup warm and comforting! Yes, you can use canned beans. They save time and are easy to use. However, dried beans have better flavor and texture. Canned beans may contain added salt. Rinse them to reduce sodium. Dried beans need soaking and cooking but provide a richer taste. Choose based on your time and preference. To make this soup dairy-free, use coconut cream instead of heavy cream. It adds creaminess without dairy. You can also try cashew cream for a similar texture. Blend soaked cashews with water until smooth. This gives a rich flavor. Always check labels for dairy in any alternatives. This soup is packed with nutrients. White beans provide protein and fiber. Sausage adds flavor and protein but can be high in fat. Spinach is rich in vitamins A and K. Potatoes add carbs for energy. Using vegetable broth keeps it low in calories. Overall, it's a hearty option for balanced meals. Yes, you can use a slow cooker for this soup. Start by sautéing onions, garlic, and veggies in a pan. Then, add them to the slow cooker. Include soaked beans, broth, and spices. Cook on low for 6-8 hours. Add sausage and cream in the last hour of cooking. This allows flavors to blend well. If you want a thicker soup, try these methods. Mash some of the beans against the pot's side. This releases starch and thickens the soup. You can also add a slurry of cornstarch and water. Stir it in and cook for a few minutes. Finally, adding more potatoes can help thicken the texture. Now you know how to make a comforting bean soup. We covered all the key ingredients, from dried beans to fresh parsley. I shared steps for preparation, cooking, and serving. You can customize the soup based on your tastes, including vegetarian options and spice levels. Remember to store leftovers properly for later enjoyment. This soup is not just filling; it’s packed with nutrients. Dive into this recipe and make it your own. Enjoy the warmth and flavor with every bite.

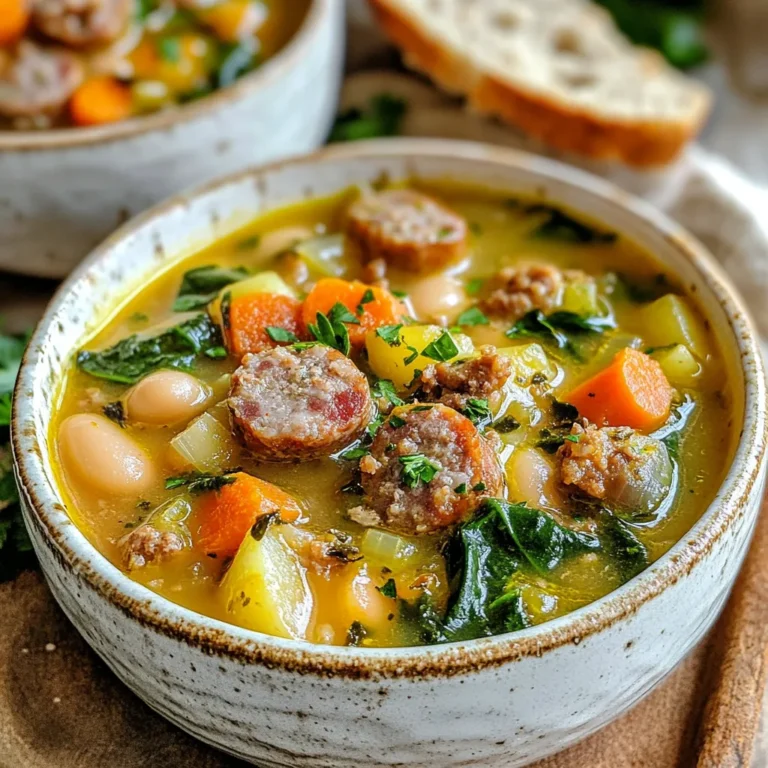
Creamy Bean Soup with Sausage Simple Comfort Dish

To make crispy baked chicken tenders, you need simple ingredients. Here’s what you will need: - 1 pound chicken tenderloins - 1 cup whole wheat breadcrumbs - 1/2 cup grated Parmesan cheese - 1 teaspoon garlic powder - 1 teaspoon onion powder - 1 teaspoon smoked paprika - 1/2 teaspoon black pepper - 1/2 teaspoon salt - 2 large eggs - 1 tablespoon Dijon mustard - 1 tablespoon honey - Olive oil spray Each ingredient plays a key role in flavor and texture. Chicken tenderloins give a tender bite. The whole wheat breadcrumbs add crunch. Grated Parmesan cheese brings a salty richness. Garlic and onion powders add savory notes. Smoked paprika gives a hint of smokiness. Black pepper and salt enhance the overall taste. Eggs act as a binding agent. Dijon mustard and honey add a sweet and tangy layer of flavor. Finally, olive oil spray helps achieve that golden brown finish. This dish is both tasty and healthy, making it a great family meal. {{ingredient_image_1}} Start by preheating your oven to 425°F (220°C). This ensures the chicken cooks evenly. While the oven heats, line a baking sheet with parchment paper. This helps with easy cleanup and prevents sticking. In a mixing bowl, combine the whole wheat breadcrumbs, grated Parmesan cheese, garlic powder, onion powder, smoked paprika, black pepper, and salt. Make sure to mix them well. This blend adds flavor and texture to the chicken. In another bowl, beat the two large eggs. Add in the Dijon mustard and honey. Whisk until smooth. This mixture will help the breadcrumbs stick to the chicken. Take each chicken tenderloin and dip it into the egg mixture. Let any extra egg drip off. Then, coat the tenderloin in the breadcrumb mixture. Press lightly to make sure the crumbs stick well. Place each coated tender on the prepared baking sheet. Keep them in a single layer for even cooking. Lightly spray the tops of the chicken tenders with olive oil spray. This step helps them turn golden and crispy. Bake them in the oven for 15-20 minutes. Halfway through, turn the tenders for even browning. They are done when they are cooked through and crispy. Once baked, remove the chicken tenders from the oven. Let them cool for a few minutes. Serve them on a platter with honey mustard or your favorite dipping sauce. Garnish with fresh parsley or extra Parmesan. Enjoy your delicious crispy baked chicken tenders! To make your chicken tenders extra crispy, start with dry chicken. Pat the tenderloins with paper towels to remove moisture. Next, use whole wheat breadcrumbs. They give a crunch and add flavor. Press the breadcrumbs onto the chicken firmly. This helps them stick. Lastly, spray a light coat of olive oil on top before baking. It aids in browning and crispiness. Always preheat your oven to 425°F (220°C). This high heat cooks the chicken quickly and evenly. Place the chicken tenders in a single layer on the baking sheet. Avoid crowding them to allow air to circulate. Turn them halfway through cooking. This ensures they brown evenly on both sides. Bake for 15-20 minutes until golden and cooked through. Use a good baking sheet lined with parchment paper. This prevents sticking and makes cleanup easy. A mixing bowl is important for your coating mixtures. A whisk helps blend the egg mixture smoothly. Finally, keep a spatula handy for flipping the tenders. These tools make the process easier and more fun! Pro Tips Use Panko Breadcrumbs: For an even crispier texture, consider using panko breadcrumbs instead of regular whole wheat breadcrumbs. They create a lighter, crunchier coating. Marinate the Chicken: For added flavor and moisture, marinate the chicken tenderloins in a mixture of buttermilk and spices for at least 30 minutes before coating them. Experiment with Seasonings: Feel free to adjust the spices according to your taste. Adding cayenne pepper for heat or Italian herbs for a different flavor profile can elevate your chicken tenders. Store and Reheat Properly: To keep leftovers crispy, store them in a single layer on a wire rack. When reheating, use an oven instead of a microwave to regain the crunch. {{image_2}} If you want a gluten-free version, swap the whole wheat breadcrumbs. Use gluten-free breadcrumbs instead. You can also crush gluten-free corn flakes for a crunchy texture. This keeps the dish crispy, tasty, and safe for gluten-sensitive diets. You can change the flavors easily. Try adding cayenne pepper for heat or Italian herbs for a twist. Use lemon zest for a fresh taste. Experiment with your favorite spices to make these tenders your own. This way, each meal can feel new and exciting. Baking is great, but you can also air fry these tenders. Set your air fryer to 400°F (200°C) and cook for about 10-12 minutes. You can achieve a crispy outside while keeping the chicken juicy inside. Grilling is another option. Just make sure to keep an eye on them to avoid drying out. To keep your chicken tenders fresh, let them cool first. Place them in a shallow container. Cover it tightly with plastic wrap or a lid. This helps keep moisture in and prevents them from drying out. Store the container in the fridge. They will stay good for about three days. When you are ready to eat the leftovers, preheat your oven to 375°F (190°C). Place the chicken tenders on a baking sheet. Heat them for about 10 to 15 minutes. This method makes them crispy again. You can also use a microwave, but the texture will not be as good. If you use the microwave, heat them for one to two minutes. Check if they are warm enough before serving. If you want to save your chicken tenders for later, freezing is a great option. First, let them cool completely. Then, wrap each piece in plastic wrap. Place them in a freezer-safe bag or container. Squeeze out as much air as you can. They can stay in the freezer for up to three months. When you want to eat them, thaw them overnight in the fridge before reheating. This keeps their taste and texture nice. You should bake chicken tenders for 15 to 20 minutes. Bake them at 425°F (220°C). Check if they are cooked through. The coating should be golden and crispy. Turn them halfway through baking for even cooking. Yes, you can use chicken breasts. Just cut them into strips. Make sure the strips are about the same size as tenderloins. This helps them cook evenly. The cooking time may change slightly. Some great dipping sauces are honey mustard and barbecue sauce. Ranch dressing also works well. You can try hot sauce for a kick. Consider making a yogurt dip for a healthy twist. Yes, these chicken tenders can be healthy. They use whole wheat breadcrumbs and lean chicken. You control the ingredients and can add your favorite spices. Baking them instead of frying cuts down on fat. Enjoy them guilt-free! This blog showed you how to make tasty baked chicken tenders. We covered the right ingredients, simple steps, and tips for crispiness. You learned variations and storage tips too. These chicken tenders are fun to make and share. Try them out for a meal or snack. Enjoy making this healthy dish for yourself and loved ones. Your next cooking adventure starts now!

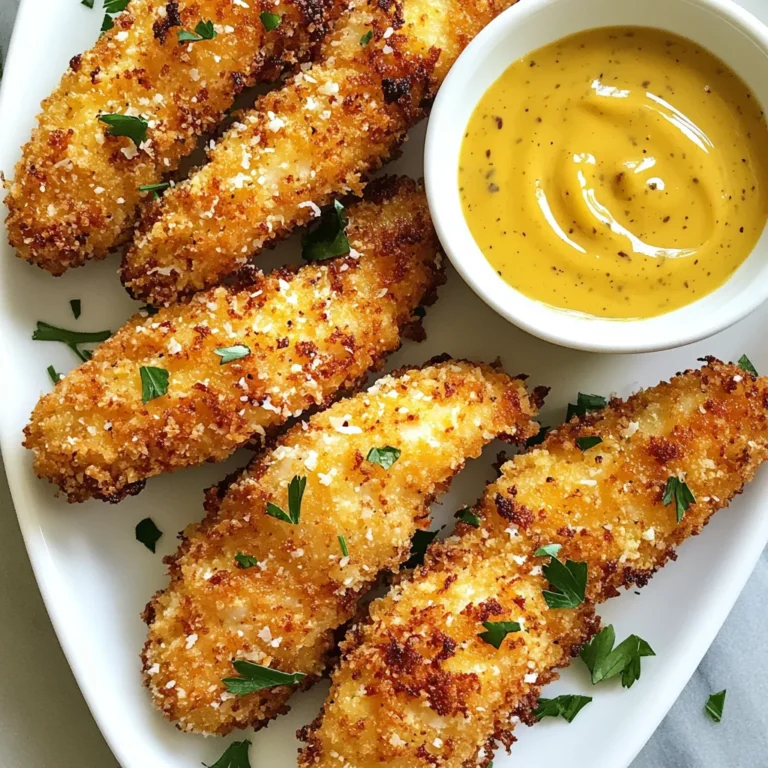
Crispy Baked Chicken Tenders Easy Family Recipe

To make a delicious Garlic Broccoli Chickpea Stir Fry, you need the following ingredients: - 2 cups broccoli florets - 1 can (15 oz) chickpeas, drained and rinsed - 4 cloves garlic, minced - 1 bell pepper, sliced (any color) - 1 medium carrot, julienned - 2 tablespoons olive oil - 2 tablespoons soy sauce (or tamari for gluten-free) - 1 tablespoon maple syrup - 1 teaspoon sesame oil - 1 teaspoon ginger, minced (optional) - Salt and pepper to taste - Sesame seeds for garnish - Fresh cilantro for garnish (optional) Gathering these ingredients sets the stage for a quick and tasty meal. Each ingredient plays a role. Broccoli provides crunch and nutrition. Chickpeas add protein. Garlic brings a rich flavor. Bell pepper and carrot offer color and sweetness. The oils and sauces tie it all together, giving depth to your dish. Feel free to adjust the veggies based on what you have. This recipe is flexible and encourages creativity! {{ingredient_image_1}} - Rinse and drain the chickpeas in a colander. - Chop broccoli into bite-sized florets. - Slice the bell pepper into thin strips. - Julienne the carrot for a nice texture. - Mince the garlic and ginger if you choose to use it. - Heat two tablespoons of olive oil in a large skillet over medium-high heat. - Add the minced garlic and ginger to the hot oil. Sauté for about 30 seconds. - Stir often to avoid burning the garlic and to keep it fragrant. - Add the chopped broccoli, sliced bell pepper, and julienned carrot. - Stir-fry these veggies for about 5 to 7 minutes. They should stay tender-crisp. - Now, add your rinsed chickpeas to the skillet. Stir well to mix them with the veggies. - In a small bowl, mix two tablespoons of soy sauce, one tablespoon of maple syrup, and one teaspoon of sesame oil. - Pour this sauce over the stir fry and toss everything well to coat evenly. - Taste your dish and adjust the seasoning with salt and pepper as needed. To keep your vegetables crisp, cook them fast over high heat. Stir-fry for just a few minutes. This helps them stay bright and crunchy. Avoid burning garlic by adding it to the pan first. Sauté it quickly for about 30 seconds. If it starts to brown, lower the heat right away. For extra flavor, try adding chili flakes or a splash of lime juice. You can also mix in a tablespoon of peanut butter for a rich taste. Fresh herbs like basil or mint can brighten the dish. Sprinkle them on top just before serving. Serve your stir fry with cooked quinoa or rice for a filling meal. This adds texture and balances the flavors. For presentation, use a large bowl or individual plates. Drizzle some sesame oil on top for a shiny finish. Garnish with sesame seeds and cilantro for a pop of color. Pro Tips Prep Ahead: Chop your vegetables and mince your garlic and ginger beforehand to save time during cooking. Customize Your Veggies: Feel free to add your favorite vegetables like snap peas or zucchini for extra color and nutrition. Adjust the Sauce: If you prefer a sweeter stir fry, increase the maple syrup, or for a spicier kick, add a splash of sriracha. Serve with Grains: For a more filling meal, serve the stir fry over brown rice, quinoa, or whole grain noodles. {{image_2}} You can switch up the veggies in this stir fry. Here are some great options: - Cauliflower florets - Snap peas - Zucchini, sliced - Carrots, cut in circles For plant-based protein, you have many options: - Tofu, cubed and cooked - Tempeh, sliced - Lentils, cooked If you need gluten-free options, use tamari instead of soy sauce. It tastes great! For vegan swaps, the recipe is already vegan. Just check the soy sauce for hidden ingredients. Want some heat? Add chili flakes while cooking. It brings a nice kick. If you like sweet, try using agave syrup or honey instead of maple syrup. It changes the taste in a fun way! To keep leftovers fresh, store them in the fridge. Use airtight containers for the best results. Glass containers work well, but plastic ones are just fine too. Make sure the stir fry cools down before sealing it. You can freeze this stir fry for meal prep. Place it in freezer-safe bags or containers. Remove as much air as possible to prevent freezer burn. To reheat, thaw it in the fridge overnight. Heat it in a skillet over medium heat until warm. This stir fry lasts about 3 to 4 days in the fridge. Always check for signs of spoilage before eating. If you see any mold or feel an odd smell, it is best to toss it. Yes, you can use frozen broccoli. It will save time and effort. Just thaw it first. Frozen broccoli may cook faster than fresh. Keep an eye on it to avoid mushiness. This stir fry is great on its own, but you can pair it with: - Cooked quinoa - Brown rice - Cauliflower rice - Noodles These options add more texture and flavor to your meal. To add heat, try these ideas: - Add red pepper flakes - Include sliced fresh chili peppers - Use spicy soy sauce Start with a little. You can always add more heat later. Absolutely! This stir fry stores well. You can keep it in the fridge for about 3-4 days. Use airtight containers for the best results. Reheat it on the stove or in the microwave. Yes, you can boost the protein. Here are some options: - Cooked chicken - Tofu - Tempeh - Shrimp Add these during the cooking process for even flavor. Adjust cooking time as needed. This blog post detailed a nutritious Garlic Broccoli Chickpea Stir Fry. We explored ingredients, prep steps, cooking methods, and storage. You learned how to keep veggies crisp and enhance flavors. I covered substitutions and variations for dietary needs. Remember to adjust the spices to your taste. This dish is not only tasty but also easy to make and perfect for meal prep. Enjoy this healthy stir fry full of color and flavor!

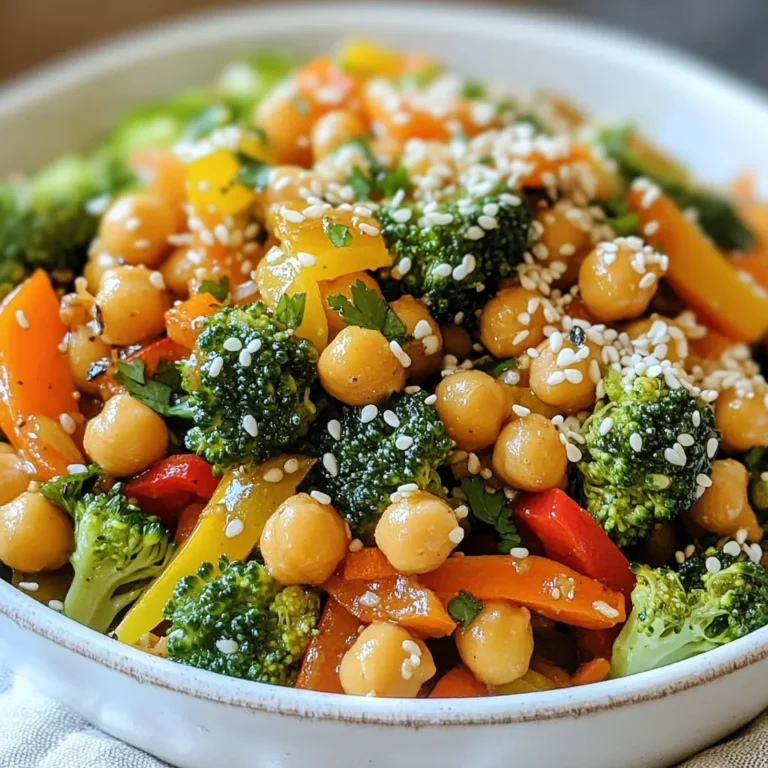
Garlic Broccoli Chickpea Stir Fry Simple and Quick Dish

PREV 1 … 55 56 57 NEXT
meal twig

explore

DessertsDinnerAppetizersDrinks

Our Policies

  • Cookie Policy
  • Copyright Policy
  • Disclaimer
  • GDPR Policy
  • Terms Of Use
Back to Top
  • About
  • Contact Us
  • Privacy Policy
© 2025 meal twig