FREE DINNER EBOOK! Get your copy!
  • Cookie Policy
  • GDPR Policy
  • Disclaimer
  • Terms Of Use
  • Visit my other site: Fun Cookie Recipes
meal twig
  • Home
  • Dinner
  • Desserts
  • Drinks
  • Appetizers
  • Contact
  • About
  • Privacy Policy
  • Home
  • Dinner
  • Desserts
  • Drinks
  • Appetizers
  • Contact
  • About
  • Privacy Policy
  • Cookie Policy
  • GDPR Policy
  • Disclaimer
  • Terms Of Use
Visit my other site: Fun Cookie Recipes

HOME / CATEGORIES /

Latest

- 1.5 lbs boneless, skinless chicken thighs: I prefer thighs for their rich flavor and tenderness. - 4 medium carrots, sliced: Carrots add sweetness and color to the stew. - 3 stalks celery, chopped: Celery gives a nice crunch and depth to each bite. - 1 large onion, diced: Onions are key for a strong base flavor. - 3 cloves garlic, minced: Garlic adds warmth and aroma. - 4 medium potatoes, diced: Potatoes make the stew hearty and filling. - 1 can (15 oz) diced tomatoes, with juices: Tomatoes bring acidity and balance to the dish. - 4 cups chicken broth: Broth is the heart of the stew, making it rich. - 2 teaspoons dried thyme: Thyme gives a lovely herbal note. - 1 teaspoon dried rosemary: Rosemary adds a woodsy flavor that’s perfect for stews. - 1 bay leaf: A bay leaf enhances the savory profile. - Salt and pepper to taste: Always adjust seasoning to your liking. - 2 tablespoons olive oil: Olive oil helps sauté the veggies and adds richness. - 1 cup frozen peas: Peas add a pop of color and sweetness at the end. - Fresh parsley, chopped (for garnish): Parsley brightens the stew and adds freshness. Each ingredient plays a vital role in creating a warm, comforting dish. The blend of chicken, vegetables, and seasonings creates an inviting aroma that fills your kitchen. When you slow cook it, the flavors meld beautifully, making every bite a delight. {{ingredient_image_1}} Sautéing the vegetables is key for great flavor. When you heat them first, it brings out their natural sweetness. This step adds depth to your stew. Here’s how to do it perfectly: - Use a large skillet. - Heat 2 tablespoons of olive oil over medium heat. - Add diced onions and minced garlic. Stir for about 2 minutes. - Next, toss in sliced carrots and chopped celery. - Cook for 3 more minutes, until onions are soft and clear. This quick process boosts the taste of your stew. You’ll notice a big difference! Seasoning the chicken well makes it extra tasty. I like to use salt and pepper for a simple touch. Here’s how to layer it in the slow cooker: 1. After sautéing, place the cooked veggies in the bottom of the slow cooker. 2. Next, add 1.5 lbs of boneless, skinless chicken thighs on top. 3. Make sure the chicken pieces are evenly spread out. This order helps the chicken absorb all those lovely flavors from the veggies. Choosing the right cooking time is important. You can cook on low or high. Here are the main differences: - Low setting: Cook for 6-7 hours. This makes the chicken very tender and juicy. - High setting: Cook for 3-4 hours. This works too but may not be as soft. No matter the setting, the stew needs time for flavors to mix well. Enjoy the rich taste that comes from slow cooking! To make your stew really stand out, try these tips: - Sauté your veggies: This step boosts the taste. Cook onions, carrots, and celery in olive oil first. Aim for five minutes until onions look soft. - Use fresh herbs: Fresh thyme and rosemary add depth. If using dried, stick to the recipe amounts. Common mistakes include: - Skipping the sauté: Avoid this. It makes a big difference in flavor. - Overcooking chicken: Too long can dry out the meat. Aim for tender, juicy pieces. Using frozen veggies can save time. Here are the pros and cons: - Pros: Frozen vegetables are often picked and frozen at peak freshness. They can save prep time. - Cons: They may lose some texture. Some may not have the same taste as fresh. For fresh ingredients, consider these swaps: - Use fresh peas instead of frozen for a sweeter taste. - Substitute fresh potatoes for diced canned ones for a heartier stew. If you want a thicker stew, here are some simple techniques: - Cornstarch method: Mix two tablespoons of cornstarch with cold water. Stir this into the stew about 30 minutes before serving. - Flour method: Mix flour with a bit of water to form a paste. Add this to the stew and stir well. To adjust liquids for thickness, check the stew's consistency. If too thin, let it cook a bit longer with the lid off. If too thick, add a splash of broth or water gradually. Pro Tips Choose the Right Chicken: Using boneless, skinless chicken thighs ensures tender meat that won’t dry out during cooking. Layer for Flavor: By sautéing the vegetables first, you develop a deeper flavor base for your stew. Adjust Consistency: If the stew is too thick, add more chicken broth at the end to reach your desired consistency. Let It Rest: Allow the stew to sit for a few minutes after cooking; this helps the flavors to meld further. {{image_2}} You can make this stew healthier with some simple swaps. Try using leaner meats like chicken breast instead of thighs. Chicken breast has less fat while still being juicy. You can also use low-sodium chicken broth to cut back on salt. This option helps control your sodium intake. Adding more vegetables boosts nutrition too. Instead of just potatoes, try adding sweet potatoes or butternut squash. Both add sweetness and healthy vitamins. You might also consider adding spinach or kale for extra greens. These choices not only improve health but also add color and taste. Want to explore new flavors? Try adding different spices to your stew. For a Mediterranean twist, use oregano or basil. If you prefer a kick, add some cumin or chili powder. Each spice brings a unique taste that can change the whole dish. You can also include non-traditional ingredients. Adding beans can make the stew heartier. Black beans or kidney beans add protein and fiber. Corn is another great option; it brings sweetness and crunch. These twists make your chicken stew exciting and fun, so feel free to mix it up! To keep your leftover chicken stew fresh, let it cool first. Place it in an airtight container. This helps keep out air and moisture. You can store it in the fridge for up to four days. If you want to save it longer, freeze it. For freezing, use freezer-safe containers or heavy-duty freezer bags. Make sure to leave some space at the top. The stew will expand as it freezes. Label each container with the date. This will help you track how long it’s been in the freezer. When you're ready to enjoy your stew again, you have two great options. You can use the microwave or the stove. For the microwave, place your stew in a bowl. Cover it with a microwave-safe lid or wrap. Heat it in one-minute intervals. Stir between each minute to ensure even heating. If you prefer the stove, pour the stew into a pot. Heat it over medium heat. Stir often to prevent sticking. This method helps keep the stew's flavor and texture. To maintain the taste, add a splash of chicken broth or water if it seems thick. This will bring back its fresh flavor and creamy texture. Enjoy your delicious chicken stew just like the first time! Yes, you can use chicken breast. Chicken breast cooks faster than thighs. This can lead to dry meat if not careful. Chicken thighs have more fat, which adds flavor and moisture. If you choose breast, cut it into larger pieces to help keep it juicy. Adjust the cooking time to avoid overcooking. To make this stew vegetarian, swap the chicken for plant-based protein. You can use chickpeas, lentils, or tofu. Replace chicken broth with vegetable broth. Keep all the veggies like carrots, celery, and potatoes. Add more spices for extra flavor. This way, you'll have a hearty, meat-free stew. You can serve many sides with this stew. Fresh bread or rolls are great for dipping. A simple green salad adds freshness. For a heartier meal, pair it with rice or mashed potatoes. You can also serve it with steamed vegetables for extra nutrition. Slow cooker chicken stew is an easy, tasty meal. You start with chicken thighs, veggies, and broth. Sautéing adds rich flavor, while the right spices make every bite delicious. Cooking on low gives the best texture. You can use fresh or frozen ingredients, but know their pros and cons. Thicken your stew if you prefer a hearty texture. Don't forget to explore healthy swaps or fun twists on this recipe. Proper storage keeps leftovers tasty for later. Enjoy your cooking, and share this stew with family and friends!

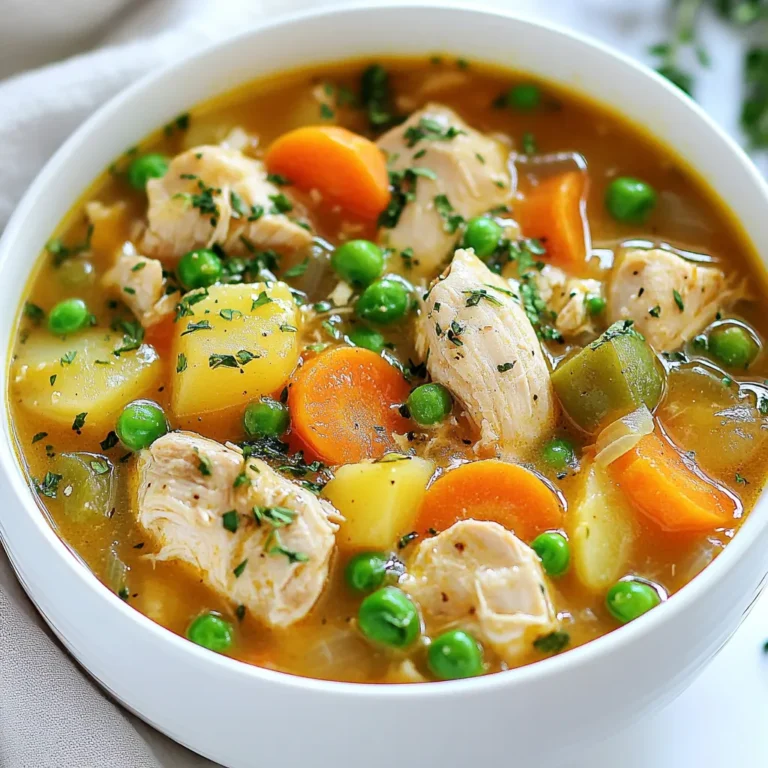
Savory Slow Cooker Chicken Stew Easy Comfort Food

- 1 lb ground beef - 1/2 lb ground pork (optional) - 1 large onion, finely chopped - 3 cloves garlic, minced - 1/2 cup breadcrumbs - 1/4 cup grated Parmesan cheese - 1 large egg - 1/2 cup shredded Gruyère cheese (for topping) Ground beef is the main star here. The pork adds a nice touch but is not required. Onions and garlic bring rich flavor. You will need breadcrumbs and Parmesan cheese to bind the meatballs and add taste. An egg helps hold everything together. Gruyère cheese makes a creamy topping that melts perfectly over the meatballs. - 1 tablespoon Worcestershire sauce - 1 teaspoon dried thyme - 1/2 teaspoon salt - 1/4 teaspoon black pepper - 1 cup beef broth Worcestershire sauce gives depth to the flavor. Thyme adds a hint of earthiness. Salt and pepper enhance all the tastes. The beef broth serves as a warm base, making the dish comforting. - Fresh herbs for garnish - Extra cheese for topping - Spices like paprika or red pepper flakes You can sprinkle fresh herbs for bright color and taste. Adding more cheese can make it extra special. If you like a kick, try spices like paprika or red pepper flakes for added heat. {{ingredient_image_1}} To start, heat 1 tablespoon of olive oil in a skillet over medium heat. Add 1 large finely chopped onion. Sauté the onion until it turns golden brown. This takes about 15 to 20 minutes. Stir the onion often to prevent it from burning. After 15 minutes, add 3 cloves of minced garlic. Cook for another 5 minutes. The garlic will add flavor and aroma to your dish. Once done, set the onions aside to cool slightly. In a large bowl, combine the meat. Use 1 pound of ground beef and 1/2 pound of ground pork if you like. Next, add the cooled caramelized onions and garlic. Then, mix in 1/2 cup of breadcrumbs and 1/4 cup of grated Parmesan cheese. Crack 1 large egg into the bowl. Add 1 tablespoon of Worcestershire sauce, 1 teaspoon of dried thyme, 1/2 teaspoon of salt, and 1/4 teaspoon of black pepper. Mix everything until well combined. This forms the base for your meatballs. Now, preheat your oven to 400°F (200°C). While it heats, shape the meat mixture into small meatballs. Aim for about 1 inch in diameter. Place them on a baking sheet lined with parchment paper. Bake the meatballs for 20 to 25 minutes. They should be cooked through and browned. While the meatballs bake, pour 1 cup of beef broth into a saucepan. Heat it until it simmers. Once the meatballs are done, transfer them into the broth. Allow them to sit for 5 minutes. This helps them absorb the rich flavors. Serve the meatballs topped with 1/2 cup of shredded Gruyère cheese. Let the cheese melt before you dig in! To make great meatballs, you need the right texture. Use binding agents like breadcrumbs and eggs. They help hold the meatball together. The moisture from the meat and onions also adds to the softness. If your mix feels too dry, add a splash of beef broth. For richer flavor, consider adding a bit of grated cheese. Adding spices can take your meatballs to the next level. Try different herbs like oregano or basil. A bit of hot sauce can add a nice kick. If you want a sweeter touch, mix in some minced bell peppers. You can also adjust the salt and pepper to fit your taste. Always taste your mix before cooking. You can cook your meatballs in many ways. Baking is easy and keeps them moist. However, you can also pan-fry them for a crispy outside. To pan-fry, heat some oil in a skillet. Cook the meatballs until they are brown on all sides. After that, simmer them in broth for extra flavor. This method gives you a nice crust and keeps them juicy. Pro Tips Use Fresh Herbs: Fresh thyme can elevate the flavor of your meatballs significantly. If you have it on hand, consider substituting dried thyme with fresh for a more aromatic taste. Mix Meat Types: Combining ground beef with ground pork adds a nice flavor and moisture to your meatballs. If you're open to it, try this combination for a richer taste. Don't Overmix: When combining your ingredients, mix just until everything is incorporated. Overmixing can lead to tough meatballs, so be gentle! Cheese Melting Tip: For perfectly melted Gruyère cheese, place the meatballs back in the oven for a few minutes after adding the cheese. This will ensure a beautifully melted topping. {{image_2}} You can mix it up with different meats. Try turkey or chicken instead of beef. These options can make the dish lighter but still tasty. Ground turkey has a milder flavor. You can spice it up with extra seasonings. Ground chicken is also a great choice. It holds flavors well and stays juicy. For a plant-based option, use lentils or mushrooms. Lentils give a nice texture and protein. Mushrooms add a deep, rich flavor. You can also use a meat substitute like tempeh or tofu. Just make sure to add enough spices to keep it flavorful. Use breadcrumbs made from whole grains for added nutrition. How you serve these meatballs can change the dish. Serve them in a shallow bowl with warm beef broth. Top with melted Gruyère cheese for a rich touch. You can also add fresh thyme for color and flavor. For a playful twist, serve them on skewers with a side of crusty bread. This makes them fun for gatherings. Another idea is to use a bed of mashed potatoes or polenta. This adds a creamy base that pairs well with the meatballs. To keep your meatballs fresh, store them in an airtight container. Place a layer of parchment paper between layers to avoid sticking. Make sure they cool down first. This keeps the flavors intact. You can store them in the fridge for up to three days. Just reheat them gently when you're ready to enjoy again. Freezing is a great option if you want to save some meatballs for later. First, let them cool completely. Then, arrange the meatballs on a baking sheet in a single layer. Freeze them for about an hour. After that, transfer them to a freezer-safe bag or container. This method helps them keep their shape. They can last in the freezer for up to three months. When you're ready to eat, thaw in the fridge overnight. Reheat them in a saucepan with beef broth for the best taste. In the fridge, meatballs can last for three days. If you freeze them, they stay good for about three months. However, for the best flavor, I recommend eating them sooner. Always check for signs of spoilage, like off smells or changes in texture. Enjoy your delicious meatballs while they're fresh! French onion meatballs shine when paired with simple sides. Here are my top picks: - Mashed Potatoes: Creamy mashed potatoes soak up the savory broth. - Crusty Bread: Fresh bread is perfect for dipping into the broth. - Green Salad: A light salad adds freshness to balance the rich meatballs. - Roasted Vegetables: Carrots, broccoli, or zucchini bring color and nutrients. These sides not only complement the meatballs but also create a hearty meal. Yes, you can prepare meatballs ahead of time! Here’s how: - Mix Ingredients: Combine your meat, bread, and seasonings. - Shape Meatballs: Form them into balls and place them on a baking sheet. - Refrigerate: Cover and store in the fridge for up to 24 hours. - Freeze: For longer storage, freeze the uncooked meatballs. They last up to three months. When ready to cook, bake them straight from the fridge or freezer. Adjust the cooking time as needed. To check if your meatballs are done, use these tips: - Internal Temperature: Cook to an internal temperature of 160°F (71°C). - Visual Cues: Meatballs should be browned on the outside. The broth will bubble around them. - Texture Check: They should feel firm, not soft or mushy. Using a meat thermometer is the best way to ensure they are safe to eat. Enjoy your savory French onion meatballs! You now have everything you need to make delicious French onion meatballs. We've covered main ingredients like ground meat, onions, and spices. I showed you how to prepare, mix, and cook them perfectly. You learned tips for texture and flavor, plus variations for different diets. Storing leftovers or freezing meatballs is easy too. Remember, cooking is about trying new things. Enjoy the flavors, and don’t hesitate to make it your own!

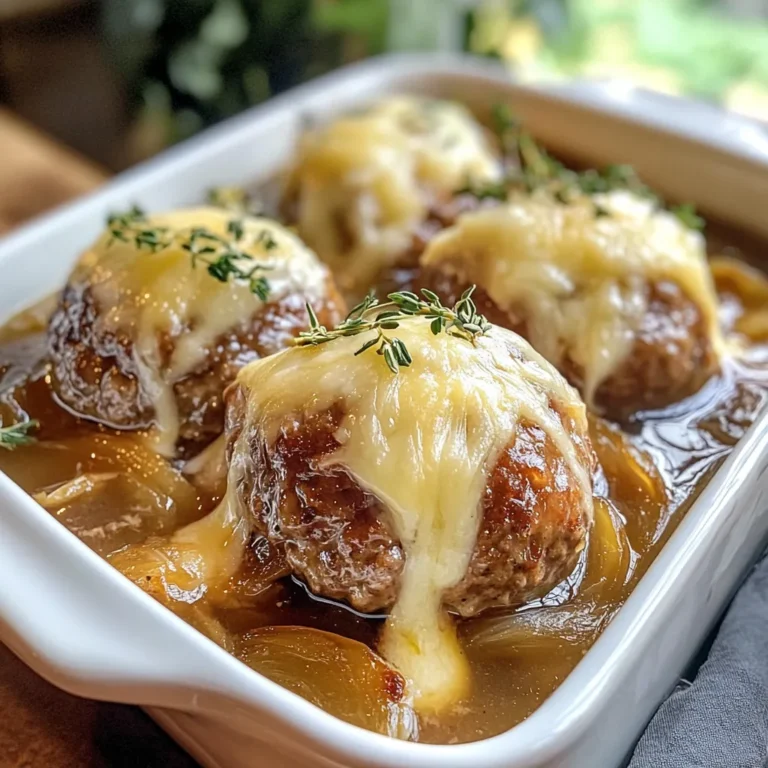
French Onion Meatballs Savory and Satisfying Meal

To make Creamy Crockpot Ranch Chicken, gather these simple ingredients: - 4 boneless, skinless chicken breasts - 1 packet ranch seasoning mix - 1 can (10.5 oz) cream of chicken soup - 1 cup chicken broth - 1 cup sour cream - ½ cup cream cheese, softened - 1 cup shredded cheddar cheese - 1 cup frozen peas (optional) - Salt and pepper to taste - Fresh parsley, chopped (for garnish) You can swap some ingredients for what you have on hand. Use Greek yogurt instead of sour cream for a lighter option. If you don’t have cream cheese, try using a dairy-free cream cheese. Instead of chicken broth, vegetable broth works well too. For a twist, try different cheese, like pepper jack, for added flavor. Each ingredient plays a key role in the dish: - Chicken breasts provide the base protein and absorb flavors. - Ranch seasoning gives that classic ranch taste, making it rich and savory. - Cream of chicken soup adds creaminess and depth to the sauce. - Chicken broth keeps the dish moist while cooking. - Sour cream and cream cheese create a velvety texture and tangy flavor. - Cheddar cheese brings a delicious, melty finish. - Frozen peas add a pop of color and sweetness, if you choose to include them. - Salt and pepper enhance all the flavors, balancing the dish. - Fresh parsley adds a bright touch on top, making the dish look inviting. These ingredients work together to create a comforting meal that warms your heart. {{ingredient_image_1}} Start with four boneless, skinless chicken breasts. Place them at the bottom of your slow cooker. This helps the chicken cook evenly. Next, sprinkle the ranch seasoning mix over the chicken. The seasoning gives great flavor. Make sure to cover all the chicken pieces. In a medium bowl, mix the cream of chicken soup, chicken broth, sour cream, and cream cheese. Use a whisk to blend until the mixture is smooth. This creamy sauce will coat the chicken nicely. Once mixed, pour it over the chicken in the slow cooker. Make sure the chicken is well covered with the sauce. Now, it’s time to cook! Cover the slow cooker with the lid. Cook on low for 6-7 hours or on high for 3-4 hours. You want the chicken to be tender and fully cooked. After cooking, shred the chicken with two forks right in the slow cooker. This keeps all the flavors together. Stir to combine everything. Finally, add the shredded cheddar cheese. Mix until it melts into the creamy sauce. To get that dreamy creamy texture, mix the sauce well. Use a medium bowl. Combine the cream of chicken soup, chicken broth, sour cream, and cream cheese until smooth. This step is key for a rich flavor. Ensure no lumps remain in the sauce. Pour it over the chicken in the crockpot. This will help the chicken soak up all that creamy goodness. When it’s time to serve, you have fun options. Try serving this dish in bowls. A sprinkle of fresh parsley adds color and taste. You can also serve it over rice or noodles. Crusty bread is great too. It’s perfect for soaking up that creamy sauce. Each bite should be full of flavor. Pair your creamy ranch chicken with easy side dishes. A simple green salad works well. You can also serve steamed veggies for more color. Rice pilaf or garlic bread make great choices too. This will round out your meal and keep everyone happy. Pro Tips Use Fresh Ingredients: Fresh chicken and high-quality cream cheese will enhance the flavor and creaminess of your dish. Adjust Seasoning: Feel free to add additional spices like garlic powder or onion powder for extra flavor that complements the ranch seasoning. Perfect Shredding: For the best shredded chicken, let the chicken rest for a few minutes after cooking before shredding to retain juices. Make It a Meal: Add vegetables like carrots or bell peppers to the slow cooker for a complete meal that’s nutritious and delicious. {{image_2}} To make your creamy crockpot ranch chicken even better, add veggies. Frozen peas work great, but you can try other options too. Chopped carrots, diced potatoes, or bell peppers add color and flavor. Just toss them in with the chicken and sauce. They will cook down nicely in the slow cooker and soak up all the tasty ranch goodness. Cheese makes this dish extra creamy and rich. While cheddar cheese is a favorite, you can mix it up. Try using pepper jack for a kick, or mozzarella for a milder taste. Cream cheese adds a smooth texture; it’s perfect to blend with any cheese you choose. Experiment with your favorites to make this dish your own. If you like a little heat, spice up your ranch chicken. Add some diced jalapeños or crushed red pepper flakes to the sauce. You can also use spicy ranch seasoning instead of the regular mix. This will give your dish a nice kick while keeping the creamy texture. Adjust the spice level to fit your taste. Enjoy the bold flavors! To store leftovers, wait until the creamy ranch chicken cools. Place it in an airtight container. Keep it in the fridge for up to three days. This way, you can enjoy it later without losing flavor. When you're ready to eat, reheat the chicken on the stove or in the microwave. If using the stove, heat it in a pan over low heat. Stir often to keep it creamy. If using the microwave, cover it to avoid drying out. Heat in short bursts, checking often. You can freeze the creamy ranch chicken for future meals. First, let it cool completely. Then, put it in a freezer-safe bag or container. Squeeze out as much air as you can. It will last for up to three months. When ready to eat, thaw it in the fridge overnight before reheating. Yes, you can use frozen chicken breasts. Just add an extra hour to the cooking time. This helps the chicken cook through and stay tender. Keep in mind that frozen chicken may release more liquid. You can adjust the broth if needed. To make this recipe dairy-free, swap the sour cream for a dairy-free alternative. Use coconut cream or cashew cream instead. For cream cheese, use a dairy-free spread. You can also skip the cheddar cheese or use a dairy-free cheese. You can serve this dish with many sides. Here are some great options: - Rice - Noodles - Crusty bread - Mashed potatoes - Steamed vegetables These sides soak up the creamy sauce well. Enjoy your meal with a sprinkle of fresh parsley for color! This blog post shared the key ingredients and steps for making Creamy Crockpot Ranch Chicken. You learned about substitution options, cooking tips, and how to store leftovers safely. I also covered fun variations to keep your meals exciting, like adding veggies or trying spicy twists. Remember to adjust the recipe to match your taste. Enjoy this simple dish that pleases everyone and fits any table. You can easily create a delicious meal that brings comfort and joy to your home.

Creamy Crockpot Ranch Chicken Delightful Dinner Dish

- 2 lbs beef chuck roast, cut into large pieces - 3 dried guajillo chilies, seeds removed - 2 dried ancho chilies, seeds removed - 1 dried pasilla chili, seeds removed - 1 onion, quartered - 4 cloves garlic, minced - 2 cups beef broth - 1 teaspoon ground cumin - 1 teaspoon dried oregano - 1 teaspoon smoked paprika - 1 teaspoon salt - 1/2 teaspoon black pepper - 1 teaspoon ground cinnamon - 2 tablespoons apple cider vinegar - Corn tortillas - Fresh cilantro - Diced onions - Lime wedges - Slow cooker - Blender - Skillet Gathering the right ingredients sets the stage for great birria tacos. You need beef chuck roast for a rich flavor and tender texture. Dried chilies add depth. Guajillo, ancho, and pasilla chilies create a balance of heat and sweetness. The onion and garlic bring aromatic notes that enhance the dish. Spices like cumin, oregano, and smoked paprika deepen the flavor. Salt and black pepper bring out the best in your ingredients. Ground cinnamon adds a unique twist. Apple cider vinegar brightens the mix. Corn tortillas serve as the perfect vessel for your savory filling. For toppings, fresh cilantro and diced onions add crunch and freshness. Lime wedges offer a zesty kick that complements the rich meat. Having the right tools is also key. A slow cooker ensures even cooking. A blender makes it easy to create a smooth marinade. A skillet helps warm your tortillas to perfection. With these ingredients and tools, you are ready to make flavorful birria tacos. {{ingredient_image_1}} - Toasting the dried chilies: Start by heating a dry skillet over medium heat. Add the guajillo, ancho, and pasilla chilies. Toast them for about 2-3 minutes. You want them fragrant but not burnt. - Letting the chilies cool: Once toasted, remove the chilies from the skillet. Let them cool for a few minutes before using them in the marinade. - Combining ingredients in the blender: In a blender, add the cooled chilies, quartered onion, minced garlic, and beef broth. Also, add cumin, oregano, smoked paprika, salt, black pepper, and cinnamon. - Achieving a smooth texture: Blend everything until it is smooth. This marinade will give your beef rich flavor. - Coating the beef with the marinade: Take your beef chuck roast and place it in a large bowl. Pour the chili marinade over the beef. Use your hands to coat all sides well. - Recommended marinating time: Cover the bowl and let it marinate in the fridge for at least one hour. For the best taste, marinate overnight. - Slow cooker settings and times: Transfer the marinated beef and sauce to a slow cooker. Set it to low and cook for 8 hours or on high for 4 hours. - Signs the beef is fully cooked: The beef is ready when it becomes tender and easily shreds with a fork. - Shredding the beef: Once cooked, take the beef out of the slow cooker. Shred it using two forks. Put the shredded beef back into the cooker to soak in the sauce. - Heating and preparing the corn tortillas: In a skillet, heat corn tortillas over medium-high heat for about 30 seconds on each side. They should be warm and slightly crispy. - Adding toppings: Fill each tortilla with a generous amount of shredded birria. Top them with chopped cilantro and diced onions for extra flavor. For the best taste, marinate the beef overnight. This allows the flavors to blend well. If you're in a hurry, at least marinate for one hour. When choosing chilies, use dried guajillo, ancho, and pasilla. These add rich, deep flavors. Remove the seeds for a milder taste. Toast them lightly before blending to enhance their flavor. To shred beef easily, wait until it cools a bit. Use two forks to pull it apart. This method makes shredding quick and simple. Use the cooking broth to keep the shredded beef moist. Instead of discarding it, return the beef to the broth. This adds flavor and makes the meat tender. Best side dishes include rice, beans, and a fresh salad. They balance the rich taste of the tacos. You can also serve grilled corn for a fun twist. For drinks, try a light beer or margarita. These pair well with birria tacos. If you prefer non-alcoholic options, serve agua fresca or lemonade for a refreshing touch. Pro Tips Toast the Chilies: Toast the dried chilies in a dry skillet to enhance their flavor before blending them into the marinade. Marinate Overnight: For the best flavor, allow the beef to marinate overnight. This allows the spices to penetrate the meat more thoroughly. Use Beef Broth: Using beef broth instead of water adds depth and richness to the sauce, making it more flavorful. Serve with Consomé: Don't forget to serve the tacos with a side of the strained cooking broth (consomé) for dipping – it's packed with flavor! {{image_2}} You can use pork or chicken instead of beef for birria. Both meats work well with the same spices and flavors. Pork adds a nice richness, while chicken brings a lighter touch. For a vegetarian or vegan option, try jackfruit or mushrooms. These ingredients absorb the flavors well and give a satisfying texture. To control the heat, you can add or reduce the dried chilies. If you like it mild, use fewer chilies or remove the seeds. For more spice, add a fresh jalapeño or cayenne pepper. You can also mix in spices like chili powder or crushed red pepper for extra kick. Birria tacos are delicious, but you can serve birria in many ways. Try it in burritos or quesadillas for a twist. You can also serve it over rice or in a bowl with vegetables. Leftovers can be added to soups or used in nachos, making them versatile and fun! To store leftover birria, let it cool down first. Place it in an airtight container. This keeps it fresh for up to three days in the fridge. For best results, try to use it within two days. For tortillas, wrap them in foil or plastic wrap. Store them in a resealable bag. This helps prevent them from drying out. They can last about a week in the fridge. You can freeze cooked birria for longer storage. Let it cool completely, then place it in a freezer-safe container. It can last up to three months in the freezer. Make sure to label it with the date. To thaw, move the container to the fridge overnight. You can also thaw it in the microwave. Reheat gently on the stovetop or microwave before serving. Cooked birria can last three to four days in the fridge. If it smells off or looks strange, it’s time to toss it. Tortillas stay good for about a week in the fridge. If they get hard or dry, discard them. Birria is a tasty Mexican dish from the state of Jalisco. It usually uses goat meat, but beef is popular too. The meat cooks slowly in a rich, spicy broth made with dried chilies and spices. This method makes the meat tender and full of flavor. People often serve birria in tacos or with broth for dipping. Yes, you can make birria tacos ahead of time! Prepare the beef and store it in the fridge for up to three days. You can also freeze the cooked meat for later use. Just thaw it in the fridge before reheating. Warm the tortillas right before serving for the best taste. For the best flavor, serve birria tacos with fresh toppings. Use chopped cilantro, diced onions, and lime wedges. You can also serve a small bowl of the rich broth (consomé) for dipping. Try adding cheese for extra creaminess! To store homemade birria, let it cool first. Place the meat and broth in an airtight container. You can keep it in the fridge for three to four days. If you want to store it longer, freeze it in a freezer-safe container. It will stay good for up to three months. Birria tacos offer a delicious mix of flavors and textures. We covered key ingredients like beef, chilies, and spices. I shared step-by-step instructions, tips for enhancing flavor, and storage methods to keep your leftover birria fresh. Whether you want to try different meats or serving styles, there's something for everyone. Enjoy making your tacos and exploring the many ways to serve them. Happy cooking!

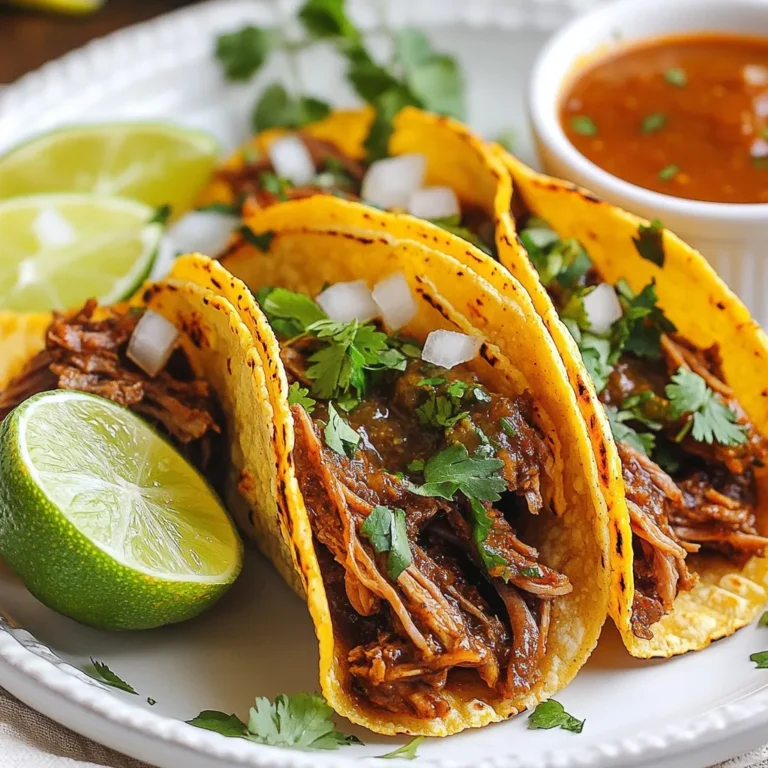
Slow Cooker Birria Tacos Flavorful and Simple Recipe

To make this dish, gather these key items: - 4 boneless, skinless chicken thighs - 2 tablespoons olive oil - Salt and pepper to taste - 1 teaspoon garlic powder - 1 teaspoon onion powder - 1 teaspoon dried thyme - 3 cups chicken broth - 2 cups egg noodles - 1 cup heavy cream - 1/4 cup grated Parmesan cheese - 2 tablespoons unsalted butter These ingredients create a rich and creamy base. The chicken adds protein, while the noodles soak up all that flavor. You can enhance the taste with these seasonings: - Salt - Pepper - Garlic powder - Onion powder - Dried thyme These spices make the chicken tasty. Thyme adds a nice herbal touch that balances the creaminess. To make your dish look even better, use these garnishes: - Fresh parsley, chopped Adding parsley gives a pop of color. It also adds a fresh flavor that brightens the dish. {{ingredient_image_1}} Start by gathering your chicken thighs. You need four boneless, skinless pieces. Rinse them lightly under cool water and pat them dry with a paper towel. This helps the seasoning stick better. Next, season each thigh with salt, pepper, garlic powder, onion powder, and dried thyme. Make sure to cover every side. This will add a lot of flavor to your dish. Now, grab a large skillet and heat two tablespoons of olive oil over medium-high heat. Once the oil is hot, add the seasoned chicken thighs to the skillet. Cook each thigh for about 5-7 minutes on one side. Flip them over and cook for another 5-7 minutes. You want them golden brown and cooked through. Once done, remove the chicken from the skillet and set it aside on a plate. This step is key for juicy chicken. In the same skillet, pour in three cups of chicken broth. Use a wooden spoon to scrape any browned bits from the bottom. This adds extra flavor. Bring the broth to a simmer. Once it’s bubbling, add two cups of egg noodles. Stir well to combine. Cook the noodles for about 8-10 minutes. They should be tender and most of the broth should be absorbed. This will create a rich noodle base. Lower the heat and pour in one cup of heavy cream. Add a quarter cup of grated Parmesan cheese. Stir until the noodles are coated and creamy. Then, toss in two tablespoons of unsalted butter. Mix until the butter melts. Now, slice the cooked chicken thighs and return them to the skillet. Gently mix everything together. Allow it to heat through for about 2-3 minutes. Taste and adjust any seasoning if needed. Finally, garnish with chopped parsley before serving. This adds a fresh touch to your meal. To cook chicken thighs well, start with good heat. Use medium-high heat for the skillet. This helps to brown the chicken nicely. Season the chicken with salt, pepper, garlic powder, onion powder, and thyme. These spices give great flavor. Cook each side for 5-7 minutes. Check that the chicken is golden brown and cooked through. Use a meat thermometer if you have one. The chicken should reach 165°F. Let the chicken rest for a few minutes before slicing. This keeps the juices inside. For creamy noodles, use heavy cream. After cooking the noodles, lower the heat. Stir in the heavy cream and Parmesan cheese. This mix makes the noodles rich and smooth. Make sure to coat all the noodles well. If it feels too thick, add a splash more chicken broth. You want the noodles creamy but not too runny. Adding butter at the end adds shine and flavor. Taste your dish as you cook. If it needs more flavor, add more salt or pepper. A pinch of garlic powder can lift the taste too. Don't forget to add fresh parsley at the end. It brightens up the dish and adds color. If you like spice, try a pinch of red pepper flakes. Adjusting flavors makes the dish your own. Enjoy making it just how you like! Pro Tips Let the Chicken Rest: After cooking, allow the chicken thighs to rest for a few minutes before slicing. This helps retain their juices, making for a more flavorful dish. Use Fresh Herbs: For an extra burst of flavor, consider adding fresh thyme or parsley instead of dried herbs. Fresh herbs can elevate the dish significantly. Check Noodle Doneness: Different brands of egg noodles may have varying cooking times. Be sure to taste-test them a minute or two before the recommended cooking time to ensure they are perfectly tender. Add a Zing: For a refreshing twist, squeeze a little lemon juice over the finished dish just before serving. It brightens the flavors beautifully. {{image_2}} If you want to switch up the chicken, you have options. You can use boneless, skinless chicken breasts. They cook faster but may dry out. You can also try turkey thighs for a leaner choice. If you're feeling adventurous, go for diced chicken sausage. This adds a nice spice to the dish. To make this dish gluten-free, swap egg noodles for gluten-free pasta. Many brands offer tasty options that cook just like regular noodles. For a low-carb version, use zucchini noodles or spaghetti squash. These alternatives keep the meal light and healthy while still being filling. You can boost the flavor of this dish with extra ingredients. Try adding sautéed mushrooms or spinach for more texture and taste. Fresh herbs like basil or dill can brighten the dish. A splash of lemon juice adds a refreshing touch. You can also mix in sun-dried tomatoes for a sweet and tangy flavor. Each addition brings a new twist to the classic one-pan chicken with buttered noodles. Store any leftover chicken and noodles in an airtight container. Make sure to let them cool down first. Keep the leftovers in the fridge. They will stay fresh for up to three days. This way, you have a tasty meal ready for lunch or dinner. To reheat, you can use a skillet or the microwave. If you use a skillet, add a splash of chicken broth to keep it moist. Heat over low until warm. In the microwave, heat in short bursts of 30 seconds. Stir between each burst to avoid hot spots. You can also freeze the dish for later. Just place the cooled chicken and noodles in a freezer-safe bag or container. Be sure to remove as much air as possible. This helps prevent freezer burn. The dish can last in the freezer for up to three months. When you’re ready to eat, thaw it in the fridge overnight before reheating. Yes, you can use many types of pasta. Try penne, fusilli, or even gluten-free pasta. Each type adds a unique texture. Just adjust the cooking time based on the pasta you choose. Make sure to cook it until tender and mix well with the sauce. To make the dish dairy-free, swap heavy cream for coconut cream or a dairy-free alternative. You can also skip the Parmesan cheese or use a dairy-free version. This keeps the dish creamy while being kind to those who avoid dairy. The flavors will still shine through. This dish pairs well with a fresh salad or steamed vegetables. You might enjoy a simple green salad with a light vinaigrette. Roasted broccoli or green beans also work great. These sides add color and nutrients, making your meal balanced and tasty. Cooking chicken thighs takes about 10-14 minutes total. First, you'll cook them for 5-7 minutes on each side. Look for a golden brown color and ensure they are cooked through. Using a meat thermometer is a great way to check. Aim for an internal temperature of 165°F. This blog explores how to make a tasty one-pan chicken with buttered noodles. We covered essential ingredients like chicken and seasonings, step-by-step cooking instructions, and tips for perfect flavors. You learned about variations, storage tips, and answers to common questions. Now, you can cook this dish with confidence, adjust it to your tastes, and enjoy it anytime. Happy cooking!

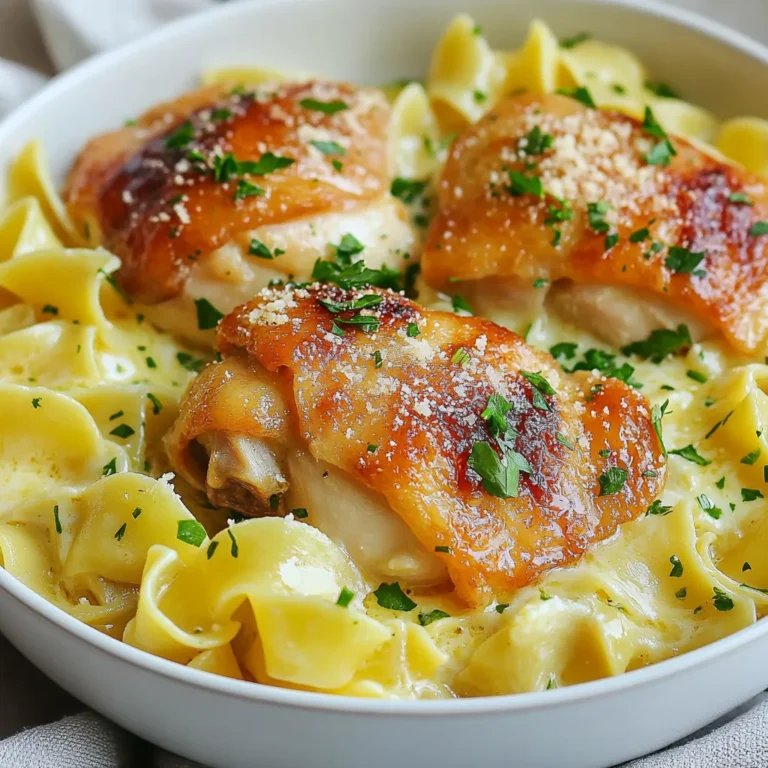
One-Pan Chicken with Buttered Noodles Delight

- 1 pound chicken tenders - 1 cup buttermilk - 1 cup all-purpose flour - 1 teaspoon garlic powder - 1 teaspoon onion powder - 1 teaspoon smoked paprika - ½ teaspoon cayenne pepper - Salt and pepper to taste - 1 cup buffalo sauce (homemade or store-bought) - 8 slider buns - 1 cup shredded lettuce - ½ cup crumbled blue cheese - 2 tablespoons ranch dressing (for drizzling) - Sliced pickles (optional, for garnish) Chicken tenders are the star here. They give you the perfect bite. Buttermilk adds moisture and flavor. Flour, garlic powder, onion powder, smoked paprika, and cayenne pepper create a tasty coating. The buffalo sauce gives that fiery kick we love. Slider buns hold it all together and make it easy to eat. Blue cheese and ranch dressing add creamy goodness. If you don’t have chicken tenders, use boneless chicken breasts. You can swap buttermilk with regular milk mixed with lemon juice. If you are out of all-purpose flour, use gluten-free flour. For a milder spice, skip the cayenne pepper. You can also use any hot sauce if you don’t have buffalo sauce. Want a different cheese? Try feta or cheddar! If you want a lighter option, use yogurt instead of ranch dressing. {{ingredient_image_1}} First, you need to marinate the chicken. Take 1 pound of chicken tenders and a bowl. Pour in 1 cup of buttermilk. Mix the chicken with the buttermilk well. Cover the bowl and place it in the fridge. Let it marinate for at least 1 hour. If you have time, marinate overnight for better flavor. Now, prepare the coating. In another bowl, mix 1 cup of all-purpose flour with 1 teaspoon each of garlic powder, onion powder, and smoked paprika. Add ½ teaspoon of cayenne pepper. Season with salt and pepper to taste. Preheat your oven to 400°F (200°C). Take the chicken from the fridge. Let the excess buttermilk drip off. Dredge each tender in the flour mixture. Ensure each piece is fully coated, then place them on a baking sheet. Once coated, bake the chicken tenders for 20-25 minutes. Flip them halfway through for even crispiness. When they turn golden brown, take them out. Let them cool for a minute. In a large bowl, pour 1 cup of buffalo sauce. Toss the crispy chicken tenders in the sauce until they are well coated. For the sliders, slice 8 slider buns in half. On the bottom half of each bun, place a few pieces of buffalo chicken. On top of the chicken, add shredded lettuce and crumbled blue cheese. Drizzle some ranch dressing over everything. Finally, place the top half of the slider bun over the fillings. You can add sliced pickles for extra crunch. Cut each slider in half for easier handling. Serve warm and enjoy every bite! To get your chicken tenders really crispy, follow these steps: - Marinate Well: Soak the chicken in buttermilk for at least one hour. This makes it juicy and helps the coating stick. - Dry Before Coating: After marinating, shake off excess buttermilk. This helps the flour coat better. - Use a Cooling Rack: Place the chicken on a cooling rack while baking. This allows air to circulate, keeping the chicken crispy all around. You can make your buffalo chicken sliders even tastier with these tips: - Add More Spices: Mix extra spices into the flour. Try adding black pepper or garlic powder for a bolder taste. - Try Different Sauces: Experiment with other sauces like barbecue or honey mustard for variety. - Use Fresh Ingredients: Fresh herbs like cilantro or parsley can brighten up the flavors. These tools will make preparing your sliders easier: - Baking Sheet: A sturdy baking sheet is key for even cooking. - Cooling Rack: Helps with crispiness by allowing air to flow around the chicken. - Mixing Bowls: Use separate bowls for marinating and coating. - Tongs: Perfect for flipping the chicken and tossing in sauce without mess. Pro Tips Marinate for Maximum Flavor: The longer you marinate the chicken tenders in buttermilk, the more flavorful and tender they will become. Aim for at least 1 hour, but overnight is even better! Achieve Extra Crispiness: For an even crispier texture, consider double-dipping the chicken tenders. After the first coating, dip them back into the buttermilk and then into the flour mixture again before baking. Adjust the Heat: If you prefer milder sliders, reduce the amount of cayenne pepper or use a milder buffalo sauce. For extra heat, add more cayenne or use a hot buffalo sauce. Customize Your Toppings: Feel free to get creative with the toppings! Add sliced jalapeños, avocado, or different types of cheese to personalize your sliders to your taste. {{image_2}} For those who love heat, spicy buffalo chicken sliders are a must-try. You can add more cayenne pepper to the flour mix. This will boost the spice level. You could also mix in hot sauce with the buffalo sauce for extra kick. If you want to get wild, try adding jalapeños or sliced serrano peppers. The heat will mix well with the creamy ranch dressing. Buffalo sauce is great, but you can switch it up! Try using barbecue sauce for a sweet twist. Honey mustard also works well for a tangy flavor. For a creamy option, ranch or blue cheese dressing can replace the buffalo sauce. This will give a different taste that many will love. You can even mix sauces together. Don't be afraid to get creative! You can still enjoy these sliders if you're vegetarian or vegan. Use cauliflower or eggplant instead of chicken. Simply coat them in the same flour mix and bake. For a vegan buffalo sauce, choose one made from plant-based ingredients. Look for vegan ranch or dressings for the topping. These options will still give you that great buffalo flavor while keeping it plant-based. After enjoying your sliders, store any leftovers to keep them fresh. Place the sliders in an airtight container. Use parchment paper between layers for best results. They will stay good in the fridge for up to three days. If you have leftover chicken, store it separately. This helps keep the buns from getting soggy. When you're ready to eat the leftovers, reheat them properly. You can use the oven for the best taste. Preheat the oven to 350°F (175°C). Place the sliders on a baking sheet. Heat for about 10-15 minutes. This warms them evenly and keeps them crispy. If you’re in a hurry, the microwave works too, but it may make the buns soft. Heat on medium power for 30 seconds or until warm. Want to save some for later? You can freeze the chicken tenders before they are tossed in buffalo sauce. Wrap them tightly in plastic wrap and then in foil. Store them in a freezer-safe bag. They can last for up to three months in the freezer. To cook, thaw in the fridge overnight and bake as directed. This way, you can enjoy crispy sliders any time you want! To make these sliders, start by marinating chicken tenders in buttermilk for at least one hour. This helps keep the chicken juicy. Next, mix all-purpose flour with garlic powder, onion powder, smoked paprika, cayenne, salt, and pepper in a bowl. Coat the chicken tenders in this mix. Preheat your oven to 400°F (200°C). Bake the coated chicken for 20-25 minutes until golden brown and crispy. Toss the cooked chicken in buffalo sauce. Finally, assemble your sliders with lettuce, blue cheese, ranch dressing, and top buns. Enjoy each tasty bite! Yes, you can use frozen chicken tenders. Just bake them according to the package instructions. Once they’re nice and crispy, toss them in buffalo sauce. Using frozen tenders saves time and still gives you great flavor. You can make this recipe even quicker! Buffalo chicken sliders go well with many sides. Some great options include: - Crisp carrot and celery sticks - Creamy coleslaw - Sweet potato fries - Potato chips - A fresh garden salad These sides balance the spicy flavor of the sliders and add extra crunch. Making homemade buffalo sauce is simple! You need: - 1 cup hot sauce (like Frank's RedHot) - ½ cup melted butter - 1 tablespoon white vinegar - 1 teaspoon garlic powder - Salt to taste In a bowl, mix the hot sauce and melted butter. Add the vinegar, garlic powder, and salt. Stir until smooth. Use this sauce on your crispy chicken for a delicious kick! In this post, we explored making delicious Buffalo chicken sliders. We covered key ingredients and substitutes, along with easy instructions for marinating and baking. I shared tips for crispiness and tasty variations to try. Lastly, we looked at storage and common questions. With these steps, you can create a wonderful dish that family and friends will love. Enjoy making your sliders, and don't be afraid to experiment!

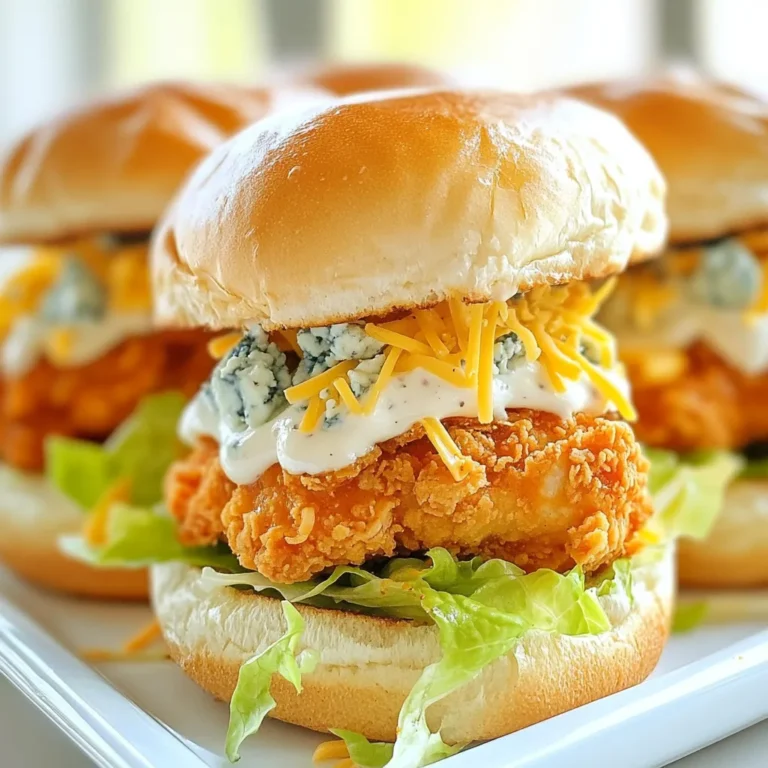
Crispy Buffalo Chicken Sliders Easy and Tasty Recipe

- 8 oz pasta (rotini or penne) - 1 lb ground beef or turkey - 1 packet taco seasoning - 1 cup beef broth - 1 cup diced tomatoes (canned) - 1 cup black beans - 1 cup sharp cheddar cheese, shredded - 1 cup cream cheese, cubed - 1/2 cup sour cream - 1/4 cup green onions, chopped To make Cheesy Taco Pasta, these ingredients are key. The pasta serves as the base, while the ground meat adds protein and flavor. Taco seasoning gives it that classic taco taste. Next, the beef broth and diced tomatoes create a rich sauce. Black beans add fiber and texture. For the toppings, sharp cheddar cheese gives a great sharpness. Cream cheese makes everything creamy and smooth. Lastly, sour cream and green onions add fresh flavor and a nice finish. When you gather these ingredients, you set the stage for a fun and tasty meal. You can easily find these items at your local grocery store. Enjoy the process of cooking, and get ready for a dish that everyone will love! {{ingredient_image_1}} 1. Boil the pasta and drain: Start by bringing a large pot of salted water to a boil. Add 8 ounces of pasta. I like using rotini or penne. Cook it according to the package directions. Once done, drain the pasta and set it aside. 2. Brown the meat and drain fat: In the same pot, add 1 pound of ground beef or turkey. Cook it over medium heat. Break the meat apart as it cooks. Once browned, drain any extra fat. 1. Stir in taco seasoning and liquids: Now, add 1 packet of taco seasoning to the cooked meat. Pour in 1 cup of beef broth and 1 cup of diced tomatoes with juices. Then, add 1 cup of black beans that you rinsed and drained. Stir everything together well and bring it to a simmer. 2. Add cream cheese and mix well: Reduce the heat to low. Now, add 1 cup of cubed cream cheese to the pot. Stir until the cream cheese melts and mixes in smoothly. 1. Combine pasta and cheesy sauce: Add the drained pasta to the pot with the cheesy sauce. Stir gently until all the pasta is coated in the sauce. 2. Stir in sour cream and season to taste: Remove the pot from heat. Mix in 1/2 cup of sour cream. Season with salt and pepper to your taste. Enjoy your cheesy taco pasta hot! - Best pasta shapes for cheesy taco pasta I love using rotini or penne for this dish. These shapes hold the sauce well. Their ridges catch bits of meat and cheese, making every bite tasty. - How to achieve a creamy texture To get a creamy texture, always add cream cheese while the heat is low. Stir it in slowly until it melts. This step makes the sauce smooth and rich. - Suggested spices or add-ins I suggest adding cumin or chili powder for extra flavor. You can also toss in some corn or bell peppers. These add a nice crunch and color to the dish. - How to customize the level of heat To make it spicy, add diced jalapeños or hot sauce. If you prefer milder flavors, use less taco seasoning. Adjust to your taste! - Best accompaniments for the dish Serve cheesy taco pasta with a side of tortilla chips or a simple salad. These add freshness and crunch to your meal. - Presentation tips for garnishing For a nice touch, sprinkle chopped green onions on top just before serving. You can also add a dollop of sour cream for extra creaminess. This makes the dish look inviting and delicious! Pro Tips Timing is Key: Make sure to time your pasta cooking so that it’s finished just as your sauce is ready. This ensures the pasta stays hot and absorbs the flavors better. Customize Your Protein: Feel free to substitute ground beef with ground turkey, chicken, or even plant-based meat alternatives for a healthier or vegetarian option. Spice it Up: Adjust the heat level by adding jalapeños or red pepper flakes to the meat mixture for an extra kick. Cheese Variations: Experiment with different cheeses like pepper jack or mozzarella for a unique flavor twist in your cheesy taco pasta. {{image_2}} You can switch the ground beef for ground turkey. Ground turkey is leaner and lower in fat. It also absorbs flavors well. You will still enjoy a tasty meal. If you want a vegetarian option, try using lentils or mushrooms. Both give a nice texture and flavor. You can also add extra beans for protein. Black beans or kidney beans work great here. The recipe uses sharp cheddar cheese, but you can try other types. Monterey Jack or pepper jack can add a nice twist. If you want something milder, use mozzarella. For a vegan option, look for plant-based cheeses. Many brands offer good substitutes. Just check the label to ensure it melts well. Nutritional yeast is also great for a cheesy flavor without dairy. If you need gluten-free pasta, many options exist. Brown rice pasta or chickpea pasta are good choices. They have a nice texture and taste. Whole grain pasta is another option. It adds extra fiber and nutrients. It also gives a hearty flavor to your cheesy taco pasta. Just remember to adjust cooking times as needed. To store leftovers, let the cheesy taco pasta cool down first. Then, place it in an airtight container. This helps keep the flavors fresh. You can refrigerate it for up to 3 days. When you are ready to eat, reheat it on the stove or in the microwave. If using the microwave, cover the dish to lock in moisture. Stir occasionally for even heating. Yes, you can freeze cheesy taco pasta! To freeze it, let it cool completely. Place it in a freezer-safe container or bag. Make sure to remove excess air to prevent freezer burn. It can be stored for up to 3 months. When you want to enjoy it, thaw it in the fridge overnight. Reheat it on the stove, adding a splash of broth if needed. This keeps it creamy and delicious. In the refrigerator, your cheesy taco pasta lasts about 3 days. After that, it may spoil. Watch for signs of spoilage like an off smell or mold. If you see either, it’s best to toss the leftovers. Enjoy your pasta while it’s fresh for the best taste! How can I make cheesy taco pasta spicier? You can add chopped jalapeños or diced green chilies. These fresh toppings bring heat. You can also use spicy taco seasoning. Look for brands labeled "hot" or "spicy." Adding a few dashes of hot sauce can give it a nice kick too. Can I use fresh tomatoes instead of canned? Yes, you can use fresh tomatoes. Dice about two medium tomatoes. You may need to add a little extra broth. Fresh tomatoes add a nice, vibrant taste too. Is this recipe gluten-free? This recipe is not gluten-free as written. The pasta contains gluten. To make it gluten-free, use gluten-free pasta. There are many options available today. Can I make it dairy-free? You can make it dairy-free. Use dairy-free cream cheese and cheese alternatives. There are many good plant-based cheese options now. Check labels to ensure they fit your diet. What type of pot is best for this recipe? A large pot works best. It needs to hold all the pasta and sauce. A heavy-bottomed pot helps with even cooking. A wide pot allows for easy mixing. Do I need any special kitchen tools? No special tools are needed. A spatula helps you mix and break up the meat. A colander is good for draining the pasta. A can opener is useful for the canned tomatoes. This blog post covered how to make cheesy taco pasta using simple, tasty ingredients. You learned the main steps, like boiling pasta and browning meat. I also shared tips for customizing the dish to fit your taste. Remember, you can use different proteins or cheeses, and it's easy to store leftovers. Cheesy taco pasta is versatile and fun to make. Enjoy creating this dish for your family or friends! Your kitchen adventures are just beginning.

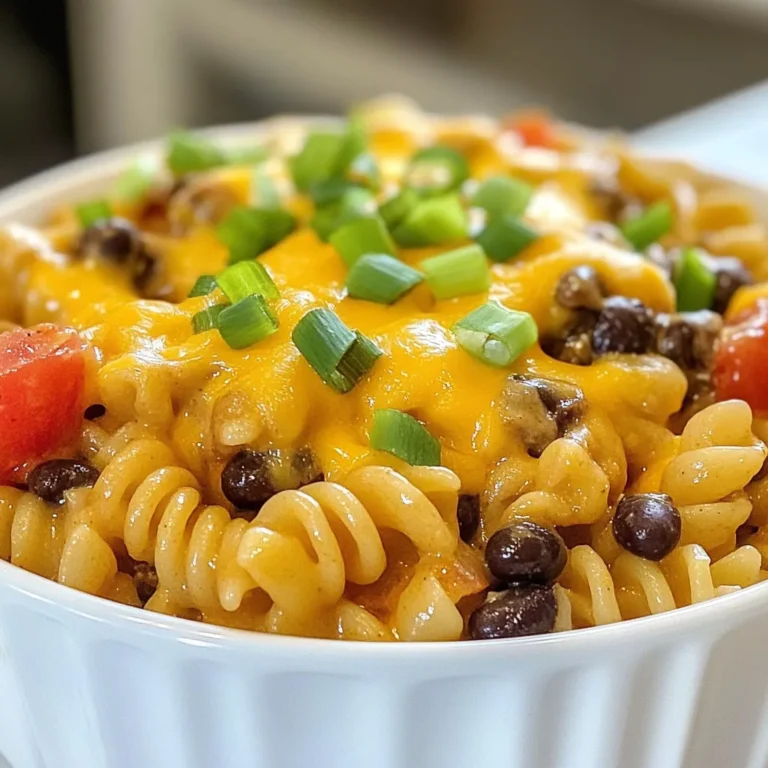
Cheesy Taco Pasta Quick and Flavorful Recipe

To make Chicken Florentine, you'll need these key ingredients: - 2 boneless, skinless chicken breasts - 2 cups fresh spinach, roughly chopped - 1 cup cherry tomatoes, halved - ½ cup heavy cream - 1 cup chicken broth - 1 tablespoon olive oil - 2 cloves garlic, minced - 1 teaspoon dried oregano - ½ cup grated Parmesan cheese - Salt and pepper to taste These items form the base of your dish. The chicken provides protein, while the spinach adds color and nutrients. Tomatoes give sweetness, and the cream makes it rich. You can boost the taste with these optional ingredients: - ½ teaspoon red pepper flakes - Fresh herbs like basil or parsley Red pepper flakes add heat. Fresh herbs give a bright finish. Feel free to adjust based on your taste. If you don’t have some ingredients, here are simple swaps: - Use chicken thighs instead of breasts for more flavor. - Swap heavy cream for coconut milk for a lighter option. - Use vegetable broth instead of chicken broth for a vegetarian version. These substitutions keep the dish tasty while meeting your needs. Cooking should be fun and flexible! {{ingredient_image_1}} To start, gather your ingredients. You need two boneless, skinless chicken breasts. First, season the chicken with salt, pepper, and oregano. This step adds a lot of flavor. Heat one tablespoon of olive oil in a large skillet over medium heat. Once the oil is hot, add the chicken. Cook each side for about 7-8 minutes until it turns golden brown. Make sure to check that it's fully cooked. When done, remove the chicken from the skillet and set it aside. In the same skillet, add minced garlic. Sauté it for about 30 seconds until it releases a nice aroma. Next, toss in one cup of halved cherry tomatoes. Cook these for about 3-4 minutes until they soften. After that, add two cups of roughly chopped fresh spinach. Cook the spinach just until it wilts, which takes about 2 minutes. Now, pour in one cup of chicken broth and bring it to a gentle simmer. Lower the heat and stir in half a cup of heavy cream. Let this simmer for another 2-3 minutes. Finally, add the cooked chicken back into the skillet, along with half a cup of grated Parmesan cheese. Stir until the cheese melts and everything blends well. Once everything is mixed, taste the sauce. You can add more salt, pepper, or even red pepper flakes to enhance the flavor. For serving, place the chicken on a plate and drizzle it with the creamy sauce. Garnish with extra Parmesan cheese and a sprig of parsley for a pop of color. This dish pairs well with crusty bread or a bed of rice. Enjoy your flavorful Chicken Florentine! To cook chicken that is juicy and tender, start with good quality meat. Choose boneless, skinless chicken breasts for even cooking. Season them well with salt, pepper, and oregano. Heat olive oil in a skillet before adding the chicken. Cook each side for about 7-8 minutes. Use a meat thermometer; chicken should reach 165°F. Let the chicken rest for a few minutes after cooking. This keeps the juices inside, making each bite delicious. If you want a thicker sauce, try a few simple methods. One way is to simmer the sauce longer. This allows the liquid to reduce and thicken. You can also add more cheese. Parmesan cheese melts well and adds creaminess. Another option is to mix a little cornstarch with water. Stir this mixture into the sauce to thicken it quickly. Always taste your sauce as you go, adjusting the flavors to your liking. Pair your Chicken Florentine with sides that enhance its flavors. A simple green salad with a light vinaigrette balances the richness of the dish. Garlic bread is a great choice, perfect for soaking up the creamy sauce. You can also serve it over rice or pasta for a heartier meal. Roasted vegetables add color and nutrients, making your plate look and taste great. Pro Tips Perfectly Cooked Chicken: Use a meat thermometer to ensure the chicken reaches an internal temperature of 165°F (75°C) for best results. Fresh Ingredients: Opt for fresh spinach and ripe cherry tomatoes to enhance the flavor and texture of the dish. Adjust the Creaminess: For a lighter version, substitute half of the heavy cream with Greek yogurt or low-fat sour cream. Flavor Boost: Add a splash of white wine after sautéing the garlic for an additional layer of flavor in the sauce. {{image_2}} You can switch the chicken for other proteins. Try using shrimp or salmon for a twist. Both options cook fast and taste great with the creamy sauce. Just adjust cooking times to keep them juicy. For shrimp, cook for about 3-4 minutes per side. For salmon, aim for 5-6 minutes per side. Each choice brings new flavors while keeping the dish easy. If you want a meatless meal, try a vegetarian version. Use hearty mushrooms or firm tofu instead of chicken. Both options soak up the flavors well. Sauté the mushrooms until they are brown and soft. For tofu, press it first to remove excess moisture, then pan-fry until golden. Add the spinach and sauce just like in the original recipe. It’s still creamy and delicious. Feel free to get creative with sauces and seasonings. Swap the heavy cream for a lighter option like Greek yogurt. This gives a tangy flavor while cutting calories. You can also play with herbs; try thyme or basil for a twist. Adding lemon zest can brighten the dish. For a spicy kick, add more red pepper flakes or a dash of hot sauce. These small changes keep the dish fresh and fun! To store Chicken Florentine, let it cool first. Place it in an airtight container. This helps keep it fresh. You can store it in the fridge for up to three days. Make sure the lid fits tightly to avoid leaks and odors. When reheating Chicken Florentine, use the stovetop for best results. Heat it in a skillet on low heat. Stir often to warm it evenly. You can add a splash of chicken broth or cream. This will keep the sauce creamy instead of dry. If you use a microwave, cover it with a damp paper towel. This helps prevent it from drying out. You can freeze Chicken Florentine for up to three months. First, let it cool completely. Then, place it in a freezer-safe container. Make sure to leave space for expansion. When ready to eat, thaw it in the fridge overnight. Reheat it slowly on the stovetop for the best texture. Enjoy your meal later without losing flavor! Chicken Florentine is a creamy dish featuring chicken and spinach. It often has garlic, tomatoes, and cheese. The dish gets its name from Florence, Italy, where spinach is a common ingredient. The rich sauce adds flavor and keeps the chicken moist. Yes, you can make Chicken Florentine ahead of time. Cook the chicken and sauce, then store them separately. Keep them in the fridge for up to two days. When you're ready to eat, reheat gently on the stove. Chicken Florentine pairs well with many sides. Here are some ideas: - Crusty bread for dipping - Rice to soak up the sauce - Pasta for a heartier meal - A fresh salad for a light touch These options will enhance your meal and balance the rich flavors. Enjoy! In this blog post, we explored Chicken Florentine, its key ingredients, and how to prepare it. You learned about optional flavors and ingredient swaps. I shared tips for cooking juicy chicken and making a thick sauce. You also saw variations with different proteins and vegetarian options. As you make this dish, remember that practice helps you improve. Experiment with flavors and enjoy the process. Chicken Florentine can be a delightful meal for any occasion. Happy cooking!

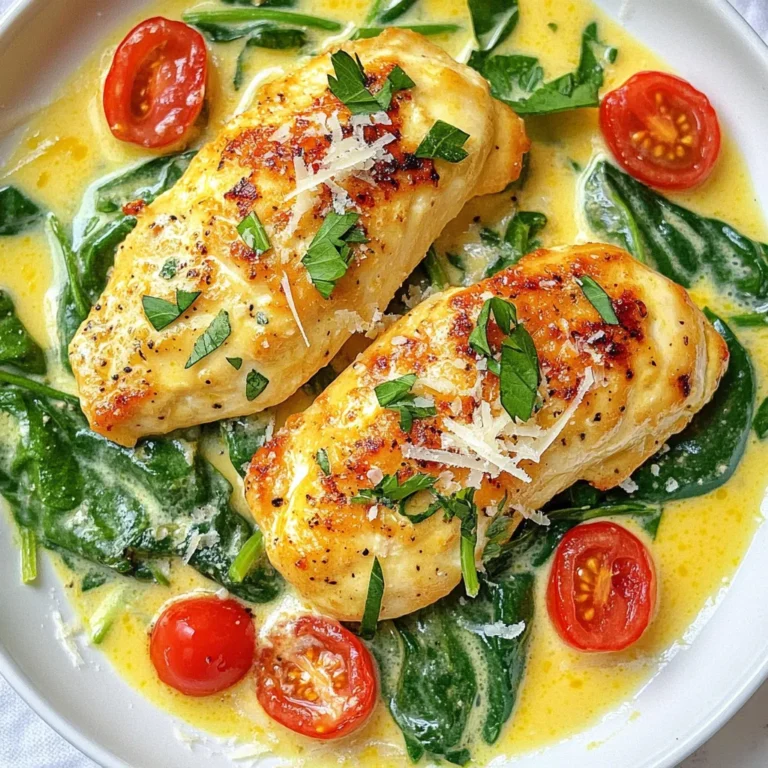
Savory Chicken Florentine Easy and Flavorful Recipe

- 1 lb ground beef (or substitute with ground turkey or plant-based meat) - 4 cups mixed greens (spinach, arugula, lettuce) - 1 cup cherry tomatoes, halved - 1/2 cucumber, diced - 1/2 red onion, thinly sliced - 1 avocado, diced - 1/2 cup shredded cheddar cheese (or dairy-free cheese) - 1/4 cup pickles, chopped - 1/4 cup ranch dressing or your favorite dressing The main ingredients in a Burger Bowl give it life and flavor. You can choose ground beef, turkey, or plant-based meat. The mixed greens add freshness. Cherry tomatoes, cucumber, red onion, and avocado bring color and crunch. Cheese and pickles add a tasty twist. You can top it off with your favorite dressing. - 1 teaspoon garlic powder - 1 teaspoon onion powder - 1 teaspoon smoked paprika - Salt and pepper to taste Seasonings can make your Burger Bowl pop. Garlic powder and onion powder give it depth. Smoked paprika adds a nice, warm flavor. Salt and pepper help highlight all the other tastes. These seasonings are simple but very effective. A Burger Bowl is not just tasty; it’s healthy too! Each serving has around 450 calories. It offers protein from the meat and healthy fats from the avocado. The mixed greens and veggies provide fiber and vitamins. This meal helps you feel full without weighing you down. It’s a smart choice for anyone seeking a balanced meal. {{ingredient_image_1}} To cook the ground beef, start by heating one tablespoon of olive oil in a large skillet over medium heat. Then, add one pound of ground beef. Break it apart with a spatula. This helps it cook evenly. Next, sprinkle in one teaspoon each of garlic powder, onion powder, and smoked paprika. Add salt and pepper to taste. Cook the beef for about 8 to 10 minutes. It should turn brown and be fully cooked. Stir it occasionally to avoid burning. If you prefer substitutes, ground turkey or plant-based meat works great too. Just follow the same cooking steps. The key is to ensure your meat is well-seasoned. This adds the best flavor and texture. While the beef cooks, prepare the salad base. In a large bowl, mix 4 cups of mixed greens, 1 cup of halved cherry tomatoes, 1/2 diced cucumber, and 1/2 thinly sliced red onion. Add 1 diced avocado for creaminess. Once the beef is ready, take it off the heat and let it cool for a minute. Then, divide the salad mixture into serving bowls. Layer the cooked ground beef on top. For a beautiful presentation, sprinkle 1/2 cup of shredded cheddar cheese and 1/4 cup of chopped pickles over the beef. This gives a nice contrast in color and flavor. Serve each burger bowl in individual bowls for a fun meal. Consider adding fresh herbs like cilantro or parsley for extra color. This makes the dish look inviting. You can also place extra dressing on the side. Ranch dressing is a great choice, but feel free to pick your favorite. Pair your burger bowl with a side of sweet potato fries or a refreshing drink like iced tea. This makes for a complete and satisfying meal. Enjoy your Burger Bowl Delight! To make your burger bowl shine, you can customize flavors and textures easily. Here are some ideas: - Meat Options: You can use ground turkey, plant-based meat, or even chicken. Each option brings a unique taste. - Spices: Add cayenne pepper for heat or Italian herbs for a different twist. Experiment with different spice blends for fun flavors. When cooking ground meat alternatives, keep these tips in mind: - Cook at Medium Heat: This helps prevent drying out the meat. Stir often for even cooking. - Check for Doneness: Make sure the meat is fully cooked. Use a thermometer if needed. Storing leftovers correctly keeps your bowl tasty for next time. Here are some tips: - Refrigerate: Store any leftovers in an airtight container. They will last for 3 to 4 days. - Separate Components: If possible, keep the meat and veggies apart. This helps maintain freshness and texture. For meal prep, follow these best practices: - Prep Ahead: Chop veggies and cook meat in advance. Store them separately until you're ready to assemble. - Use Clear Containers: This helps you see what you have, making it easy to grab and go. To boost the taste of your burger bowl, try these dressings and seasonings: - Dressings: Ranch dressing works well, but you can also try balsamic vinaigrette or a creamy garlic sauce. - Seasonings: Sprinkle some chili flakes or fresh herbs for extra flavor. Optional toppings can add flair to your bowl: - Crunchy Toppings: Add croutons or crispy onions for a crunch. - Fresh Ingredients: Try diced bell peppers or olives for a pop of color and taste. Your burger bowl can be as creative and tasty as you want! Pro Tips Choose Your Meat Wisely: Opt for lean ground beef or turkey to keep the dish healthier. If using plant-based meat, select a well-seasoned variety for optimal flavor. Layering is Key: When assembling your burger bowl, layer the ingredients thoughtfully for an appealing visual presentation and to ensure balanced flavors in each bite. Freshness Matters: Use fresh vegetables for the salad base to enhance the flavor and texture. Consider seasonal veggies for an exciting twist on the classic salad. Make It Your Own: Feel free to customize the toppings and dressings according to your preference. Try adding crispy bacon, jalapeños, or a spicy aioli for an extra kick! {{image_2}} For a tasty vegetarian burger bowl, try using plant-based proteins like lentils or black beans. Both options pack a punch in flavor and nutrition. You can mash the beans or leave them whole. This gives you a nice texture. For salad toppings, consider using roasted chickpeas or tofu. They add protein and crunch. You can also add toppings like sliced radishes or carrots for color. Use a vegan dressing like tahini or a simple olive oil and lemon mix to keep it fresh and light. You can easily change the vegetable base in your burger bowl. Use kale, romaine, or even coleslaw mix for a fun twist. Feel free to add roasted veggies like bell peppers or zucchini. They bring out great flavors. Swapping dressings and cheeses is simple too. If you want a tangy bite, try a balsamic vinaigrette instead of ranch. For cheese, use dairy-free options or skip it entirely for a lighter meal. Using seasonal vegetables makes your burger bowl even better. In summer, add fresh corn or bell peppers. In fall, think about using roasted sweet potatoes or squash for a warm touch. When ingredients are limited, you can still build a great burger bowl. Frozen veggies work well in a pinch. Just cook them according to the package. You can also use canned beans or tomatoes for easy flavor and nutrition. To store leftovers, place your Burger Bowl in an airtight container. This keeps it fresh in the fridge. The shelf life of prepared ingredients is about three to four days. Make sure to cool down the beef before sealing it up. If you want to freeze your Burger Bowl, start by separating the components. Freeze the beef and the veggies in individual bags. This helps keep the flavors fresh. When you're ready to eat, thaw the beef overnight in the fridge. Reheat it on the stove for best results. Batch cooking makes meals easier. You can cook a larger amount of beef at once. Store it in portions for quick meals. Keep the salad ingredients separate until you're ready to eat. This way, everything stays fresh and crunchy. A Burger Bowl is a meal that mixes the best parts of a burger with fresh salad. You get the juicy meat, tasty toppings, and healthy greens all in one bowl. It's a fun way to enjoy burgers without the bun. You can customize it with your favorite veggies and sauces. To make your Burger Bowl healthier, choose lean proteins. Ground turkey or plant-based meat are great options. Use fresh veggies like spinach, cucumber, and tomatoes. Swap regular cheese for low-fat or dairy-free cheese. For dressing, try a lighter option, like vinaigrette instead of ranch. Yes, you can use many proteins in a Burger Bowl. Chicken, turkey, or even tofu work well. For chicken, grill or sauté it with spices. If you choose tofu, press it, then cube and pan-fry for crispy texture. These options add variety and flavor to your meal. A variety of dressings pair nicely with a Burger Bowl. Ranch dressing is a classic choice, but you can also try BBQ sauce or a balsamic vinaigrette. For a spicy kick, use sriracha mixed with yogurt. These flavors enhance the dish and make it more exciting. The Burger Bowl is a tasty mix of flavors and fresh ingredients. You learned how to choose proteins, veggies, and dressings to fit your taste. I shared tips on cooking each component to perfection and how to store leftovers for later use. You can customize your bowl for any dietary needs, making it versatile and fun. Remember, the right seasonings and fresh veggies can elevate your meal. Experiment with different combinations to find your favorite. Enjoy building your own delicious Burger Bowl!

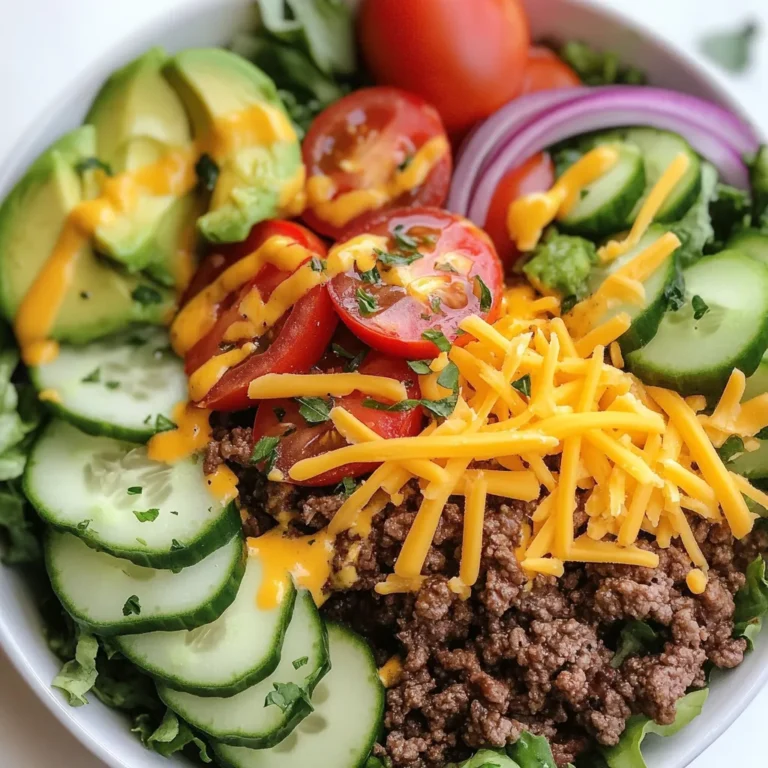
Burger Bowl Delight Healthy and Flavorful Meal

Here are the ingredients you need for Butternut Squash Apple Soup: - 1 medium butternut squash, peeled and cubed - 2 large apples (like Granny Smith or Honeycrisp), cored and chopped - 1 medium onion, chopped - 2 cloves garlic, minced - 4 cups vegetable broth - 1 teaspoon ground ginger - 1 teaspoon ground cinnamon - 1 tablespoon olive oil - Salt and pepper to taste - ¼ cup coconut milk (optional for creaminess) - Garnish: chopped fresh parsley or chives This simple list helps you gather all you need for delicious soup. The butternut squash gives a nice sweetness. The apples add a tart flavor. Onions and garlic bring depth. Ginger and cinnamon add warmth. Finally, coconut milk makes it creamy and rich. When you gather these ingredients, choose fresh ones for the best taste. You can find butternut squash and apples at local markets. If you want a unique touch, pick a mix of apple varieties. Adjust salt and pepper to your liking. This soup is hearty and comforting. Enjoy cooking! {{ingredient_image_1}} 1. Sautéing the onion and garlic In a large pot, heat 1 tablespoon of olive oil over medium heat. Add the chopped onion. Sauté until it turns soft and clear, which takes about 5 minutes. Stir in 2 minced garlic cloves, 1 teaspoon of ground ginger, and 1 teaspoon of ground cinnamon. Cook this mix for about 1 minute. The warm spices will fill your kitchen with a great smell. 2. Adding spices and vegetables Now it’s time to add in the star ingredients. Toss in the peeled and cubed butternut squash and the chopped apples. Use 2 large apples like Granny Smith or Honeycrisp for a nice balance of sweet and tart. Stir everything together well, so the spices coat the vegetables. 3. Cooking and blending the soup Pour in 4 cups of vegetable broth. Make sure the veggies are fully covered. Bring this mix to a boil, then turn down the heat and let it simmer. Cover the pot and let it cook for about 20 to 25 minutes. Check the squash and apples; they should be tender. Once they are ready, use an immersion blender to puree the soup until it’s nice and smooth. If you don’t have an immersion blender, carefully transfer the soup in batches to a standard blender. 1. Mixing in coconut milk If you want a creamier soup, stir in ¼ cup of coconut milk at this stage. It adds a rich flavor that complements the squash and apples. 2. Adjusting seasoning Taste the soup and add salt and pepper as needed. This step is key to making the flavors pop. If the soup needs warming, put it back on low heat for a few minutes. Serve your soup hot, and enjoy the cozy flavors! To get the best flavor in your butternut squash apple soup, layer your ingredients well. Start by cooking the onion in olive oil. This brings out its sweetness. Add garlic, ginger, and cinnamon next. This mix creates a warm, fragrant base. When you add the squash and apples, stir them well. This helps them absorb all the flavors. For even cooking, cut your squash and apples into similar-sized pieces. This way, they cook at the same rate. Check them with a fork to see if they are soft. If they are tender, your soup is ready to blend. This soup pairs perfectly with crusty bread. A warm baguette or sourdough works great for dipping. It's a comforting combo, especially on chilly days. For a beautiful presentation, ladle the soup into bowls and garnish with fresh herbs. Chopped parsley or chives add a nice touch. You can drizzle a little coconut milk on top for an eye-catching swirl. This makes each bowl look more inviting and adds a hint of creaminess. Pro Tips Fresh Ingredients: Use fresh, in-season butternut squash and apples for the best flavor and sweetness. Blending Technique: For a super creamy texture, blend the soup in smaller batches and allow it to cool slightly before blending. Flavor Boost: Add a pinch of nutmeg or a dash of cayenne pepper for an extra layer of warmth and spice. Serving Suggestions: Pair the soup with a dollop of yogurt or a sprinkle of roasted pumpkin seeds for added texture and flavor. {{image_2}} You can switch out ingredients if you want. Try sweet potatoes or carrots instead of butternut squash. They add a nice sweetness too. Instead of apples, you can use pears for a different flavor. If you're looking for dairy-free options, skip the coconut milk. Use almond milk or oat milk instead. These will keep the soup creamy without dairy. Add herbs or spices to change the taste. Fresh thyme or rosemary can add a nice touch. You might also try a pinch of nutmeg for warmth. Want more texture? Add cooked quinoa or lentils. They make the soup heartier and more filling. You can even toss in some cooked chicken for a protein boost. To keep your butternut squash apple soup fresh, store leftovers in an airtight container. This method helps keep moisture in and prevents the soup from absorbing other fridge odors. You can place the cooled soup in the fridge right after serving. The best practice is to let it cool to room temperature before sealing. In the fridge, your soup will stay good for about 3 to 5 days. Be sure to check for any changes in smell or color before eating. If it looks or smells off, it's best to discard it. Freezing your butternut squash apple soup is a great way to save it for later. To freeze, first let the soup cool completely. Then, pour it into freezer-safe bags or containers. If using bags, remove as much air as you can before sealing. This helps prevent freezer burn. When you're ready to enjoy it again, thaw the soup overnight in the fridge. Reheat it on the stove over low heat. Stir often to keep it from sticking. If it seems too thick, add a splash of vegetable broth or water to adjust the texture. To maintain the flavor and texture, avoid freezing the coconut milk if you add it. Instead, mix it in fresh after thawing and reheating. This keeps the soup creamy and delicious. How can I make this soup spicier? To add spice, include red pepper flakes or cayenne pepper. Start with a pinch. Taste the soup as you go to avoid too much heat. You can also stir in some hot sauce for an extra kick. Can I use frozen butternut squash instead? Yes, you can use frozen butternut squash. Just add it directly to the pot. You might need to cook it a bit longer since it's frozen. The soup will still taste great! What are the health benefits of butternut squash and apple? Butternut squash is rich in vitamins A and C. It helps with vision and boosts your immune system. Apples are high in fiber and good for your heart. Together, they make a nutritious and tasty soup. Can I make this soup in a slow cooker? Absolutely! To make it in a slow cooker, add all ingredients to the pot. Cook on low for 6-8 hours or on high for 3-4 hours. Blend it after cooking for a smooth texture. How long does it take to cook butternut squash? Cooking butternut squash takes about 20-25 minutes when cubed. You want it soft enough to blend easily. Cooking time may vary if you use larger pieces. Always check with a fork. This soup recipe combines fresh butternut squash and apples for a rich flavor. You learned how to sauté vegetables, add spices, and create a creamy texture with or without coconut milk. I shared tips for storing leftovers and making variations to suit your taste. Think of this soup as a comforting dish for any season. Whether you enjoy it on chilly days or serve it at gatherings, it’s sure to delight. Happy cooking!

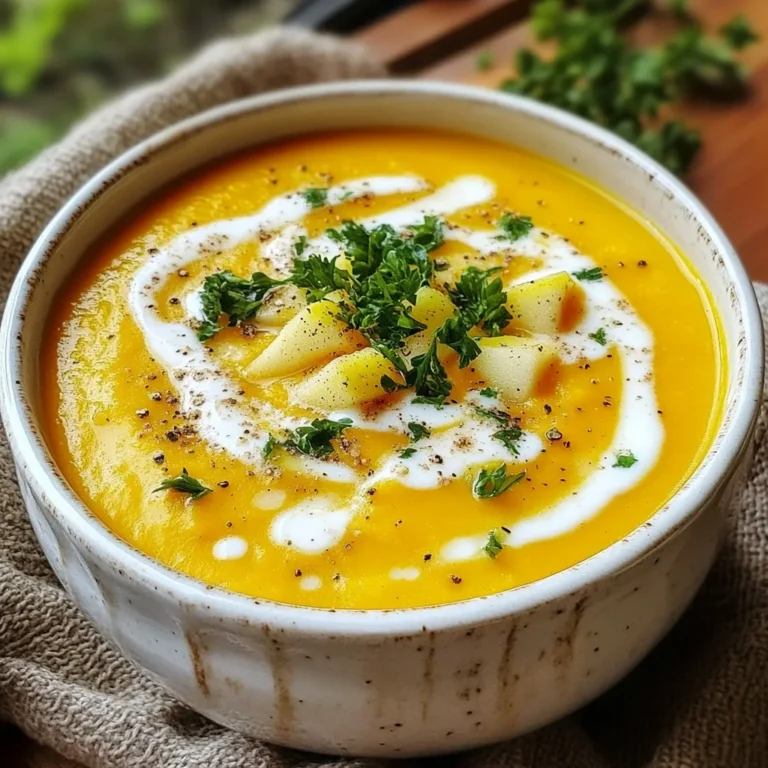
Butternut Squash Apple Soup Hearty and Simple Recipe

PREV 1 … 54 55 56 57 NEXT
meal twig

explore

DessertsDinnerAppetizersDrinks

Our Policies

  • Cookie Policy
  • Copyright Policy
  • Disclaimer
  • GDPR Policy
  • Terms Of Use
Back to Top
  • About
  • Contact Us
  • Privacy Policy
© 2025 meal twig