FREE DINNER EBOOK! Get your copy!
  • Cookie Policy
  • GDPR Policy
  • Disclaimer
  • Terms Of Use
  • Visit my other site: Fun Cookie Recipes
meal twig
  • Home
  • Dinner
  • Desserts
  • Drinks
  • Appetizers
  • Contact
  • About
  • Privacy Policy
  • Home
  • Dinner
  • Desserts
  • Drinks
  • Appetizers
  • Contact
  • About
  • Privacy Policy
  • Cookie Policy
  • GDPR Policy
  • Disclaimer
  • Terms Of Use
Visit my other site: Fun Cookie Recipes

HOME / CATEGORIES /

Latest

To make this tasty ground turkey orzo skillet, gather these essential items: - 1 lb ground turkey - 1 cup orzo pasta - 1 medium onion, diced - 2 cloves garlic, minced - 1 red bell pepper, diced - 1 zucchini, diced - 1 can (14 oz) diced tomatoes, undrained - 3 cups chicken broth - 1 teaspoon dried oregano - 1 teaspoon smoked paprika - Salt and pepper to taste - 2 tablespoons olive oil - 1/4 cup fresh parsley, chopped You can add these optional ingredients for more taste: - 1/2 cup feta cheese, crumbled Feta adds a creamy and salty kick that enhances the dish. This skillet meal is not just delicious; it is also packed with nutrition. Here’s a basic breakdown for each serving: - Calories: 400 - Protein: 30g - Carbohydrates: 45g - Fat: 12g - Fiber: 3g This meal provides a good balance of protein and carbs. It keeps you full and satisfied. The veggies add vitamins and minerals, making it a healthy choice. Enjoy this quick dish that is both tasty and good for you! {{ingredient_image_1}} Start by gathering your ingredients. You will need ground turkey, orzo, onion, garlic, bell pepper, zucchini, tomatoes, chicken broth, spices, olive oil, parsley, and feta. Use a large skillet for this recipe. Heat two tablespoons of olive oil over medium heat. Add the diced onion and sauté for about 2-3 minutes. You want the onion to soften and turn slightly golden. Next, stir in the minced garlic for one minute. This will add a lovely aroma to your dish. Now, it’s time to add the ground turkey. Break it up with a spatula as it cooks. You should see it turn from pink to brown in about 5-7 minutes. Season the turkey with salt, pepper, dried oregano, and smoked paprika. Mixing these spices will enhance the flavor. Make sure everything is well combined. With the turkey cooked, add the diced bell pepper and zucchini. Cook these for another 4-5 minutes until they start to soften. Then, stir in the can of diced tomatoes with their juices. Pour in the chicken broth and bring the mix to a simmer. Once simmering, add the orzo pasta. Stir to ensure the orzo is covered in liquid. Cover the skillet and lower the heat. Cook for about 10-12 minutes, stirring occasionally. This will help the orzo become tender and absorb the broth. After cooking, let it sit for 5 minutes. Finally, fluff the dish and mix in the chopped parsley. If you like, add crumbled feta cheese on top before serving. To make your ground turkey orzo skillet shine, remember these tips. Start with fresh ingredients. Fresh veggies like onions, zucchini, and bell peppers boost taste. Use high-quality ground turkey. This will give your dish a rich flavor. When cooking, don’t rush the browning of the turkey. This step adds depth to your dish. Keep the heat medium and stir often. Let the garlic cook just until fragrant. This enhances the dish’s aroma. For the orzo, make sure it is fully submerged in the broth. This helps it cook evenly. Stir occasionally, so it doesn’t stick. Letting it rest at the end helps the flavors meld. One common mistake is overcooking the orzo. This can make it mushy. Make sure to check it after about 10 minutes. It should be al dente, firm yet tender. Another mistake is not seasoning well. Ground turkey can be bland without enough salt and spices. Taste as you go, adjusting the seasonings. Finally, don’t forget to let it rest before serving. This allows the flavors to deepen. Serve your ground turkey orzo skillet in bowls. This makes it look inviting. Top it with fresh parsley for a pop of color. If you like cheese, sprinkle feta on top. It adds a creamy tang. Pair your dish with a lemon wedge. The citrus brightens the flavors. For a complete meal, serve with a side salad or crusty bread. Enjoy your tasty and simple dish! Pro Tips Use Fresh Ingredients: Fresh vegetables and herbs can elevate the flavor profile of your dish, making it taste more vibrant and delicious. Don’t Overcook the Orzo: Keep an eye on the cooking time for the orzo; it should be al dente, as it will continue to cook in the residual heat. Experiment with Seasonings: Feel free to adjust the spices or add your favorite herbs to customize the flavor according to your taste preferences. Add a Citrus Twist: A squeeze of lemon juice just before serving can brighten the dish and enhance the overall flavors. {{image_2}} You can easily make this dish vegetarian. Just swap the ground turkey for a plant-based meat. Many brands offer great options today. Look for one with good flavor and texture. You can also use lentils or chickpeas for a protein boost. Both add a nice texture and taste. Want to make your skillet even healthier? Add more veggies! You can toss in spinach, kale, or carrots. These add vitamins and color. Try using frozen mixed vegetables for quick prep. Just throw them in with the bell pepper and zucchini. Cheese can change the flavor of the dish. Feta gives a tangy kick, while cheddar adds creaminess. If you love feta, crumbled on top works best. For a milder taste, shredded cheddar melts well. You can mix both for a unique flavor. To store your Ground Turkey Orzo Skillet, let it cool down first. Use an airtight container to keep the dish fresh. Make sure to store it in the fridge. It will stay good for 3 to 4 days. If you want to keep it longer, freezing is a great option. When you are ready to eat leftovers, reheating is key. I recommend using the stove for the best taste. Put the skillet on low heat and add a splash of broth. Stir often to keep it from sticking. This way, the orzo stays nice and creamy. You can also use a microwave. Just cover it and heat in short bursts, stirring in between. If you want to freeze your Ground Turkey Orzo Skillet, it’s easy! Portion the meal into freezer-safe bags. Squeeze out the air before sealing. Label the bags with the date and name of the dish. It will stay fresh for up to 3 months. When you're ready to eat, thaw it overnight in the fridge. Then, reheat it as mentioned above for the best flavor. Yes, you can use other pasta shapes. Options like penne, shells, or fusilli work well. Just remember to check cooking times. Short pasta shapes often cook faster than orzo. Adjust the liquid as needed if you choose a larger pasta. Leftovers can last for about three days in the fridge. Store them in an airtight container. Make sure to let it cool down before sealing. This helps keep the pasta fresh and tasty. Reheat in a skillet for the best texture. If you need a substitute, try ground chicken or beef. Both work well in this recipe. For a vegetarian option, use lentils or a plant-based meat alternative. Just adjust the cooking time if using lentils. They may need less time to cook. This article covered all you need to make a tasty ground turkey orzo skillet. We looked at key ingredients, cooking steps, and tips for better flavor. Variations allow for personal tastes while easy storage keeps leftovers fresh. Remember, use what you love most in this dish. Experiment and enjoy your cooking. With a few simple changes, your skillet can shine.

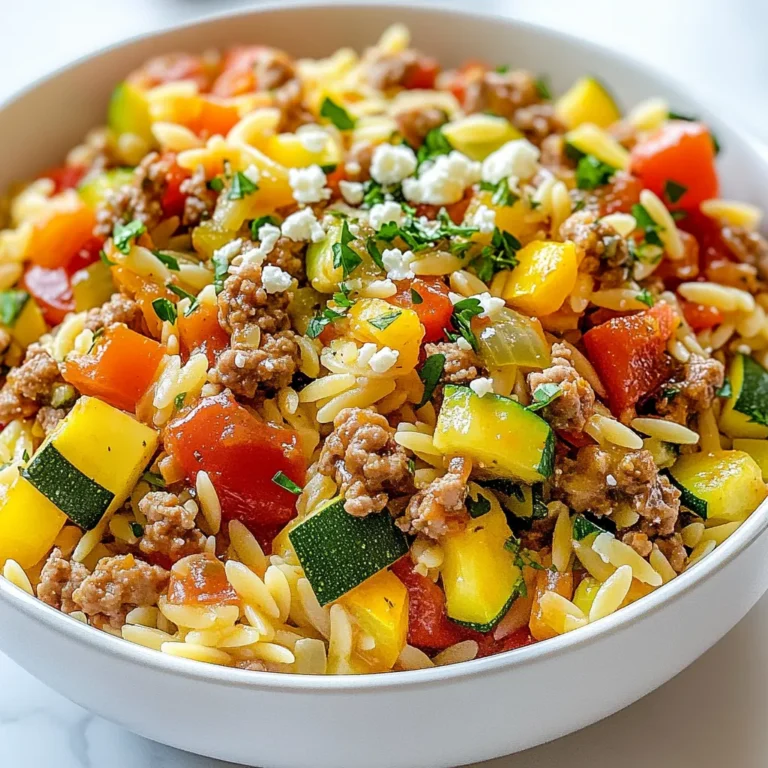
Ground Turkey Orzo Skillet Tasty and Simple Recipe

To make Simple Greek Chicken Bowls, gather these fresh ingredients: - 2 boneless, skinless chicken breasts - 2 tablespoons olive oil - 1 teaspoon dried oregano - 1 teaspoon garlic powder - Salt and pepper to taste - 1 cup cooked quinoa or couscous - 1 cup cherry tomatoes, halved - 1 cucumber, diced - 1/2 red onion, thinly sliced - 1 cup feta cheese, crumbled - 1/4 cup kalamata olives, pitted and halved - 2 tablespoons fresh lemon juice - Handful of fresh parsley, chopped The chicken needs a tasty marinade to shine. Use these items: - 2 tablespoons olive oil - 1 teaspoon dried oregano - 1 teaspoon garlic powder - Salt and pepper to taste Mix these together in a bowl. This blend gives the chicken great flavor. You can customize your bowls! Here are some fun ideas: - Avocado slices for creaminess - Roasted red peppers for extra color - Arugula or spinach for greens - Hummus for a rich dip - Extra herbs like dill or mint These add-ins let you create your perfect Greek chicken bowl! Enjoy experimenting with flavors and textures. {{ingredient_image_1}} To start, you need to marinate the chicken. In a bowl, mix olive oil, dried oregano, garlic powder, salt, and pepper. This mix gives the chicken great flavor. Add the chicken breasts to the bowl and coat them well. Let the chicken sit for at least 30 minutes. For more flavor, marinate it for up to 2 hours in the fridge. This step is key for juicy, tasty chicken. Next, you will cook the marinated chicken. Preheat your grill or skillet to medium-high heat. Cook the chicken for about 6 to 7 minutes on each side. You want the internal temperature to reach 165°F (75°C). After cooking, take the chicken off the heat and let it rest for 5 minutes. Resting helps keep the chicken juicy. While the chicken cooks, prepare the base. In a separate bowl, combine your cooked quinoa or couscous. Add cherry tomatoes, diced cucumber, thinly sliced red onion, and halved kalamata olives. Pour in the fresh lemon juice. Toss everything gently to mix. This fresh base adds color and flavor to your bowls. Now it’s time to assemble your bowls. Slice the grilled chicken into strips. In each serving bowl, layer the quinoa or couscous mix first. Then, place the sliced chicken on top. Crumble feta cheese over the chicken. Finish with a sprinkle of fresh parsley for a pop of color. This step makes your meal look beautiful. Serve the bowls warm. You can drizzle extra olive oil on top if you want. This adds richness and brings all the flavors together. Enjoy this fresh Mediterranean taste with family or friends! To keep your chicken juicy, marinate it well. Use olive oil, oregano, garlic powder, salt, and pepper. Let the chicken sit in the marinade for at least 30 minutes. If you have time, two hours in the fridge makes it even better. When cooking, don’t rush it. Cook on medium-high heat for about 6-7 minutes on each side. Always check the internal temperature. It should reach 165°F (75°C). Letting the chicken rest for 5 minutes after cooking helps keep it moist. Cooking quinoa or couscous is simple. For quinoa, use a 2:1 water-to-quinoa ratio. Bring water to a boil, then add quinoa. Reduce heat and cover. Cook for about 15 minutes, or until the water is absorbed. Fluff it with a fork after cooking. For couscous, use the same water-to-couscous ratio. Boil water, remove from heat, and add couscous. Cover and let it sit for about 5 minutes. Fluff with a fork before mixing in your veggies. To make these bowls pop with flavor, add fresh lemon juice. It brightens up all the ingredients. You can also toss in fresh herbs, like parsley or dill. They add freshness and taste. Don't forget about the feta cheese; it gives a salty and creamy kick. If you like heat, add some crushed red pepper flakes. For a richer taste, drizzle extra olive oil over the finished bowl. This makes every bite delicious! Pro Tips Marinate for Maximum Flavor: Allow the chicken to marinate for at least 2 hours in the refrigerator to enhance the flavors and tenderness. Use a Meat Thermometer: To ensure perfectly cooked chicken, use a meat thermometer to check the internal temperature reaches 165°F (75°C). Customize Your Bowl: Feel free to add other Mediterranean ingredients like roasted red peppers, artichokes, or chickpeas for extra flavor and nutrition. Fresh Herbs Matter: Fresh parsley or mint can elevate the dish’s flavor profile, so don’t skip the garnish! {{image_2}} You can easily make a tasty vegetarian version of Greek chicken bowls. Replace the chicken with roasted vegetables. Great choices include zucchini, bell peppers, and eggplant. You can also use chickpeas or lentils for protein. These options add a nice texture and flavor to your dish. If you want to switch up the protein, try using shrimp or fish. Grilled shrimp adds a nice touch with its sweet flavor. You can also use marinated tofu for a plant-based option. Just cook it until golden brown for a delicious bite. Each of these proteins pairs well with the fresh veggies and zesty dressing. For a gluten-free bowl, use quinoa or choose rice instead of couscous. Both are great bases that soak up flavors well. Ensure that any sauces or dressings you use are also gluten-free. This way, everyone can enjoy a wholesome meal without worry. Once you finish your meal, cool the leftovers quickly. Place them in an airtight container. This helps keep the food fresh. Store the Greek chicken bowls in the fridge for up to four days. If you want to keep them longer, freeze them. Just remember to let them cool before freezing. To reheat your Greek chicken bowls, remove them from the container. Place them on a microwave-safe plate. Heat it in the microwave for about 2-3 minutes. Make sure the chicken is hot all the way through. You can also use a skillet. Heat on medium until warm, adding a splash of water if needed. Meal prep makes busy days easier. Start by cooking extra chicken and quinoa or couscous. Store them separately in containers. You can mix and match toppings later. Prepare veggies like tomatoes and cucumbers ahead of time, too. Keep them fresh in the fridge. This way, you can whip up a Greek chicken bowl in no time. Yes, you can use chicken thighs. They add more flavor and stay moist. They work well in this recipe. Just adjust the cooking time. Thighs typically need a few extra minutes. Aim for an internal temperature of 165°F (75°C). To make the recipe dairy-free, skip the feta cheese. You can use avocado for creaminess instead. Another option is to add a spoonful of hummus. This keeps the texture nice and rich. If you want a feta substitute, try goat cheese or vegan cheese. These options mimic the tangy flavor well. If you prefer a nutty taste, use toasted sunflower seeds. They add crunch without dairy. For a low-carb meal, replace quinoa or couscous with cauliflower rice. Cauliflower rice is light and full of flavor. You can also add more veggies like spinach or bell peppers. This keeps the meal filling and healthy. In this article, we explored how to create delicious Greek chicken bowls. We covered the full list of ingredients, marinades, and tasty toppings. You learned step-by-step instructions for marinating and cooking chicken, preparing quinoa, and mixing everything together. I shared tips on keeping chicken juicy and ways to enhance flavor. We also discussed vegetarian options, gluten-free substitutes, and storage tips. Enjoy crafting your own Greek chicken bowls. With these clear steps, your meal will impress!

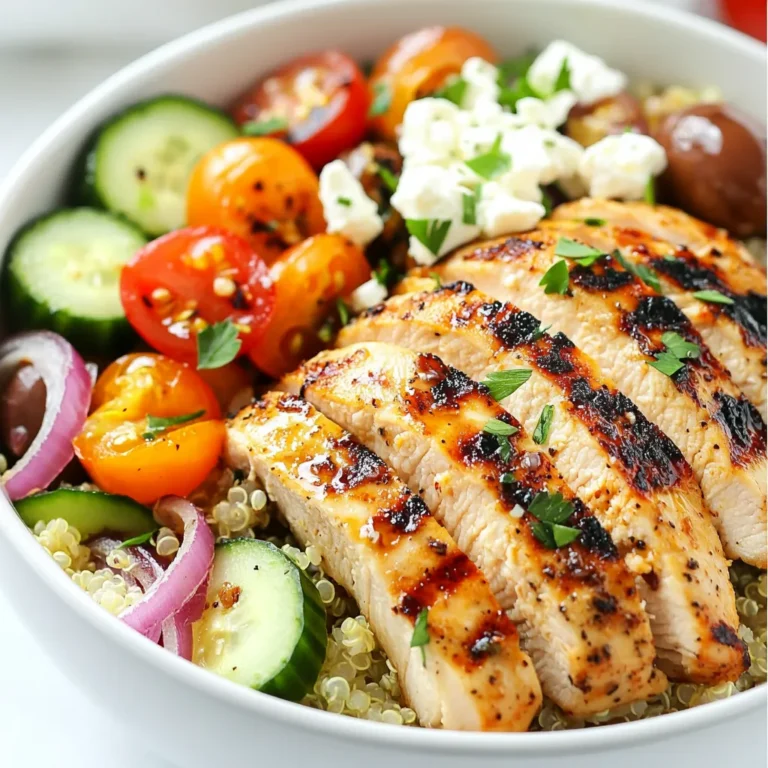
Simple Greek Chicken Bowls Flavorful and Easy Meal

- 1 lb beef stew meat, cut into bite-sized pieces - 2 tablespoons olive oil - 1 medium onion, diced - 2 cloves garlic, minced - 4 cups beef broth - 2 cups water - 3 medium carrots, sliced - 2 stalks celery, chopped - 1 potato, diced - 1 (14 oz) can diced tomatoes, with juice - 1 cup frozen peas - 1 teaspoon dried thyme - 1 teaspoon oregano - 1 bay leaf - Salt and pepper to taste - Fresh parsley, chopped for garnish Old Fashioned Vegetable Beef Soup is a cozy dish. It starts with simple, fresh ingredients. You need beef stew meat, which gives the soup its hearty base. The olive oil adds richness and flavor. Diced onion and minced garlic bring a nice aroma. Next, we have the broth and vegetables. Beef broth gives depth to the soup. Adding water balances the flavors. Carrots, celery, and potatoes add color and nutrition. Diced tomatoes bring a bit of sweetness. Frozen peas add a pop of green. For seasoning, dried thyme and oregano add warmth. A bay leaf gives a subtle hint of flavor. Don't forget to season with salt and pepper. Finally, fresh parsley adds a bright touch when you serve it. Gather these ingredients, and you're ready to make a comforting meal. Each one plays a role in creating a rich, satisfying soup. {{ingredient_image_1}} To start, heat the olive oil in a large pot over medium heat. Add the beef stew meat, making sure to brown it on all sides. This step takes about 5 to 7 minutes. Once it’s brown, remove the beef from the pot and set it aside. This helps build flavor for the soup. Next, add the diced onion and minced garlic to the same pot. Sauté them until the onion becomes soft and clear. This should take about 3 to 4 minutes. The smell will be amazing! Once done, return the beef to the pot, mixing it with the onion and garlic. Now it's time to add the magic. Pour in the beef broth and water. Stir everything together. Then, add the sliced carrots, chopped celery, diced potato, and the can of diced tomatoes along with their juice. Don't forget the frozen peas! For seasoning, sprinkle in the dried thyme, oregano, and bay leaf. Add salt and pepper to taste. Bring the soup to a simmer. Cover the pot and reduce the heat to low. Let it simmer for about 1.5 to 2 hours. Stir it occasionally, so nothing sticks. The beef will become tender, and the flavors will mix beautifully. Before serving, taste it again and adjust the seasoning if needed. Remember to remove the bay leaf! Ladle the soup into bowls and top with fresh parsley. Enjoy! To brown the meat well, use a hot pot. Heat olive oil first. Place the beef in a single layer. Let it cook without moving it for a few minutes. This helps develop a nice crust. Turn the pieces to brown all sides. Once brown, take the beef out and set it aside. To keep the flavor balanced, add salt and pepper in layers. Season the beef while it cooks. Also, season the vegetables as they sauté. This builds depth in taste. You can add more herbs and spices to boost flavor. Try adding a pinch of paprika or a dash of cayenne for warmth. Fresh herbs like thyme or rosemary can brighten the soup. Adjusting the soup's consistency is easy. If you want it thicker, mash some potatoes in it. For a thinner soup, add more broth or water. For a lovely presentation, serve the soup in rustic bowls. Top it with fresh parsley for color. A slice of crusty bread on the side is perfect for dipping. Pair the soup with a light salad or some cheese. This adds variety to your meal and makes it more satisfying. Pro Tips Use Quality Beef: Opt for well-marbled beef stew meat for a richer flavor and more tender texture after slow cooking. Add Fresh Herbs: For an aromatic boost, consider adding fresh herbs like thyme or rosemary towards the end of cooking. Customize Veggies: Feel free to swap in your favorite seasonal vegetables, such as green beans or corn, to personalize the soup. Let it Rest: Allow the soup to sit for about 30 minutes after cooking for the flavors to deepen before serving. {{image_2}} You can swap beef for chicken or turkey. This change keeps the soup light and tasty. Just like with beef, brown the meat first. Then, add it to the pot with the same veggies. You can also use different vegetables or legumes. Try adding green beans, corn, or lentils. They add great flavor and texture. You can mix and match based on what you have. To make the soup gluten-free, use gluten-free broth. Check labels to ensure all ingredients fit. Most of the veggies and spices are already gluten-free. For vegetarian or vegan options, skip the meat. Use veggie broth instead of beef broth. Add more beans or tofu for protein. This keeps the soup filling and nutritious without animal products. If you want to add some heat, toss in peppers. Jalapeños or crushed red pepper can spice things up. Start with a small amount and taste as you go. You can also give the soup different flavors by using various cuisines. For an Italian twist, add basil and oregano. For a Mexican flair, use cumin and cilantro. These changes can make the soup feel new and exciting. After cooking your Old Fashioned Vegetable Beef Soup, let it cool down to room temperature. This step helps keep it fresh. Store the soup in a sealed container. Glass or BPA-free plastic containers work best. This keeps the soup safe and tasty. To freeze soup, let it cool completely. Pour the soup into freezer-safe bags or containers. Leave some space at the top. This space helps the soup expand as it freezes. When you want to eat it, take it out and thaw it in the fridge overnight. To reheat, warm it on the stove over low heat. Stir often to keep it smooth. In the fridge, this soup lasts about three to four days. Look for signs of spoilage, like an off smell or mold. If you see any, it’s best to toss it. Always trust your senses to judge if it’s still good to eat. How long does vegetable beef soup last in the fridge? Vegetable beef soup lasts about 3 to 4 days in the fridge. Store it in a sealed container. Always check for any signs of spoilage before eating. Can I make this soup in a slow cooker? Yes, you can make this soup in a slow cooker. Brown the beef first, then add all the ingredients to the slow cooker. Cook on low for 6 to 8 hours. How long to cook for optimal tenderness? For the best tenderness, simmer the soup for 1.5 to 2 hours. This allows the beef to become soft and the flavors to blend well. Can I speed up the cooking process? You can speed up cooking by using a pressure cooker. In a pressure cooker, the soup can be ready in about 30 minutes. Can I use fresh instead of frozen peas? Yes, you can use fresh peas instead of frozen ones. Just add them in the last 10 minutes of cooking for the best texture. What if I don't have beef broth? Can I substitute it? If you don't have beef broth, you can use chicken broth or vegetable broth. The soup will still taste good, but the flavor will change slightly. This blog post covered the key steps to make a hearty vegetable beef soup. We discussed the main ingredients, from beef stew meat to fresh herbs. We then explored cooking techniques and tips for flavor. You can also make fun variations, like swapping meats or adjusting for dietary needs. Finally, proper storage helps keep your soup fresh. Enjoy trying different flavors and techniques. Make this soup your own, and share it with friends and family!

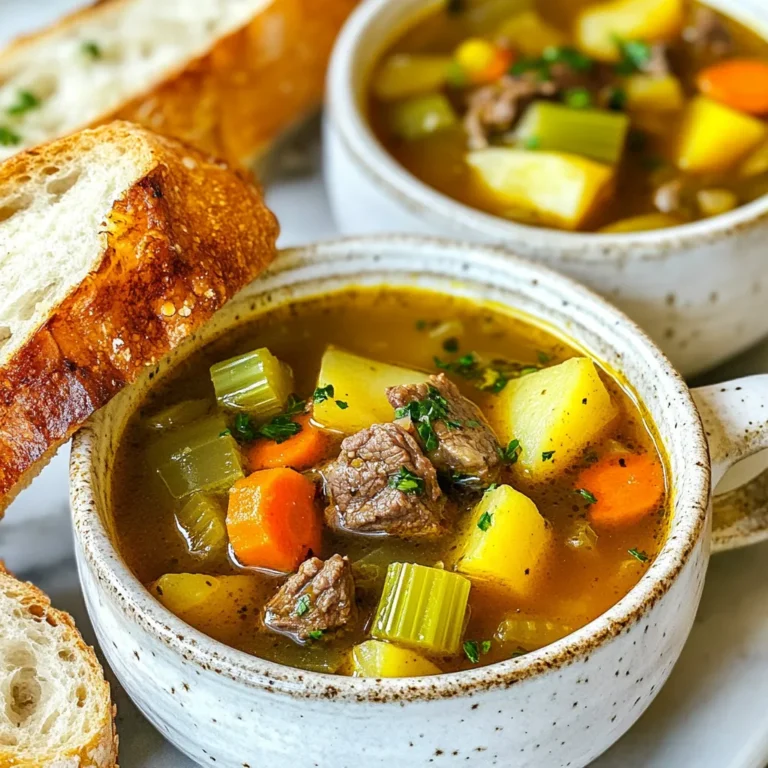
Old Fashioned Vegetable Beef Soup Hearty and Simple Dish

- 2 cups cooked chicken, shredded - 1 cup broccoli florets - 1 cup cauliflower florets - 1 medium zucchini, diced - 1 red bell pepper, chopped - 1 cup coconut milk - 2 tablespoons olive oil - 2 cloves garlic, minced - 1 teaspoon onion powder - 1 teaspoon dried thyme - Salt and pepper - Fresh parsley for garnish Chicken is a great source of protein. It helps build muscle and keeps you full. The veggies add fiber and many vitamins. Broccoli and cauliflower are both high in nutrients. They support good health and digestion. Zucchini adds hydration and flavor with fewer calories. Red bell pepper brings sweetness and vitamin C. Coconut milk gives a creamy texture. It is full of healthy fats that support energy. This milk is also dairy-free. It fits well in a Paleo diet. Using coconut milk makes this dish rich and satisfying. Overall, these ingredients make a tasty and healthy meal for your family. {{ingredient_image_1}} First, preheat your oven to 375°F (190°C). This step warms the oven for even cooking. While it heats, clear your workspace. Gather all your ingredients so you can work smoothly. To shred chicken quickly, use two forks. Hold the chicken with one fork and pull it apart with the other. This method makes shredding easy and fast. Next, heat 2 tablespoons of olive oil in a large skillet over medium heat. Add the minced garlic and sauté it for about 1 minute. You want it fragrant but not burned. Now, add the broccoli, cauliflower, zucchini, and red bell pepper to the skillet. Sauté the veggies for 5-7 minutes. You want them to soften but still have crunch. Stir them often to cook evenly. After that, take a large mixing bowl and combine the shredded chicken, sautéed veggies, 1 cup of coconut milk, onion powder, thyme, salt, and pepper. Stir everything until well mixed. This ensures every bite is packed with flavor. Now it’s time to bake. Transfer the mixture into a greased 9x13 inch casserole dish. Spread it out evenly for even cooking. Place the casserole in your preheated oven. Bake for 25-30 minutes. You know it’s done when the edges start to brown and it’s heated through. To check for doneness, insert a fork in the center. If it comes out hot, it’s ready. Remove it from the oven and let it sit for 5 minutes before serving. This resting time helps the flavors settle. Garnish with fresh parsley for a burst of color and taste. Enjoy your delicious Paleo Chicken Veggie Casserole! To avoid a runny casserole, use less liquid. Coconut milk adds creaminess, but too much can make it soupy. Ensure your veggies are not overcooked during sautéing. They should be tender but firm. Drain any excess liquid before adding to the chicken mix. For seasoning, try adding a pinch of smoked paprika for a warm flavor. You can also increase the garlic to suit your taste. This can enhance the dish’s overall taste. When sautéing vegetables, use medium heat. This cooks them evenly and keeps them crisp. Stir often to prevent sticking. I suggest cooking the broccoli and cauliflower first. Add the zucchini and bell pepper later for the best texture. Let the casserole rest for five minutes after baking. This helps the flavors meld and makes serving easier. The dish will hold its shape better, too. Enjoy every bite! Pro Tips Use Leftover Chicken: Utilizing leftover rotisserie chicken can save you time and enhance the flavor of this casserole. Veggie Variations: Feel free to swap in your favorite vegetables like spinach, carrots, or asparagus for a personal touch. Make it Spicy: Add a pinch of red pepper flakes or a dash of hot sauce to the mix for a little heat. Freezing Instructions: This casserole freezes well. Just cool it completely, then cover tightly and freeze for up to 3 months. {{image_2}} You can switch the chicken for other proteins. Try turkey or pork for a twist. For a vegetarian dish, use chickpeas or lentils. They add protein and fiber. Feel free to change the veggies too! Replace broccoli with green beans or asparagus. Cauliflower works well with carrots or squash. Use what you like best. Want a kick? Add spices like paprika or cayenne pepper. They bring heat and flavor. Herbs can also change the taste. Try basil or oregano for a fresh twist. Rosemary adds a nice touch too. Mix and match to find your favorite flavor! To store leftover casserole, cool it first. Place it in a glass or plastic container. Seal it tightly with a lid. This keeps out air and moisture. Leftovers will stay fresh for about three days in the fridge. If you want to keep it longer, freeze it. Use freezer-safe bags or containers for this. To reheat without drying out, use low heat. The oven works best for even warming. Preheat your oven to 350°F (175°C). Place the casserole in a dish and cover it with foil. This helps retain moisture. Heat for 20-25 minutes or until warm. If you're in a hurry, the microwave is an option. Place a serving in a microwave-safe bowl. Cover it with a damp paper towel. Heat in short bursts, stirring in between. This method can make it hot but may dry it out if overcooked. How can I make this casserole dairy-free? You can make this casserole dairy-free by using coconut milk, which is already in the recipe. It adds creaminess without any dairy. If you want an even richer flavor, you can use full-fat coconut milk. This keeps the dish creamy and delicious while staying true to the Paleo diet. Is it possible to freeze the Paleo Chicken Veggie Casserole? Yes, you can freeze this casserole! Just let it cool completely after baking. Then, cover it tightly with plastic wrap and foil. It will stay fresh in the freezer for about three months. When you want to eat it, thaw it overnight in the fridge. Then, reheat it in the oven until hot. Can I prepare this dish in advance? Absolutely! You can prepare this dish a day ahead. Just follow the recipe up to the baking step. Cover the prepared dish and store it in the fridge. When you're ready to eat, pop it in the oven. It might need a few extra minutes to bake. What are good side dishes to serve with this casserole? This casserole is filling on its own, but you can serve it with a fresh salad. A simple green salad with olive oil and lemon dressing works well. You could also serve it with steamed green beans or roasted sweet potatoes for a balanced meal. This blog post covered how to make a tasty Paleo Chicken Veggie Casserole. We shared the full ingredient list and the health benefits of each item. I detailed the step-by-step cooking process, from prep to baking. Plus, you learned tips for perfecting the dish and storage advice. Remember, you can customize the ingredients to fit your taste. Enjoy experimenting in the kitchen! Your delicious, nutritious casserole awaits.

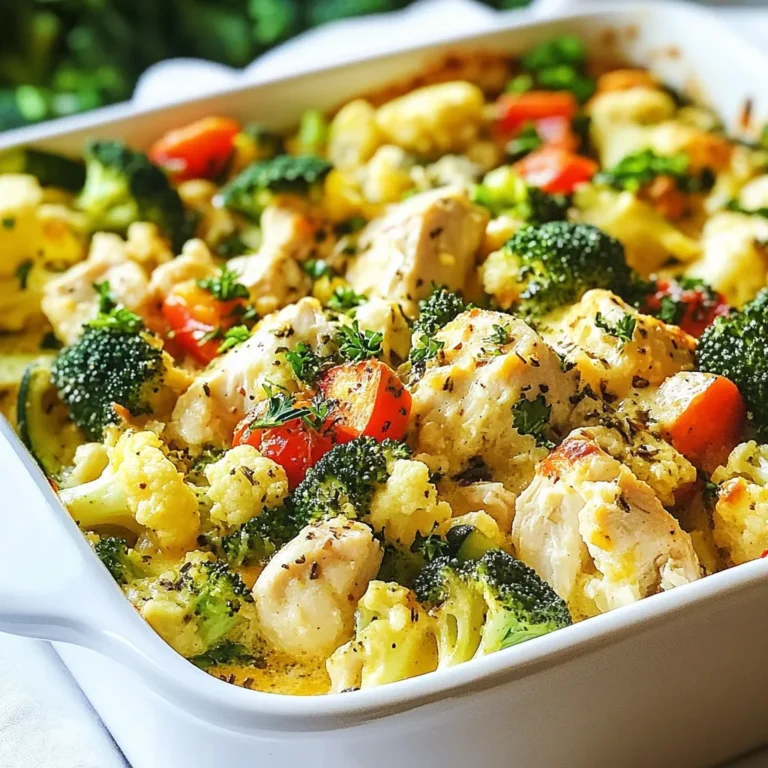
Paleo Chicken Veggie Casserole Savory Family Meal

To make a tasty creamy carbonara, gather these simple ingredients: - 200g spaghetti or fettuccine - 100g cream cheese - 2 large eggs - 100g grated Parmesan cheese - 150g pancetta or turkey bacon, cut into small pieces - 2 cloves garlic, minced - 1 tablespoon olive oil - Salt and freshly cracked black pepper, to taste - Fresh parsley, chopped, for garnish Each ingredient plays a key role in building flavors. The pasta provides a base that holds the sauce well. Cream cheese adds a rich creaminess, while eggs give a silky texture. Parmesan cheese brings a sharp, salty bite that elevates the dish. Pancetta or turkey bacon gives a savory crunch, and garlic adds depth. Olive oil helps cook the meat and adds a nice finish. Finally, salt and pepper enhance all the flavors, while parsley adds color and freshness. These items are easy to find and create a delightful carbonara that feels gourmet! {{ingredient_image_1}} To cook the pasta, fill a large pot with water. Add a good amount of salt. When the water boils, add your spaghetti or fettuccine. Cook it according to the package instructions until it is al dente. This means it should still have a slight bite. After cooking, save 1 cup of the pasta water. Drain the pasta well, but do not rinse it. Rinsing removes the starch, which helps the sauce stick. In a mixing bowl, take the cream cheese and add the two eggs. Whisk them together until smooth. Then, add the grated Parmesan cheese. Mix it well until the sauce is creamy. A pinch of salt and black pepper adds flavor. Make sure there are no lumps. You want a nice, thick sauce that will coat the pasta perfectly. Grab a large skillet and heat some olive oil over medium heat. Add the pancetta or turkey bacon. Fry it for about 5 to 7 minutes until it gets crispy. This gives a nice flavor to your dish. In the last minute of cooking, add the minced garlic. Be careful! Garlic can burn quickly, so add it just before it's done. Once the pancetta is crispy, lower the heat. Add the drained pasta to the skillet with the pancetta and garlic. Toss everything together so the pasta gets coated. Now, slowly pour in the cream cheese mixture. Stir quickly to coat the pasta. This step is key: if you don't stir fast enough, the eggs will scramble. If the sauce is too thick, add a little pasta water until it looks just right. Give your pasta a taste. If it needs more flavor, add a bit of salt and black pepper. You want it to taste great! When serving, sprinkle some fresh parsley on top. This adds color and freshness. You can also add more grated Parmesan if you like. Enjoy your creamy carbonara right away while it's warm and delicious! To make a smooth sauce, mix the cream cheese with eggs and Parmesan well. This helps the sauce blend nicely. When you cook the pasta, save some pasta water. This water is starchy and helps the sauce cling to the pasta. If the sauce gets too thick, add a bit of the reserved water to make it creamy. To keep your sauce from scrambling, mix the pasta with the sauce on low heat. If the heat is too high, the eggs cook too fast. Remember, slow and steady is best. Always combine the pasta and sauce off the heat for the best results. Spaghetti and fettuccine are great choices for carbonara. They hold the sauce well and give a nice bite. If you want a change, try penne or linguine. These pasta types also work well with creamy sauces and can give you a fun twist on the classic dish. Pro Tips Use Fresh Ingredients: Fresh pasta and high-quality cheese will significantly enhance the flavor of your carbonara. Control the Heat: When adding the cream cheese mixture, ensure the skillet is on low heat to avoid scrambling the eggs. Reserve Pasta Water: Always save some pasta water; it helps to adjust the sauce consistency without diluting the flavor. Garnish Generously: Don't skimp on the parsley and extra Parmesan; they add freshness and richness to the dish. {{image_2}} You can change up the meat in your carbonara. Try adding different proteins to make it your own. Here are a few ideas: - Pancetta: This is the classic choice. It gives a rich flavor. - Turkey Bacon: A lighter option that tastes great too. - Chicken: Cooked and diced chicken works well for a heartier meal. - Shrimp: Adds a seafood twist that pairs nicely with the creamy sauce. For vegetarian options, you can skip the meat entirely. Instead, add some protein-rich ingredients like: - Tofu: Firm tofu can be cubed and sautéed for a nice texture. - Tempeh: This has a nutty flavor and is great when cooked until crispy. Adding veggies can boost flavor and nutrition. Here are some ideas: - Peas: Sweet peas add a pop of color and flavor. - Spinach: Fresh or wilted spinach is a fantastic way to add greens. - Mushrooms: Sautéed mushrooms lend an earthy taste. - Broccoli: Roasted broccoli adds texture and a nice crunch. To incorporate greens, you can mix them in with the pasta. Just toss them in at the end of cooking for a vibrant touch. Spice up your carbonara with herbs and spices. Here are some fun suggestions: - Basil: Fresh basil brightens the dish. - Oregano: Just a pinch adds depth and warmth. - Red Pepper Flakes: If you like heat, sprinkle some in for a kick. You can also switch up the cheese for fun variations. Instead of Parmesan, try: - Pecorino Romano: This cheese is saltier and has a bold flavor. - Goat Cheese: For a tangy twist, this cheese melts well into the sauce. Experimenting with these ideas can make your creamy carbonara unique and exciting! To keep your creamy carbonara fresh, store leftovers in the fridge. Use airtight containers. This helps to prevent moisture loss and keeps flavors intact. Make sure to let the pasta cool before sealing it. You can store it for up to three days. When you reheat carbonara, you want to keep it creamy and smooth. Avoid the microwave if you can. Instead, use a stovetop. Place the pasta in a skillet over low heat. Add a splash of pasta water to help loosen the sauce. Stir gently until warm. If using the microwave, heat in 30-second bursts. Stir after each burst to prevent drying out. You can freeze carbonara, but it's best to do this without the eggs. Egg-based sauces do not freeze well. To freeze, let the dish cool completely. Place in a freezer-safe container. Store for up to one month. When ready to eat, thaw it overnight in the fridge. Reheat using the stovetop method for the best texture. Yes, you can use other cheeses. Pecorino Romano adds a sharp taste. Cheddar gives a rich flavor, but it changes the dish. Always remember that different cheeses alter the taste and texture. Experiment to find what you like best. No, traditional carbonara does not use cream. It relies on eggs and cheese for creaminess. Modern recipes often add cream for a richer sauce. Purists enjoy the classic method, while others prefer the creamy twist. To make carbonara gluten-free, choose gluten-free pasta. Many brands offer rice or corn-based options. Also, check the pancetta or bacon for gluten. This way, you can enjoy the dish without worry. You can prepare some parts in advance. Cook the pasta and store it separately. Keep the sauce in the fridge. Reheat gently to avoid cooking the eggs too much. Freshly combine before serving for the best taste. Simple salads pair well with carbonara. A Caesar salad adds crunch. Garlic bread is another excellent choice. Roasted vegetables bring color and flavor. These sides complement the creamy pasta perfectly. This blog post covered how to make a classic carbonara. I shared key ingredients, like spaghetti, cream cheese, and pancetta. You learned step-by-step how to cook pasta and prepare a creamy sauce without scrambling eggs. We also discussed variations, storage tips, and common questions. In conclusion, making carbonara can be easy and fun. Enjoy experimenting with flavors and textures. Your next meal can be a crowd-pleaser with just a few thoughtful steps. Happy cooking!

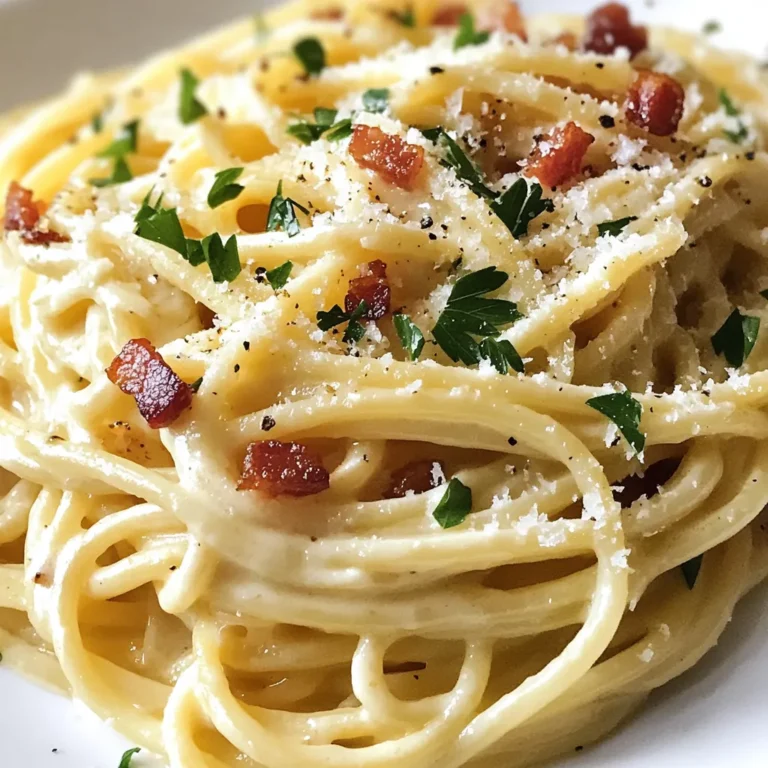
Creamy Carbonara Pasta Simple and Flavorful Recipe

- 1 lb sauerkraut, drained and rinsed - 1 lb fresh green cabbage, chopped - 1 lb beef chuck, diced - 1 lb smoked sausage, sliced - 1 large onion, finely chopped - 3 cloves garlic, minced - 2 carrots, grated - 1 tbsp tomato paste - 2 bay leaves - 1 tsp dried thyme - 1 tsp caraway seeds - 4 cups beef or vegetable broth - 2 tbsp vegetable oil - Salt and pepper to taste - Fresh parsley, for garnish I love using sauerkraut and green cabbage for Bigos. They add a great tang and crunch. The beef chuck gives a rich flavor. Smoked sausage adds depth and a nice smokiness. Onions and garlic bring sweetness and aroma. Carrots add color and mild sweetness. Tomato paste enhances the stew’s taste. Bay leaves, thyme, and caraway seeds bring warm herbs to the dish. Broth adds moisture and flavor. I prefer fresh ingredients for Bigos. Fresh cabbage and carrots taste better. They hold up well during cooking. Canned sauerkraut is fine, but rinse it well. It helps reduce the saltiness. If you use canned broth, check the label for sodium levels. Fresh parsley brightens the dish. It adds a pop of color and freshness when served. {{ingredient_image_1}} 1. Start by gathering your ingredients. You need sauerkraut, fresh cabbage, beef chuck, and smoked sausage. 2. Chop the onion finely and mince the garlic cloves. Grate the carrots and set them aside. 3. Rinse the sauerkraut under cold water and drain it well. This helps reduce the sour taste. 4. Cut the beef chuck into small, even cubes. This helps it cook evenly. 5. Slice the smoked sausage into bite-sized pieces. This allows for great flavor in each bite. 1. Heat the vegetable oil in a large pot over medium heat. Add the chopped onion and sauté until soft. This takes about 5 minutes. 2. Next, add the minced garlic and cook for about one minute. You want it fragrant but not burnt. 3. Add the diced beef chuck to the pot. Cook it until all sides are browned, about 6 to 7 minutes. 4. Stir in the sliced smoked sausage. Cook for another 5 minutes to let its flavors mix in. 5. Mix in the grated carrots and tomato paste. Stir well to combine all the ingredients. 6. Add the chopped green cabbage and rinsed sauerkraut. Mix everything together until well combined. 7. Pour in the beef or vegetable broth. Add bay leaves, thyme, caraway seeds, salt, and pepper. Stir to mix. 8. Bring the stew to a gentle simmer. Cover the pot and reduce the heat to low. 9. Let it cook for about 1.5 to 2 hours. Stir occasionally to prevent sticking. 10. Before serving, taste the Bigos. Adjust the seasoning if needed. - For the stovetop, follow the steps above. Keep an eye on it and stir often. - For a slow cooker, brown the meat and onions first. Then transfer everything to the slow cooker. - Set the slow cooker on low for 6 to 8 hours. This makes the flavors even better! - Always taste the Bigos before serving. Adjust seasoning for the best flavor. To make Polish Bigos stew truly shine, focus on layering flavors. Start with good quality meat. Use beef chuck and smoked sausage for rich taste. Sauté onions until soft. This brings out their natural sweetness. Add garlic next; it adds depth. Don't rush this step. Let the stew simmer slowly. This helps all the flavors meld together beautifully. Use fresh herbs when possible. They elevate the dish. For a touch of brightness, add a splash of vinegar before serving. One common mistake is cooking the stew too fast. This can lead to tough meat. Always simmer on low heat for the best results. Another mistake is not seasoning enough. Taste as you cook. Adjust salt and pepper to your liking. Avoid using too much liquid. You want a hearty consistency, not soup. Lastly, don’t skip the resting time. Letting the stew sit enhances the flavors even more. Serve your Bigos in deep bowls. Garnish with fresh parsley for color. Pair it with crusty bread for dipping. This adds texture and flavor. If you want a side, try pickles. They bring a nice crunch. For a drink, a light beer or cider works well. It balances the stew's richness. Enjoy your meal with family and friends. Bigos is all about sharing! Pro Tips Choose Your Meats Wisely: Using a combination of beef chuck and smoked sausage adds depth of flavor to the stew. Feel free to experiment with other meats, like pork or turkey, for different tastes. Let It Simmer: The longer you let the Bigos stew simmer, the better the flavors meld together. If you have the time, consider making it a day in advance and reheating it for an even richer taste. Adjust the Sourness: Depending on your preference, you can adjust the amount of sauerkraut used. For a milder flavor, use less; for a tangier dish, add more. Taste as you go! Perfect Pairing: Bigos pairs wonderfully with crusty bread or rye bread. Serve with a side of pickles or a light salad to balance the hearty stew. {{image_2}} You can create a tasty vegetarian version of Bigos. Replace the meat with hearty veggies. Use mushrooms for a rich flavor. Add lentils or beans for protein. This keeps the stew filling and healthy. Don't forget to use vegetable broth instead of beef broth. You can also add tofu for extra texture. Bigos is flexible with meats. You can mix different types for new flavors. Try using pork, turkey, or even chicken. Each meat brings its own taste. If you want a smoky flavor, use smoked sausage. I love adding a mix of meats for depth in taste. The more variety, the better! Feel free to experiment with seasonings. Besides thyme and caraway seeds, try adding paprika for warmth. You can also use bay leaves for added depth. Some people enjoy a dash of hot sauce for a kick. Want more veggies? Toss in bell peppers or potatoes. These changes can make your Bigos unique! After enjoying your Bigos stew, let it cool down. Use airtight containers to keep it fresh. Store leftovers in the fridge for up to three days. Make sure to label your containers with the date. This way, you can track how long it has been stored. Want to save some for later? Bigos freezes well! Pour the cooled stew into freezer-safe bags or containers. Remove as much air as you can before sealing. Label your bags with the date. You can freeze Bigos for up to three months. When you’re ready to eat it, just pull it out of the freezer. To reheat Bigos, use a pot on the stove. Add a splash of broth or water to keep it moist. Heat it over medium-low heat, stirring occasionally. You can also use the microwave. Place it in a microwave-safe dish and cover it. Heat in short bursts, stirring in between. Make sure it reaches a safe temperature before serving. Enjoy your hearty meal again! Bigos is a traditional Polish stew. It blends sauerkraut and meat for rich flavor. You can find it made with different meats, like beef and sausage. The mix of cabbage and spices adds depth. This stew warms you up on cold days. It's also known as "hunter's stew" for its hearty nature. Yes, you can make Bigos ahead of time. In fact, it tastes better after a day. The flavors meld and become more intense. Store it in the fridge for up to three days. You can also freeze it for longer storage. Just let it cool before packing it up. To make Bigos spicier, add hot sausage or chili flakes. You can also mix in some diced jalapeños. Adjust the heat to your taste. Start with small amounts and taste as you go. This stew is flexible, so feel free to experiment with spices. Bigos can be gluten-free, depending on the meat and broth you use. Check labels on packaged broth and sausage. Use gluten-free broth and sausage for a safe option. The vegetables and sauerkraut are naturally gluten-free. Always confirm ingredients if you're sensitive to gluten. Bigos pairs well with crusty bread or rye bread. You can also serve it with boiled potatoes or dumplings. A side of pickles or a fresh salad adds crunch. For drinks, try a light beer or a glass of red wine. Enjoy the stew in deep bowls for a cozy meal. In this article, we explored the rich world of Bigos. We covered essential ingredients, preparation steps, and cooking methods. I shared tips for flavor perfection and common mistakes to avoid. You learned about variations, storage tips, and answered FAQs. Bigos is a dish full of flavor and history. With these steps and insights, you can create your own version. Enjoy the cooking journey and flavor your table with Bigos!

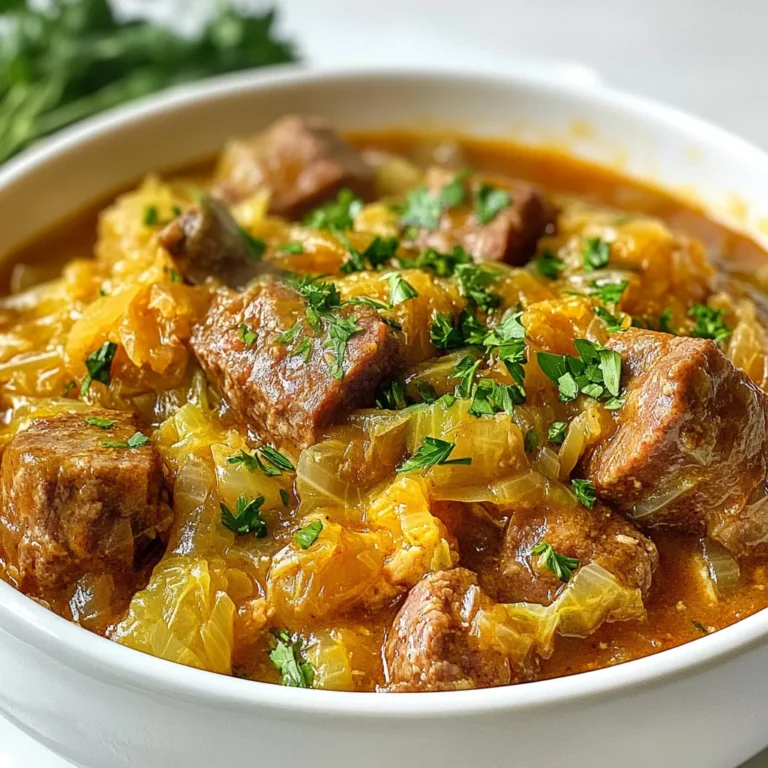
Polish Bigos Stew Hearty and Flavorful Recipe Guide

- 4 boneless, skinless chicken breasts - 2 tablespoons olive oil - 1 medium onion, finely chopped - 3 cloves garlic, minced - 8 ounces cremini or button mushrooms, sliced - 1 cup heavy cream - 1 cup chicken broth - 1 teaspoon dried thyme - 1 teaspoon dried Italian seasoning - Salt and pepper to taste For this dish, you need fresh, quality ingredients. Start with chicken breasts. They should be boneless and skinless for easy cooking. Olive oil adds flavor and helps cook the chicken. Onions and garlic create a fragrant base. Use a medium onion, chopped finely. For garlic, three cloves, minced, will add a nice kick. Mushrooms bring a rich taste. You can use cremini or button mushrooms. They should be sliced for even cooking. Heavy cream and chicken broth make the sauce creamy and rich. The cream adds body, while broth adds depth. Seasonings are key. Dried thyme and Italian seasoning give great flavor. Salt and pepper enhance all the tastes. - Fresh parsley Fresh parsley adds a pop of color and freshness. It makes the dish look and taste better. Just chop a bit and sprinkle it on top before serving. - Large skillet - Cooking utensils - Measuring cups and spoons - Knife and cutting board You will need a large skillet to cook everything. It should be sturdy and heat evenly. Basic cooking utensils like spatulas and spoons will help mix and serve the dish. Measuring cups and spoons are important for accuracy. They ensure you use the right amounts of each ingredient. A knife and cutting board are needed to chop your onions, garlic, and mushrooms. Having the right tools makes cooking easier and more fun. Enjoy the process! {{ingredient_image_1}} To start, prepare your chicken breasts. Pat them dry with paper towels. This step helps them sear nicely. Next, season both sides with salt and pepper. Heat 2 tablespoons of olive oil in a large skillet over medium-high heat. Once hot, add the chicken. Sear each side for about 5-7 minutes. Look for a golden brown color. This adds great flavor. Once cooked through, remove the chicken from the skillet and set it aside. In the same skillet, add the finely chopped onion. Sauté for 2-3 minutes until it becomes translucent. Then, add the minced garlic and cook for about 30 seconds. The aroma will fill your kitchen! Next, add the sliced mushrooms. Cook them for 5-6 minutes, stirring occasionally. As they cook, they will soften and release their juices. Now, pour in 1 cup of chicken broth. Bring it to a gentle simmer. Let it reduce for about 3-4 minutes. This step intensifies the flavors. After that, lower the heat. Stir in 1 cup of heavy cream, 1 teaspoon of dried thyme, and 1 teaspoon of Italian seasoning. Mix well and let it simmer for another 2-3 minutes. This will thicken the sauce slightly. Return the seared chicken to the skillet. Spoon the creamy mushroom sauce over the top. Cook for an additional 2-3 minutes until the chicken heats through. Finally, taste your sauce and adjust the seasoning with more salt and pepper if needed. For a fresh finish, garnish with chopped parsley before serving. Enjoy your delicious dish! - To ensure tender chicken, start with room temperature meat. This helps it cook evenly. - Sear the chicken for 5-7 minutes on each side. This gives it a nice golden crust. - For creamy sauce consistency, let the sauce simmer after adding the cream. This thickens it. - Use a gentle heat when adding cream to prevent curdling. - Serve this dish with fluffy mashed potatoes or pasta for a hearty meal. - For a colorful plate, add steamed vegetables like broccoli or green beans. - Garnish the chicken with fresh parsley to add a pop of color and flavor. - Drizzle extra sauce over the chicken to enhance the presentation. - Store leftovers in an airtight container in the fridge. They stay fresh for up to three days. - When reheating, use low heat to keep the chicken moist and the sauce creamy. - Add a splash of chicken broth when reheating to bring back the sauce's texture. - Avoid microwaving for too long to prevent drying out the chicken. Pro Tips Use Fresh Herbs: Fresh herbs can elevate the flavor of your dish significantly. Consider adding fresh thyme or parsley for a vibrant finish. Don’t Overcrowd the Pan: When searing the chicken, make sure not to overcrowd the skillet. This ensures even cooking and a nice golden crust. Adjust the Creaminess: If you prefer a lighter sauce, substitute half of the heavy cream with Greek yogurt or sour cream for a tangy twist. Perfect Pairings: This dish pairs wonderfully with a side of roasted asparagus or a simple green salad to balance the richness of the sauce. {{image_2}} You can make a tasty vegetarian version of this dish. Instead of chicken, use firm tofu or seitan. Both options absorb flavors well. For the creamy sauce, use vegetable broth and add a splash of plant-based cream. This keeps the dish rich and satisfying. Tips for flavor enhancement: - Use a mix of mushrooms, like portobello or shiitake, for depth. - Add a squeeze of lemon juice for brightness. - Toss in fresh spinach or kale for added nutrition. Changing up herbs and spices can make your dish unique. Try adding smoked paprika for a warm flavor or rosemary for a piney twist. You can also mix in a bit of nutmeg for warmth. Incorporating other vegetables: - Bell peppers add sweetness and color. - Peas bring a nice pop and freshness. - Zucchini or asparagus can add texture and nutrition. The dish works well over various bases. You can serve it over pasta for a hearty meal. Use fettuccine, spaghetti, or even gnocchi. Alternatively, rice is a great choice. It soaks up the sauce well and adds a mild base. Alternative creamy bases: - Mashed potatoes provide comfort and creaminess. - Quinoa offers a protein boost and nutty flavor. - Polenta is another creamy option that pairs nicely. The Chicken in Creamy Mushroom Sauce recipe serves four. Each serving is about one chicken breast with sauce. Here’s a breakdown of the nutritional values per serving: - Calories: 450 - Protein: 34g - Fat: 30g - Carbohydrates: 8g - Fiber: 1g This dish packs a punch in protein while keeping carbs low. It’s perfect for a filling meal without the carbs weighing you down. If you need gluten-free options, this dish is already safe. All ingredients used are naturally gluten-free. For low-calorie modifications, consider using half-and-half instead of heavy cream. You can also use chicken thighs for a more flavorful option while keeping calories in check. Chicken is a great source of lean protein. It helps build muscles and repair tissues. The mushrooms add fiber and vitamins, like B vitamins, which help with energy. Heavy cream gives a comforting richness but can be swapped for lighter options if you prefer. Overall, this dish offers a good mix of nutrients, making it a balanced choice for dinner. You can use several alternatives to cream. A mix of milk and flour works well. This gives a creamy texture without heavy cream. You can also use Greek yogurt or cashew cream. These options add flavor and thickness too. Yes, you can freeze this dish. Make sure it cools down first. Use an airtight container to avoid freezer burn. When you want to eat it, thaw it in the fridge overnight. Reheat on the stove over low heat for best results. Pair this chicken with several tasty sides. Fluffy mashed potatoes are a classic choice. You can also serve it over pasta or rice. Steamed veggies add color and nutrition to your plate. A crisp salad complements the meal nicely too. This dish takes about 30 minutes to make. Prep work only needs 10 minutes. The cooking time is around 20 minutes. Make sure to keep an eye on the chicken to avoid overcooking. In this blog post, we covered how to make Chicken in Creamy Mushroom Sauce step by step. We discussed the key ingredients, including chicken and cream, along with the kitchen tools you need. I shared tips for cooking, serving ideas, and ways to customize the dish. Remember, with simple swaps, you can make it vegetarian or adjust flavors. Enjoy experimenting to find your perfect version. Cooking should be fun!

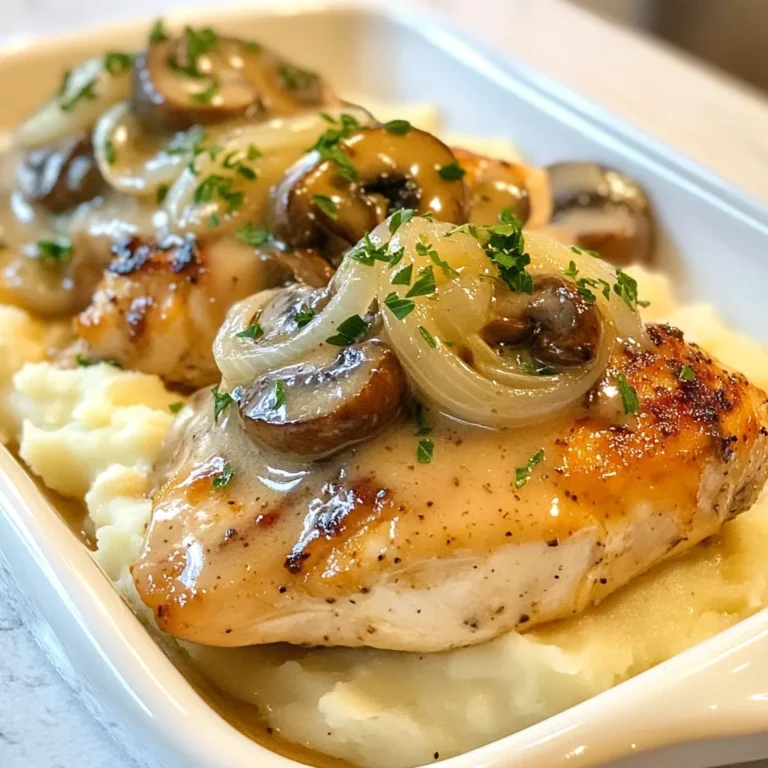
Chicken in Creamy Mushroom Sauce Simple and Flavorful

- 2 pounds ripe tomatoes, halved - 1 medium onion, quartered - 4 cloves garlic, peeled - 3 tablespoons olive oil - Salt and black pepper to taste - 2 cups vegetable broth - 1 teaspoon balsamic vinegar - 1 teaspoon sugar (optional, for sweetness) - ½ cup fresh basil leaves, torn (plus extra for garnish) - ½ cup heavy cream (or coconut cream for a vegan option) Each ingredient adds a unique flavor. The ripe tomatoes give a sweet base. The onion adds depth. Garlic brings warmth and richness. Olive oil ensures a smooth texture. Salt and pepper enhance all flavors. Vegetable broth rounds it out. Balsamic vinegar adds a tangy note. Sugar can balance the acidity if you like it sweeter. Fresh basil brings a bright finish. Lastly, cream makes it rich and creamy. You can use coconut cream for a vegan twist. Each bite will feel like a warm hug! {{ingredient_image_1}} First, set your oven to 425°F (220°C). This high heat will help the tomatoes roast well. Next, grab 2 pounds of ripe tomatoes. Cut them in half. Take 1 medium onion and cut it into quarters. Peel 4 cloves of garlic. Place the halved tomatoes, onion pieces, and garlic in a large bowl. Drizzle 2 tablespoons of olive oil over them. Add salt and black pepper to taste. Toss everything until it’s well coated. Spread the tomato mixture on a large baking sheet. Ensure the veggies are in a single layer. This helps them roast evenly. Roast in the oven for 30-35 minutes. Keep an eye on them. You want the tomatoes to caramelize and become soft. This caramelization adds a deep flavor to your soup. Once the vegetables are roasted, transfer them to a large pot. Add 2 cups of vegetable broth, 1 teaspoon of balsamic vinegar, and sugar if you want some sweetness. Bring the pot to a simmer. Let it cook for about 10 minutes. This helps all the flavors mix well. Now, remove the pot from the heat and stir in the torn basil leaves. For a smooth soup, use an immersion blender to puree it. If you like some chunks, blend only half of the soup. Return the pureed soup to low heat. Stir in ½ cup of heavy cream. Adjust the seasoning with salt and pepper if needed. Heat it through, but do not let it boil. - Using high-quality ingredients: Start with ripe tomatoes. They add the best taste. Fresh basil is key, too. It brings a bright flavor. Always choose good olive oil. It enhances the soup's richness. Skip low-quality products for better results. - Adjusting seasoning to taste: Taste is personal. Always check the soup before serving. Add salt and pepper little by little. You want to find the right balance. If it's too tart, a bit of sugar can help. Just remember, less is more. - Ideal toppings and garnishes: Serve the soup with a drizzle of olive oil. It adds a nice finish. A sprinkle of fresh basil on top looks great, too. You can also add croutons for some crunch. They add fun texture. - Complementary side dishes: Pair the soup with crusty bread. It’s perfect for dipping. A light salad also works well. It adds freshness to your meal. Consider a grilled cheese sandwich for a cozy combo. - Best blender for soup: An immersion blender is my favorite. It makes blending easy and quick. If you prefer a stand blender, choose one that’s powerful. It should handle hot soups without issues. - Recommended baking sheets and pots: Use a large baking sheet for roasting. It helps the veggies caramelize evenly. A heavy pot is best for cooking the soup. It holds heat well and prevents sticking. Pro Tips Use Ripe Tomatoes: For the best flavor, select tomatoes that are fully ripe and fragrant. They will provide a natural sweetness and rich taste to your soup. Adjust the Consistency: If you prefer a thicker soup, reduce the amount of vegetable broth. For a lighter soup, add more broth until you reach your desired consistency. Experiment with Herbs: While basil is fantastic, try adding other herbs like oregano or thyme for a different flavor profile. Fresh herbs can elevate the taste significantly. Garnish Creatively: Enhance your presentation by adding a swirl of olive oil, a dollop of cream, or some croutons on top before serving to make the dish visually appealing. {{image_2}} You can easily make this soup vegan. Replace heavy cream with coconut cream. This gives the soup a rich, creamy texture. You can also add extra vegan ingredients for flavor. Consider using nutritional yeast for a cheesy taste. You might add a splash of lemon juice for brightness. To ensure your soup is gluten-free, check all ingredients. Make sure the vegetable broth is gluten-free. Look for brands that specify they are free from gluten. Most fresh ingredients, like tomatoes and herbs, are naturally gluten-free. Spices and herbs can elevate your soup. Try adding red pepper flakes for heat. You might also consider fresh thyme or oregano for added depth. If you want to incorporate other vegetables, consider carrots or bell peppers. Roast them with the tomatoes for extra flavor. To store leftovers, let the soup cool down first. Then, pour it into an airtight container. You can keep it in the fridge for up to five days. When ready to eat, check for any signs of spoilage. If it looks and smells good, it's safe to warm up. Freezing is a great option for this soup. After the soup cools, transfer it to freezer-safe bags or containers. Leave some space at the top, as soup expands when frozen. It can last for up to three months in the freezer. When you're ready to enjoy it, simply thaw it in the fridge overnight. For reheating, use a pot on low heat. Stir often to prevent sticking. You can also use a microwave, but make sure to cover it to avoid splatters. If the soup seems thick, add a splash of broth or water. This will help bring back its creamy texture. Always taste and adjust the seasoning before serving. Yes, you can make roasted tomato soup ahead of time. After cooking, let it cool completely. Store it in an airtight container in the fridge. It lasts for about three days. When you are ready to eat, just reheat it on the stove. This soup tastes even better the next day as the flavors blend. To add spice to your roasted tomato soup, consider adding red pepper flakes or chopped jalapeños. You can also stir in some hot sauce during cooking. Start with a small amount and taste as you go. This way, you can control the heat level to your liking. Ripe tomatoes are best for roasting. Varieties like Roma, on the vine, or beefsteak tomatoes work great. They have good flavor and texture. Look for tomatoes that have a bright color and feel heavy for their size. The better the tomatoes, the better the soup! Yes, you can use canned tomatoes for this soup. Choose whole or diced tomatoes packed in juice. Drain any excess liquid for a thicker soup. Roasting fresh tomatoes gives a rich flavor, but canned tomatoes can save time. This can still result in a tasty soup. To thicken your roasted tomato soup, you can add a little more heavy cream. You can also blend in some cooked potato or add a tablespoon of tomato paste. Another great option is to use a cornstarch slurry. Mix equal parts of cornstarch and cold water, then stir it into the soup while it simmers. You’ve learned how to make a delicious roasted tomato soup. We covered essential ingredients and step-by-step instructions. You now know tips for better flavor and variations to suit your needs. The right ingredients and cooking techniques make a big difference. Store your soup well, and enjoy a warm bowl any time. Go ahead and try this recipe, and have fun experimenting with your own twists!

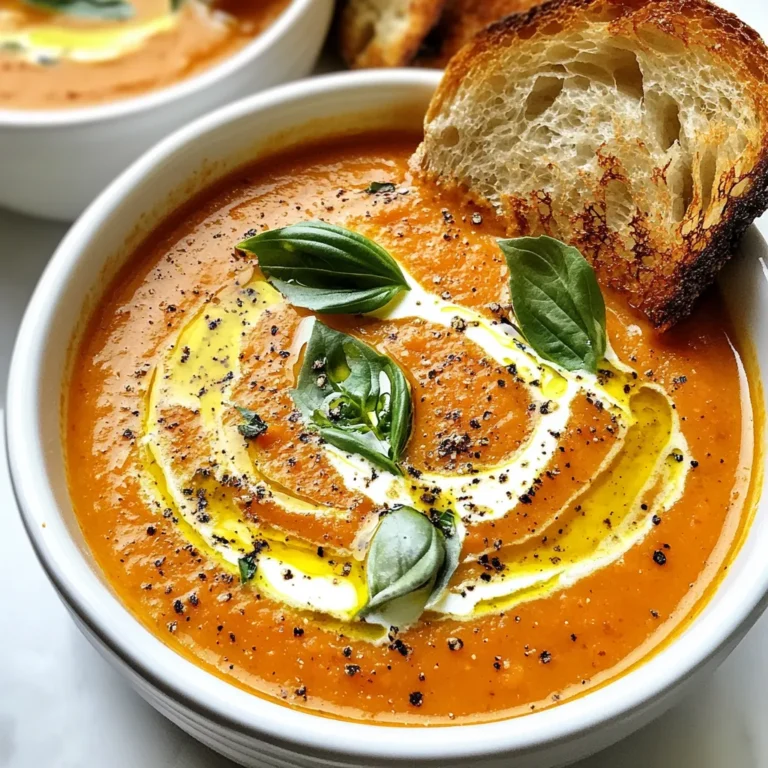
Roasted Tomato Soup Flavorful and Simple Recipe

For this tasty dish, you will need: - 4 boneless, skinless chicken breasts - 1 cup honey mustard dressing - 1 cup shredded Monterey Jack cheese - 1 cup shredded cheddar cheese - 4 strips cooked turkey bacon, crumbled - 1 cup sautéed mushrooms (fresh or canned) - 2 tablespoons olive oil - 1 teaspoon garlic powder - 1 teaspoon smoked paprika - Salt and pepper, to taste - Fresh parsley, for garnish You can change some ingredients if needed. Try using chicken thighs for juicier meat. If you want a lighter option, use Greek yogurt instead of honey mustard. For cheese, mix in gouda or mozzarella. If you have a veggie lover, add spinach or bell peppers for extra crunch. You can also swap turkey bacon with regular bacon if you prefer. Quality makes a big difference in taste. Look for chicken breasts that are plump and fresh. Check for a nice pink color with no dark spots. When choosing cheese, opt for brands that are not processed. Fresh mushrooms should feel firm and look clean. For the best honey mustard, pick one with natural ingredients. This ensures your dish is full of flavor and good for you. {{ingredient_image_1}} To start, gather your ingredients. You need four boneless, skinless chicken breasts. You will also need a cup of honey mustard dressing, shredded Monterey Jack cheese, shredded cheddar cheese, and crumbled turkey bacon. Don’t forget sautéed mushrooms, olive oil, garlic powder, smoked paprika, salt, and pepper. 1. Preheat your oven to 375°F (190°C). 2. Mix olive oil, garlic powder, smoked paprika, salt, and pepper in a small bowl. 3. Rub this mix evenly over the chicken breasts. 4. Heat a large oven-safe skillet on medium heat. 5. Add the chicken breasts and sear each side for about five minutes until they are golden brown. 6. While the chicken cooks, sauté the mushrooms in the same skillet for four to five minutes. Remove them and set aside. Searing chicken gives it a nice crust. Make sure your skillet is hot enough. If the oil shimmers, it’s ready. Place the chicken in the skillet without crowding it. This helps it sear well. Don’t move the chicken around too much. Let it cook undisturbed for five minutes. This way, it will get that lovely golden crust. When you add cheese, sprinkle it evenly over the chicken. This helps it melt nicely. After searing, brush honey mustard dressing on the chicken. Then, layer the sautéed mushrooms and crumbled turkey bacon on top. Lastly, sprinkle the Monterey Jack and cheddar cheese over everything. Once your chicken is ready for the oven, bake it for 15 to 20 minutes. Check that the internal temperature reaches 165°F (74°C). When it’s done, the cheese should be melted and bubbly. Let the chicken rest for five minutes before serving. Enjoy this delicious meal! To cook chicken breasts well, start with even pieces. This helps them cook evenly. Use a meat thermometer to check the inside. The chicken should reach 165°F (74°C) to be safe. Sear the chicken for a nice crust. This adds flavor and keeps it juicy. Marinating the chicken is a great way to add flavor. Use honey mustard dressing for a sweet and tangy taste. Rub in olive oil, garlic powder, and smoked paprika for extra flavor. Cooking the chicken in a hot skillet first helps seal in moisture. Covering the dish with foil while baking also helps keep it juicy. One common mistake is overcooking the chicken. This makes it dry and tough. Always check the temperature. Another mistake is not seasoning enough. Salt and pepper are key to taste. Avoid crowding the pan when searing. This can cause steaming instead of browning. Finally, don’t skip the resting step. Letting the chicken rest for a few minutes helps keep it moist. Pro Tips Marinate for More Flavor: For an extra burst of flavor, marinate the chicken breasts in honey mustard dressing for at least 30 minutes or overnight before cooking. Use Fresh Ingredients: Whenever possible, use fresh mushrooms and freshly chopped parsley to enhance the flavor and presentation of your dish. Check for Doneness: Always use a meat thermometer to ensure that the chicken reaches an internal temperature of 165°F (74°C) for safe consumption and optimal juiciness. Customize Cheese Choices: Feel free to mix and match different types of cheese, such as pepper jack or gouda, to create unique flavor profiles that suit your taste. {{image_2}} You can change the cheeses to create new tastes. Instead of Monterey Jack, try Swiss cheese. It melts well and adds a nice nutty taste. For a sharp kick, use gouda cheese. You can also mix cheeses for even more flavor. Cheddar gives a strong taste, while mozzarella makes it creamy. Experiment to find what you love best! If you need a gluten-free meal, swap the honey mustard dressing. Look for gluten-free dressings in stores. You can also make your own with honey and mustard. Check the labels on other ingredients too, like bacon. Many brands offer gluten-free turkey bacon. Enjoy your meal without worry! Boost the nutrition by adding more veggies. Spinach or kale adds color and health. You can toss in some bell peppers for crunch. Zucchini or broccoli also works well. Sauté them with the mushrooms for extra flavor. This makes the dish more colorful and tasty! To keep your Alice Springs Chicken fresh, store it in an airtight container. Let the chicken cool first. Then, place it in the fridge. This will keep it safe for up to three days. Label the container with the date. This helps you track how long it has been stored. When you're ready to enjoy leftovers, reheat the chicken gently. Use the oven for best results. Preheat it to 350°F (175°C). Place the chicken in an oven-safe dish. Cover it with foil to keep it moist. Heat for about 15-20 minutes, or until it's warm throughout. You can also use a microwave. Heat on medium power for 2-3 minutes, checking often. If you want to freeze Alice Springs Chicken, wrap it tightly. Use plastic wrap or aluminum foil. Then place it in a freezer bag. Remove as much air as you can. This helps prevent freezer burn. The chicken can last up to three months in the freezer. When ready to eat, thaw it overnight in the fridge before reheating. Alice Springs Chicken comes from a restaurant chain called Outback Steakhouse. They created this dish to mix flavors from Australia and America. The recipe features chicken, cheese, mushrooms, and bacon. It quickly became a favorite due to its rich taste and easy prep. Yes, you can prepare Alice Springs Chicken ahead of time. Cook the chicken and layer it with toppings. Then, cover it and store it in the fridge. When you are ready to eat, just bake it until hot. This dish tastes great even after being stored! Alice Springs Chicken can be healthy if you make smart choices. It has lean chicken and mushrooms, which are good for you. You can use less cheese or bacon for a lighter version. Pair it with a side of veggies for a balanced meal. You can serve Alice Springs Chicken with many tasty sides. Here are some great options: - Mixed greens salad - Steamed broccoli - Rice or quinoa - Roasted sweet potatoes These sides add color and nutrition to your meal. To change the spice levels, you can add or reduce spices. For a milder dish, use less garlic powder and smoked paprika. If you like it spicy, add red pepper flakes or cayenne pepper. Taste as you go to find your perfect balance! This guide covered everything you need for Alice Springs Chicken. I shared key ingredients, cooking steps, and tips to make it great. You can choose quality ingredients, avoid common mistakes, and store leftovers well. Explore variations to keep things exciting. Remember, you can enjoy this dish definitely and adjust it to your taste. With these tips, you’ll serve a tasty meal every time. Enjoy cooking your Alice Springs Chicken!

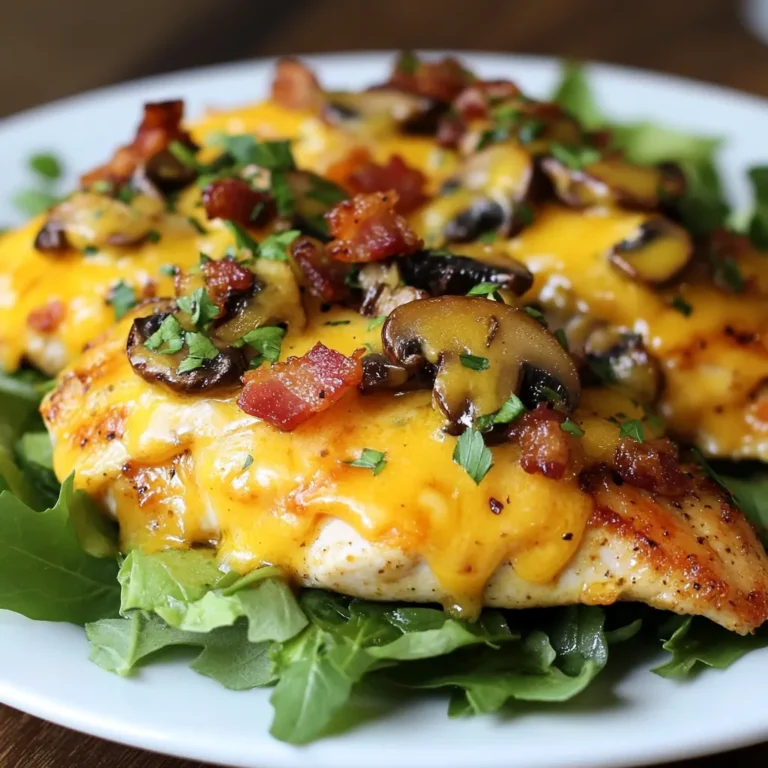
Alice Springs Chicken Flavorful and Easy Recipe Guide

To make Cheesy Ground Turkey Pasta, you need a few simple ingredients. Here’s what you will need: - 1 lb ground turkey - 8 oz pasta (penne or fusilli) - 2 cups cherry tomatoes, halved - 1 cup spinach, roughly chopped - 1 cup shredded mozzarella cheese - 1/2 cup cream cheese - 1 teaspoon garlic powder - 1 teaspoon onion powder - 1/2 teaspoon smoked paprika - Salt and pepper to taste - 2 tablespoons olive oil - Fresh basil for garnish (optional) These ingredients come together to create a tasty and creamy dish. Ground turkey gives you lean protein. Pasta adds a nice base. Cherry tomatoes and spinach bring color and nutrients. The blend of mozzarella and cream cheese makes it rich and cheesy. Feel free to mix and match ingredients based on what you have. You can use different pasta shapes or add more veggies. Cooking should be fun, so enjoy the process! {{ingredient_image_1}} To cook the pasta just right, start with a large pot. Fill it with water and bring it to a boil. Once boiling, add salt. This helps the pasta taste great. Aim for about 1 tablespoon of salt for every 4 quarts of water. Add your pasta and cook according to the package directions. You want it to be al dente. This means the pasta should be firm to the bite. When it's done, drain it and set it aside. Next, let's brown the ground turkey. Heat a large skillet over medium heat. Add 2 tablespoons of olive oil to the skillet. When the oil is hot, add the ground turkey. Use a spatula to break it into smaller pieces. Season it with garlic powder, onion powder, smoked paprika, salt, and pepper. Cook this for about 5 to 7 minutes. The turkey should be nicely browned and cooked through. Now it’s time to add some veggies. Toss in the halved cherry tomatoes and chopped spinach. Stir and cook for about 3 to 4 minutes. This makes the spinach wilt and the tomatoes soften. Next, lower the heat and add the cream cheese. Stir it until it melts into the turkey and veggies. Then, mix in the shredded mozzarella cheese. Keep stirring until everything is creamy and well combined. Finally, let’s combine the pasta with our sauce. Add the cooked pasta into the skillet. Use a spatula to mix everything well. Make sure the pasta is coated with the sauce. If it seems too thick, add a splash of reserved pasta water. This will help adjust the sauce to your liking. Now, your cheesy ground turkey pasta is ready to serve! To boost the taste of your cheesy ground turkey pasta, try adding spices. I like garlic powder, onion powder, and smoked paprika. These spices give the dish a warm, savory flavor. If you want to switch things up, you can replace cream cheese with Greek yogurt or ricotta. Both add creaminess and a nice tang. Timing is key when making this pasta. Start by boiling your water for the pasta while you prepare the turkey. This cuts down on cooking time. Use a timer for each step, so you don’t overcook anything. Set it for the pasta and the turkey to keep everything on track. There are many fun ways to serve this dish. You can serve it in bowls or on plates. Top each serving with fresh basil for color and taste. Pair it with a simple salad or garlic bread for a full meal. Consider a side of steamed veggies to add more nutrients. Pro Tips Use Lean Turkey: Opt for lean ground turkey to keep the dish healthier while still providing plenty of protein. Customize Your Veggies: Feel free to add or substitute other vegetables like bell peppers or zucchini for added flavor and nutrition. Perfect Pasta Texture: Always cook pasta al dente for the best texture; it will continue to cook slightly when mixed with the sauce. Extra Creaminess: For a creamier sauce, consider adding a splash of milk or additional cream cheese to the mixture. {{image_2}} You can easily make a gluten-free version of cheesy ground turkey pasta. Just use gluten-free pasta. Many brands offer tasty options that cook just like regular pasta. Look for ones made from rice or corn. They taste great and work well in this dish. For a dairy-free option, swap the cream cheese and mozzarella with your favorite dairy-free cheese. You can find various brands of dairy-free cream cheese that melt nicely. Nutritional yeast can also add a cheesy flavor without dairy. If you want to switch the protein, try using chicken or beef. Ground chicken will be lighter in taste. Lean ground beef will give a richer flavor. You can also try plant-based options like lentils or tofu. These will change the dish's taste but still keep it yummy. Using different proteins can change how the dish feels. Turkey is mild and lets the cheese shine. Chicken adds a lighter taste, while beef gives a heartier feel. Plant-based meats can also add unique flavors, making the dish exciting. Adding new vegetables or spices can enhance the flavor. Bell peppers, zucchini, or mushrooms work wonderfully. Just chop them up and add them when you cook the turkey. Fresh herbs like parsley or thyme can brighten the dish. You can also play with cheese types. Try using cheddar for a sharper taste or pepper jack for a spicy kick. Mixing cheeses can create a depth of flavor that makes each bite special. So, don’t hesitate to get creative! To store leftovers, let the pasta cool to room temperature. Place it in an airtight container. Make sure to cover it tightly. This helps keep the dish fresh. Leftover Cheesy Ground Turkey Pasta lasts about 3-4 days in the fridge. Recommended storage containers include glass or plastic containers. I prefer glass because it does not stain. Plus, it is easy to reheat in the oven or microwave. To freeze the dish, let it cool completely first. Then, transfer the pasta to a freezer-safe container. Leave some space at the top. The pasta expands when it freezes. It will keep well for about 2-3 months. When you’re ready to eat, thaw the pasta in the fridge overnight. To reheat, place it in a skillet over low heat. Add a splash of water or milk to help with moisture. Stir until heated through. You can also use the microwave for a quick meal. Enjoy your cheesy delight! Yes, you can use pre-cooked turkey. It will save time. Just warm it up in the skillet. Then, add the spices and mix well. This method keeps the flavors strong without extra cooking time. If you need a substitute for cream cheese, try Greek yogurt or sour cream. Both options give creaminess. You can also use cottage cheese for a healthier twist. Blend it until smooth for the best texture. To add heat, sprinkle in red pepper flakes or cayenne pepper. You can also use spicy sausage instead of turkey. If you like, add jalapeños for a fresh kick. Mix these into the turkey as it cooks. Absolutely! Kids love cheesy pasta. The flavor is mild and comforting. You can adjust the veggies to suit their taste. Try adding carrots or peas for color and fun. This dish is easy to make and fun to eat. Cheesy ground turkey pasta lasts about 3 to 4 days in the fridge. Store it in an airtight container. When ready to eat, reheat it gently on the stove or in the microwave. Add a splash of water to keep it moist. This recipe helps you create a tasty dish with simple steps. You learned about key ingredients like ground turkey, pasta, and cheese. I showed you how to cook it, add flavors, and even make swaps for dietary needs. Remember, cooking is fun and creative! Experiment with flavors or share your dish with friends. Keep your leftovers fresh for later. Enjoy your culinary adventure and the smiles it brings!

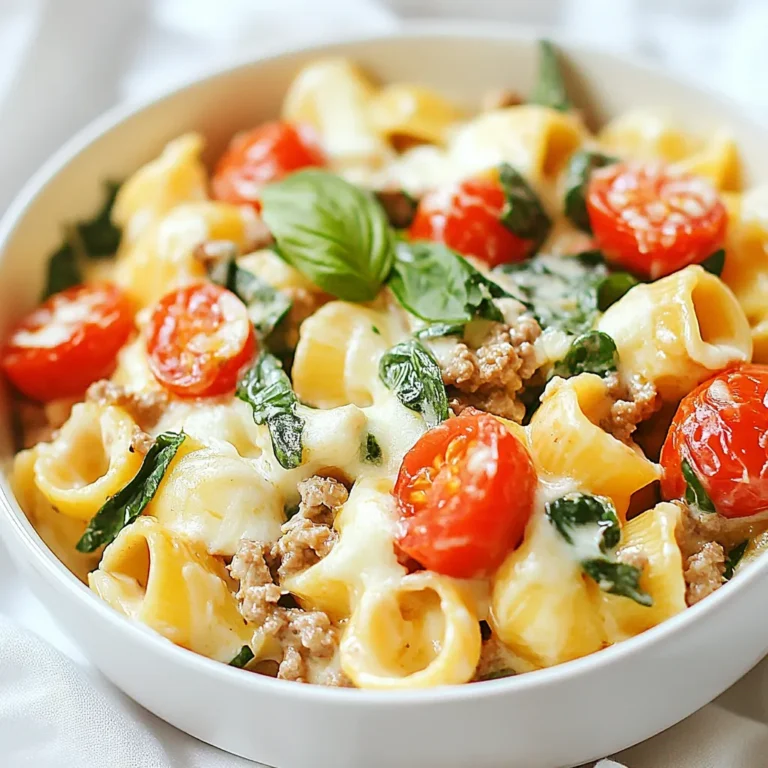
Cheesy Ground Turkey Pasta Quick and Easy Meal

PREV 1 … 48 49 50 … 57 NEXT
meal twig

explore

DessertsDinnerAppetizersDrinks

Our Policies

  • Cookie Policy
  • Copyright Policy
  • Disclaimer
  • GDPR Policy
  • Terms Of Use
Back to Top
  • About
  • Contact Us
  • Privacy Policy
© 2025 meal twig