FREE DINNER EBOOK! Get your copy!
  • Cookie Policy
  • GDPR Policy
  • Disclaimer
  • Terms Of Use
  • Visit my other site: Fun Cookie Recipes
meal twig
  • Home
  • Dinner
  • Desserts
  • Drinks
  • Appetizers
  • Contact
  • About
  • Privacy Policy
  • Home
  • Dinner
  • Desserts
  • Drinks
  • Appetizers
  • Contact
  • About
  • Privacy Policy
  • Cookie Policy
  • GDPR Policy
  • Disclaimer
  • Terms Of Use
Visit my other site: Fun Cookie Recipes

HOME / CATEGORIES /

Latest

- 1 pound ground beef (or ground turkey) - 1 cup ricotta cheese - 1/2 cup grated Parmesan cheese - 1/4 cup almond flour - 1 large egg - 2 cloves garlic, minced - 1 teaspoon dried oregano - 1 teaspoon dried basil - Salt and pepper to taste - 1/4 cup fresh parsley, chopped (for garnish) - 2 cups marinara sauce (sugar-free if low carb) Using ricotta cheese in these meatballs adds creaminess and protein. Ricotta also provides calcium, which is great for bones. Ground beef or turkey gives you iron, which keeps your energy up. Almond flour is low in carbs and rich in healthy fats. It can help you feel full and satisfied. Garlic adds flavor and may support heart health. Fresh herbs like parsley not only taste good but also add vitamins. You can swap ground beef with ground chicken or pork for a lighter option. If you need a dairy-free choice, use cashew cheese instead of ricotta. Instead of almond flour, you can try coconut flour, but use less of it. If you don't have fresh herbs, you can use dried herbs. Just remember to use less since dried herbs are stronger. Lastly, if you want a bit of spice, add red pepper flakes to the mix! {{ingredient_image_1}} First, set your oven to 400°F (200°C). This heat helps the meatballs cook evenly. While it warms up, take a baking sheet and line it with parchment paper. This makes cleanup easy and helps prevent sticking. In a large bowl, mix the ground beef or turkey with ricotta cheese, Parmesan cheese, and almond flour. Add the minced garlic, egg, oregano, basil, salt, and pepper. Use your hands to blend everything well. Be careful not to overmix, as this can make the meatballs tough. Once mixed, shape the mixture into meatballs about 1.5 inches wide. Place them on the baking sheet. Bake for 20-25 minutes, until they turn golden brown. While baking, heat your marinara sauce in a pan over medium heat. When the meatballs are done, add them to the sauce to soak up the flavor. Let them simmer for five minutes. Serve hot, topped with fresh parsley and extra marinara for a lovely look. Baking meatballs is my go-to method. It cooks them evenly and is easy. You just place them on a baking sheet and let the oven do the work. Bake at 400°F for 20-25 minutes. This method keeps them moist and less greasy. Pan-frying is another option. It gives meatballs a nice crust. You heat oil in a skillet and fry them until browned. This method takes a bit more attention. You must turn them often to cook evenly. Both methods yield tasty meatballs, but I prefer baking for ease. Cooking meatballs in sauce adds great flavor. After baking, gently place the meatballs in warm marinara sauce. Let them simmer for about 5 minutes. This allows the meatballs to soak up the sauce. You get a rich taste that pairs well with the meat. It also keeps the meatballs moist. Using a sugar-free marinara sauce helps keep the dish low carb. You can make your own sauce too. Just blend tomatoes, garlic, and herbs for a fresh taste. You can also try slow cooking. Place the meatballs in a slow cooker with sauce. Cook on low for 4-6 hours. This method makes them super tender. Another option is grilling. Form the meatballs and skewer them. Grill over medium heat for about 10-15 minutes. This gives them a smoky flavor. Each method offers a unique taste and texture. Try them all to find your favorite! Pro Tips Use Fresh Herbs: Fresh herbs like basil and parsley enhance the flavor of the meatballs significantly compared to dried herbs. Don’t Overmix: Mixing the meatball ingredients just until combined will keep them tender. Overmixing can lead to tough meatballs. Chill Before Baking: Allow the meatballs to chill in the refrigerator for about 30 minutes before baking. This helps them hold their shape better. Variations: Feel free to add chopped spinach or other vegetables to the mixture for extra nutrition and flavor. {{image_2}} To keep your meatballs moist, use ricotta cheese. It adds creaminess. Ground beef has fat, which helps too. If you use turkey, select a mix with some fat. Don't overbake the meatballs; check at 20 minutes. When they are golden brown, they are ready. Let them simmer in the sauce for five minutes. This step helps them soak up flavor and stay juicy. When mixing your ingredients, use your hands. This method allows you to feel the texture. Combine the meats, cheeses, and spices gently. Overmixing can make meatballs tough. Just mix until everything is blended. You want a uniform mix that still holds some air. This air gives the meatballs a lighter texture. To boost the flavor of your meatballs, think about adding more herbs. Fresh herbs like basil or parsley work great. You can also try adding red pepper flakes for heat. A splash of Worcestershire sauce or a sprinkle of smoked paprika can add depth. Experiment with flavors to find what you like best. Always taste a small bit of the mixture before baking. Adjust salt and pepper to fit your taste. You can make low carb veggie meatballs for a lighter option. Start with a base of finely chopped vegetables. Zucchini and cauliflower work well. Use about 2 cups of mixed veggies. Replace the ground meat with these veggies. Add the same ricotta cheese, Parmesan, and almond flour. You will still get a moist and tasty meatball. Bake them just like the meat version. If you want to skip dairy, use tofu or cashew cream. For tofu, blend it until smooth to mimic ricotta's texture. Cashew cream is easy too; just soak cashews and blend them. Use the same amount as ricotta in the recipe. Both options keep the meatballs moist and delicious without dairy. You can customize the flavors in your meatballs. For a spicy kick, add red pepper flakes or diced jalapeños. Mix in about 1 teaspoon for a good heat level. If you love herbs, try adding fresh basil or thyme. Use about 1 tablespoon of chopped herbs. You can even experiment with different cheeses, like feta or goat cheese, for a unique twist. Each flavor variation will give your meatballs a new life! To keep your leftover meatballs fresh, first let them cool. Place them in an airtight container. You can store them in the fridge for up to three days. If you want to keep them longer, freezing is a great option. When freezing meatballs, make sure they cool completely first. This helps prevent ice crystals from forming. Arrange the meatballs in a single layer on a baking sheet. Freeze them for about an hour. Once frozen, transfer them to a freezer bag. Remove as much air as possible. Label the bag with the date for easy reference. Frozen meatballs can last for up to three months. To reheat your meatballs, you have a few options. The oven is a great choice for keeping them juicy. Preheat your oven to 350°F (175°C). Place the meatballs on a baking sheet and cover them with foil. Heat for about 15-20 minutes. You can also reheat them in the microwave. Place the meatballs in a microwave-safe dish with a splash of sauce. Cover and heat for 2-3 minutes. Stir halfway for even heating. Enjoy those tasty meatballs! In this post, I shared the steps to make great meatballs. We covered ingredients, cooking methods, and tasty variations. You learned how to keep meatballs moist and flavorful. Remember, you can mix things up with different flavors and substitutes. Don't forget to store and reheat leftovers for more delicious meals. Enjoy your meatball journey and keep experimenting with new styles!

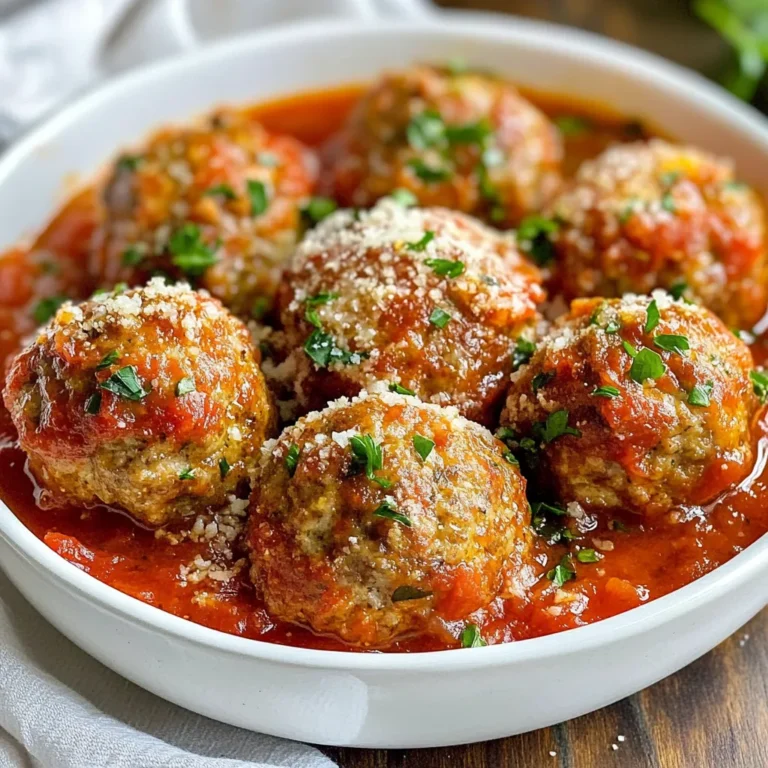
Low Carb Ricotta Meatballs Flavorful and Easy Recipe

- 2 chicken breasts, boneless and skinless - 4 cloves garlic, minced - 1 tablespoon dried oregano - 1 teaspoon paprika - 1 teaspoon cumin - 1 lemon, juiced - 3 tablespoons olive oil - Salt and pepper to taste - 4 whole wheat pitas For the gyros, the main star is chicken. I use boneless, skinless chicken breasts for easy cooking. The marinade is key here. I mix minced garlic, dried oregano, paprika, cumin, lemon juice, and olive oil. This blend brings out vibrant flavors. I add salt and pepper to taste for balance. The whole wheat pitas serve as the perfect wrap, adding nutrition and a hearty feel. - 1 cup Greek yogurt - 1 cup cucumber, diced - 1 teaspoon dill (fresh or dried) The tzatziki sauce is simple but essential. I use Greek yogurt as the base. It’s thick and creamy. I add diced cucumber for crunch and freshness. Dill adds a unique taste. You can also mix in minced garlic if you want a stronger flavor. This sauce cools the dish and brightens it. - Fresh parsley - Extra toppings ideas: cherry tomatoes, red onion Garnishes can elevate your gyros. I like to sprinkle fresh parsley for a pop of color and flavor. You can also add more toppings like halved cherry tomatoes and thinly sliced red onion. These extras not only taste great but also make your gyros look appealing. {{ingredient_image_1}} In a medium bowl, combine the minced garlic, dried oregano, paprika, cumin, lemon juice, olive oil, salt, and pepper. This mix creates a tasty marinade that gives the chicken flavor. Marinating is key. It helps the chicken absorb all those great flavors. Aim for at least 30 minutes, but two hours is best. This extra time makes your chicken so much tastier. Preheat your grill or grill pan to medium-high heat. It's important to get the right temperature. This ensures the chicken cooks evenly. Once hot, add the marinated chicken. Grill each side for 6 to 8 minutes. You're looking for a golden brown color and cooked through. If the chicken is juicy and tender, you've done it right! While the chicken cooks, let’s whip up the tzatziki sauce. In a bowl, mix Greek yogurt, diced cucumber, minced garlic (if you want), dill, and a pinch of salt. Stir it all together until smooth. This sauce is cool and refreshing. Chill it in the fridge until you're ready to use it. The longer it sits, the better the flavors blend. Now it’s time to build your gyros! Warm the whole wheat pitas on the grill for about 1 minute on each side. Take a pita and pile on the grilled chicken strips. Next, add diced cucumber, halved cherry tomatoes, and sliced red onion. Drizzle tzatziki sauce on top, and garnish with fresh parsley. Fold the pita in half and enjoy. Each bite will be full of flavor! For the best taste, marinate the chicken for at least 30 minutes. If you have time, let it sit for 2 hours. This extra time helps the flavors soak into the meat. More flavor means a better gyro! To enhance flavor absorption, cut the chicken into strips. This increases the surface area, allowing the marinade to reach more meat. Also, mix the marinade well before adding the chicken. This ensures an even coating of spices. Use a grill or grill pan for cooking the chicken. Preheat it over medium-high heat. This makes sure the chicken cooks evenly and gets nice grill marks. Cook the chicken for 6 to 8 minutes on each side. Look for a golden-brown color and make sure it's fully cooked. A meat thermometer can help and should read 165°F (75°C). For a smooth tzatziki, use thick Greek yogurt. This gives the sauce a creamy texture. If it's too thick, add a little water or extra lemon juice to reach your desired consistency. If you don’t have dill, try mint or parsley as swaps. Both will add a fresh taste to your tzatziki. You can also mix in a little garlic for extra flavor. Pro Tips Marinate for Maximum Flavor: Allow the chicken to marinate for at least 2 hours, or even overnight if possible. This enhances the flavor and tenderness of the chicken. Grilling Technique: Ensure the grill is preheated to medium-high before adding the chicken. This helps achieve a nice sear and prevents sticking. Homemade Tzatziki Perfection: For a creamier tzatziki sauce, strain the yogurt beforehand to remove excess moisture. This will keep your sauce from becoming watery. Fresh Ingredients Matter: Use fresh herbs and vegetables for the best flavor and texture. Fresh parsley, dill, and ripe tomatoes make a significant difference. {{image_2}} You can swap chicken for other proteins in gyros. Try beef or lamb for a richer flavor. Pork also works well and adds a nice twist. For a lighter option, use turkey. If you want a vegetarian twist, consider grilled halloumi or marinated tofu. Both options give you a great texture and flavor. To adjust spice levels, add herbs and spices to your taste. You can boost the flavor with extra cumin or paprika. Fresh herbs like mint or cilantro can also add a nice touch. If you like heat, add red pepper flakes or a dash of cayenne. Start with a little and taste as you go. Pair your gyros with tasty side dishes. Greek salad or roasted veggies go well with gyros. You could also serve them with crispy fries for a fun meal. If you want to try different wraps, use lettuce leaves for a fresh touch. Corn tortillas or flatbreads are other great options. To keep your leftover gyros fresh, use airtight containers. This helps prevent moisture loss and keeps flavors intact. Store the gyros in the fridge for up to three days. You can easily see what you have, so there is no waste. If you want to save your gyros for later, freezing is a great option. First, wrap the cooked chicken tightly in plastic wrap. Then, place it in a freezer-safe bag. You can freeze the tzatziki sauce too. Just make sure to store it in a separate container. It keeps well for about one month. When you are ready to eat, defrost the chicken overnight in the fridge. For the tzatziki, let it thaw in the fridge as well. Reheat the chicken in a pan on low heat until warm. You can also use the microwave. Just be careful not to overheat it. Enjoy your gyros just like fresh! You can enjoy many sides with Mediterranean Chicken Gyros. Here are some popular ones: - Greek salad with tomatoes, cucumbers, and feta cheese - Roasted vegetables like zucchini and bell peppers - Crispy sweet potato fries for a tasty crunch - Pita chips with hummus for a fun dipper - Rice pilaf for a hearty addition Each side adds more flavor and texture. Choose what you love best! Yes, you can make Mediterranean Chicken Gyros ahead of time! Here are some time-saving tips: - Marinate the chicken the night before for better taste. - Grill the chicken and store it in the fridge for up to three days. - Make the tzatziki sauce a day ahead to let the flavors mix. - Warm pitas just before serving for a fresh taste. These steps can save you time on busy days! You can easily make a low-carb version of gyros! Here are some suggestions for substitutes: - Use lettuce wraps instead of pitas for a fresh bite. - Swap chicken for grilled shrimp or beef for variety. - Replace Greek yogurt with a low-fat yogurt option. - Add more veggies like bell peppers and radishes for crunch. These swaps keep the flavor while cutting down on carbs! You learned how to make tasty gyros from scratch. We covered key ingredients like chicken, tatziki sauce, and pitas. I shared step-by-step cooking tips to help you grill perfect chicken and create creamy sauce. You can even change up the spice level or try different proteins. Don’t forget about smart storage tips for leftovers. Now, you can enjoy delicious gyros any time. Happy cooking!

Mediterranean Chicken Gyros Flavorful and Easy Recipe

To make Sticky Garlic Chicken Noodles, you need: - 300g egg noodles - 2 tablespoons vegetable oil - 2 chicken breasts, thinly sliced - 4 garlic cloves, minced - 1 tablespoon fresh ginger, grated - 1/4 cup soy sauce - 2 tablespoons honey - 1 tablespoon rice vinegar - 1 tablespoon oyster sauce - 1/2 teaspoon red pepper flakes (optional) - 1 green onion, chopped for garnish - Sesame seeds for garnish Fresh ginger and garlic make this dish shine. They add a punch of flavor. Garlic offers a savory taste, while ginger adds warmth. When you use fresh ingredients, you get the best taste. Always choose firm, vibrant garlic and ginger. This choice makes a big difference in your meal. If you can't find some ingredients, here are some swaps: - For soy sauce, use tamari or coconut aminos for a gluten-free option. - Honey can be swapped with maple syrup or agave for a vegan choice. - If you don't have egg noodles, try rice noodles or whole wheat pasta. These alternatives will keep your dish tasty and enjoyable. {{ingredient_image_1}} To start, cook the egg noodles. Boil a pot of salted water. Add the noodles and cook them until al dente. This will take about 4 to 5 minutes. After cooking, drain the noodles and rinse them under cold water. This stops the cooking process. Set the noodles aside. Next, prepare the sauce. In a small bowl, mix the soy sauce, honey, rice vinegar, and oyster sauce. If you like a kick, add red pepper flakes. Whisk everything together until well combined. Set this sauce aside too. Now, let’s cook the chicken. Heat vegetable oil in a large skillet over medium-high heat. Once the oil is hot, add the thinly sliced chicken. Spread it out so it cooks evenly. Cook for about 5 to 7 minutes. You want the chicken to turn golden brown. It should be cooked through, with no pink inside. Once ready, remove the chicken from the skillet and set it aside. In the same skillet, add minced garlic and grated ginger. Sauté these for about 1 minute. You want to smell those lovely aromas without burning them. Now, return the cooked chicken to the skillet. Pour the prepared sauce over the chicken. Stir everything together. Let it simmer for 2 to 3 minutes. This allows the sauce to thicken slightly. Finally, add the cooked noodles to the skillet. Toss them well, making sure they are coated with that sticky garlic sauce. This is where all the flavors come together. Once mixed, remove the skillet from heat. Garnish with chopped green onions and sesame seeds. Your Sticky Garlic Chicken Noodles are ready to enjoy! When making sticky garlic chicken noodles, avoid overcooking the noodles. Cooking them too long makes them mushy. Aim for al dente. For the chicken, it can also dry out if you overcook it. Cook it just until it's browned and no longer pink inside. This keeps it juicy and tender. To make your noodles even tastier, consider adding vegetables. Bell peppers, snap peas, or carrots add color and crunch. You can also mix in crushed peanuts or cashews for texture. If you want a kick, add more red pepper flakes. For a richer taste, a dash of sesame oil can elevate the dish. Use a large skillet or wok for this recipe. A non-stick pan can help prevent sticking and burning. Make sure to have a good spatula for tossing the ingredients. A pot for boiling the noodles should also be deep enough to avoid splashes. If you have a whisk, it’s great for mixing the sauce ingredients evenly. Pro Tips Prep Your Ingredients: Before starting, have all your ingredients prepped and ready to go. This ensures a smooth cooking process and prevents any ingredients from burning while you’re busy chopping or measuring. Adjust the Heat: When sautéing the chicken, adjust the heat as needed to avoid overcooking. You want the chicken to be golden brown but not dry—keep an eye on it! Customize the Sauce: Feel free to adjust the sweetness or saltiness of the sauce by adding more honey or soy sauce according to your taste preferences. A splash of lime juice can also brighten the flavors. Garnish Generously: Don't skip the garnishes! Fresh green onions and sesame seeds add not only flavor but also a lovely visual appeal to the dish, making it more appetizing. {{image_2}} You can change the protein in this dish. Shrimp can add a nice touch. Just cook it for 3-4 minutes until pink. Tofu is a great choice for a plant-based option. Use firm tofu and cube it. Sauté it until golden for crispiness. You can also use beef. Thinly slice it and cook it for 4-5 minutes until brown. Each option brings its unique flavor. If you want a meat-free meal, skip the chicken. Use mushrooms for a hearty texture. Shiitake or portobello work best. They soak up the sauce well. You can also add extra veggies like bell peppers or broccoli. This will boost the nutrition and add color to your plate. Toss them in when you cook the garlic for extra flavor. You can adjust sweetness and spice for your taste. If you like it sweeter, add more honey. Start with a teaspoon and taste as you go. For spice lovers, increase the red pepper flakes. You can also add sriracha or chili paste for more heat. Try adding a squeeze of lime for a zesty kick. This will brighten the dish and make it pop. Store your Sticky Garlic Chicken Noodles in an airtight container. Place them in the fridge. This keeps them fresh for up to three days. Make sure to let the noodles cool before sealing. This prevents steam from building up inside the container. You can freeze the noodles if you want to keep them longer. Just place the cooled noodles in a freezer-safe bag. Squeeze out as much air as you can before sealing. For best results, freeze them in single servings. To reheat, thaw in the fridge overnight. Then warm them in a skillet with a splash of water. Enjoy your leftovers within three days for the best taste and texture. If frozen, try to eat them within two months. This way, you'll keep the flavor and quality at their best. After that, the noodles may lose their taste or texture. To make this dish vegan, you can swap the chicken for tofu or tempeh. Use firm tofu, and cut it into cubes. For the sauce, replace the oyster sauce with a vegan alternative, like mushroom sauce. You can also use maple syrup instead of honey for sweetness. These swaps keep the flavors strong and tasty. Yes, you can use many types of noodles. Rice noodles or whole wheat noodles work well. If you choose gluten-free noodles, check the cooking time. Each type may cook differently, so adjust your timing to keep them al dente. These noodles can be mild or spicy, based on your taste. The red pepper flakes add heat, but you can skip them for a milder dish. If you love spice, add more flakes or a dash of hot sauce. Always taste as you go to find your perfect heat level. In this post, we explored delicious sticky garlic chicken noodles. I shared essential ingredients and why fresh ginger and garlic matter. You discovered easy tips to avoid common mistakes and enhance flavors. We also discussed variations for protein and vegetarian options, ensuring everyone can enjoy this dish. Finally, remember to store leftovers properly for the best taste. With these insights, you can make a tasty meal that everyone will love. Enjoy your cooking journey and have fun experimenting!

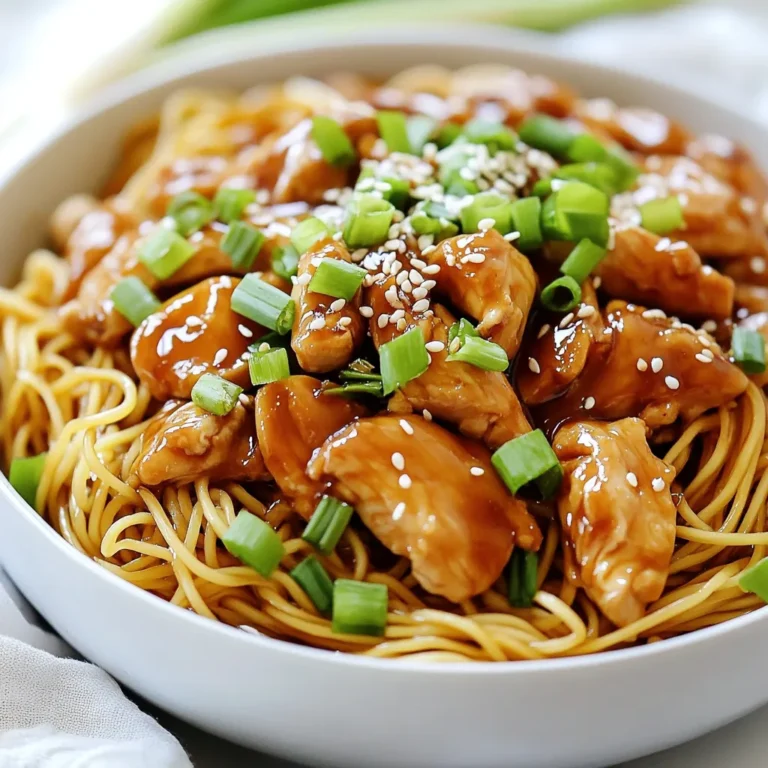
Sticky Garlic Chicken Noodles Savory and Simple Meal

- 1 lb ground turkey - 2 cups cooked jasmine rice - 1 cup green bell pepper, diced - 1 cup carrot, shredded - 1/2 cup green onions, sliced For Bang Bang Ground Turkey Rice Bowls, I start with ground turkey. It’s lean and full of flavor. I use jasmine rice for a perfect base. The rice is fluffy and fragrant. Diced green bell pepper adds crunch and color. Shredded carrot brings sweetness and nutrition. Sliced green onions give a fresh bite. - 1/4 cup mayonnaise - 3 tablespoons sweet chili sauce - 1 tablespoon soy sauce - 1 tablespoon sesame oil - 1 teaspoon lime juice Next, I make the sauce. Mayonnaise adds creaminess and helps bind flavors. Sweet chili sauce gives a nice kick and sweetness. Soy sauce adds umami and depth. Sesame oil brings a nutty flavor. A splash of lime juice brightens everything up. - Salt and pepper - Optional: sesame seeds and cilantro for garnish Finally, I season with salt and pepper. These simple spices enhance the dish. For garnishes, I suggest sesame seeds and fresh cilantro. They add texture and a burst of flavor. {{ingredient_image_1}} First, we need to preheat the skillet. Set your heat to medium and add sesame oil. Let the oil heat for a minute. Then, add the ground turkey. Cook it for about 5 to 7 minutes. Use a spatula to break it apart. Cook until it turns brown. This step gives the turkey a nice texture and flavor. Now, add ginger and garlic to the skillet. Stir these in for 1 to 2 minutes. This will make your kitchen smell amazing. Ginger adds warmth, while garlic brings depth. These flavors will enhance the dish. Next, it’s time to cook the veggies. Add the diced green bell pepper and shredded carrot. Stir these into the skillet. Cook for another 2 to 3 minutes. You want them to soften but still have some crunch. Mixing the veggies with the turkey adds color and nutrition. In a small bowl, combine the sauce ingredients. Mix together mayonnaise, sweet chili sauce, soy sauce, and lime juice. Stir until smooth. This sauce ties all the flavors together. It gives the dish a creamy, tangy taste. To serve, scoop some jasmine rice into a bowl. Top it with the bang bang ground turkey mixture. This is where the magic happens! Garnish with sliced green onions and sesame seeds. You can also add fresh cilantro for extra flavor. Enjoy your meal! To ensure your turkey is cooked thoroughly, use a meat thermometer. The turkey should reach an internal temperature of 165°F. If you don’t have a thermometer, look for no pink in the meat. Break it apart as it cooks. This helps it brown evenly. For the sauce, the right consistency is key. Mix the mayonnaise, sweet chili sauce, soy sauce, and lime juice well. If the sauce is too thick, add a bit of water or more lime juice. This helps it coat the turkey perfectly. To add more flavor, consider using garlic powder or onion powder. These spices boost the taste without overpowering the dish. You can also add a pinch of crushed red pepper for a little heat. Adjusting spice levels is easy. If you like more heat, add sriracha or chili flakes. Start with a small amount and taste as you go. This way, you control the spice. Pair your rice bowls with a fresh side salad. A simple mix of greens with a light dressing works great. Also, consider serving with steamed broccoli or snap peas for a crunchy contrast. For drinks, iced green tea or a light white wine pairs well. A fruity drink can also complement the sweet chili sauce. Choose what you enjoy most! Pro Tips Use Lean Ground Turkey: Opt for lean ground turkey to reduce fat content while keeping your dish flavorful and healthy. Customize Your Veggies: Feel free to swap in other vegetables like zucchini or broccoli for added nutrition and flavor. Make It Spicy: Add a dash of sriracha or red pepper flakes to the sauce if you enjoy a little heat in your dishes. Batch Cooking: Double the recipe and store leftovers in the fridge for quick, healthy meals throughout the week. {{image_2}} You can switch ground turkey for other proteins. Chicken is a great choice. For beef lovers, use ground beef instead. If you prefer plant-based options, tofu works well. Just make sure to adjust cooking times. Chicken cooks fast, while beef takes a bit longer. Tofu needs only a short sauté to warm up and absorb flavors. Feel free to mix in different veggies. Broccoli, snap peas, or zucchini add nice crunch. You can also use spinach for a leafy twist. If you have a veggie you love, toss it in! This dish fits many diets. If you need it vegan, skip the mayo and use a plant-based alternative. You can change the sauce to fit your taste. Add more sweet chili sauce for extra sweetness. If you like heat, sprinkle in some red pepper flakes. To make it milder, reduce the chili sauce. For a dairy-free option, use coconut cream in place of mayo. This keeps the dish creamy and rich without dairy. To keep your Bang Bang Ground Turkey Rice Bowls fresh, follow these tips: - Cool down: Let the dish cool to room temperature before storing. - Containers: Use airtight containers to prevent moisture loss. Glass or plastic containers work well. - Labeling: Mark the date on each container for easy tracking. When it's time to enjoy your leftovers, here’s how to reheat them: - Microwave method: Place a bowl in the microwave. Heat on medium power for 1-2 minutes. Stir halfway through. - Stovetop method: Heat a skillet on medium. Add a splash of water to maintain moisture. Stir the mixture until warm. - Rice texture: Keep an eye on the rice. Add a bit of water if it looks dry. This helps keep it fluffy. If you want to save some for later, freezing is a great option: - Freezing: Portion the dish into airtight containers. Leave some space at the top for expansion. - Thawing: Move the container to the fridge overnight to thaw. - Reheating frozen portions: Use the stovetop or microwave methods mentioned above. Ensure it’s heated all the way through. By following these storage tips, you can enjoy your Bang Bang Ground Turkey Rice Bowls whenever you want! To add heat, you can try a few things. - Add red pepper flakes to the turkey while cooking. - Mix in sriracha with the sauce for an extra kick. - Use spicy chili paste instead of sweet chili sauce. These options will give your dish a nice, warm flavor. Yes, you can easily meal prep this dish. - Cook the turkey and veggies, then let them cool. - Store them in airtight containers in the fridge. - Cook the rice and store it separately. When you’re ready to eat, just reheat everything. This keeps the rice fluffy and the turkey tasty. If you want a different grain, there are great options. - Brown rice adds a nutty flavor and is more filling. - Quinoa is a healthy choice and cooks fast. - Cauliflower rice is low-carb and works well too. These alternatives will fit right in with the bang bang flavors. Look for these signs to know your turkey is done. - The meat should be browned and not pink. - Use a meat thermometer; it should reach 165°F. - The juices should run clear, not pink. These tips ensure your dish is safe and tasty. You have everything you need to make delicious Bang Bang Ground Turkey Rice Bowls. We covered the key ingredients, from ground turkey to fragrant jasmine rice. I showed you step-by-step how to cook the turkey and mix in sweet and savory sauces. Plus, you learned tips for enhancing flavors and serving the dish just right. Remember, you can easily customize this meal based on your tastes. Enjoy creating your own tasty version!

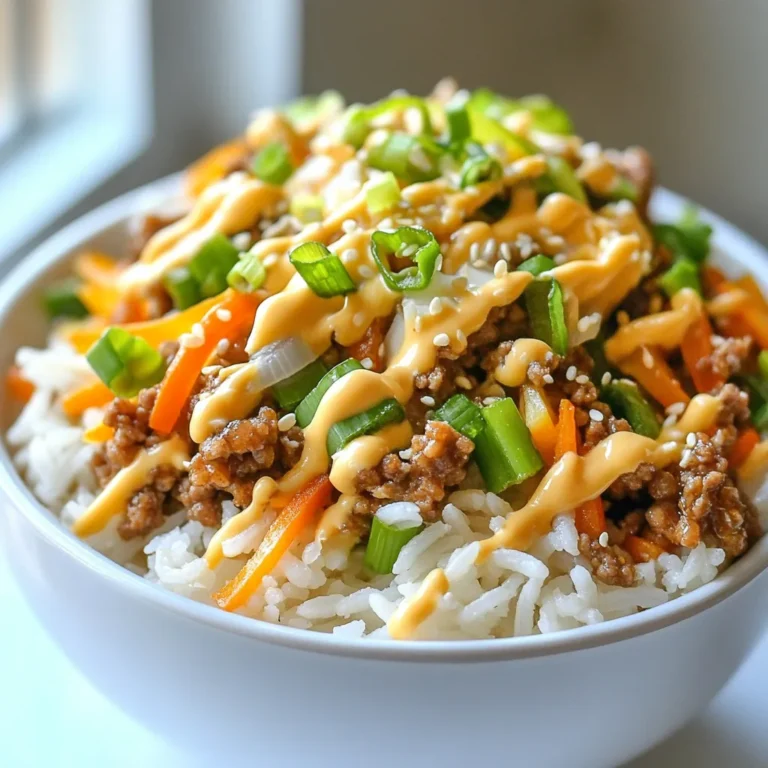
Bang Bang Ground Turkey Rice Bowls Flavorful Meal Prep

- 2 boneless, skinless chicken breasts - 1 cup shredded mozzarella cheese - 1/2 cup cream cheese, softened - 2 cloves garlic, minced - 1 teaspoon garlic powder - 1 teaspoon onion powder - 1/2 teaspoon paprika - Salt and pepper to taste The main ingredients bring a rich and creamy flavor to the wraps. Grilled chicken adds protein and texture. The mozzarella cheese melts beautifully and complements the cream cheese. Garlic adds warmth and depth. You can tweak the spices for your taste. - 4 large flour tortillas - 1 cup fresh spinach leaves - 1/2 cup diced tomatoes - 1/4 cup chopped fresh cilantro - Olive oil for grilling Tortillas hold everything together. Fresh spinach adds crunch and health. Diced tomatoes brighten each bite, while cilantro gives a fresh kick. Olive oil is key for grilling, helping the wraps turn golden. - Mixing bowls - Skillet - Cooking utensils You need mixing bowls for easy combining. A skillet is crucial for cooking the wraps. Basic cooking utensils, like spatulas, help with the flipping and serving. With these tools, you can create a tasty meal! {{ingredient_image_1}} First, grab a bowl and mix the cream cheese, garlic, garlic powder, onion powder, paprika, salt, and pepper. Stir until it is smooth and creamy. This mix will add a rich flavor to your wraps. Next, take your grilled chicken and slice it into strips. Toss the chicken in the creamy mixture until every piece is coated well. This step ensures that each bite of chicken is full of flavor. Now, lay out four large flour tortillas on a clean surface. Start by adding a handful of fresh spinach onto each tortilla. This adds a nice crunch and color. Then, place a generous portion of the cheesy garlic chicken mixture on top of the spinach. Sprinkle shredded mozzarella cheese over the chicken to give it that gooey texture. Finally, add diced tomatoes and chopped cilantro for freshness. To roll the wraps, fold in the sides first, then roll tightly from the bottom to the top. This keeps all the tasty fillings inside. Heat a skillet over medium heat and add a drizzle of olive oil. Once the oil is hot, place the wraps seam-side down in the skillet. Cook each wrap for about 3-4 minutes until they turn golden brown. Flip them over and cook for another 3-4 minutes. The cheese should melt nicely, making the wraps extra delicious. When done, let the wraps cool for a minute before slicing them in half. Enjoy your cheesy garlic chicken wraps warm! To make juicy chicken, grill it just right. Use medium heat and flip often. This keeps the chicken tender and full of flavor. After grilling, slice it thin for easy wrapping. For the cheese, use shredded mozzarella. It melts well and adds great texture. Layer the cheese on top of the chicken in the wrap. This helps it melt evenly. Dips make great pairings. Ranch dressing and salsa add extra flavor. Serve them on the side for a tasty touch. For plating, arrange your wraps on a bright platter. Garnish with chopped cilantro and cherry tomatoes. This makes the dish pop with color and looks inviting. Be careful not to overfill the wraps. Too much filling makes them hard to roll. Stick to a small amount of each ingredient for best results. Watch the tortillas while cooking. If they cook too long, they can burn. Aim for a golden brown color. This gives the wraps a nice crunch. Pro Tips Tip Title: Use Fresh Ingredients: Always opt for fresh spinach and ripe tomatoes for the best flavor and texture in your wraps. Tip Title: Customize Your Cheese: Experiment with different types of cheese like cheddar or pepper jack for a unique twist on flavor. Tip Title: Perfectly Grilled Wraps: Ensure your skillet is hot enough before placing the wraps in to get that perfect golden brown crust. Tip Title: Add Some Heat: For those who enjoy spice, add jalapeños or a dash of hot sauce to the chicken mixture for an extra kick. {{image_2}} You can switch things up with different proteins. Turkey works well as a lean option. It also pairs nicely with the garlic flavor. If you love tofu, use it for a vegetarian twist. Just marinate it in the garlic cream cheese mix. For seafood lovers, try adding shrimp. Cook the shrimp until they turn pink. Then, coat them in the same garlic mixture for a tasty contrast. Want to spice things up? Add jalapeños for a kick. Slice them thin and mix them with the chicken. This adds heat and flavor. You can also play with fresh herbs. Basil, parsley, or dill work great. Chop the herbs finely and mix them into the cream cheese. Each herb brings its own unique taste. Think about your tortilla choice. Whole wheat tortillas add fiber and a nutty taste. Spinach tortillas bring a splash of color and nutrients. If you need gluten-free options, look for gluten-free tortillas. They are tasty and work well with all the fillings. Choose the one that fits your needs and enjoy! To keep your Cheesy Garlic Chicken Wraps fresh, place them in an airtight container. This helps to lock in flavors and moisture. You can refrigerate them for up to three days. When you want to reheat, use a skillet on low heat. This method warms the wraps gently, keeping the outside crispy and the cheese melty. If you want to freeze the wraps, wrap each one in plastic wrap, then place them in a freezer bag. This will keep them safe from freezer burn. They can last up to three months in the freezer. To eat, thaw the wraps in the fridge overnight. Reheat them in a skillet or oven until hot. In the fridge, these wraps last about three days. Always check for signs of spoilage. If the wraps smell off or the chicken looks different, it's best to toss them. Keeping an eye on your leftovers helps ensure a safe and tasty meal! To make Cheesy Garlic Chicken Wraps healthier, try these tips: - Use grilled chicken thighs instead of breasts for more flavor. - Swap cream cheese for Greek yogurt for fewer calories. - Choose whole wheat tortillas for more fiber. - Add extra veggies like bell peppers or cucumbers for crunch. - Use low-fat cheese or cut back on the amount used. These changes keep the wraps tasty while reducing calories. Yes, you can make Cheesy Garlic Chicken Wraps ahead of time. Here are some best practices: - Prepare the filling and store it in an airtight container in the fridge. - Assemble the wraps just before serving to keep them fresh. - If needed, wrap them in foil and store them in the fridge for up to 24 hours. - You can also freeze the assembled wraps. Wrap each one tightly in plastic wrap and store in a freezer bag. When ready to eat, thaw in the fridge overnight and reheat in a skillet or microwave. Serve Cheesy Garlic Chicken Wraps with these delicious sides: - Fresh salad with mixed greens and a light vinaigrette. - Crispy potato wedges or sweet potato fries for a hearty touch. - A side of ranch dressing or salsa for dipping. - Grilled corn on the cob for a fun summer vibe. - Pickles or olives for a tangy contrast. These sides complement the wraps and add variety to your meal. You learned how to make Cheesy Garlic Chicken Wraps step-by-step. We covered key ingredients, cooking tips, and fun variations to keep things exciting. Remember, using fresh ingredients and avoiding overfilling your wraps ensures a tasty result. Keep experimenting with flavors and storage tips to enjoy these wraps anytime. With practice, you’ll create delicious meals your friends and family will love. Enjoy your cooking adventure and share your tasty creations!

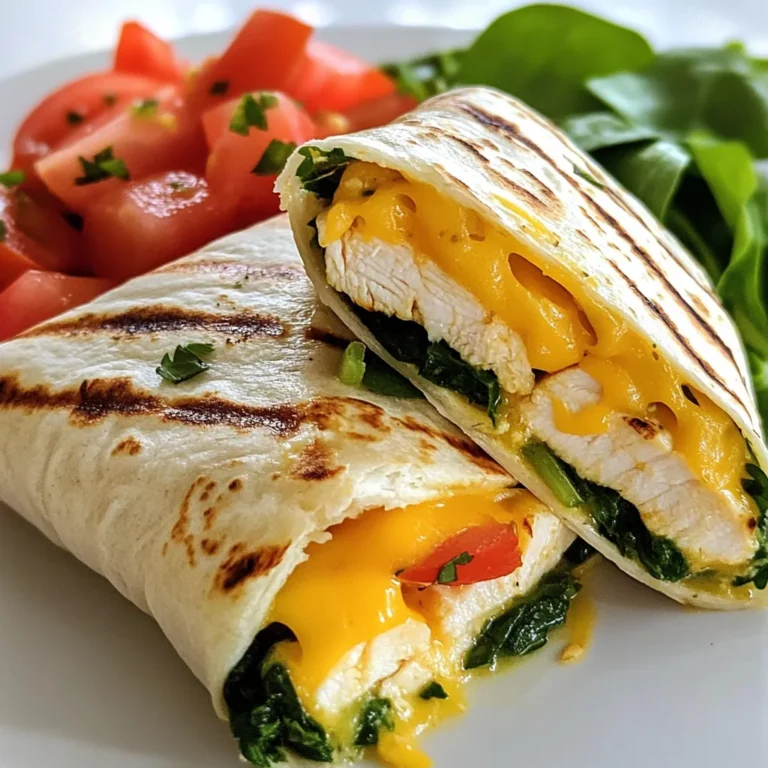
Cheesy Garlic Chicken Wraps Flavorful and Simple Meal

To make the best baked chicken, you need a few simple ingredients. Here’s what you will need: - 4 bone-in, skin-on chicken thighs - 2 tablespoons olive oil - 1 tablespoon smoked paprika - 1 teaspoon garlic powder - 1 teaspoon onion powder - 1 teaspoon dried thyme - 1 teaspoon salt - ½ teaspoon black pepper - 1 lemon, sliced - Fresh rosemary for garnish These ingredients work together to create a crispy and flavorful dish. The chicken thighs have skin that helps lock in moisture. The spices add depth and warmth, making each bite a delight. Olive oil not only helps the skin crisp up but also adds richness. Using fresh lemon slices brightens the flavor and balances the dish. Rosemary gives a lovely aroma when you serve it. With these key ingredients, you are set for a tasty meal that shines in both flavor and presentation. {{ingredient_image_1}} 1. Preheat the oven. Start by setting your oven to 425°F (220°C). This high heat helps make the skin crispy. 2. Mix the seasoning. In a small bowl, mix together: - 1 tablespoon smoked paprika - 1 teaspoon garlic powder - 1 teaspoon onion powder - 1 teaspoon dried thyme - 1 teaspoon salt - ½ teaspoon black pepper This spice mix adds great flavor to the chicken. 3. Prepare the chicken. Pat the chicken thighs dry with paper towels. This step is key for crispy skin. Next, coat the chicken with 2 tablespoons of olive oil in a large bowl. Sprinkle the spice mix all over the chicken. Make sure every side is covered. 1. Arrange chicken in the baking dish. Place the chicken thighs in a single layer in your baking dish. Avoid stacking them to ensure even cooking. 2. Add lemon for flavor. Slice 1 lemon and place the slices on top of and around the chicken. The lemon will add a nice zing and keep the meat juicy. 3. Baking time and temperature guidelines. Bake the chicken in the oven for 35-40 minutes. Check that the internal temperature reaches 165°F (74°C). You want the skin to be crispy and golden brown. 1. Resting the chicken. After baking, let the chicken rest for about 5 minutes. This step helps the juices settle. 2. Garnishing options. Before serving, add fresh rosemary on top for a pop of color and extra flavor. Enjoy your beautifully baked chicken! To get crispy skin, drying the chicken is key. Use paper towels to pat the skin dry. This step removes moisture that can make the skin soggy. After drying, coat the chicken with olive oil. The oil helps the skin crisp up while baking. Make sure to rub the oil all over for even results. Fresh herbs add a burst of flavor. I love using rosemary or thyme. Sprinkle them on top of the chicken before baking. They blend well with the spices and give a nice aroma. Lemon slices also play an important role. They add a bright flavor as they bake. The juice seeps into the chicken, making it juicy and tasty. Monitoring doneness is crucial for perfect chicken. Use a meat thermometer to check the internal temperature. You want it to reach 165°F (74°C) for safe eating. This ensures the chicken cooks through but stays juicy. Keep an eye on the time too. Bake for 35-40 minutes, but check early to avoid overcooking. Pro Tips Pat the Chicken Dry: Ensure your chicken is thoroughly dried with paper towels before seasoning to achieve a crispier skin when baked. Use Fresh Herbs: For an even more aromatic flavor, consider adding fresh herbs like thyme or rosemary to the baking dish along with the lemon slices. Check Internal Temperature: Always use a meat thermometer to check that your chicken has reached an internal temperature of 165°F (74°C) for safe consumption. Let it Rest: Allow the chicken to rest for a few minutes after baking; this helps the juices redistribute, making for a juicier bite. {{image_2}} You can switch up the spice mix to fit your taste. Try using cumin for warmth. Add chili powder for a spicy kick. Mix in Italian herbs for a twist. You can even go sweet with cinnamon or allspice. This allows you to create new flavors every time you cook. You can cook chicken thighs in different ways. Air frying gives you crispy skin fast. Set your air fryer to 400°F (200°C) and cook for 25-30 minutes. Baking the chicken is classic and simple. Preheat your oven to 425°F (220°C) and follow the recipe. You can also grill the chicken for a nice smoky flavor. Just cook it over medium heat for about 30 minutes. If you're gluten-free, this recipe is safe. All the spices and chicken are gluten-free. For low-carb diets, focus on the chicken and spices. You can skip the lemon if you want fewer carbs. Serve it with a side of veggies for a healthy meal. To keep your baked chicken fresh, start with refrigeration. Place leftover chicken in an airtight container. It stays good for up to three days in the fridge. If you want to store it longer, freeze it. Wrap each piece tightly in plastic wrap, then place it in a freezer bag. In the freezer, it can last up to three months. When it's time to enjoy leftovers, reheating properly is key. The oven is the best method. Preheat it to 350°F (175°C). Place the chicken on a baking sheet. Cover it with foil to keep moisture in. Heat for about 20 minutes, or until warm. If you want to keep the skin crispy, avoid microwaving. The microwave will make it soggy. For extra crispiness, you can heat it in an air fryer for about 5 minutes at 400°F (200°C). This method revives the crunchiness and keeps your chicken tasty. You should bake chicken thighs for 35 to 40 minutes at 425°F (220°C). This time ensures juicy meat and crispy skin. Several factors can change cooking time. The size of the thighs matters. Larger pieces need more time. If you use a glass dish, it may cook faster than metal. Always check for doneness. Yes, you can use chicken breast instead of thighs. Keep in mind that chicken breasts cook faster. Bake them for about 25 to 30 minutes. To keep them juicy, don’t overcook. Use a meat thermometer to check the internal temperature and ensure they reach 165°F (74°C). The safe internal temperature for baked chicken is 165°F (74°C). Checking the temperature is crucial for food safety. Use a meat thermometer in the thickest part of the chicken. This step ensures that harmful bacteria are gone. Cooking chicken to the right temperature keeps it safe and tasty. In this blog post, we explored the key ingredients for baking bone-in chicken thighs, including spices and garnishes. I shared step-by-step instructions, tips for crispy skin, and suggested variations to suit your taste. Remember, baking at the right temperature is crucial for juicy chicken. As you try these methods, feel free to experiment with flavors and cooking techniques. Enjoy your delicious baked chicken, and don’t forget to store any leftovers properly for later!

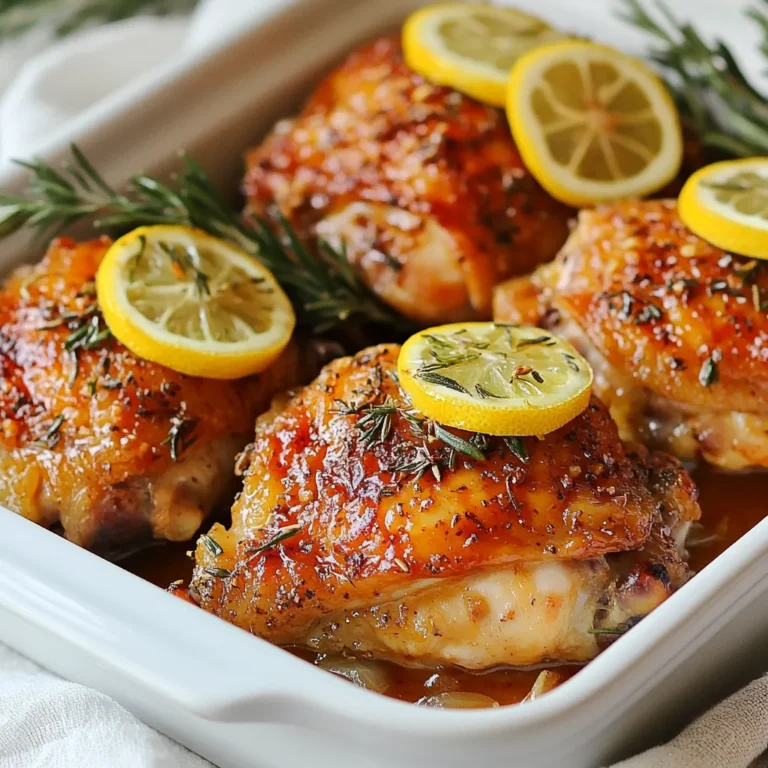
The Best Baked Chicken Recipe for Crispy Perfection

To make this dish, you need the following ingredients: - 1 lb ground beef - 1 cup orzo pasta - 1 can (15 oz) crushed tomatoes - 1 cup heavy cream - 1 medium onion, diced - 2 cloves garlic, minced - 1 teaspoon Italian seasoning - ½ teaspoon red pepper flakes (optional) - Salt and pepper to taste - 2 tablespoons olive oil - Fresh basil leaves for garnish - Grated Parmesan cheese for serving You can swap some ingredients for different flavors: - Use ground turkey instead of beef for a lighter option. - Try a different pasta shape if you don’t have orzo, like penne or macaroni. - Substitute coconut milk for cream for a dairy-free version. - Use fresh tomatoes if you prefer, about 4-5 medium-sized will work. - For herbs, fresh oregano or thyme can replace Italian seasoning. To ensure the best taste, follow these tips: - Choose ground beef that is bright red with minimal fat. - Look for firm, ripe tomatoes without blemishes. - Select heavy cream that is cold and has no lumps. - Pick onions that feel heavy for their size and have dry skins. - Fresh garlic should have a firm bulb and no green shoots. - For basil, look for vibrant green leaves without browning. These ingredient tips help create a tasty Tomato Cream Beef Orzo that you will enjoy! {{ingredient_image_1}} 1. Heat 2 tablespoons of olive oil in a large skillet over medium heat. 2. Add 1 medium diced onion and sauté for 3-4 minutes until it softens. 3. Stir in 2 minced garlic cloves and cook for 1 minute until fragrant. 4. Add 1 pound of ground beef to the skillet. Break it up with a spoon. Cook until browned for about 5-6 minutes. Drain any excess fat if needed. 5. Stir in 1 can (15 oz) of crushed tomatoes, 1 teaspoon of Italian seasoning, and ½ teaspoon of red pepper flakes (if using). Add salt and pepper to taste. Let it simmer for about 10 minutes. 6. While the sauce simmers, bring a large pot of salted water to a boil. Add 1 cup of orzo and cook according to package instructions, usually 8-10 minutes. Drain the orzo and set it aside. 7. Lower the heat and stir in 1 cup of heavy cream into the tomato-beef mixture. Let it warm for 2-3 minutes, stirring occasionally. 8. Mix in the cooked orzo until everything is well combined and heated through. 9. Taste and adjust seasoning if needed. Serve hot with fresh basil leaves and grated Parmesan cheese on top. - When sautéing the onion, keep an eye on it. You want it soft but not brown. - Stir the garlic constantly. It can burn quickly and ruin the dish. - Break the ground beef into small pieces for even cooking. It helps with texture. - Let the sauce simmer without rushing. This lets the flavors come together. - Salt your water for the orzo. It enhances the pasta's flavor. - Avoid boiling the cream. Stir gently to keep it smooth and rich. - Mix the orzo in slowly. It helps distribute the flavors evenly. - Don’t skip draining the fat from the beef. It can make the dish greasy. - Avoid overcooking the orzo. It should be al dente for the best texture. - Don’t rush the simmering step. It’s key for flavor development. - Forgetting to taste and adjust seasoning can lead to blandness. - Skipping the garnish can make the dish less appealing. Fresh basil and cheese add great flavor and color. To make Tomato Cream Beef Orzo truly shine, use fresh herbs. Fresh basil adds a bright taste. Chop it just before serving for the best flavor. You can also add a splash of balsamic vinegar. This little twist brings out the tomato's sweetness. For a hint of heat, sprinkle in red pepper flakes. Adjust the amount to your taste. Remember to season well with salt and pepper. This makes every bite pop! Using the right tools makes cooking easier. A large skillet is key for browning the beef. Choose one with a sturdy base for even heat. A wooden spoon works well for mixing. It helps break up the beef and stir the sauce. Use a pot for boiling the orzo. Make sure it’s large enough so the pasta doesn’t stick. A colander is vital for draining the orzo. Lastly, grab a good knife for chopping. A sharp knife saves time and effort. Serve your dish hot for the best experience. Garnish with fresh basil leaves for color and flavor. Grated Parmesan cheese adds a creamy touch. You can also pair it with crusty bread. This is perfect for soaking up the sauce. A simple side salad balances the richness of the dish. For a fun twist, add a sprinkle of lemon zest. It brightens the flavors and makes it special. Enjoy your comforting meal! Pro Tips Use Fresh Ingredients: Fresh herbs and ripe tomatoes will enhance the flavor profile of your dish significantly. Cook Orzo Perfectly: Make sure to cook the orzo until al dente; it will continue to absorb liquid while mixed with the sauce. Adjust Spice Level: Feel free to modify the amount of red pepper flakes based on your heat preference. Leftovers Storage: Store any leftovers in an airtight container in the fridge for up to 3 days; reheat gently on the stove. {{image_2}} To make a tasty vegetarian version, swap the ground beef for lentils or mushrooms. Use one cup of cooked lentils or two cups of chopped mushrooms. Both options add a nice texture. Keep the rest of the recipe the same. You can still enjoy the creamy tomato sauce and orzo. This change makes the dish rich in plant protein. If you like heat, try adding more red pepper flakes. Start with one teaspoon in the sauce. You can also add diced jalapeños or crushed chili peppers. This will bring a vibrant kick to your meal. Serve with a sprinkle of spicy cheese for extra flavor. The heat balances well with the creamy sauce. You can use various proteins in this dish. Chicken or turkey works great. For chicken, use one pound of cooked and shredded meat. For turkey, choose ground turkey instead of beef. Both options will give you a lighter dish. Adjust the cooking time as needed, but follow the same steps. Each protein brings a unique taste and texture to the creamy tomato orzo. To keep your Tomato Cream Beef Orzo fresh, store it in an airtight container. Let it cool to room temperature before sealing. Place it in the fridge if you plan to eat it within three days. If you want it to last longer, consider freezing it. When you're ready to enjoy your Tomato Cream Beef Orzo again, reheat it in a skillet over medium heat. Add a splash of water or broth to help with moisture. Stir it often to heat evenly. You can also microwave it in short bursts, stirring in between, until hot. To freeze your Tomato Cream Beef Orzo, portion it into freezer-safe bags. Press out the air and seal tightly. This dish can last up to three months in the freezer. When you're ready to eat, thaw it overnight in the fridge. Then, reheat using the skillet method for the best flavor. To make this dish gluten-free, swap orzo pasta for gluten-free orzo. Many stores sell it. You can also use rice, quinoa, or another gluten-free pasta. Just ensure your crushed tomatoes are gluten-free too. This dish pairs well with a fresh salad. A simple green salad with a light vinaigrette works great. You can also serve garlic bread or a warm baguette to soak up the sauce. For a fun twist, offer some roasted vegetables. Yes, you can prepare the dish ahead of time. Make it and let it cool. Store it in an airtight container in the fridge for up to three days. Reheat in a skillet, adding a splash of cream or water to keep it moist. To adjust servings, simply multiply or divide each ingredient by your desired number. For example, if you want to serve eight, double each ingredient. If you want to serve two, halve the amounts. This way, you can always make the right amount for your guests. You learned about making Tomato Cream Beef Orzo, from ingredients to storage tips. Choosing fresh ingredients is key for great taste. Follow the steps to avoid common mistakes when cooking. Don’t forget the variations to suit everyone's taste. With these tips, you'll create a dish that delights all. Enjoy being creative in the kitchen and share your tasty results!

Tomato Cream Beef Orzo Flavorful Comfort Dish

To make this yummy soup, you need fresh, simple ingredients. Here is a list: - 2 lbs ripe tomatoes, halved - 1 large onion, quartered - 4 cloves garlic, unpeeled - 2 tablespoons olive oil - 1 teaspoon salt - 1/2 teaspoon black pepper - 1 teaspoon sugar - 4 cups vegetable broth - 1 cup fresh basil leaves, packed - 1 tablespoon balsamic vinegar These ingredients bring out the best flavors. Fresh tomatoes add sweetness. The garlic gives a nice kick. Onions add depth. Olive oil helps everything cook well. You can make your soup look and taste even better with garnishes. Here are some ideas: - Heavy cream for a smooth finish - Fresh basil leaves for a pop of color - A drizzle of olive oil for richness These garnishes add a touch of elegance. They also enhance the taste. If you don’t have all the ingredients, don’t worry! You can swap some out. Here are a few ideas: - Use yellow or green tomatoes instead of red - Replace the onion with shallots for a milder taste - Use chicken broth if you want a richer flavor These swaps help you use what you have. They still keep the soup delicious. {{ingredient_image_1}} Start by gathering your fresh ingredients. You need 2 lbs of ripe tomatoes. Cut each tomato in half. Next, take 1 large onion and cut it into quarters. Then, grab 4 cloves of garlic. You don’t need to peel them yet. This step adds depth to the flavor. Now, place all the veggies on a large baking sheet. Make sure they have space. This helps them roast evenly. Drizzle 2 tablespoons of olive oil over the vegetables. Next, sprinkle with 1 teaspoon of salt, 1/2 teaspoon of black pepper, and 1 teaspoon of sugar. Toss everything well. You want every piece nicely coated. Now it’s time to roast. Preheat your oven to 400°F (200°C). Once it's hot, put your baking sheet in the oven. Roast the vegetables for 30 to 35 minutes. Look for caramelized tomatoes and tender onions. These signs mean they are ready. When they finish roasting, take them out and let them cool for a bit. This cooling time makes blending easier. Next, move the roasted veggies to a large pot. Add 4 cups of vegetable broth and 1 cup of fresh basil leaves. Bring this mixture to a simmer over medium heat. Let it cook for about 15 minutes. This step helps the flavors blend together. Now, it's blending time. Use an immersion blender to mix until smooth. If you don’t have one, transfer the soup to a regular blender in batches. Blend well and then return it to the pot. Finally, stir in 1 tablespoon of balsamic vinegar. Taste your soup and adjust the seasoning if needed. For a creamier finish, add some heavy cream before serving. Enjoy your delicious roasted tomato basil soup! To make your roasted tomato basil soup shine, focus on the basics. Use ripe, fresh tomatoes. They give a sweet taste and rich color. Roasting adds depth. The caramelization brings out the natural sugars. Add a touch of sugar while roasting to help with this. Try adding a pinch of red pepper flakes for heat. This small change can make a big difference. Fresh basil is key. Add it right at the end for the best flavor. A splash of balsamic vinegar adds brightness and balance. One mistake is using under-ripe tomatoes. They lack flavor and sweetness. Make sure to roast the garlic, too. Unpeeled garlic becomes sweet and soft. If you peel it first, you might burn it. Don’t skip the blending step. Leaving chunks can ruin the creamy texture. Be careful not to over-blend. You want a smooth soup without turning it into a puree. Last, taste before serving. Adjust the salt or pepper as needed. Serve your soup hot in bowls. Garnish with fresh basil leaves for color. Drizzle a bit of olive oil for a rich finish. A swirl of heavy cream adds a nice touch, too. Pair it with crusty bread or a grilled cheese sandwich. This gives you a comforting meal. For a fun twist, top with croutons or a sprinkle of cheese. Enjoy your delicious soup! Pro Tips Use Fresh Tomatoes: For the best flavor, opt for ripe, in-season tomatoes. They provide a natural sweetness that enhances the soup. Don’t Skip the Garlic: Roasting the garlic with the vegetables mellows its flavor and adds depth to the soup, making it rich and aromatic. Adjust Consistency: If you prefer a thicker soup, reduce the amount of vegetable broth. For a lighter version, add more broth for a thinner texture. Garnish Creatively: Enhance presentation by garnishing with a swirl of heavy cream, a sprinkle of fresh basil, or even croutons for added texture. {{image_2}} You can easily make this soup vegan and gluten-free. The base of the soup is already plant-based, using ripe tomatoes, onion, garlic, and vegetable broth. Just make sure your broth is gluten-free. This soup is rich and tasty without any dairy. If you want to add creaminess, try using coconut cream or cashew cream. Both options will keep it vegan and add a nice flavor. To elevate your soup, think about adding some extra ingredients. You can mix in roasted red peppers for a smoky taste. A splash of lemon juice brightens up the flavors. For a bit of umami, add a tablespoon of soy sauce or miso paste. Fresh herbs like thyme or oregano can also enhance the taste. Don’t be afraid to get creative! If you like heat, making a spicy version is easy. You can add red pepper flakes while roasting the veggies. If you want more heat, chop up some jalapeños or serrano peppers and mix them in. Another option is to stir in some hot sauce after blending the soup. Adjust the spice level to suit your taste buds. Enjoy the warmth! After making your roasted tomato basil soup, let it cool. Pour it into a glass or plastic container. Seal it tightly. You can keep it in the fridge for up to five days. If you want to enjoy it later, this soup stores well. Just remember to cool it first. Freezing the soup is a great idea for long-term storage. Use freezer-safe bags or containers. Leave some space in the container for the soup to expand. Label the bags with the date. You can freeze it for up to three months. Thaw it in the fridge overnight before reheating. To reheat the soup, pour it into a pot. Heat over medium-low heat until warm. Stir it often to avoid sticking. You can also use a microwave. Heat in a safe bowl, stirring halfway through. Make sure it is hot all the way through. Enjoy your soup with fresh bread! Yes, you can use canned tomatoes. They work well when fresh ones aren’t in season. Choose whole or crushed canned tomatoes for the best flavor. Just drain them before adding to the pot. This will help keep your soup from getting too watery. If your soup is too thick, add more vegetable broth. Start with half a cup and stir well. Let it simmer again to blend the flavors. If it’s too thin, simmer it longer. This will help reduce the liquid and thicken the soup naturally. This soup pairs nicely with crusty bread or a grilled cheese sandwich. You can also serve it with a fresh salad. For a special touch, add a drizzle of olive oil on top before serving. Enjoy it hot for the best flavor! Roasted Tomato Basil Soup is a simple, tasty dish. We explored key ingredients, optional garnishes, and smart swaps. I shared easy steps from prepping to blending. Also, I offered tips to boost flavors and avoid mistakes. There are fun variations, like vegan options and a spicy twist. Finally, I covered storage tips for leftovers. This soup is comforting and flexible. It works for any meal. Enjoy making it your own!

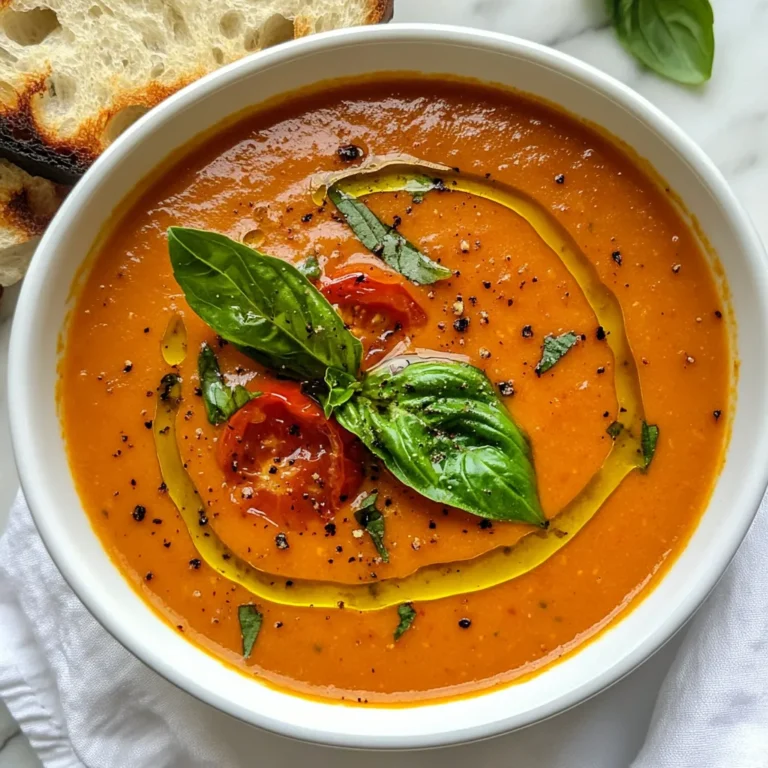
Roasted Tomato Basil Soup Simple and Tasty Recipe

For a tasty Meatball Mashed Potato Bake, you'll need: - 1 lb ground beef or turkey - 1/4 cup breadcrumbs - 1/4 cup grated Parmesan cheese - 1 egg - 2 cloves garlic, minced - 1 teaspoon dried Italian herbs (oregano, basil) - Salt and pepper to taste - 2 cups marinara sauce - 4 large potatoes, peeled and cubed - 1/2 cup milk - 1/4 cup butter - 1 cup shredded mozzarella cheese - Fresh parsley for garnish These ingredients come together to create a warm and filling meal. Ground beef or turkey forms the base, while breadcrumbs and Parmesan add flavor. The egg binds the meatballs, and garlic gives them a lovely aroma. You can personalize your bake with these fun additions: - Chopped onions for a sweet crunch - Spinach or kale for extra greens - Different cheese types, like cheddar or gouda - Red pepper flakes for some heat These options let you adjust the dish to your taste. Feel free to mix and match as you like. To enhance your bake, consider these toppings: - Extra mozzarella for a cheesier finish - Fresh basil leaves for a hint of freshness - A drizzle of olive oil for richness - Crushed red pepper for spice These toppings add layers of flavor and make your dish stand out. You can also let your creativity shine with these suggestions. {{ingredient_image_1}} Start by preheating your oven to 375°F (190°C). This ensures even cooking. In a large bowl, mix 1 pound of ground beef or turkey with 1/4 cup of breadcrumbs, 1/4 cup of grated Parmesan cheese, and 1 egg. Add 2 cloves of minced garlic, 1 teaspoon of dried Italian herbs, salt, and pepper. Use your hands to mix everything until it’s well combined. Shape the mixture into small meatballs about 1 inch wide. Next, heat a splash of olive oil in a large skillet over medium heat. Once hot, add the meatballs. Cook them for about 8-10 minutes, turning them until browned on all sides. They don’t need to be fully cooked yet since they will finish in the oven. Remove them from the skillet and set them aside. Now, it’s time to cook the potatoes. Boil a pot of salted water and add 4 large, peeled, and cubed potatoes. Cook these for about 15-20 minutes, or until they are fork-tender. Drain the potatoes well. Return the drained potatoes to the pot. Add 1/2 cup of milk and 1/4 cup of butter. Mash them until smooth and creamy. Season with salt and pepper to taste. This step gives your dish a rich flavor that pairs perfectly with the meatballs. Grab a greased 9x13 inch baking dish. Spread half of the marinara sauce evenly at the bottom. Layer the browned meatballs over the sauce. Then, carefully spread the creamy mashed potatoes over the meatballs. Pour the remaining marinara sauce over the mashed potatoes. To finish, sprinkle 1 cup of shredded mozzarella cheese evenly over the top. Cover the dish with aluminum foil. Bake in the preheated oven for 25 minutes. After that, remove the foil and bake for another 10-15 minutes. You want the cheese to become bubbly and golden. Once done, let it cool for a few minutes. This dish is sure to be a hit with your family! To make great meatballs, choose the right meat. I like ground beef or turkey. Mix it well with breadcrumbs, Parmesan, garlic, and herbs. This mix keeps them moist. Don't overwork the meat; just blend until combined. Shape them into balls about one inch wide. Browning adds flavor, so cook them in a hot skillet. They should brown on all sides but not be fully cooked. This step makes sure they stay juicy. Start with large potatoes for the best mash. Peel and cube them for quicker cooking. Boil them in salted water until fork-tender, about 15-20 minutes. Drain the potatoes well to remove excess water. Return them to the pot and add warm milk and butter. Mash until smooth and creamy. Season with salt and pepper to taste. If you want a richer flavor, use half-and-half instead of milk. Preheat your oven to 375°F (190°C) for even cooking. Layer the marinara sauce on the bottom of your baking dish. This keeps the meatballs moist. After adding the meatballs and mashed potatoes, spread the remaining sauce on top. Cover the dish with foil for the first part of baking. This helps steam the dish and cook everything through. Remove the foil later to let the cheese brown. Bake until bubbly and golden for that perfect finish. Pro Tips Use Fresh Herbs: Fresh herbs can significantly enhance the flavor of your meatballs. Consider adding chopped fresh basil or parsley to the meat mixture for a more vibrant taste. Perfectly Mashed Potatoes: For creamier mashed potatoes, use warm milk and melted butter. This helps the potatoes absorb the liquid better, resulting in a smoother texture. Cheese Variations: Feel free to experiment with different cheese types! Adding a blend of cheddar and mozzarella can give your bake a unique flavor profile. Make Ahead: This dish is perfect for meal prep! Assemble the bake a day in advance and store it in the refrigerator. Just pop it in the oven the next day for a quick dinner. {{image_2}} You can switch up the meat in this dish. Ground turkey works great instead of beef. It gives a lighter taste while still being tasty. You can also use chicken or pork. For a fun twist, try meatballs made from sausage. They add a spicy kick to the bake. Just be sure to adjust the seasoning to match the meat you choose. If you want a meat-free version, I have great options. Use lentils or chickpeas for the base. These add protein and flavor. You can also use a store-bought meat substitute. Look for veggie meatballs that taste good. You can follow the same steps to make the bake, just swap the meat and add extra herbs for flavor. You can make this dish healthier without losing taste. Instead of white potatoes, try sweet potatoes. They add a nice sweetness and are full of vitamins. Use low-fat milk and butter to cut calories. You can also swap the mozzarella for a lighter cheese like ricotta. Finally, use whole wheat breadcrumbs for added fiber. These swaps keep your dish tasty and nutritious. To keep your Meatball Mashed Potato Bake fresh, let it cool first. Transfer leftovers to an airtight container. Store in the fridge for up to three days. If you want to keep it longer, freezing is a great option. Reheat your leftovers easily. Preheat your oven to 350°F (175°C). Place the bake in an oven-safe dish. Cover it with foil to keep moisture in. Heat for about 20-25 minutes, or until warmed through. You can also use a microwave. Heat in short bursts to avoid drying it out. To freeze, cut the bake into portions. Wrap each piece tightly in plastic wrap. Then place them in a freezer bag. Label the bags with the date. You can freeze it for up to three months. When ready to eat, thaw it in the fridge overnight before reheating. Yes, you can prepare the Meatball Mashed Potato Bake in advance. Make the meatballs and mashed potatoes, then layer them in the baking dish. Cover and store in the fridge for up to two days. When you are ready to bake, add a few extra minutes to the cooking time. This makes it easy for busy nights! You can serve a fresh salad or steamed veggies with this dish. A simple green salad with a light dressing goes well. You might also enjoy garlic bread on the side for extra flavor. These options add color and balance to your meal, making it even more enjoyable. The bake is done when the cheese is bubbly and golden. You can also check the meatballs. They should reach an internal temperature of 165°F (74°C). If you see a nice golden crust on top, that’s a good sign! Let it cool for a few minutes before serving. This blog post shared a simple recipe for Meatball Mashed Potato Bake. We covered key ingredients, optional add-ins, and tasty toppings. I provided step-by-step instructions for each part, like preparing meatballs and cooking mashed potatoes. You learned tips for perfect texture and creaminess. I also explored variations, storage tips, and answered common questions. With these details, you can create a delicious meal that everyone will love. Enjoy making this dish again and again!

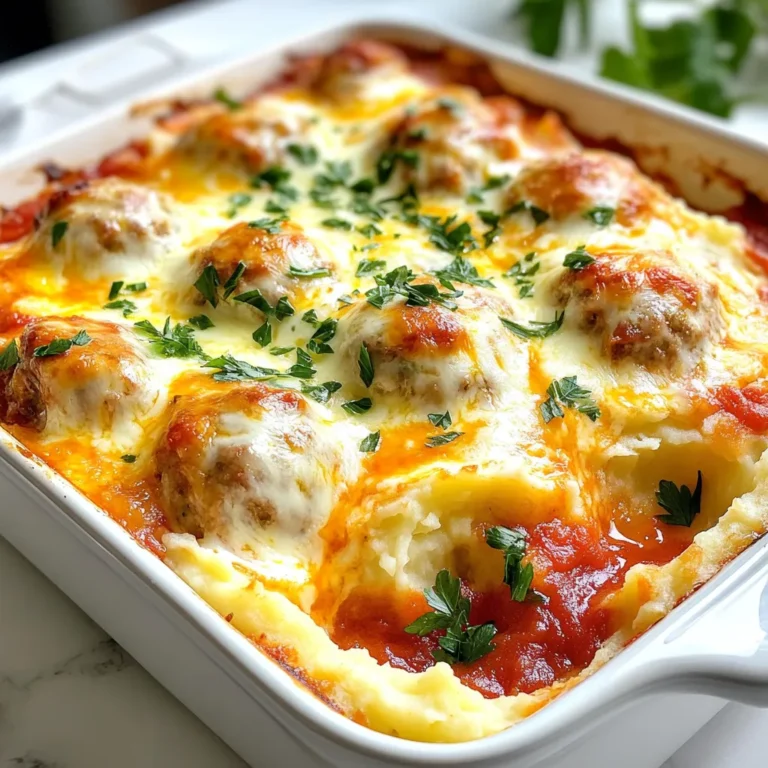
Meatball Mashed Potato Bake Easy Family Comfort Meal

To make S’mores Chocolate Bark, gather the following ingredients: - 12 ounces milk chocolate chips - 12 ounces dark chocolate chips - 1 cup graham cracker crumbs - 1 cup mini marshmallows - 1/2 cup mini chocolate chips (for extra topping) - 1 teaspoon vanilla extract If you want to switch things up, consider these options: - Use white chocolate chips instead of milk or dark chocolate. - Try gluten-free graham crackers if you need a gluten-free bark. - Substitute regular marshmallows with flavored ones for a twist. - For a nutty flavor, add chopped nuts like almonds or pecans. Here are some handy conversions for your ingredients: - 1 cup = 8 ounces - 12 ounces of chocolate chips is about 2 cups. - If you need less, 1 ounce is about 2 tablespoons. - For graham cracker crumbs, 1 cup equals about 10 crushed crackers. Now you have everything you need to create this fun and tasty treat! {{ingredient_image_1}} Start by lining a baking sheet with parchment paper. This helps the bark come off easily. Set it aside for later. Next, measure out your ingredients. You will need 12 ounces of milk chocolate chips and 12 ounces of dark chocolate chips. Also, gather 1 cup of graham cracker crumbs, 1 cup of mini marshmallows, and 1/2 cup of mini chocolate chips. Don't forget the teaspoon of vanilla extract! To melt chocolate, use a microwave-safe bowl. Heat the milk chocolate chips in the microwave for 30 seconds. After each interval, stir until smooth. This helps prevent burning. Once melted, pour the chocolate onto the prepared baking sheet. Spread it evenly with a spatula. For the dark chocolate, repeat the same melting process. Aim for a smooth texture. Once your dark chocolate is melted, drizzle it over the milk chocolate. To make a marbled look, use a toothpick or a small spatula. Swirl the two chocolates together gently. Be careful not to mix them too much. You want to see both colors. After this, sprinkle your graham cracker crumbs evenly over the top. Add mini marshmallows and mini chocolate chips on top for extra flavor. One mistake is not melting the chocolate properly. Always melt in short bursts, stirring often. This helps keep the chocolate smooth. Another mistake is not using parchment paper. It makes removing the bark easier. Skip the paper, and you might break your bark. Lastly, don’t rush the chilling time. If the chocolate isn't fully set, it will be messy. To get the best flavor, use high-quality chocolate. I recommend using brands you enjoy eating. Mixing milk and dark chocolate gives a rich taste. Adding a dash of vanilla extract boosts the flavor. Don’t skip the graham cracker crumbs; they add crunch and nostalgia. If you want, toast the mini marshmallows slightly for a smokier taste. Use a microwave-safe bowl for melting chocolate. It makes the process easy. A spatula helps you spread the chocolate evenly. For swirling, a toothpick works great. If you have a kitchen torch, use it to toast marshmallows. It adds a fun element to your treat. Lastly, a baking sheet with a rim keeps everything contained. Pro Tips Choose Quality Chocolate: Using high-quality chocolate will enhance the flavor of your bark. Look for chocolate that contains cocoa butter for the best results. Experiment with Toppings: Feel free to get creative with your toppings! Try adding nuts, dried fruit, or different types of candy for a unique twist. Swirl Technique: For a more visually appealing marbled effect, don’t over-swirl the chocolates. Just a few gentle movements with a toothpick will do! Storage Tips: Store your chocolate bark in an airtight container at room temperature to maintain its texture and flavor. Avoid refrigeration if possible to prevent condensation. {{image_2}} You can make S’mores Chocolate Bark more fun by adding your favorite snacks. Try using peanut butter chips instead of milk chocolate. The nutty flavor pairs well with the other ingredients. You can also use white chocolate for a sweeter touch. Mix in crushed pretzels for added crunch. This gives a salty twist to the sweet bark. To amplify flavors, consider adding spices. A pinch of cinnamon brings warmth. You can also try a dash of sea salt on top to enhance sweetness. For a hint of coffee flavor, stir in a bit of instant coffee granules with the melted chocolate. Each of these small changes can elevate your bark to new heights. You can adapt S’mores Chocolate Bark for holidays. For Halloween, add candy corn or orange sprinkles. For Christmas, use peppermint extract in the chocolate and sprinkle crushed candy canes on top. For Easter, pastel-colored mini eggs can add a festive touch. Tailoring your bark to the season makes it a special treat all year round! To keep your S’mores Chocolate Bark fresh, store it in an airtight container. This helps prevent moisture from ruining the texture. Place a piece of parchment paper between layers if you stack them. Keep it at room temperature. Avoid direct sunlight or heat sources. When stored correctly, S’mores Chocolate Bark lasts about two weeks. Check it for signs of spoilage, like a dull look or strange smells. If you notice these, it’s best to throw it away. For the freshest taste, enjoy it within the first week. You can freeze S’mores Chocolate Bark for longer storage. Cut it into pieces before freezing. Wrap each piece in plastic wrap and place them in a freezer-safe bag. It stays good for up to three months. To enjoy, thaw it in the fridge overnight. This keeps the texture just right. Yes, you can! Feel free to mix and match chocolates. You can use white chocolate, milk chocolate, or dark chocolate. Each type brings a new taste. If you like darker flavors, use more dark chocolate. If you prefer sweeter, go for milk or white. The key is to melt them well for a smooth mix. To make it gluten-free, choose gluten-free graham crackers. Many brands offer this option. Always check the label! You can also swap the graham crackers for gluten-free cookie crumbs. This way, you keep the crunch without gluten. Enjoy your sweet treat without worry! You can add many fun toppings! Try nuts like almonds or peanuts for crunch. You could also use dried fruits like cherries or cranberries for a chewy bite. Want a savory twist? Add a sprinkle of sea salt. The options are endless, so get creative! In this post, we covered how to make S’mores Chocolate Bark. You learned about the ingredients, step-by-step instructions, and useful tips. We also shared fun variations and storage advice. Now you can create a tasty treat with ease. Don’t hesitate to try new flavors or explore fun twists. Enjoy making this sweet snack for yourself or to share!

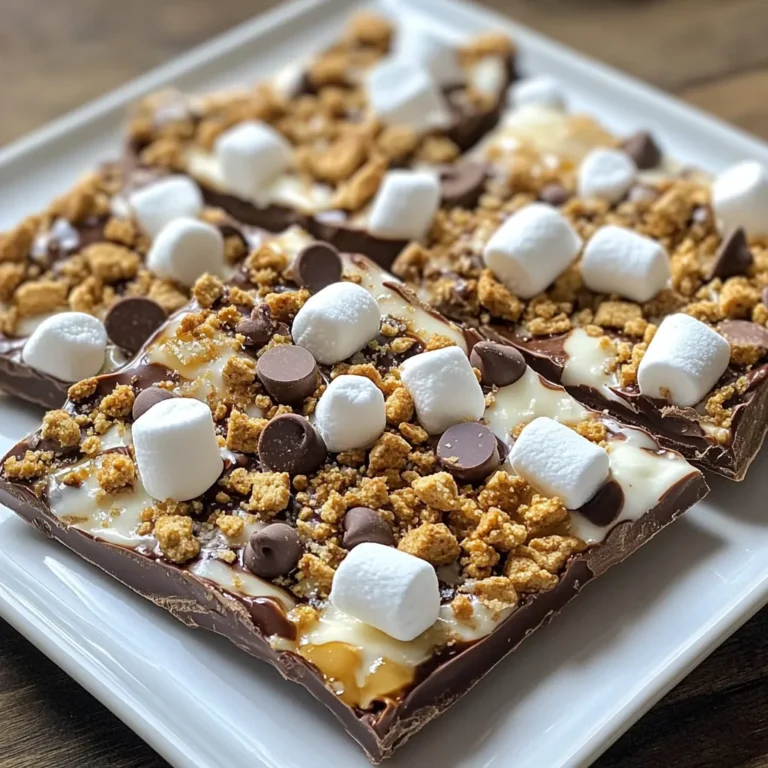
S’mores Chocolate Bark Irresistible and Easy Treat

PREV 1 … 47 48 49 … 57 NEXT
meal twig

explore

DessertsDinnerAppetizersDrinks

Our Policies

  • Cookie Policy
  • Copyright Policy
  • Disclaimer
  • GDPR Policy
  • Terms Of Use
Back to Top
  • About
  • Contact Us
  • Privacy Policy
© 2025 meal twig