FREE DINNER EBOOK! Get your copy!
  • Cookie Policy
  • GDPR Policy
  • Disclaimer
  • Terms Of Use
  • Visit my other site: Fun Cookie Recipes
meal twig
  • Home
  • Dinner
  • Desserts
  • Drinks
  • Appetizers
  • Contact
  • About
  • Privacy Policy
  • Home
  • Dinner
  • Desserts
  • Drinks
  • Appetizers
  • Contact
  • About
  • Privacy Policy
  • Cookie Policy
  • GDPR Policy
  • Disclaimer
  • Terms Of Use
Visit my other site: Fun Cookie Recipes

HOME / CATEGORIES /

Latest

- 2 large onions, thinly sliced - 2 tablespoons olive oil - 1 tablespoon unsalted butter - 1 teaspoon balsamic vinegar - Salt and pepper to taste - 2 cups Gruyere cheese, shredded - 4 large flour tortillas - 1 teaspoon garlic powder - Fresh thyme leaves for garnish (optional) - Large skillet - Spatula - Cutting board - Knife - Grater (for cheese) - Serving platter You can swap Gruyere with other cheeses like cheddar or mozzarella. If you want a dairy-free option, try vegan cheese. For tortillas, corn tortillas work well. You can also use whole wheat tortillas for a healthier choice. If you don’t have balsamic vinegar, use red wine vinegar. To start, grab a large skillet and place it on medium heat. Add 2 tablespoons of olive oil and 1 tablespoon of unsalted butter. Wait until the oil is hot. Then, add 2 large onions that you’ve sliced thin. Stir them every few minutes. You want them to turn golden brown and soft. This process takes about 15 to 20 minutes. When they are ready, add 1 teaspoon of balsamic vinegar, salt, and pepper. Mix everything well and then remove the skillet from the heat. Set the onions aside. Next, take another large skillet and lightly coat it with olive oil. Heat it on medium. Grab your tortillas, and let’s get to work on assembling. Place one tortilla in the skillet. Sprinkle half of your 2 cups of shredded Gruyere cheese on one half of the tortilla. Add a good scoop of your caramelized onions on top of the cheese. Finally, sprinkle the rest of the cheese over the onions. Now, fold the tortilla in half to cover the filling. Cook it for about 3 to 4 minutes on one side. Check for a golden brown color. Once it’s nice and crispy, flip it over. Cook for another 3 to 4 minutes. Your cheese should be melted and gooey by now. If the quesadilla browns too fast, lower the heat. Repeat this process with the remaining tortillas and filling. Once they are all cooked, cut each quesadilla into wedges. You can sprinkle some garlic powder on top and add fresh thyme leaves if you like. Enjoy! To make great caramelized onions, use medium heat. This helps them cook evenly. Stir them often. This keeps them from burning. It takes about 15-20 minutes to turn golden brown. Add a bit of balsamic vinegar for a sweet touch. If you want more flavor, add salt and pepper too. Don't rush the process. Good things take time! For the best melty cheese, use Gruyere. It melts nicely and has a rich flavor. Shred the cheese yourself for better melting. Pre-shredded cheese often has extra stuff that keeps it from melting well. When you cook the quesadilla, keep the heat medium to low. This ensures the cheese melts without burning the tortilla. Cut the quesadillas into wedges for easy eating. You can serve them with salsa, sour cream, or guacamole. Fresh thyme leaves add a nice touch on top. You can also try a side salad for a fresh contrast. These quesadillas make a great snack or a light meal. Enjoy! {{image_2}} You can add many extra ingredients to your quesadillas. Try cooked chicken or beef for protein. Spinach or bell peppers can add a fresh crunch. Mushrooms also work well, adding earthy flavors. For a spicy kick, add jalapeños or chili flakes. Mix and match to find your perfect combo! Gruyere cheese gives a nutty taste, but you can switch it up. Cheddar adds sharpness, while mozzarella offers a milder flavor. Feta brings a salty twist, and pepper jack adds heat. Use your favorite cheese or mix several for a unique taste. Flour tortillas are classic, but try corn tortillas for a gluten-free option. Whole wheat tortillas add fiber and a nutty flavor. For a twist, use spinach or tomato tortillas to brighten up your dish. You can even use large leaves of lettuce for a low-carb wrap! After enjoying your quesadillas, let them cool. Place them in an airtight container. This keeps them fresh in the fridge. They can stay good for up to three days. Just remember to separate layers with parchment paper to avoid sticking. To reheat, use a skillet over medium heat. Place the quesadilla in the pan. Heat it for about 2-3 minutes on each side. This warms the cheese and makes the tortilla crispy again. You can also use a microwave. Just cover it with a damp paper towel. Heat for about 30-45 seconds. You can freeze quesadillas too! Wrap each one tightly in plastic wrap. Then place them in a freezer bag. Make sure to remove as much air as possible. They can last for up to three months in the freezer. To cook, thaw in the fridge overnight before reheating. Yes, you can use other cheeses. Monterey Jack or cheddar work well. Both melt nicely. You can even try feta for a tangy twist. Just remember, choose a cheese that melts easily. Mixing cheeses can add depth to the flavor. Onions are done when they turn golden brown and are soft. This takes about 15-20 minutes. Stir them often to prevent burning. The smell will be sweet and rich. A nice brown color means they are ready for your quesadillas. You can serve these quesadillas with salsa or guacamole. A fresh salad adds a nice crunch. Sour cream or Greek yogurt is great for dipping too. Pair with a light soup for a complete meal. Enjoy them with your favorite beverage for a fun twist! In this post, we covered the key ingredients and tools for making caramelized onion Gruyere quesadillas. We walked through the steps for caramelizing onions, assembling, and cooking. I shared tips for perfecting your quesadillas and suggested tasty variations. Finally, we discussed storage options and answered common questions. These quesadillas offer flavor and fun in each bite. Try them today for a delicious meal!

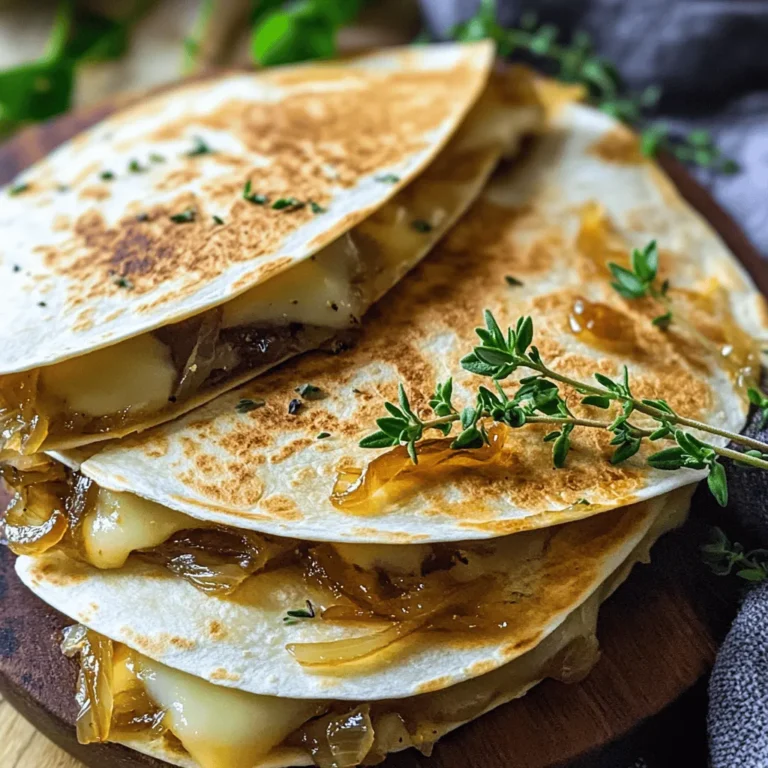
Savory Caramelized Onion Gruyere Quesadillas Recipe

- 2 ripe avocados - 4 large eggs - Salt and pepper to taste - 1 tablespoon olive oil - 2 tablespoons fresh chives, chopped - 1/2 teaspoon smoked paprika - Cherry tomatoes, halved (for garnish) When you gather your ingredients, pick ripe avocados. They should yield slightly when you press them. Fresh eggs make a big difference too. Use large eggs for the best fit in the avocado halves. Don't forget the salt and pepper. These simple seasonings will enhance all the flavors. - Calories: 420 - Protein: 18g - Fats: 36g - Carbs: 18g This meal packs a nutritional punch. Avocados provide healthy fats, while eggs add protein. Together, they form a well-rounded breakfast that keeps you full. Nutritional benefits of avocados Avocados are rich in monounsaturated fats. These healthy fats support heart health. They also contain fiber, which aids digestion. Plus, avocados are loaded with vitamins like E and K. Health advantages of eggs Eggs are a great source of protein. They contain all nine essential amino acids. Eggs also provide choline, which is good for brain health. Eating eggs can help you feel full longer. 1. Preheating the oven: Start by preheating your oven to 425°F (220°C). This is the right temperature for baking the eggs in your avocado boats. Preheating ensures an even cook. 2. Preparing the avocados: Take two ripe avocados. Cut them in half and remove the pit. If the hole isn’t deep enough, scoop out a little flesh from the center. This gives the egg enough space. Place the avocado halves in a small baking dish. You may need to use crumpled aluminum foil to keep them stable. 1. Baking time and temperature settings: Place the prepared avocados in the oven. Bake them for about 15 to 20 minutes. The time will depend on how you like your eggs. Less time gives you runny yolks. More time will make them firm. 2. Tips for achieving desired egg doneness: Keep an eye on your eggs. If you want them runny, check at the 12-minute mark. For firmer yolks, let them bake longer. Remember, eggs will continue to cook a bit after you take them out. 1. How to garnish the dish: Once baked, it’s time for the finishing touches. Remove the avocado boats from the oven. Sprinkle chopped chives over them. You can add salt and pepper for extra flavor. 2. Serving suggestions: Garnish with halved cherry tomatoes. They add a fresh pop of color and taste. Serve the avocado egg boats warm, maybe with toast or a simple salad on the side. Enjoy your meal! To make your avocado egg breakfast boats perfect, timing is key. You can adjust the baking time based on how you like your yolks. If you want runny yolks, bake for about 15 minutes. For firmer yolks, let them bake for 20 minutes. Choosing ripe avocados is also very important. Ripe avocados are soft to the touch. They will hold the egg well and taste great. If your avocados are not ripe, they will not work as well. You will need a few simple tools to create these tasty boats. A baking dish works best to hold the avocados steady. A spoon helps to remove any extra egg white. Sometimes, avocado halves can tip over. You can stabilize them with crumpled aluminum foil. Just place the foil in the baking dish to support the avocado halves. This step keeps everything in place while baking. Get creative with your breakfast boats! You can add cheese or fresh herbs for more flavor. Cheese like feta or cheddar melts wonderfully over the egg. Fresh herbs like basil or parsley add a nice touch as well. Seasoning is also fun to change up. If you want a kick, try adding chili flakes or a dash of hot sauce. For a different taste, use garlic powder or onion powder. The options are endless! {{image_2}} You can change the ingredients in your avocado egg breakfast boats. Try using different veggies or proteins. For a fresh crunch, add bell peppers or spinach. These will boost flavor and nutrition. If you want a vegan version, swap the egg for tofu. Use silken tofu for a creamy texture. You can also add nutritional yeast for a cheesy flavor. This keeps the dish tasty without eggs. Make your breakfast boats special with different themes. For a Mediterranean style, add feta cheese, olives, and sun-dried tomatoes. This gives a bright, salty taste that pairs well with avocado. For a spicy Southwest twist, include diced jalapeños, black beans, and corn. Top with cilantro and lime juice. It adds heat and zest, making your breakfast exciting. Pair your avocado egg boats with side dishes or drinks. A light salad or some toast works well. You can also serve them with fresh fruit. This adds color and balance to your meal. Presentation is key for brunch. Place the boats on a colorful plate. Add fresh herbs or cherry tomatoes around them. This makes your dish look as good as it tastes. Store leftover avocado egg boats in an airtight container. Keep them in the fridge for up to two days. If possible, separate the egg from the avocado to prevent browning. You can also cover the avocado flesh with lemon juice. This will help slow down the browning process. To reheat, use the oven or a microwave. If using the oven, preheat it to 350°F (175°C). Place the avocado boats in a baking dish and cover with foil. Heat for about 10 minutes, or until warm. If using a microwave, place the boat on a plate. Heat in 30-second intervals until warm. Be careful not to overcook the eggs. You can prepare ingredients in advance. Scoop out the avocado and store it in the fridge. Keep the eggs in their shells until ready to use. You can also chop chives and store them in a small container. For quick breakfasts, assemble the boats the night before. Just cover and place them in the fridge. In the morning, bake them for a quick meal. To keep your avocado fresh, use lemon juice. The acid slows browning. After cutting, splash some juice over the flesh. Store the avocado in an airtight container. Wrap it tightly in plastic wrap, too. If you are serving them, wait until just before serving to cut them. This keeps them bright and green. Yes, you can prepare for busy mornings! You can scoop out the avocado and store it in a container with lemon juice. You can crack the eggs into a bowl and cover it. When you are ready to bake, just fill the avocado halves and bake them. This saves time and still gives you a warm breakfast. If you lack smoked paprika, don’t worry! You can use regular paprika as a substitute. If you want more flavor, add a pinch of cayenne pepper. You can also try garlic powder or chili powder for a tasty twist. Seasoning is flexible, so feel free to experiment! In this post, we explored a simple and tasty recipe for avocado egg boats. You learned about the key ingredients and their health benefits, like how avocados offer healthy fats and eggs provide protein. I shared step-by-step instructions for preparation and cooking, plus tips to perfect your meal. You also discovered fun variations and storage tips for leftovers. I hope you try this recipe and enjoy every bite. Cooking can be easy and fun, especially when you have tasty ideas to follow. Happy cooking!

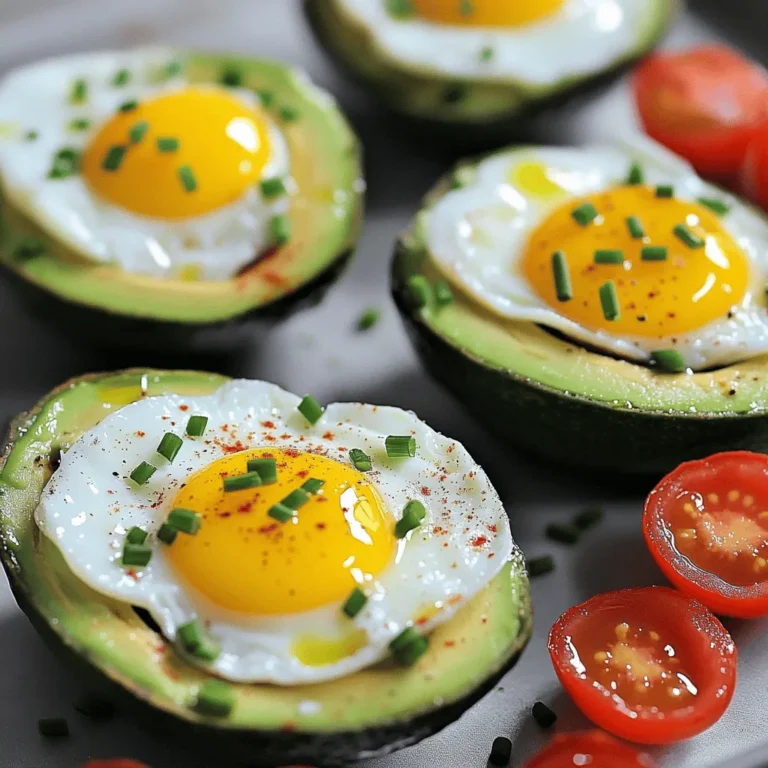
Avocado Egg Breakfast Boats Flavorful and Easy Recipe

To make prosciutto melon skewers, you need only a few key items. Here’s what you will need: - 1 cantaloupe, cut into 1-inch cubes - 1 honeydew melon, cut into 1-inch cubes - 8 ounces thinly sliced prosciutto - 1 cup fresh basil leaves - 2 tablespoons balsamic glaze - Freshly cracked black pepper, to taste - Skewers (wooden or metal) These ingredients work well together. The sweet melons balance the salty prosciutto. The basil adds a nice touch of freshness. The balsamic glaze brings a sweet and tangy flavor, making every bite special. You can boost the taste with some optional ingredients. Consider adding: - Feta cheese, crumbled - Arugula for a peppery kick - A drizzle of olive oil - Lemon zest for brightness These extras can take your skewers to the next level. You can mix and match to find your favorite flavor combinations. Each serving of prosciutto melon skewers offers a tasty snack packed with nutrients. Here’s what you get per serving, based on one skewer: - Calories: 120 - Protein: 6 grams - Carbohydrates: 9 grams - Fat: 7 grams - Fiber: 1 gram This dish is light yet satisfying. It’s perfect for a summer gathering or a light meal. The balance of flavors keeps it interesting, and the fresh ingredients make it a healthy choice. For the full recipe, check out the details above. First, pick ripe melons. A sweet cantaloupe and a juicy honeydew work best. To cut the melons, slice them in half. Remove the seeds with a spoon. Next, scoop out the flesh and cut it into 1-inch cubes. Set the melon cubes aside. Now, take the prosciutto. You want it thinly sliced for easy wrapping. If it's too thick, it won't stick well to the melon. Grab a skewer. Start with a piece of prosciutto. Wrap it around a cube of cantaloupe. Make sure it covers the melon well. Next, thread the skewer through the wrapped melon. Add a fresh basil leaf for flavor. Then, place a cube of honeydew melon on the skewer. Keep repeating this until the skewer is full, but leave some space at the ends. This way, it's easier to hold when serving. For the best taste, drizzle balsamic glaze over the assembled skewers. This adds a sweet and tangy flavor. Then, sprinkle some freshly cracked black pepper on top. It gives a nice kick! Serve the skewers right away for a fresh taste. You can also chill them in the fridge for a bit before serving. This makes a refreshing appetizer that everyone will love. For more details, check the Full Recipe. Always pick ripe melons for your skewers. Look for a cantaloupe with a sweet smell. It should feel heavy for its size. The skin should have a slight netting and be firm. For honeydew, choose one that feels heavy too. The skin should be smooth and slightly waxy. When you tap a melon, it should sound hollow. This means it is ripe and juicy. To wrap your prosciutto well, keep it thin. Start at one end of the melon cube. Wrap it around tightly, but don't tear it. If you use too much, it can overpower the melon. A little goes a long way. You want the sweet and salty flavors to balance. Make sure to leave a bit of melon showing for a nice look. Use a large white platter for contrast. This makes the colors pop. Arrange the skewers in a circle or a line. Add fresh basil leaves around the skewers for color. Drizzle balsamic glaze over the top for shine. A sprinkle of cracked black pepper adds a nice touch. For a fun twist, use colorful skewers. This can make your dish more inviting. For the full recipe, check out the details above! {{image_2}} You can switch up the meat in your skewers. Try using salami or ham for a different taste. Each meat brings unique flavors that pair well with melon. For a lighter option, turkey or chicken can work too. Just cut the meat into thin slices. Wrap it around the melon cubes as you would with prosciutto. This keeps the dish simple and fresh. Feel free to get creative with fruits and veggies. You can include strawberries, peaches, or even cucumber. Each fruit adds its own sweetness and crunch. Slice them into bite-sized pieces. Mix and match to find your favorite combos. For a colorful plate, use a variety of fruits. Enhance your Prosciutto Melon Skewers with bold flavors. Consider adding cheese, like mozzarella or feta, for creaminess. A sprinkle of chili flakes can add heat. You might also drizzle honey for extra sweetness. Mix fresh herbs like mint or cilantro for a refreshing kick. These small changes can make a big difference in taste and presentation. For the full recipe, check out the details above. To keep your leftover prosciutto melon skewers fresh, wrap them tightly in plastic wrap. Place them in an airtight container. This helps keep the flavors intact. Refrigerate the container for up to two days. If you notice any ingredients starting to wilt, use them up quickly. When prepping for a gathering, consider making fresh skewers the day before. Store them in the fridge as mentioned above. If you want to save time, cut the melons and prosciutto ahead of time. Keep them separate until you're ready to assemble. This way, the prosciutto won't become soggy. Freezing skewers can be tricky since the texture changes. If you want to freeze them, remove the basil before freezing. Wrap the assembled skewers in plastic wrap and place them in a freezer bag. They can last up to a month. When you're ready to eat, thaw them in the fridge overnight. Enjoy them fresh, not frozen, for the best taste. The best types of melon for this recipe are cantaloupe and honeydew. These melons have a sweet taste and juicy texture. Cantaloupe adds a nice orange color, while honeydew brings a light green hue. Both flavors work well with the salty prosciutto. You can also try other melons, such as watermelon, if you want a twist. Yes, you can make Prosciutto Melon Skewers ahead of time. Prepare the skewers and store them in the fridge. This keeps them fresh and cool. I suggest eating them within a few hours for the best taste. If you make them too early, the melon may release juice and make the skewers soggy. If you want a substitute for prosciutto, try thinly sliced ham or turkey. Both options will give a similar salty flavor. You can also use smoked salmon for a different taste. If you need a vegetarian option, consider using marinated tofu or tempeh for added flavor. Each choice will change the overall dish, so choose what you like best. Yes, adding cheese to the skewers can enhance the flavor. Soft cheeses like mozzarella or goat cheese pair well with the sweet melon. You can cube the cheese and add it between the melon and prosciutto. This adds creaminess and richness to each bite. Feel free to experiment with flavors that you enjoy! To make Prosciutto Melon Skewers, we explored key ingredients, tips, and variations. You learned how to prepare, assemble, and serve these tasty bites with ease. Choosing the right melon and perfecting the prosciutto wrap can elevate your dish. If you follow storage tips, you can enjoy these skewers even later. Experimenting with different meats and fruits can create new flavors. Now, you have the knowledge to make this dish a hit at any event. Enjoy these fresh and simple skewers!

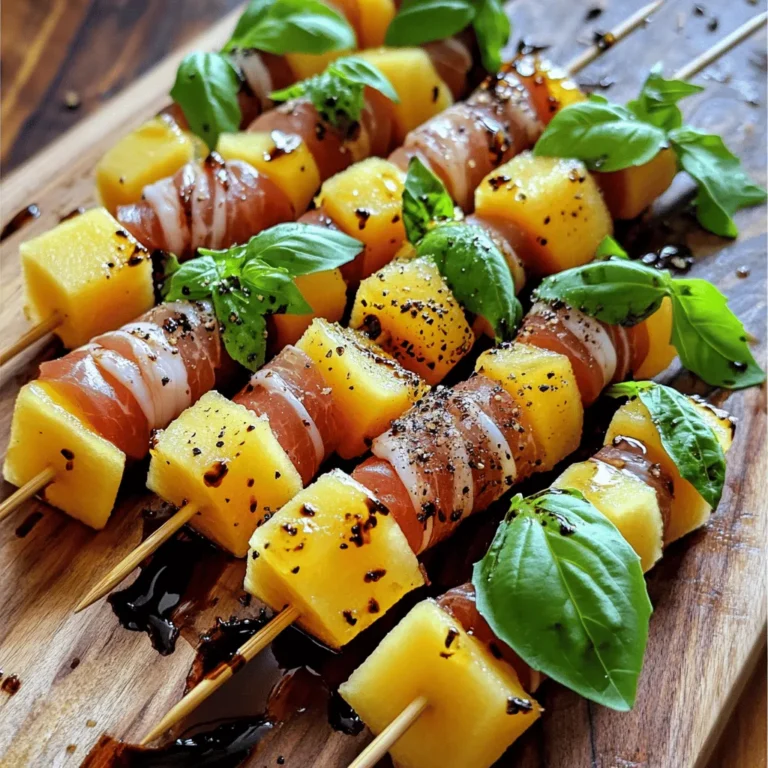
Prosciutto Melon Skewers Fresh and Simple Delight

- 1 cup unsalted butter, softened - 1 cup granulated sugar - 1 cup packed brown sugar - 1 large egg - 1 teaspoon vanilla extract - 1 cup pumpkin puree - 4 cups all-purpose flour - 2 teaspoons cream of tartar - 1 teaspoon baking soda - 1 teaspoon ground cinnamon - 1 teaspoon pumpkin pie spice - ½ teaspoon salt - ½ cup sugar (for rolling) - 2 tablespoons ground cinnamon (for rolling) The star of these cookies is the pumpkin puree. It gives these snickerdoodles their signature flavor and softness. The mix of sugars creates a nice balance. Using both brown and granulated sugar adds depth. Butter is key for a rich taste. Make sure it is softened, as this helps to cream well. The egg adds moisture and helps bind everything together. Flour is the backbone of any cookie. The cream of tartar gives that classic snickerdoodle tang and helps the cookies rise. Baking soda helps them spread and become soft. Spices like cinnamon and pumpkin pie spice bring warmth. The extra sugar and cinnamon for rolling make the cookies extra sweet and fun. - Butter alternatives: You can use coconut oil or margarine for a dairy-free option. - Sugar substitutes: Try using coconut sugar or stevia if you want a lower-calorie choice. - Gluten-free flour options: A gluten-free flour blend can replace all-purpose flour for those with gluten sensitivities. These substitutions can adjust the flavor and texture. Each choice may change the final cookie, so keep that in mind. For the best results, stick to the main recipe for your first batch. Check out the Full Recipe for all the details! - Preheating the oven: Start by preheating your oven to 350°F (175°C). This step is key to baking your cookies evenly. - Creaming butter and sugars: In a large bowl, cream together 1 cup of softened unsalted butter, 1 cup of granulated sugar, and 1 cup of packed brown sugar. Mix until the mixture is light and fluffy. This step adds air, making your cookies soft. - Adding pumpkin and egg: Next, mix in 1 large egg, 1 teaspoon of vanilla extract, and 1 cup of pumpkin puree. Stir until everything is well combined. The pumpkin gives moisture and flavor. - Whisking dry ingredients together: In another bowl, whisk together 4 cups of all-purpose flour, 2 teaspoons of cream of tartar, 1 teaspoon of baking soda, 1 teaspoon of ground cinnamon, 1 teaspoon of pumpkin pie spice, and ½ teaspoon of salt. This blend creates the base for your dough. - Combining wet and dry mixtures: Gradually add the dry mixture to the wet ingredients. Stir gently until just combined. The dough may feel slightly sticky; that’s perfect! - Rolling dough and coating in cinnamon sugar: In a small bowl, mix ½ cup of sugar with 2 tablespoons of ground cinnamon for rolling. Scoop out small portions of the dough, about 1.5 tablespoons each, and roll them into balls. Then, roll each ball in the cinnamon-sugar mixture until fully coated. - Baking times and cooling instructions: Place the dough balls on a baking sheet lined with parchment paper, spaced 2 inches apart. Bake for 10-12 minutes, until the edges are lightly golden but the centers are still soft. After baking, let the cookies cool on the sheet for about 5 minutes before moving them to a wire rack to cool completely. This process leads to soft, irresistible pumpkin spice snickerdoodles. For the complete recipe, refer to the [Full Recipe]. To keep your pumpkin spice snickerdoodles soft, avoid overbaking them. Bake just until the edges turn golden. The centers should look soft and puffy. They will firm up as they cool. Using room temperature ingredients also helps. Make sure your butter and eggs are at room temperature before mixing. This gives the cookies a nice, smooth texture. You can make these cookies even better by adding chocolate chips. Dark or white chocolate pairs well with pumpkin spice. You can also experiment with nuts or dried fruit. Chopped walnuts or pecans add a nice crunch. Dried cranberries or raisins can bring sweetness and chewiness. For the best display, arrange your cookies on a rustic platter. A sprinkle of pumpkin pie spice on top adds a festive touch. You can also serve them with a dollop of whipped cream on the side. This makes for a fun dipping option. Pair your cookies with a warm drink, like apple cider or chai tea. The flavors will blend beautifully, creating a cozy experience. {{image_2}} You can easily change up your pumpkin spice snickerdoodles for fun. One great way is by adding white chocolate chips. They melt and create sweet pockets in your cookies. This sweet twist makes each bite even more delightful. Just mix in one cup of white chocolate chips when you combine your wet and dry ingredients. Another fun idea is to create a spicy version by adding ginger. A teaspoon of ground ginger can add a nice kick. This spice pairs well with pumpkin and cinnamon. You can taste the warmth and depth it brings to each cookie. You can adapt pumpkin spice snickerdoodles for any holiday. For Halloween, add festive sprinkles to the dough. For Thanksgiving, try shaping the cookies into leaves or pumpkins. These little touches make them extra special. You can also change the spices based on the season. In the spring, use lemon zest instead of pumpkin spice. In summer, add a hint of mint or citrus. These changes keep your cookies fresh and fun all year long. For the full recipe, check out the complete guide to making these treats. To keep your pumpkin spice snickerdoodles fresh, use an airtight container. This helps prevent them from drying out. A glass jar or plastic container works well. Ensure the lid is tightly sealed after each use. Store the cookies at room temperature for up to one week. For longer storage, consider the freezer. You can freeze snickerdoodles both before and after baking. If you freeze the dough, scoop it into balls and roll them in cinnamon sugar. Place the dough balls on a baking sheet, freeze them until firm, then transfer them to a zip-top bag. This way, you can bake fresh cookies whenever you want. If you've already baked the cookies, let them cool fully first. Then, layer them in an airtight container with parchment paper between layers. They will stay good in the freezer for up to three months. To thaw, simply take out the desired number of cookies. Let them sit at room temperature for about 30 minutes. For a warm treat, you can also pop them in the microwave for a few seconds. Enjoy freshly baked goodness anytime! You can use cream of tartar as a leavening agent. It helps cookies rise and stay soft. You will need to double the amount of cream of tartar. So, use 2 teaspoons instead of 1. This change will keep the cookies light and airy. Yes, but the flavors will change. Pumpkin pie filling contains spices and sugar. This means you might need to cut back on other spices and sugar in the recipe. You can also skip adding pumpkin pie spice. Adjust the flavor to keep it balanced. If your dough sticks too much, add more flour a little at a time. Mix it in until the dough is easier to handle. You can chill the dough for 20-30 minutes. This helps firm it up and makes it easier to roll. Making pumpkin spice snickerdoodles is simple and fun. You need common ingredients like butter, sugar, and pumpkin puree. Follow the steps to mix, shape, and bake your cookies. Use my tips for soft, flavorful treats and explore variations to match any season. These cookies are great for sharing or enjoying with your favorite drink. Store them well for long-lasting freshness. Dive into baking these delicious cookies and enjoy every bite!

Pumpkin Spice Snickerdoodles Soft and Irresistible Treat

- 2 cups rolled oats - 1 cup mixed nuts (almonds, cashews, pecans) - 1/2 cup unsweetened coconut flakes - 1/2 cup maple syrup - 1/4 cup coconut oil, melted - 1/2 teaspoon vanilla extract - 1 teaspoon ground cinnamon - 1/2 teaspoon ground ginger - 1/4 teaspoon ground nutmeg - 1/4 teaspoon ground cloves - 1 cup dried cranberries - 1/2 cup dark chocolate chips (optional) - Pinch of salt The ingredients in my spiced Christmas granola make it special. I love the mix of flavors and textures. The rolled oats form a hearty base. They provide fiber and give a nice chew. Mixed nuts add crunch and healthy fats. I often use almonds, cashews, and pecans for great taste. The coconut flakes bring a tropical touch. They add sweetness and chewiness. Maple syrup acts as a natural sweetener. It also helps bind all the ingredients together. Coconut oil gives the granola a rich flavor and crispy texture. Spices like cinnamon, ginger, nutmeg, and cloves bring warmth. They create a cozy, festive flavor that feels like Christmas. Vanilla extract adds a lovely aroma, too. For a fruity touch, I add dried cranberries. They provide a nice tartness that balances the sweetness. Dark chocolate chips are optional, but they add a fun twist. A pinch of salt enhances all these flavors and makes them pop. Gather these ingredients to start making this festive treat. You’ll enjoy each crunchy bite, filled with the spirit of the season! {{ingredient_image_1}} 1. Preheat oven and prepare baking sheet First, set your oven to 325°F (160°C). This helps the granola bake evenly. Line a large baking sheet with parchment paper. This will prevent sticking and make cleanup easy. 2. Combine dry ingredients in a large mixing bowl In a large mixing bowl, add the rolled oats, mixed nuts, and coconut flakes. Then, sprinkle in the ground cinnamon, ginger, nutmeg, cloves, and a pinch of salt. Mix these dry ingredients well. You want the spices spread evenly throughout. 3. Mix wet ingredients separately In another bowl, whisk together the maple syrup, melted coconut oil, and vanilla extract. This mixture will help bind the granola and add flavor. 4. Combine wet and dry mixtures Pour the wet mixture over the dry ingredients. Stir until everything is coated. This step ensures each oat and nut gets the sweet and spiced goodness. 5. Spread granola on baking sheet and bake Spread the granola mixture evenly on your prepared baking sheet. Bake it for 25-30 minutes. Stir halfway through to help it bake evenly. Look for a golden brown color as a sign it’s ready. 6. Cool and add dried cranberries and chocolate chips After baking, remove the granola from the oven. Let it cool completely on the baking sheet. Once cool, stir in the dried cranberries and chocolate chips if you like. This adds a nice sweet touch to your granola. To get the perfect granola texture, aim for a mix of crunch and chew. Start with rolled oats. They give a hearty base. Use a mix of nuts for added crunch. Almonds, cashews, and pecans work well together. Coconut flakes add a nice chewiness, too. When you mix the dry ingredients, make sure spices are well blended. This helps to spread the flavor evenly. I like to add a pinch of salt. It brings out the sweetness of the maple syrup. Stir the mixture every 10 minutes while baking. This ensures even cooking. Feel free to add your favorite seasonal spices. Nutmeg and ginger give a warm flavor. You can also add a bit of cardamom for extra zest. Mixing in dried fruits is a great way to personalize your granola. Dried cranberries add tartness. You could also use dried apples or figs for a sweeter touch. If you want, toss in dark chocolate chips for a treat. They melt slightly and give a rich flavor. Pro Tips Customize Your Nuts: Feel free to mix and match your favorite nuts for a personalized touch. Walnuts, hazelnuts, or even pistachios can add unique flavors. Adjust the Sweetness: If you prefer a less sweet granola, reduce the amount of maple syrup. You can also substitute with honey or agave syrup if desired. Store for Freshness: To keep your granola crispy, store it in an airtight container. You can also refrigerate it for extended freshness. Mix-ins Variations: Experiment with different dried fruits like raisins, apricots, or cherries. You can also add seeds like pumpkin or sunflower for extra crunch. {{image_2}} You can change the nuts in this granola to fit your taste. If you love walnuts or hazelnuts, use them instead of mixed nuts. Each nut gives a unique flavor and texture, so feel free to mix and match. Adding seeds can also boost nutrition. Pumpkin seeds add a nice crunch and are great for protein. Sunflower seeds bring a nutty taste and extra vitamins. They both work well in this recipe and make the granola even more festive. Sweeteners change the taste of your granola. Instead of maple syrup, try honey or agave syrup for a different flavor. You can also use brown sugar for a rich, caramel-like taste. Chocolate can make your granola special too. While dark chocolate chips add a rich touch, you might like white chocolate or milk chocolate instead. Each type of chocolate brings its own sweetness and creaminess, making your granola unique and tasty. To keep your spiced Christmas granola fresh, store it in an airtight container. This helps to lock in flavor and crunch. I recommend glass jars or plastic containers with tight lids. Avoid using bags, as they allow air in, which can make the granola stale. Before sealing, make sure the granola is completely cool. Warm granola can create moisture in the container. This moisture can lead to clumping or sogginess. You can keep your granola at room temperature for up to two weeks. If you want it to last longer, consider freezing it. Frozen granola can last up to three months. Just remember to thaw it in the fridge before eating. Signs that your granola has spoiled include a stale smell or a change in texture. If it feels soft or chewy instead of crunchy, it’s time to toss it. Always trust your senses! Can I make this granola gluten-free? Yes, you can easily make this granola gluten-free. Just use certified gluten-free oats. You can also check all other ingredients for gluten-free labels. This keeps your granola safe for those with gluten sensitivities. How do I adjust the sweetness to my preference? To adjust sweetness, you can change the amount of maple syrup. If you prefer less sweetness, try using half the amount. You can also add more dried fruits, like cranberries, for natural sweetness. Taste as you go to find your perfect balance. Is it possible to make this granola vegan? Yes, this granola is vegan-friendly as it stands. The ingredients, like maple syrup and coconut oil, are plant-based. Ensure the chocolate chips you choose are dairy-free if you add those. Enjoy your tasty, vegan treat with no worries! Breakdown of calories and macros Each serving of this granola contains around 200 calories. You get about 8 grams of protein, 10 grams of healthy fats, and 25 grams of carbohydrates. This makes it a wholesome snack or breakfast option. Health benefits of the ingredients - Rolled oats: These provide fiber and can help lower cholesterol. - Nuts: They add healthy fats and protein, keeping you full longer. - Coconut flakes: These offer a bit of natural sweetness and healthy fats. - Cranberries: They are rich in antioxidants and add a tart flavor. - Spices: Cinnamon and ginger can help with digestion and have anti-inflammatory benefits. This granola is not just tasty; it packs a nutritional punch! You can create a delicious granola at home with just a few ingredients. Start by mixing oats, nuts, and spices. Combine them with wet ingredients, then bake for a healthy snack. Remember, you can customize the recipe with your favorite fruits or nuts. Store it in a sealed container for lasting freshness. Making your own granola is easy and fun. Enjoy experimenting with flavors and textures. Your homemade granola will offer taste and nutrition!

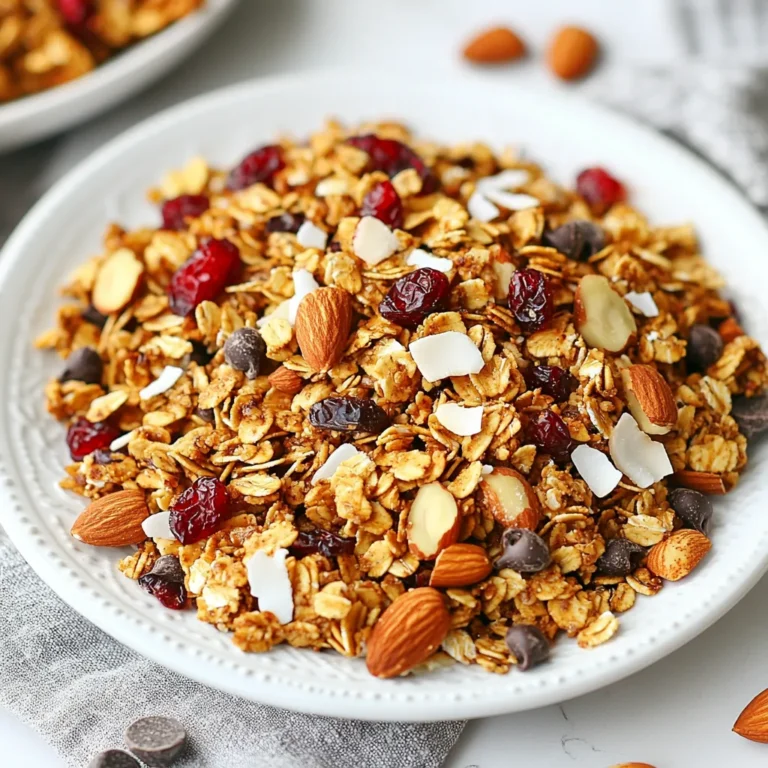
Spiced Christmas Granola Festive and Flavorful Treat

- 1 lb ground beef - 1 cup breadcrumbs - 1 small onion, finely chopped - 2 cloves garlic, minced The main ingredients are key to the flavor of the casserole. I use ground beef for its rich taste. Breadcrumbs help bind everything together. The onion and garlic add a nice depth of flavor. - 1 tablespoon Worcestershire sauce - 1 teaspoon Italian seasoning - 2 cups shredded cheddar cheese - 1 cup marinara sauce - 1 cup green bell pepper, diced - 1 cup corn kernels (fresh or canned) Worcestershire sauce gives a savory kick. Italian seasoning brings in great herbs. The cheddar cheese melts beautifully and creates a creamy layer. Marinara sauce adds moisture and tang. Diced bell pepper and corn add color and texture. - Fresh parsley Fresh parsley is a nice touch. It adds color and a hint of freshness. Just chop a bit and sprinkle it on before serving. {{ingredient_image_1}} Start by setting your oven to 350°F (175°C). This temperature helps the meatloaf cook evenly. Preheating is key to a great bake. In a large bowl, mix together the following ingredients: - 1 lb ground beef - 1 cup breadcrumbs - 1 small onion, finely chopped - 2 cloves garlic, minced - 1 egg - 1 tablespoon Worcestershire sauce - 1 teaspoon Italian seasoning - Salt and pepper to taste Use your hands or a spoon to blend everything well. It should be thick but not dry. Once mixed, transfer the meatloaf mixture into an 8x8 inch baking dish. Press it flat across the bottom. Bake in the preheated oven for 25 minutes. This step locks in the flavors. After 25 minutes, take the dish out. Spread 1 cup of marinara sauce evenly over the meatloaf. Next, sprinkle on: - 1 cup diced green bell pepper - 1 cup corn kernels (fresh or canned) This adds color and taste to your dish. Now, it’s time for the fun part! Top the casserole with 2 cups of shredded cheddar cheese. Make sure to spread the cheese evenly. This helps every bite be cheesy and delicious. Return the casserole to the oven. Bake for another 15-20 minutes. You’ll know it’s done when the cheese is melted and bubbly. Enjoy the rich aroma filling your kitchen! To keep your meatloaf from drying out, use lean ground beef. Mix in breadcrumbs to add moisture. Onions and garlic also help bring flavor and juiciness. Be sure to mix everything well but avoid overworking the meat. This keeps the texture tender. Use a timer to bake it for 25 minutes. This gives you a nice base before adding other layers. Choosing the right cheese is key to a great cheesy meatloaf casserole. I recommend sharp cheddar cheese for its rich flavor and great melt. Mozzarella also works well if you want a stretchy texture. Feel free to mix cheeses for more depth. Just ensure they melt nicely for that gooey finish. Pair your casserole with fresh sides to balance the richness. A simple green salad with vinaigrette adds a nice crunch. Roasted vegetables also complement the dish well. Mashed potatoes can make the meal more filling. Choose sides that brighten the plate and enhance the flavors. Pro Tips Use Fresh Ingredients: Always opt for fresh vegetables and high-quality ground beef for the best flavor and texture in your casserole. Add Extra Cheese: For an even cheesier dish, consider adding a layer of mozzarella cheese along with the cheddar for a melty, gooey topping. Mix It Up: Feel free to customize the vegetables! Spinach, mushrooms, or zucchini can be great additions for extra nutrition and flavor. Let It Rest: Allow the casserole to sit for a few minutes after baking. This helps it set up and makes serving easier. {{image_2}} You can use ground turkey instead of beef. It makes a lighter dish. For a plant-based option, try lentils or chickpeas. They add good protein and flavor. Just mash them well with your other ingredients. You still get that tasty meatloaf vibe, but it’s healthier! Love heat? Add diced jalapeños or a splash of hot sauce. This brings a nice kick to the dish. You can also mix in some cayenne or chili powder. Adjust the heat to your liking, but remember, a little goes a long way! Switch up the sauces to change the flavor. Use barbecue sauce for a sweet twist. Or try a spicy marinara for extra zest. Experiment with different seasoning blends like taco or curry powder. Each option can make your casserole taste brand new! To store your Cheesy Meatloaf Casserole, wait until it cools. Then, cover it tightly with plastic wrap or aluminum foil. You can also use an airtight container. Place it in the fridge. It stays fresh for about 3 to 4 days. Always label it with the date. This helps you keep track of how long it has been stored. To reheat, take out the portion you want. Place it in a microwave-safe dish. Cover it with a damp paper towel. Heat it on medium power for 1 to 2 minutes. Check if it’s warm all the way through. If you prefer the oven, set it to 350°F (175°C). Bake for about 15 minutes. This keeps the cheese melty and delicious. You can freeze the casserole if you want to save it for later. Cut it into portions and wrap each piece in plastic wrap. Then, put them in a freezer bag. Make sure to label the bags with the date. When you’re ready to eat, take a piece out and thaw it in the fridge overnight. You can reheat it once it’s thawed. This way, you enjoy a homemade meal anytime. Yes, you can! Feel free to switch up the cheese. Here are some tasty options: - Monterey Jack - Mozzarella - Gouda - Pepper Jack for a kick Each cheese brings a unique flavor. Experiment and find your favorite! Look for a few clear signs: - The cheese should be melted and bubbly. - The edges may turn golden brown. - A meat thermometer should read 160°F (70°C) in the center. Trust your eyes and the thermometer for the best result! Absolutely! Here are some tips: - Mix the meatloaf and layer everything in the dish. - Cover it and store it in the fridge for up to 24 hours. - When ready, bake it straight from the fridge. Just add a few extra minutes to the time. This makes meal time easy and stress-free! This blog post guides you through making a delicious meatloaf casserole. We discussed the key ingredients like ground beef, garlic, and cheese. I provided step-by-step instructions, from preheating the oven to layering with marinara. We also explored tips to make it perfect and various ways to customize the dish. Enjoy experimenting with flavors and techniques. Whether you're cooking for family or friends, this casserole will impress everyone. Embrace your creativity in the kitchen and have fun making it your own!

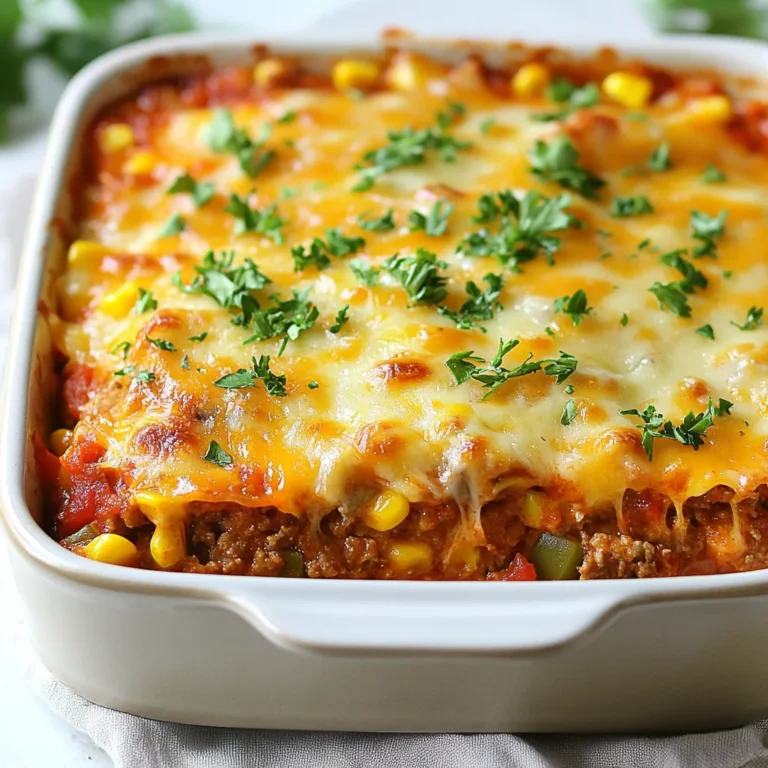
Cheesy Meatloaf Casserole Flavorful and Simple Dish

Here are the ingredients you need for crispy Mexican pizza: - 1 large flour tortilla - 1/2 cup refried beans - 1/2 cup cooked ground beef (or turkey) - 1/2 cup shredded Mexican cheese blend - 1/4 cup diced tomatoes - 1/4 cup sliced black olives - 1/4 cup diced green onions - 1 jalapeño, sliced (optional) - 1 tablespoon taco seasoning - 1 tablespoon olive oil - Fresh cilantro for garnish - Salsa and sour cream for serving This list combines flavors and textures to create a delicious meal. Flour tortillas provide a soft but sturdy base. The refried beans add creaminess. Ground beef or turkey gives it a hearty bite. The cheese melts perfectly, making it a gooey delight. Fresh tomatoes and olives add brightness. Green onions bring crunch, while jalapeños add heat, if you like spice. Taco seasoning packs in flavor, while olive oil helps crisp the tortilla. Finally, fresh cilantro, salsa, and sour cream make great garnishes. Each ingredient plays a special role in making this dish truly tasty. {{ingredient_image_1}} 1. Preheat your oven to 400°F (200°C). This helps the pizza cook evenly. 2. Mix the cooked ground beef with taco seasoning in a small bowl. Stir until it is well combined. 3. Place the large flour tortilla on a baking sheet lined with parchment paper. Brush one side with olive oil. This helps it get crispy. 1. Spread refried beans evenly over the un-oiled side of the tortilla. Make sure to cover it well. 2. Add the seasoned ground beef on top of the beans. Spread it out evenly. 3. Top with shredded Mexican cheese blend. Then add diced tomatoes, black olives, and green onions. If you like, add jalapeño slices for extra heat. 1. Place the baking sheet in the oven. Bake for 15-20 minutes. The cheese should be melted, and the edges should be crispy. 2. Remove the pizza from the oven. Let it cool for a minute. Then slice it into wedges. 3. Garnish with fresh cilantro. Serve with salsa and sour cream on the side for a tasty dip. To get that perfect crispy pizza, start with the right oven temperature. Preheat your oven to 400°F (200°C). This heat makes the tortilla crisp up well. Brush oil evenly on the tortilla. Use olive oil, and coat one side. This layer helps the tortilla turn golden and crunchy. You can swap proteins based on your taste. Ground turkey works great if you prefer a lighter option. You can also use grilled chicken or even beans for a vegetarian twist. For cheese, try different blends. Cheddar or pepper jack can add unique flavors. For a dairy-free option, use vegan cheese, which melts nicely. To boost flavor, don't hold back on spices. Add a pinch of cumin or paprika for extra warmth. Fresh herbs can elevate your pizza. Top with cilantro or fresh parsley before serving. A squeeze of lime juice adds brightness too. Pro Tips Use Fresh Ingredients: Always opt for fresh vegetables and herbs to enhance the flavor of your Mexican pizza. Customize Your Toppings: Feel free to add or substitute any of your favorite toppings such as avocado, corn, or different types of cheese. Monitor Baking Time: Keep an eye on your pizza as it bakes to prevent over-browning; every oven is different. Let It Cool: Allow the pizza to cool for a minute before slicing to help the toppings set and prevent spills. {{image_2}} For a tasty vegetarian twist, skip the meat. Use more refried beans and add veggies. You can add corn, bell peppers, or mushrooms. This option is colorful and full of flavor. Beans pack protein, making your pizza hearty and satisfying. If you like heat, make a spicy version. Add more jalapeños to the top. You can also drizzle hot sauce over the pizza before baking. This adds a nice kick. Adjust the heat level to your taste. Enjoy the bold flavors that come with it! Want something sweet? Try a dessert-style Mexican pizza. Start with a plain tortilla and brush it with butter. Use a mix of cream cheese and sugar as your base. Top with fruit, like strawberries or bananas, and sprinkle with cinnamon. Bake until golden brown. This twist is fun and unique! To store leftovers, let the pizza cool completely. Then, place it in an airtight container. You can keep it in the fridge for up to three days. This helps maintain its flavor and texture. When you're ready to eat, check for freshness before reheating. The best way to reheat the pizza is in the oven. Preheat your oven to 350°F (175°C). Place the pizza on a baking sheet and heat for about 10-15 minutes. This keeps the crust crispy and the toppings warm. You can also use a skillet on low heat. Cover it with a lid to warm it evenly. Yes, you can freeze this dish! To do this, slice the pizza first. Wrap each slice tightly in plastic wrap, then place them in a freezer bag. You can freeze it for up to two months. When you are ready to enjoy it, thaw it in the fridge overnight and reheat as mentioned above. I recommend using a large flour tortilla. Flour tortillas are soft and hold toppings well. They also become crispy without breaking apart. Corn tortillas are thinner and can be more brittle. If you prefer corn, choose thicker ones to avoid issues. Yes, you can prep some ingredients before cooking. Cook the ground beef and mix in the taco seasoning. You can also spread the refried beans on the tortilla. Cover these with plastic wrap and store them in the fridge. When you’re ready, layer the toppings and bake. This recipe is not gluten-free due to the flour tortilla. If you want a gluten-free option, use a corn tortilla instead. There are also gluten-free flour tortillas available in stores. Always check labels to confirm they meet your dietary needs. You now have all the tools to make a great Mexican pizza. We covered ingredients, steps, tips, and variations. Each piece helps you create a tasty dish. Remember, the key is to achieve that crispy texture. You can customize the flavors to suit your taste. Whether you want vegetarian, spicy, or even a dessert version, the options are endless. Don't forget how to store and reheat leftovers for later. Enjoy your cooking adventure!

Crispy Mexican Pizza Simple and Tasty Recipe

For these tasty Thai chicken bites, you will need: - 1 lb (450g) boneless, skinless chicken breast, cut into small bite-sized cubes - 2 tablespoons olive oil - 3 tablespoons soy sauce - 1 tablespoon fish sauce - 2 tablespoons brown sugar - 1 tablespoon fresh lime juice - 3 cloves garlic, minced - 1 teaspoon grated fresh ginger - 1 red bell pepper, diced - 1/2 cup fresh cilantro, chopped - Salt and pepper to taste These ingredients create a perfect mix of savory and sweet flavors. The chicken is tender and juicy. The soy sauce and fish sauce add depth, while the lime juice gives it a fresh kick. To make your dish pop, consider these optional garnishes: - Sliced red chili - Crushed peanuts These add extra flavor and texture. The chili gives heat, while the peanuts add crunch. You can adjust these based on your taste. This recipe is great for many diets. It is gluten-free if you use gluten-free soy sauce. It's also low in carbs and high in protein. If you want a vegetarian version, you can swap chicken for tofu. Just make sure to adjust the cooking time as needed. {{ingredient_image_1}} Start by gathering your ingredients. You will need soy sauce, fish sauce, brown sugar, lime juice, minced garlic, and grated ginger. In a mixing bowl, add these ingredients together. Whisk them until the sugar fully dissolves. This will create a rich marinade that has sweet and savory notes. Now, take 1 pound of cubed chicken breast. Add the chicken to the marinade. Make sure each piece is well coated. This is key for flavor. Let the chicken marinate for about 10 minutes. This short time helps the chicken absorb those yummy flavors. Next, heat 2 tablespoons of olive oil in a large skillet over medium-high heat. Once the oil is hot, add the marinated chicken with all the marinade. Spread it out evenly. Cook for about 6 to 8 minutes. Stir occasionally until the chicken turns golden brown. Use salt and pepper to taste. After the chicken is cooked, stir in half a diced red bell pepper. Cook for an extra 2 to 3 minutes. This keeps the pepper crunchy but tender. Finally, remove the skillet from heat and sprinkle chopped cilantro on top. Toss gently to mix. Now, your Minute Thai Chicken Bites are ready to serve! To cook chicken well, start with small cubes. This helps it cook fast and evenly. Heat your skillet until hot. If it's not hot enough, the chicken will steam instead of brown. Cook the chicken for 6-8 minutes. Stir it often to avoid burning. Check that the inside is no longer pink. A meat thermometer can help; it should read 165°F. A good marinade makes chicken tasty. For this recipe, mix soy sauce, fish sauce, brown sugar, lime juice, garlic, and ginger. Whisk it until the sugar dissolves. After chopping the chicken, add it to the marinade. Let it soak for at least 10 minutes. This gives the chicken time to absorb all the good flavors. You can marinate it longer in the fridge if you want more flavor. Want to make it even better? Add fresh herbs like basil or mint. They add a bright taste. You can also include different vegetables. Broccoli or snap peas work well. For a spicy kick, try adding sliced red chili. If you like crunch, crushed peanuts are a great topping. They add texture and nutty flavor. Enjoy experimenting to find your favorite combination! Pro Tips Marination Time: For deeper flavor, marinate the chicken for at least 30 minutes, or up to overnight, in the refrigerator. Cooking Temperature: Ensure your skillet is hot before adding the chicken to achieve a nice sear and prevent sticking. Vegetable Variations: Feel free to add other vegetables like snap peas or broccoli for extra color and nutrition. Serving Suggestions: Serve these bites over rice or noodles for a complete meal, or as an appetizer with toothpicks. {{image_2}} You can swap chicken for other proteins. Try shrimp, tofu, or even beef. Each protein adds a new twist. Shrimp cooks fast and tastes great with the marinade. Tofu soaks up the flavors well. Beef offers a heartier bite. Adjust cooking times based on the protein choice. To make this dish vegetarian or vegan, use tofu or tempeh instead of chicken. Both options work well. Make sure to marinate them just like the chicken. You can also add vegetables like mushrooms or zucchini for extra texture. This keeps the dish fresh and colorful. If you love heat, add sliced red chili or crushed red pepper. You can mix these into the marinade. For a milder flavor, skip the chili. You can also serve the dish with chili flakes on the side. This way, each person can adjust the spice to their taste. After enjoying your Minute Thai Chicken Bites, let the leftovers cool. Place them in an airtight container. You can keep them in the fridge for up to three days. Make sure to label the container with the date. This helps you know when to eat them. When you're ready to enjoy your leftovers, reheating is quick. You can use a microwave or a skillet. If using a microwave, place the chicken bites on a plate and cover them with a damp paper towel. Heat for about 1-2 minutes. If using a skillet, add a bit of olive oil and heat over medium. Stir until warmed through, about 5 minutes. Always check to make sure they're hot. If you want to save some for later, freezing is easy. Place the cooled chicken bites in a freezer-safe bag. Squeeze out as much air as you can. Label the bag with the date and store it in the freezer for up to three months. When you want to eat them, thaw in the fridge overnight. Then, reheat as mentioned above. This way, you will have a quick meal ready anytime! Yes, you can use many vegetables in this dish. Broccoli, snap peas, or carrots work well. Just cut them into small pieces. This helps them cook fast. Add them to the skillet with the chicken. Cook until they are tender but still crisp. This way, you mix up the flavors and textures. To make this dish gluten-free, swap regular soy sauce for gluten-free soy sauce. You can also use tamari as a great alternative. Check the fish sauce too, as some brands may contain gluten. Always read the labels. This simple change keeps the taste while meeting gluten-free needs. These Thai chicken bites taste great with rice or noodles. You can serve them over jasmine rice for a lovely meal. Adding a fresh salad on the side brightens up the plate. You might also try a dipping sauce like peanut or sweet chili. Each option adds a new twist to this tasty dish. In this blog post, we explored how to make Thai Chicken Bites. We covered the main and optional ingredients, helped you with dietary choices, and shared step-by-step cooking instructions. You learned tips for perfect cooking and flavor tricks. We also looked at variations with different proteins and spice levels, plus how to store leftovers. Now, you can create a tasty dish that fits your needs and preferences. Enjoy your cooking journey and the delicious results!

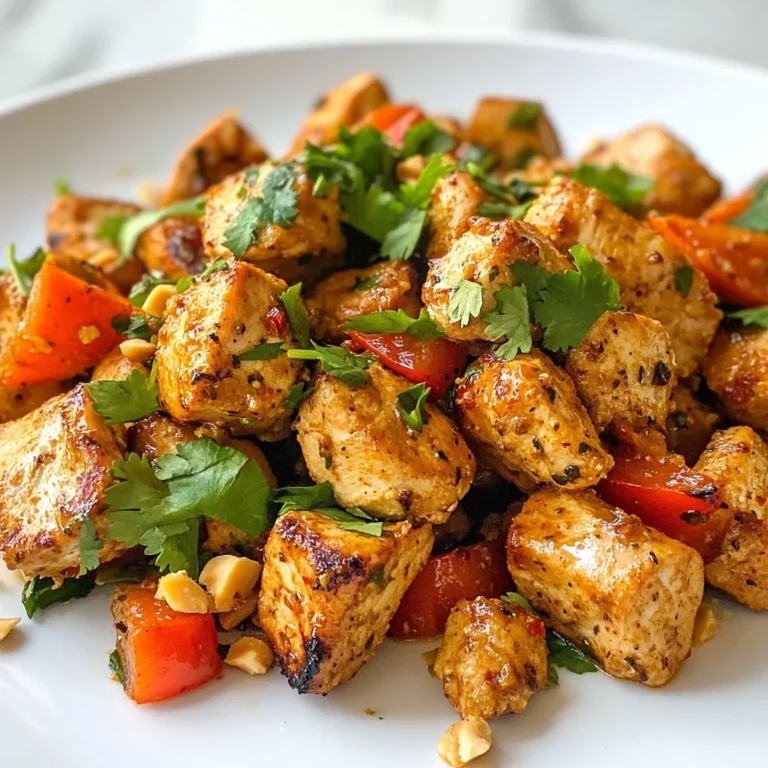
Minute Thai Chicken Bites Quick and Tasty Recipe

To make these tasty ground beef tostadas, you will need: - 1 pound ground beef - 1 tablespoon olive oil - 1 small onion, finely chopped - 2 cloves garlic, minced - 2 teaspoons ground cumin - 1 teaspoon chili powder - Salt and pepper to taste - 8 corn tostada shells - 1 cup shredded lettuce - 1 cup diced tomatoes - 1 cup grated cheese (cheddar or Mexican blend) - 1/2 cup sour cream or Greek yogurt These key ingredients give the tostadas their good flavor and texture. You can add some optional ingredients to suit your taste. Consider these: - Avocado slices for creaminess - Jalapeños for heat - Black beans for extra protein - Corn for sweetness Feel free to mix and match based on what you enjoy! Garnishes can make a big difference in presentation and flavor. Here are some great choices: - Fresh cilantro, chopped - Lime wedges for zest - Sliced radishes for crunch - Hot sauce for added spice These garnishes will elevate your tostadas and add freshness. {{ingredient_image_1}} Start by heating 1 tablespoon of olive oil in a large skillet over medium heat. Add a small, finely chopped onion and 2 cloves of minced garlic. Sauté until the onion turns clear, about 3-4 minutes. Next, add 1 pound of ground beef. Break it apart with a wooden spoon as you cook it. Keep cooking until the beef is brown, which takes about 5-7 minutes. Now, stir in 2 teaspoons of ground cumin, 1 teaspoon of chili powder, and salt and pepper to taste. Mix well, letting it cook for another 2 minutes. This helps all the flavors blend together. While the beef cooks, prepare your tostada shells. Check the package instructions, as some need baking or frying. If you bake them, preheat the oven to the right temperature. Place the tostada shells on a baking sheet and bake until they are crispy, usually about 5-7 minutes. If frying, heat oil in a pan and fry each shell until golden brown. Once done, set them aside to cool. Now it’s time to put everything together! Start with a crispy tostada shell. Place a generous layer of the beef mixture on top. Next, add 1 cup of shredded lettuce and 1 cup of diced tomatoes over the beef. Sprinkle 1 cup of grated cheese on top, either cheddar or a Mexican blend. Finish with a dollop of sour cream or Greek yogurt. For the final touch, garnish with fresh cilantro. Serve with lime wedges on the side for a zesty flavor burst. Enjoy your delicious creation! To cook ground beef well, start with a hot pan. Use medium heat and add olive oil. This helps prevent sticking. When the oil is hot, add chopped onions and garlic. Sauté until the onions are soft. Then, add the ground beef. Break it apart with a wooden spoon. Keep stirring as it cooks. Cook until it turns brown, about 5 to 7 minutes. This step adds great flavor. Season it well with salt, pepper, cumin, and chili powder. Let the spices mix in for extra taste. While the beef is cooking, you can enhance its flavor. Try these simple marinades and seasonings. Use ground cumin and chili powder for a classic taste. Add paprika for a smoky touch. A splash of lime juice brightens the dish. If you like heat, add cayenne pepper or hot sauce. Just a pinch will do! Mix the seasonings into the beef as it cooks. This will make every bite burst with flavor. When serving your tostadas, think about balance. Start with a thick layer of seasoned beef. This is your base. Next, add fresh toppings like lettuce and tomatoes. They provide a nice crunch. Sprinkle some cheese on top for creaminess. A dollop of sour cream or Greek yogurt adds tang. Finish with fresh cilantro for a pop of color and flavor. Serve with lime wedges on the side. Squeezing lime over the tostadas adds freshness. Enjoy the mix of textures and tastes in each bite! Pro Tips Make it Spicy: Add diced jalapeños or a splash of hot sauce to the ground beef for an extra kick. Customize Your Toppings: Feel free to add avocado, black beans, or corn to your tostadas for added texture and flavor. Keep it Crispy: If you like your tostadas extra crispy, bake them for a few minutes after assembling to ensure they hold up under the toppings. Fresh Herbs: Experiment with different herbs like parsley or green onion for a unique twist on the garnish. {{image_2}} You can swap ground beef for plants. Use lentils or black beans as a base. Cook them with the same spices. This gives you great flavor and texture. You can also use store-bought plant-based meat. The cooking steps remain the same. This option is tasty and healthy. Tostadas are fun because they let you mix and match. Try adding sliced avocados for creaminess. Pickled jalapeños add a nice kick. You can also use corn or roasted peppers for sweetness. For extra crunch, consider radishes or cucumbers. Each topping changes the flavor and feel. Do you like heat? Here’s how to spice things up. Add more chili powder to the ground beef. You can also mix in diced jalapeños while cooking. For an extra layer, try a spicy salsa on top. This will give your tostadas a fiery twist. Adjust the heat to suit your taste. To keep your leftover tostadas fresh, store each part separately. Place the beef in a sealed container. Keep the tostada shells in a dry spot, away from moisture. Store toppings like lettuce and tomatoes in their own containers. This prevents sogginess and keeps everything tasty. You can enjoy leftovers for up to three days. When it's time to reheat, use an oven or toaster oven. Preheat it to 350°F (175°C). Place the tostada shells on a baking sheet. Bake them for about 5-7 minutes. This method keeps them crispy. For the beef, heat it in a skillet on medium heat. Stir often until it’s hot. Avoid the microwave since it can make the shells soft. You can freeze the beef for later use. Let it cool completely before placing it in a freezer-safe bag. Remove as much air as possible to avoid freezer burn. Seal it tight and label the bag with the date. The beef can last for up to three months in the freezer. When you're ready to use it, thaw it overnight in the fridge before reheating. Yes, you can use other meats. Ground turkey, chicken, or pork work well. Each meat has a unique flavor. Make sure to adjust the cooking time as needed. For example, turkey cooks faster than beef. You can also use plant-based meat for a vegetarian option. Just follow the same steps as with ground beef. Making tostadas is easy! Start with corn tortillas. Heat oil in a pan over medium heat. Fry each tortilla until golden and crispy, about 1-2 minutes per side. Drain on paper towels to remove excess oil. Let them cool before topping. You can also bake them in the oven for a healthier option. Bake at 400°F (200°C) for 8-10 minutes, flipping halfway. Several side dishes go great with tostadas. Here are a few ideas: - Refried beans for a creamy texture - Spanish rice for a flavorful bite - Grilled corn for sweetness - Fresh guacamole for creaminess - A simple salad for crunch These sides balance the meal and add variety. You can mix and match to find your favorites. We explored the key ingredients for tasty tostadas and how to prepare them. You learned how to cook beef, what toppings to use, and even some fun variations. Remember, customizing your tostadas lets you create your own favorite flavors. Don't forget about storage, so you can enjoy leftovers later. These dishes are easy and fun to make. Now, it's time to gather your ingredients and start cooking! Enjoy making delicious tostadas that everyone will love.

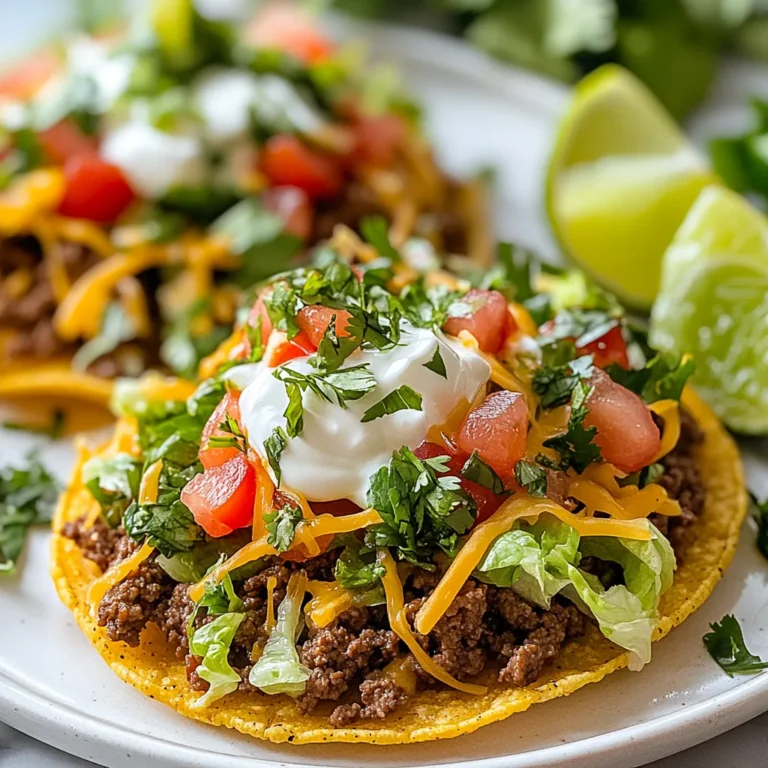
Easy Ground Beef Tostadas Simple and Flavorful Meal

- Beef chuck: Use 1 pound of beef chuck. Cut it into 1-inch cubes. This cut is tender and full of flavor. It cooks well in stews and holds moisture. - Aromatics: You need 1 large onion, finely chopped, and 2 cloves of minced garlic. These add rich flavor and aroma to the dish. - Spices and seasonings: Gather 1 teaspoon of dried oregano and 1 teaspoon of ground cinnamon. Don't forget to add salt and pepper to taste. These spices create warmth and depth in the dish. - Orzo pasta and additional toppings: You will need 1½ cups of orzo pasta. This small pasta absorbs the sauce well. For garnish, use fresh parsley, chopped, and optional grated feta cheese. Feta adds creaminess and a tangy flavor to the dish. {{ingredient_image_1}} - Searing the beef and setting it aside: First, heat 2 tablespoons of olive oil in a large pot. Add 1 pound of beef chuck, cut into 1-inch cubes. Sear the meat until it turns brown on all sides, which takes about 5-7 minutes. Once browned, remove the beef and set it aside for later. - Sautéing onions and garlic for flavor: In the same pot, add 1 large finely chopped onion and 2 minced garlic cloves. Sauté these until the onion becomes soft and translucent, around 3-4 minutes. This step builds a strong flavor base. - Combining tomatoes and spices: Next, stir in 1 cup of diced tomatoes, 1 teaspoon of dried oregano, 1 teaspoon of ground cinnamon, and salt and pepper to taste. Cook this mixture for another 2-3 minutes. This helps enhance the dish’s flavor profile. - Simmering the beef in broth: Now, return the seared beef to the pot. Pour in 2 cups of beef broth and bring everything to a simmer. Cover the pot and let it cook on low heat for about 1 hour. The beef should become tender during this time. - Adding orzo and cooking until al dente: After the beef is tender, add 1 ½ cups of orzo pasta directly into the pot. Stir it well to mix everything. Cover the pot again and cook for an additional 10-12 minutes. The orzo should be cooked al dente and absorb some of the liquid. - Adjusting the consistency and seasoning: If the dish seems too thick, add a bit more broth or water to thin it out. Stir everything together to ensure it’s well mixed. Taste and adjust the seasoning if needed. - Garnishing for serving: When ready to serve, remove the pot from heat. Let the dish sit for a couple of minutes. Serve hot, garnished with chopped fresh parsley and optional grated feta cheese on top. This adds a nice touch and extra flavor! Choosing the right cut of beef matters. I suggest beef chuck. This cut has good fat and makes the meat tender. You want to cut it into 1-inch cubes for even cooking. Balancing flavors is key to a great dish. Use dried oregano and ground cinnamon. These spices add warmth and depth. You can also taste and adjust as you go. A little salt and pepper can make a big difference. One common mistake is overcooking the orzo. This pasta cooks quickly. Stir it in when the beef is tender. Cook it for about 10-12 minutes. You want it al dente, not mushy. Another mistake is not seasoning enough. Taste the dish as you cook. If it needs more flavor, add salt or spices. Remember, seasoning builds layers of taste. Don't skip this step! Pro Tips Choose the Right Cut: Opt for beef chuck for its tenderness and flavor; it becomes melt-in-your-mouth delicious when slow-cooked. Enhance the Flavors: Allow the beef to sear well before adding other ingredients, as this adds a rich depth of flavor to your dish. Adjust Liquid Levels: Keep an eye on the cooking liquid; if it gets too thick, add more broth or water to ensure your orzo cooks perfectly. Garnish for Freshness: Always finish with a sprinkle of fresh parsley and feta cheese, as it brightens the dish and adds a lovely contrast in flavor. {{image_2}} You can easily switch up the beef in this dish. Try lamb or chicken for a new taste. Both meats work well with the spices and broth. If you want a meat-free option, consider using mushrooms or lentils. They add a hearty feel and soak up the flavors nicely. Pair this dish with a fresh Greek salad. The cool veggies balance the warm, rich flavors of the beef orzo giouvetsi. You could also serve it with some crusty bread for dipping. A side of roasted vegetables adds color and nutrition. After enjoying your Beef Orzo Giouvetsi, it's key to store any leftovers properly. Follow these tips for the best results: - Refrigeration: Place the dish in an airtight container. Make sure it cools to room temperature first. Store it in the fridge for up to three days. This keeps the flavors fresh and the beef tender. - Freezing: For longer storage, you can freeze the dish. Use a freezer-safe container or a heavy-duty freezer bag. Remove as much air as possible to prevent freezer burn. Beef Orzo Giouvetsi can last in the freezer for up to three months. When ready to enjoy, just thaw it in the fridge overnight. To enjoy your Beef Orzo Giouvetsi again, you need to reheat it properly. This step ensures the dish stays tasty and has the right texture. - Stovetop Method: Place the leftovers in a pot over low heat. Add a splash of beef broth or water to help loosen it up. Stir occasionally until heated through, about 10-15 minutes. - Microwave Method: Transfer a portion to a microwave-safe dish. Add a bit of broth or water to keep it moist. Cover with a microwave-safe lid or wrap. Heat on medium power for 2-3 minutes, stirring halfway. This helps prevent hot spots and keeps the orzo from drying out. By following these tips, you can enjoy your delicious Beef Orzo Giouvetsi more than once! What is giouvetsi and its origin? Giouvetsi is a Greek dish. It usually combines meat with pasta or rice. The dish often features orzo, which looks like rice but is pasta. Giouvetsi is traditionally baked but can also be cooked on the stovetop. Its roots come from the Greek islands, where it showcases rich flavors and simple ingredients. Can I make this dish in advance? Yes, you can prepare Beef Orzo Giouvetsi ahead of time. Cook the dish fully, let it cool, and store it in the fridge. It will taste even better the next day as the flavors meld. When ready to serve, just reheat it on the stove or in the microwave. If it seems dry, add a splash of beef broth or water while reheating. How do I make it gluten-free? To make Beef Orzo Giouvetsi gluten-free, swap out the orzo for gluten-free pasta. Many brands offer gluten-free orzo that works well. Always check the labels to ensure the pasta is certified gluten-free. The rest of the recipe remains the same, so you won't miss out on the flavors! This post covered how to make Beef Orzo Giouvetsi from start to finish. We discussed key ingredients like beef chuck, aromatic onions, garlic, and flavorful spices. You learned step-by-step instructions, tips to perfect your dish, and common mistakes to avoid. I also shared storage tips and answered FAQs about the dish. Enjoy preparing this warm and comforting meal. It's simple, delicious, and perfect for any gathering. Dive in, and make it your own!

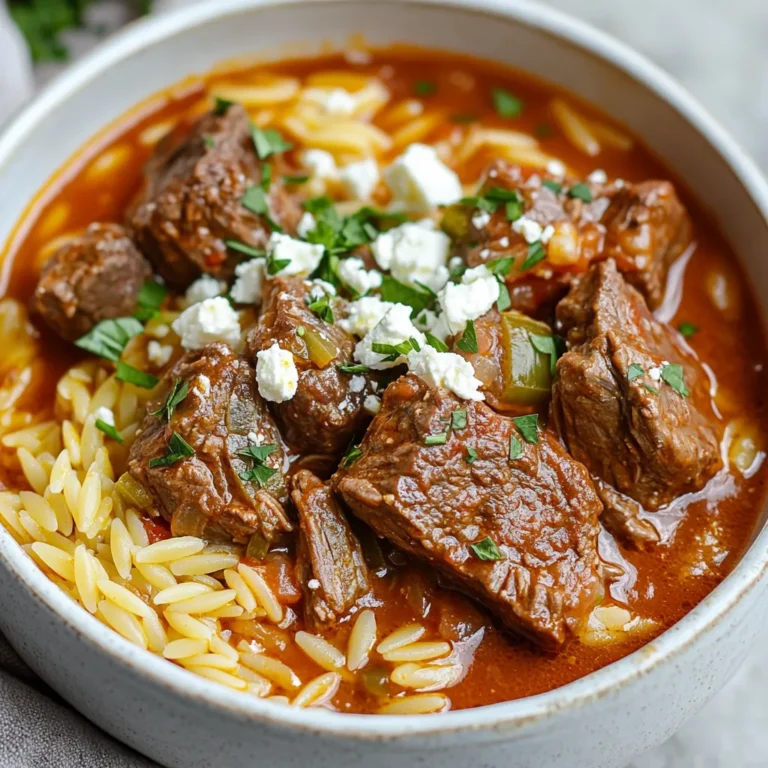
Beef Orzo Giouvetsi Flavorful and Simple Recipe

PREV 1 … 43 44 45 … 57 NEXT
meal twig

explore

DessertsDinnerAppetizersDrinks

Our Policies

  • Cookie Policy
  • Copyright Policy
  • Disclaimer
  • GDPR Policy
  • Terms Of Use
Back to Top
  • About
  • Contact Us
  • Privacy Policy
© 2025 meal twig