FREE DINNER EBOOK! Get your copy!
  • Cookie Policy
  • GDPR Policy
  • Disclaimer
  • Terms Of Use
  • Visit my other site: Fun Cookie Recipes
meal twig
  • Home
  • Dinner
  • Desserts
  • Drinks
  • Appetizers
  • Contact
  • About
  • Privacy Policy
  • Home
  • Dinner
  • Desserts
  • Drinks
  • Appetizers
  • Contact
  • About
  • Privacy Policy
  • Cookie Policy
  • GDPR Policy
  • Disclaimer
  • Terms Of Use
Visit my other site: Fun Cookie Recipes

HOME / CATEGORIES /

Latest

To make Chocolate Peanut Butter Overnight Oats, gather these key items: - 1 cup rolled oats - 1 cup almond milk (or any milk of choice) - 2 tablespoons unsweetened cocoa powder - 2 tablespoons natural peanut butter (smooth or crunchy) - 1 tablespoon honey or maple syrup (adjust to taste) - 1/2 teaspoon vanilla extract - 1/4 teaspoon salt - 1/4 cup Greek yogurt (optional, for creaminess) Each ingredient plays a special role in this tasty dish. The rolled oats give a hearty base. The almond milk adds moisture, while cocoa powder brings rich chocolate flavor. Peanut butter gives it that creamy texture we all love. Honey or maple syrup offers sweetness, and vanilla extract adds warmth. You can easily swap some ingredients to fit your needs. If you prefer a dairy-free option, almond milk works great. You can also use oat milk or coconut milk. If you want to reduce sugar, use less honey or maple syrup. For a nut-free version, try sunflower seed butter instead of peanut butter. Toppings make your overnight oats fun! Some great ideas include: - Sliced bananas - Chopped nuts - Chocolate chips - Shredded coconut You can mix and match these toppings to find your favorite combo. Add sliced bananas for sweetness, or chopped nuts for crunch. Chocolate chips provide extra chocolatey goodness. Shredded coconut adds a tropical twist. Feel free to get creative! 1. First, grab a mixing bowl. 2. Add 1 cup of rolled oats. 3. Pour in 1 cup of almond milk. 4. Add 2 tablespoons of unsweetened cocoa powder. 5. Add 2 tablespoons of natural peanut butter. 6. Mix in 1 tablespoon of honey or maple syrup. 7. Add 1/2 teaspoon of vanilla extract. 8. Sprinkle in 1/4 teaspoon of salt. 9. Whisk everything until well mixed. 10. If you want creaminess, fold in 1/4 cup Greek yogurt. 11. Spoon the mixture into mason jars or containers. 12. Seal them tightly. 13. Place the jars in the fridge overnight or for 4-6 hours. Adding Greek yogurt gives the oats a rich, creamy texture. It also adds protein and a slight tang. If you choose to use it, mix it in gently. This keeps the oats fluffy. You can skip this step if you prefer lighter oats. In the morning, stir your oats. If they are too thick, add a splash of milk. Top your oats with sliced bananas, nuts, or chocolate chips. You can also sprinkle shredded coconut for extra flavor. For a beautiful look, layer the oats and toppings in clear jars. This shows off the chocolate color and vibrant toppings. Enjoy your tasty breakfast! To make your oats just right, mix your ingredients well. Combine rolled oats with almond milk and cocoa powder first. Stir in the peanut butter next. If you want creaminess, add Greek yogurt. After soaking, if the oats are too thick, just add a splash of milk. This will help the oats get nice and creamy. Store your overnight oats in airtight containers. Mason jars work great for this! Keep them in the fridge for up to five days. If you layer toppings, add them just before eating. This keeps them fresh and crunchy. Prep your oats the night before. This way, breakfast is ready when you wake up. You can even make a batch for the week. Just scoop a serving each morning. If you need a quick breakfast, grab a jar and go! {{image_2}} You can switch up nut butters in this recipe. Try almond or cashew butter. Each nut butter adds a unique taste. For a fun twist, use sun butter if you want a nut-free option. You can also add spices. Cinnamon or nutmeg can give a warm flavor. Want it sweeter? Add a touch more honey or maple syrup. If you want a vegan version, use plant-based milk. Almond milk works great, but soy or oat milk are also good. Instead of honey, use maple syrup for sweetness. To make it gluten-free, check your oats. Look for certified gluten-free oats. This way, you can enjoy this treat without worry. Making a large batch saves time. You can prepare several jars at once. Just double or triple the recipe. Store them in the fridge. They last for about four days. When ready to eat, just stir and add toppings. This is perfect for busy mornings or meal prep days. Store your leftover overnight oats in the fridge. Use an airtight container. They will stay fresh for up to five days. If you want to keep them longer, freeze them. To freeze overnight oats, scoop them into freezer-safe containers. Leave some space at the top for expansion. They can last up to three months in the freezer. When ready to eat, thaw them overnight in the fridge. I recommend using glass mason jars or BPA-free plastic containers. These keep the oats fresh and make it easy to see what you have. They are also great for meal prep and on-the-go. Chocolate peanut butter overnight oats can last up to five days in the fridge. Just keep them in a sealed container. After a few days, the oats may get softer, but they will still taste great. I often make a batch on Sunday for quick breakfasts during the week. Yes, you can use quick oats, but the texture will change. Quick oats absorb more liquid and get mushy faster. If you prefer a creamier texture, go for rolled oats. They stay chewier and offer a better bite in your overnight oats. You can get really creative with toppings! Here are some fun ideas: - Sliced strawberries or other fresh fruits - Chopped nuts like almonds or walnuts - A sprinkle of chia seeds for added nutrition - A drizzle of extra honey or maple syrup - Dried fruit for a chewy texture To make this recipe sugar-free, skip the honey or maple syrup. Instead, use ripe bananas for natural sweetness. You can also add a few drops of liquid stevia or monk fruit sweetener. Both options add sweetness without the sugar! Overnight oats are tasty and easy to make. We covered the best ingredients and how to prepare them. You learned about tips for the right consistency and storage. There are many ways to customize your oats, like flavors or toppings. Remember, you can make them vegan or gluten-free too. With these ideas, you can enjoy a simple meal every morning. Start experimenting and find your favorite mix! Enjoy your healthy and delicious breakfasts!

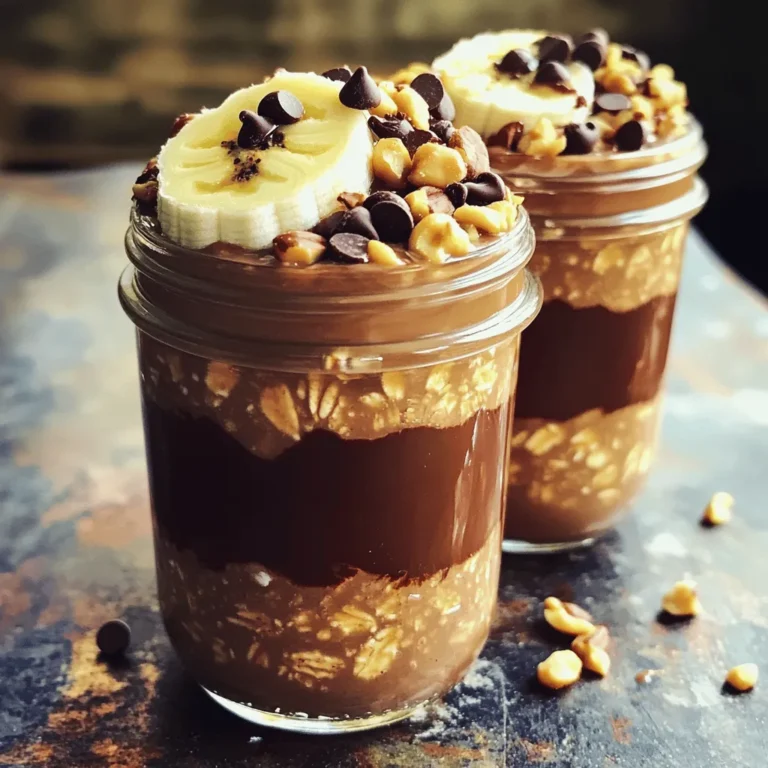
Chocolate Peanut Butter Overnight Oats Easy Recipe

To make creamy chicken tortilla soup, gather these ingredients: - 2 tablespoons olive oil - 1 onion, chopped - 2 cloves garlic, minced - 1 jalapeño, seeded and diced - 1 red bell pepper, diced - 2 cups cooked chicken, shredded - 4 cups chicken broth - 1 can (14 oz) diced tomatoes with green chilies - 1 teaspoon ground cumin - 1 teaspoon chili powder - Salt and pepper to taste - 1 cup corn kernels (fresh or frozen) - 1 cup heavy cream - Juice of 1 lime - Tortilla strips, for garnish - Fresh cilantro, for garnish - Avocado, diced, for garnish If you don’t have some ingredients, don’t worry. You can swap them out: - Use vegetable oil instead of olive oil. - Any onion type works, but yellow onion is best. - Swap jalapeño for a milder pepper, like a bell pepper. - Canned chicken works if you lack fresh cooked chicken. - Use vegetable broth for a vegetarian option. - Coconut cream can replace heavy cream for a dairy-free soup. Fresh ingredients make the soup taste better. Here’s how to choose: - Look for onions that feel firm and have no soft spots. - Garlic should be plump and not sprouting. - Pick bell peppers that are shiny and have a smooth skin. - Choose corn that is bright and has a sweet smell. - For cilantro, select leaves that are vibrant green and fresh. - Avocados should be slightly soft but not mushy. Using the best ingredients enhances flavor and texture. Enjoy your cooking! Start by gathering your ingredients. You need olive oil, onion, garlic, jalapeño, red bell pepper, cooked chicken, chicken broth, diced tomatoes, cumin, chili powder, salt, pepper, corn, heavy cream, lime, and garnishes like tortilla strips, cilantro, and avocado. 1. Heat two tablespoons of olive oil in a large pot over medium heat. 2. Add one chopped onion and cook until it turns clear, about three to four minutes. 3. Next, add two minced garlic cloves, one diced jalapeño (make sure to remove the seeds), and one diced red bell pepper. Cook for another two to three minutes. You want the veggies soft. Now, it’s time to build flavor. 1. Stir in two cups of shredded chicken, four cups of chicken broth, one can of diced tomatoes, one teaspoon of ground cumin, and one teaspoon of chili powder. 2. Add salt and pepper to taste. Bring the mix to a boil. 3. Once it boils, reduce the heat to low. Let it simmer without a lid for about 15 minutes. This step helps the flavors mix well. After simmering, it’s nearly time to serve. 1. Add one cup of corn kernels and one cup of heavy cream to the pot. Stir well. 2. Let it simmer for another five minutes. 3. Remove the pot from the heat. Squeeze in the juice of one lime for a fresh taste. 4. Taste the soup and adjust seasoning if needed. When serving, ladle the soup into bowls. Top each bowl with crispy tortilla strips, fresh cilantro, and diced avocado. Enjoy the beautiful colors and flavors of your creamy chicken tortilla soup! To get a smooth, creamy soup, use heavy cream. It adds richness without making it too thick. When you stir in the cream, do it slowly. This helps mix it well without curdling. Always taste your soup after adding the cream. You may want to add more spices or salt to balance the flavors. One common mistake is cooking the cream too long. If you let it boil, it can split. Always add cream at the end and keep the heat low. Another mistake is not seasoning enough. A little salt and pepper go a long way. Taste often as you cook to get it just right. This soup pairs well with tortilla chips or fresh bread. You can also serve it with a side salad for a complete meal. For garnish, use crispy tortilla strips, fresh cilantro, and diced avocado. These toppings add color and extra texture to your bowl. Consider a squeeze of lime for extra zing. Enjoy your meal! {{image_2}} You can easily make this soup vegetarian or vegan. Start by swapping chicken for beans. Black beans or chickpeas add protein and texture. Use vegetable broth instead of chicken broth. For a creamy base, replace heavy cream with coconut milk or cashew cream. These options make it rich and tasty without dairy. If you love heat, kick up the spice! Add more jalapeños or use a hotter pepper. Chipotle peppers in adobo sauce bring a smoky flavor. You can also sprinkle in some cayenne pepper for an extra kick. Adjust the heat to your taste. Toppings bring fun and flavor to your soup. Try crispy tortilla strips for crunch. Fresh cilantro adds brightness. Diced avocado gives creaminess and richness. You might also add cheese or sour cream for a tangy touch. Lime wedges on the side add a fresh zing. Mix and match toppings based on your mood! To keep your creamy chicken tortilla soup fresh, store it in an airtight container. Let the soup cool to room temperature before sealing. This helps prevent bacteria growth. You can store it in the fridge for up to 4 days. Make sure to label the container with the date. This way, you’ll know when to use it. When you're ready to enjoy your leftovers, pour the soup into a pot. Heat it over medium heat on the stove. Stir often to help it warm evenly. If the soup is too thick, add a splash of chicken broth or water. This will help bring back its creamy texture. You can also reheat it in the microwave. Use a microwave-safe bowl and heat it in 1-minute bursts. Stir between each burst until it's hot. If you want to save the soup for later, freezing is a great option. Let the soup cool completely first. Then, pour it into freezer-safe bags or containers. Press out as much air as possible before sealing. Label the bags with the date. You can freeze it for up to 3 months. When you're ready to eat, thaw it in the fridge overnight. Reheat it as mentioned before for a warm, comforting meal. You can use half-and-half or whole milk. For a lighter option, try Greek yogurt. These swaps will change the texture a bit, but they will still taste great. To add heat, include more jalapeño or add diced serrano peppers. You can also sprinkle in some cayenne pepper. If you want a kick, use a hot sauce to taste. Yes, rotisserie chicken works perfectly. Just shred the chicken and add it to the soup. This saves time and adds great flavor. The soup lasts about three to four days in the fridge. To keep it fresh, store it in an airtight container. Reheat on the stove or in the microwave. This blog post covered the key ingredients for a tasty soup, from fresh choices to substitutions. I shared clear steps for preparation and cooking, plus tips for a smooth texture. We looked at fun variations, ways to store leftovers, and answered common questions. Now you have the tools to make this soup your own. Get creative and enjoy every bowl!

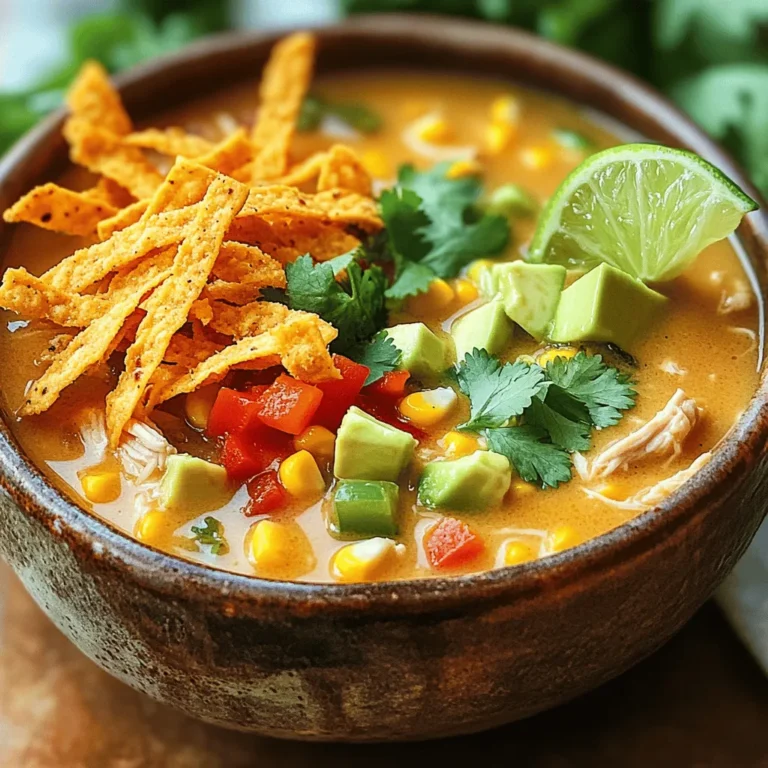
Creamy Chicken Tortilla Soup Simple and Delicious Meal

- 2 boneless, skinless chicken breasts - 2 cups fresh spinach, chopped - 1 cup heavy cream - 1 cup grated Parmesan cheese - 2 cloves garlic, minced - 1 tablespoon olive oil - 1 teaspoon Italian seasoning - Salt and pepper to taste - 1 cup cherry tomatoes, halved (for garnish) - Fresh basil leaves (for garnish) To create a delightful Chicken Florentine, you need simple yet fresh ingredients. First, grab boneless, skinless chicken breasts. They cook evenly and stay juicy. Next, fresh spinach is key. It gives the dish color and nutrition. Heavy cream adds that rich, creamy texture we love. Grated Parmesan cheese brings a salty flavor. Minced garlic adds depth and aroma. Don’t forget olive oil, which helps with cooking and adds flavor. Italian seasoning brings a hint of herbs. Salt and pepper are crucial for taste. For garnishing, cherry tomatoes and fresh basil brighten the plate. Each ingredient plays a role in making Chicken Florentine taste amazing. Gather these items for a creamy, comforting meal. {{ingredient_image_1}} First, season the chicken breasts with salt, pepper, and Italian seasoning. This adds flavor and makes the chicken tasty. Next, heat one tablespoon of olive oil in a large skillet over medium heat. Once hot, add the chicken breasts. Cook them for about 6-7 minutes on each side. Look for a golden brown color and ensure they are cooked through. This is key for juicy chicken. After cooking, remove the chicken from the skillet and set it aside. In the same skillet, add two cloves of minced garlic. Sauté the garlic for about one minute until it smells fragrant. This step adds depth to our dish. Now, add two cups of chopped fresh spinach. Cook it until it wilts, which takes about 2-3 minutes. Stir it gently to avoid burning. Perfect wilted spinach is soft and vibrant green. You want it to be bright and fresh. Lower the heat to avoid burning the sauce. Pour in one cup of heavy cream while stirring to mix it with the garlic and spinach. This creates a rich and creamy base. Gradually add one cup of grated Parmesan cheese, stirring until it melts completely. The sauce should be smooth and creamy. If needed, season with more salt and pepper. The creaminess is what makes this dish special. Now, return the cooked chicken breasts to the skillet. Spoon the creamy spinach sauce over the chicken. Let them simmer together for about 2-3 minutes. This allows the flavors to blend. You want the chicken to soak up all that creamy goodness. To serve, transfer the Chicken Florentine to plates. Garnish with halved cherry tomatoes and fresh basil leaves. This adds color and a fresh taste. For sides, consider serving it with pasta or a crisp salad. A nice white wine pairs well too, enhancing the meal experience. Enjoy your delightful Chicken Florentine! - Best cooking methods for chicken: I recommend pan-searing chicken breasts. This method gives a nice golden crust while keeping the chicken juicy. Always use medium heat and a bit of olive oil to prevent sticking. - How to avoid overcooking spinach: Cook spinach quickly over medium heat. Add it to the pan after the garlic is fragrant. Stir for only 2-3 minutes until wilted. Overcooking makes spinach slimy and less tasty. - Suggestions for additional spices or ingredients: Try adding crushed red pepper for some heat. You can also use fresh herbs like thyme or rosemary for extra flavor. A squeeze of lemon juice adds brightness. - Tips for adjusting richness and creaminess: If you want a lighter sauce, use half-and-half instead of heavy cream. For a richer taste, add more Parmesan cheese. Balance is key! - Ideas for elevating the dish’s appearance: Use a wide plate to showcase the chicken and sauce. Arrange the spinach artfully around the chicken. Add a drizzle of sauce on top for a restaurant-style look. - Importance of color contrast in plating: Bright garnishes like cherry tomatoes and fresh basil not only add color but also flavor. A mix of green and red makes your dish pop and look more inviting. Pro Tips Use Fresh Ingredients: Fresh spinach and high-quality Parmesan cheese will elevate the flavor of your Chicken Florentine, making it taste restaurant-quality. Monitor the Cooking Time: To prevent the chicken from drying out, be sure not to overcook it. Use a meat thermometer to check for an internal temperature of 165°F (75°C). Enhance the Creaminess: For an extra creamy texture, consider adding a splash of cream cheese or mascarpone to the sauce while stirring in the Parmesan. Garnish with Fresh Herbs: Fresh basil not only adds a pop of color but also brightens the dish. Feel free to experiment with other herbs like parsley or thyme. {{image_2}} You can switch up the protein in Chicken Florentine. Shrimp works great here. Just cook shrimp for a few minutes until they turn pink. Tofu is another option. Use firm tofu and press it to remove extra water. Cut it into cubes and cook until golden. Adjust cooking time based on the protein you choose. Shrimp cooks fast, while tofu may need a bit more time. For a dairy-free version, you can use coconut cream instead of heavy cream. It adds a nice, rich flavor. Nutritional yeast can replace Parmesan cheese. It gives a cheesy taste without dairy. You can also try almond milk or soy milk for a lighter cream. These options help create a delicious vegan meal. Feel free to add other vegetables to your Chicken Florentine. Bell peppers, mushrooms, or zucchini can add color and flavor. You can also spice it up with red pepper flakes for heat. Seasonal veggies like asparagus or peas can brighten the dish in spring. Experimenting with these additions makes your Chicken Florentine unique and fun! To store leftovers, let Chicken Florentine cool down first. Place it in an airtight container. This keeps out air and moisture. Store it in the fridge, where it stays fresh for up to three days. Make sure your fridge is set to 40°F (4°C) or lower. This helps keep your food safe. When you're ready to eat the leftovers, use the best reheating methods. The stovetop works great for this dish. Place the Chicken Florentine in a skillet over low heat. Add a splash of cream or broth to keep it moist. Cover the skillet with a lid to trap steam. This helps maintain the creaminess of the sauce. Stir occasionally to heat evenly. You can also use a microwave, but be careful. Heat in short bursts and stir in between. This avoids overheating and drying out the dish. Yes, you can freeze Chicken Florentine! To do this, let it cool completely. Transfer it to a freezer-safe container. Make sure to leave some space for the sauce to expand. It can last up to three months in the freezer. When ready to eat, thaw it overnight in the fridge. Reheat it gently in a skillet or microwave. This keeps the flavors fresh and delicious. Chicken Florentine is a classic dish that hails from Italy. It features tender chicken cooked in a creamy spinach sauce. The dish is named after Florence, where it first gained popularity. Traditionally, it includes eggs and cheese, but modern recipes often focus on chicken and spinach in a rich sauce. The blend of flavors is both comforting and sophisticated. Yes, you can make Chicken Florentine ahead of time. To prep, cook the chicken and sauce as directed. Let everything cool, then store it in an airtight container. When you’re ready to eat, just reheat it gently on the stove over low heat. Add a splash of cream to keep it creamy and moist. Chicken Florentine pairs well with several sides. Here are some great options: - Garlic bread - Steamed rice - Mashed potatoes - A fresh green salad - Roasted vegetables These sides help balance the creaminess of the dish. To keep your chicken juicy, follow these tips: - Use boneless, skinless chicken breasts, as they cook quickly. - Don’t overcook the chicken; aim for an internal temperature of 165°F. - Let the chicken rest for a few minutes after cooking. This helps the juices redistribute. These steps will give you tender, flavorful chicken every time. Chicken Florentine can be a healthy choice. It offers lean protein from the chicken and vitamins from the spinach. However, the heavy cream and cheese add calories. To make it lighter, consider using half-and-half or a dairy-free cream. Store leftovers in the fridge for up to three days, making it a convenient meal option. In this blog post, we explored Chicken Florentine, a rich and creamy dish full of flavor. We detailed the ingredients needed, from chicken to spinach, and walked through each cooking step to ensure your meal turns out great. You now have tips for cooking techniques, flavor enhancements, and even variations for dietary needs. Remember, good presentation makes a difference, too. Enjoy creating this delicious meal that can impress anyone at your table. Happy cooking!

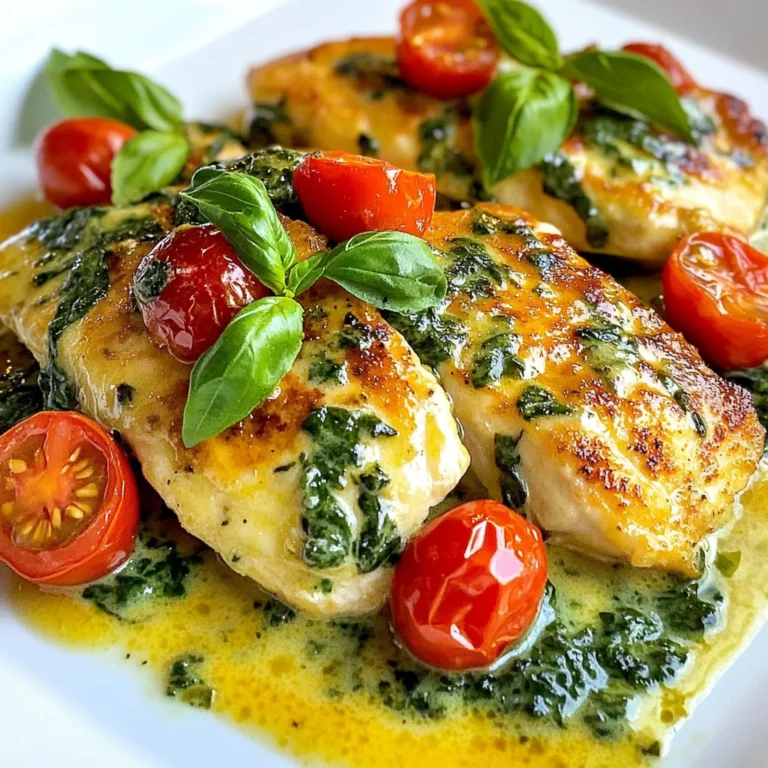
Chicken Florentine Delightfully Creamy Recipe Guide

- Ground turkey: This meat is lean and healthy. It has less fat than beef. Ground turkey is rich in protein, making it a great option for meals. It helps keep you full and fits well in many dishes. - Types of cheese used: - Mozzarella: This cheese melts well and adds a creamy texture. It gives a great stretch to your pasta. - Ricotta: This cheese is soft and adds richness. It helps make the dish creamy and smooth. - Parmesan: This cheese has a strong flavor. It adds a nice savory touch to the dish when sprinkled on top. - Other essential ingredients: - Pasta: I like using penne for its shape. It holds the sauce well. - Marinara sauce: This sauce adds a rich tomato flavor. It ties all the ingredients together. - Seasonings: Garlic powder, onion powder, salt, and pepper enhance the dish's flavor profile. You can also add red pepper flakes for a little heat. - Additional seasonings and spices: You can add Italian herbs like oregano and basil for extra flavor. A dash of smoked paprika can also bring a nice twist. - Vegetable add-ins: Adding spinach or bell peppers boosts nutrition. These veggies add color and a fresh taste to the dish. - Cookware: You need a large pot to cook the pasta. A skillet is essential for sautéing the ground turkey. - Baking dish: A 9x13 inch baking dish works best for this recipe. It holds all the ingredients and helps achieve a nice bubbly top. {{ingredient_image_1}} To cook perfect al dente pasta, start with a big pot of salted water. Bring it to a rolling boil. Add 12 ounces of penne pasta and cook according to the package directions. This usually takes about 8 to 10 minutes. To test for doneness, take a piece out and bite it. You want it firm but not hard. Once ready, drain the pasta in a colander. Rinse it briefly with cold water to stop the cooking. Set the pasta aside in the pot. This keeps it warm for the next steps. For the ground turkey, heat one tablespoon of olive oil in a large skillet over medium heat. Add one pound of ground turkey. Use a spatula to break it into small pieces. This helps it brown evenly. Season the turkey with one teaspoon of garlic powder, one teaspoon of onion powder, and salt and pepper to taste. If you like a bit of heat, add half a teaspoon of red pepper flakes. Cook the turkey for about 5 to 7 minutes. Look for a nice golden-brown color, which means it’s cooked through and packed with flavor. Once the turkey is browned, pour in two cups of marinara sauce. Stir well to combine. Let it simmer for about 5 minutes. This allows the flavors to mix. Now, lower the heat and add one cup of ricotta cheese. Mix until the cheese is well blended. Then add the cooked pasta and one cup of shredded mozzarella cheese. Stir everything together until the pasta is coated and the cheese is melted. This step ensures every bite is cheesy and delicious. Preheat your oven to 350°F (175°C). Grease a 9x13 inch baking dish. Transfer the pasta mixture into the dish. Top it off with half a cup of grated Parmesan cheese. This adds a nice crust while baking. Bake the dish in the preheated oven for 20 to 25 minutes. You want the top to be bubbly and golden brown. When it’s done, the cheese will be melted and delicious. To boost the taste of your cheesy ground turkey pasta, I suggest adding fresh herbs like basil or oregano. These herbs bring a bright, fresh note to the dish. For a hint of warmth, sprinkle in some garlic powder or onion powder. If you like heat, consider using red pepper flakes. Adjust the spice level by adding more or less of these spices. Taste as you go to find your perfect balance. The key to a creamy cheese texture is to add it at the right time. Stir in the ricotta first, then mix in mozzarella while the heat is low. This gentle heat helps the cheese melt without clumping. A common mistake is adding cheese too early or cooking it on high heat, which can lead to a grainy texture. Take your time to melt the cheese for a smooth finish. For a complete meal, serve your cheesy ground turkey pasta with a side salad. A simple green salad with a light vinaigrette pairs well. For something heartier, garlic bread is a great option too. If you enjoy wine, try a light red like Pinot Noir. Its fruity notes complement the flavors in the dish beautifully. Pro Tips Use Lean Turkey: Opt for lean ground turkey to reduce fat content while maintaining flavor. Cheese Variations: Experiment with different cheeses like pepper jack or feta for a unique twist on flavor. Add Vegetables: Incorporate spinach, bell peppers, or mushrooms for added nutrition and texture. Make Ahead: Prepare the dish in advance and refrigerate it; just bake it when you're ready to serve. {{image_2}} To make this dish vegetarian, swap out the ground turkey for plant-based protein. Options like lentils or crumbled tempeh work well. Both lend texture and protein while keeping flavors rich. For cheese, use vegan mozzarella or cashew-based cheese. These options melt nice and add creaminess without dairy. If you need a gluten-free version, use gluten-free pasta. Look for brands made from rice or lentils. These types hold up well with the sauce. You may need to adjust cooking times, so check the package instructions. To keep flavors balanced, add extra herbs or spices since gluten-free pasta can taste different. For a one-pot meal, you can combine everything in one pot. Start by sautéing the turkey in a large pot. Then, add the pasta, sauce, and water. Cook until the pasta is tender. Stir in cheeses at the end. This method cuts down on dishes but may affect the texture. It can be creamier but will not have that baked top. To store leftovers of cheesy ground turkey pasta, first allow it to cool. Then, place it in a shallow container. This helps it cool faster and keeps it fresh. I recommend using an airtight container. This will stop air from entering and keep your pasta tasty. Leftovers can last in the fridge for about three to four days. Always label the container with the date. This way, you won’t forget when you made it! To freeze cheesy ground turkey pasta, start by cooling it completely. Once cool, scoop it into a freezer-safe container. Leave some space at the top for expansion. You can also use freezer bags. Squeeze out as much air as possible. This dish can last in the freezer for up to three months. When ready to eat, thaw it overnight in the fridge. Then, reheat it using your favorite method. The best way to reheat cheesy ground turkey pasta is in the oven. Preheat your oven to 350°F (175°C). Place the pasta in a baking dish. Cover it with foil to keep moisture in. Bake for about 20 minutes. If you want to use the microwave, place a portion in a bowl. Add a splash of water to keep it moist. Heat in short bursts, stirring in between. Avoid reheating too long, as it can dry out. You can add heat by using red pepper flakes. Start with a pinch and taste. If you want more kick, add a little more. Another option is to mix in diced jalapeños. They bring heat and flavor. Fresh or canned green chilies work well too. Just be careful not to overpower the dish. Balance is key for a great meal. Yes, you can use any pasta shape you like. Penne is great, but rotini or fusilli are also good choices. They hold sauce well and add fun textures. If you want a smaller option, try ditalini or elbows. Just remember to adjust cooking time based on the pasta shape. Always check for al dente doneness. You can use store-bought pesto for a fresh twist. Another option is Alfredo sauce for a creamy feel. If you want to make your own, blend canned tomatoes with garlic and herbs. You can also use a mix of tomato sauce and diced tomatoes for a chunkier texture. Just make sure to season it well for the best flavor. This blog covered how to make a tasty Cheesy Ground Turkey Pasta. You learned about key ingredients like ground turkey and different cheeses. We also talked about cooking methods and tools needed. I shared tips to enhance flavor and how to store leftovers. Remember, cooking is about experimenting and having fun. Try your variations and make the dish your own. Enjoy every bite!

Cheesy Ground Turkey Pasta Hearty and Flavorful Meal

For Pineapple Teriyaki Meatballs, gather these ingredients: - 1 pound ground chicken or turkey - 1/2 cup panko breadcrumbs - 1/4 cup finely chopped green onion - 1/4 cup finely chopped bell pepper (red or yellow) - 1 egg, beaten - 2 tablespoons soy sauce (low sodium recommended) - 1 tablespoon fresh ginger, grated - 1 tablespoon garlic, minced - 1 cup pineapple chunks (fresh or canned) - 1/2 cup teriyaki sauce - Sesame seeds for garnish - Fresh cilantro or parsley for garnish You can swap ground chicken or turkey for lean ground beef or pork. If you need a gluten-free option, use gluten-free breadcrumbs. For a vegan twist, try using chickpeas or lentils instead of meat. Coconut aminos can work as a soy sauce alternative. If you can't find fresh ginger, use powdered ginger. For added sweetness, you can use honey or maple syrup instead of teriyaki sauce. Always choose fresh vegetables. Look for firm bell peppers and bright green onions. Fresh pineapple adds a burst of flavor, but canned is okay in a pinch. Check for low-sodium soy sauce to keep salt levels down. When you use fresh garlic, you get a more vibrant taste. Always store ingredients properly to keep them fresh longer. To start, gather all your ingredients. You will need: - 1 pound ground chicken or turkey - 1/2 cup panko breadcrumbs - 1/4 cup finely chopped green onion - 1/4 cup finely chopped bell pepper (red or yellow) - 1 egg, beaten - 2 tablespoons soy sauce - 1 tablespoon fresh ginger, grated - 1 tablespoon garlic, minced - 1 cup pineapple chunks - 1/2 cup teriyaki sauce - Sesame seeds for garnish - Fresh cilantro or parsley for garnish In a large bowl, add the ground chicken or turkey, panko breadcrumbs, chopped green onion, and chopped bell pepper. Then, pour in the beaten egg, soy sauce, grated ginger, and minced garlic. Mix it all together until everything is well combined. Next, preheat your oven to 400°F (200°C). While the oven heats, shape the meat mixture into small meatballs, about 1 inch wide. Place these meatballs on a baking sheet lined with parchment paper for easy cleanup. Bake the meatballs for about 15-20 minutes. You want them to be fully cooked and golden brown. While the meatballs are baking, take a medium saucepan and heat the teriyaki sauce over medium heat. Add the pineapple chunks and let them simmer for 5-7 minutes. This helps the flavors blend and the sauce thicken a bit. Once the meatballs are done, take them out of the oven. Add them to the saucepan with the teriyaki sauce and pineapple. Gently toss the meatballs to coat them well in the sauce. To ensure your meatballs stay juicy, avoid overmixing the meat mixture. This keeps the texture light and tender. If you want a bit of crunch, bake them on a wire rack set over the baking sheet. This allows hot air to circulate all around the meatballs. Don't forget to check for doneness; they should reach an internal temperature of 165°F. Enjoy these bold and flavorful Pineapple Teriyaki Meatballs hot, garnished with sesame seeds and fresh herbs! To make juicy meatballs, use ground chicken or turkey. These meats are lean, so you need to add moisture. Panko breadcrumbs and an egg hold in the juice well. Mix all ingredients gently to avoid tough meatballs. Shape them to about one inch for even cooking. Bake them until golden brown, which ensures they stay juicy. Add fresh ginger and garlic for a bright taste. Chopped bell peppers and green onions bring in a crunch. Pineapple chunks not only add sweetness but also a tropical twist. For more flavor, use low-sodium soy sauce. Experiment with a touch of chili flakes for heat or sesame oil for a nutty flavor. One mistake is overmixing the meat. This makes meatballs tough. Another is baking them too long, which dries them out. Always check for doneness with a meat thermometer. They should reach 165°F (74°C). Lastly, don’t skip the sauce. Tossing the meatballs in teriyaki sauce gives them extra flavor. {{image_2}} You can swap the ground chicken or turkey for other meats. Ground beef or pork works well. They add a rich flavor that pairs nicely with teriyaki sauce. If you want a meat-free option, try using lentils or mushrooms. They offer great texture and soak up the sauce well. Want to change the flavor? You can add heat by mixing in some red pepper flakes or Sriracha. This gives your meatballs a nice kick. If you prefer sweetness, add more pineapple or a bit of honey. These tweaks let you create a dish that fits your taste. You don’t have to bake the meatballs if you don’t want to. You can cook them on the stovetop. Just brown them in a pan first, then add the teriyaki sauce and pineapple to simmer. For a hands-off approach, use a slow cooker. Cook the meatballs and sauce together for a few hours on low. Each method brings its own charm to this dish. To keep your Pineapple Teriyaki Meatballs fresh, place them in an airtight container. Make sure they cool down first. Store them in the fridge for up to three days. If you follow this method, the meatballs stay tasty and safe to eat. When you are ready to eat leftovers, reheat them gently. You can use the microwave or a skillet. If using the microwave, heat in 30-second intervals. Check the meatballs often to avoid overcooking. If you use a skillet, add a splash of water to keep them moist. Heat on low to medium until warm. You can freeze Pineapple Teriyaki Meatballs for later meals. First, let them cool completely. Arrange them in a single layer on a baking sheet. Freeze for about two hours until firm. Then, transfer them to a freezer-safe bag or container. They can last up to three months in the freezer. When you are ready to enjoy them, thaw in the fridge overnight before reheating. You can tell when the meatballs are cooked by checking their color. They should be golden brown on the outside. Use a meat thermometer to be sure. The inside should reach 165°F. If you cut one open, it should not be pink. This means they are done and safe to eat. Yes, you can use homemade teriyaki sauce. Making it fresh adds a nice touch. Just mix soy sauce, honey, ginger, and garlic. You can adjust the flavors to suit your taste. Homemade sauce often tastes better than store-bought. It can make your meatballs even more special. You can serve Pineapple Teriyaki Meatballs with many sides. Here are some tasty options: - Cooked rice (white or brown) - Steamed vegetables (like broccoli or snap peas) - Noodles (rice or egg noodles work well) - A fresh salad with a light dressing These sides will balance the sweet and savory flavors of the meatballs. Enjoy mixing and matching to find your favorite! In this post, we explored key ingredients and their substitutes. We covered step-by-step cooking and baking tips to make perfect meatballs. You learned about techniques for juicy meatballs, flavor boosts, and common mistakes to avoid. We also shared variations for proteins and cooking methods. Lastly, we discussed how to store and reheat leftovers. Now, go ahead and enjoy making your own unique meatballs!

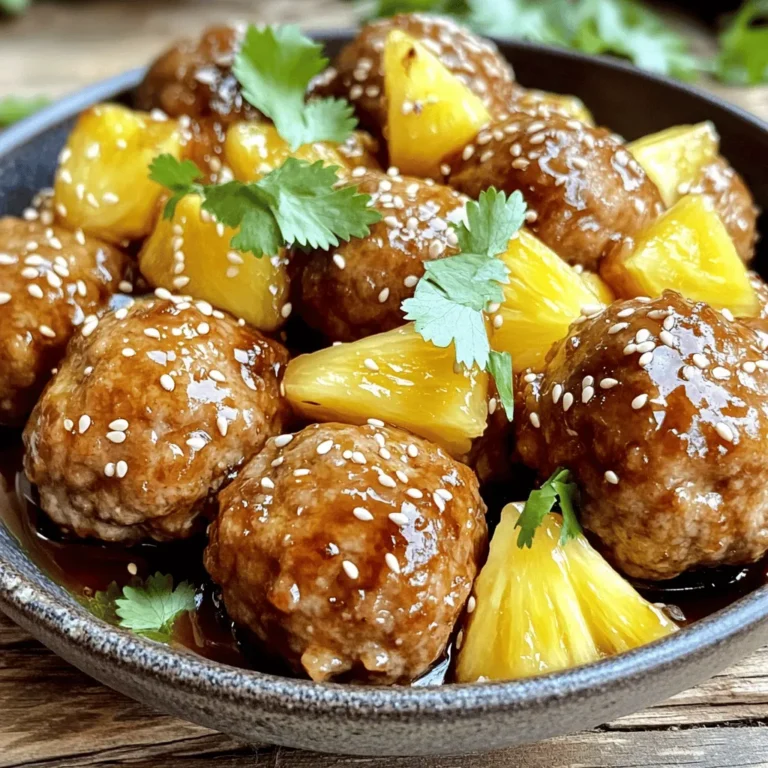
Pineapple Teriyaki Meatballs Bold and Flavorful Dish

To make this tasty treat, you will need: - 2 cups Oreo cookie crumbs - 1/2 cup unsalted butter, melted - 3 cups mocha ice cream, softened - 1 cup whipped cream - 1/2 cup chocolate syrup - 1/2 cup crushed Oreos for topping - 1/4 cup brewed espresso or strong coffee (cooled) - 1/2 cup chocolate chips (optional) These simple ingredients create a rich and creamy cake. The blend of mocha and Oreo flavors makes it extra special. If you don’t have an ingredient, don’t worry. Here are some easy swaps: - Use graham cracker crumbs instead of Oreo cookie crumbs for a different crust. - Swap the unsalted butter for coconut oil for a dairy-free option. - Any chocolate ice cream can replace mocha ice cream if you prefer. - For whipped cream, you can use a dairy-free whipped topping. - If you don’t have espresso, strong brewed coffee works well too. These swaps will still give you a delicious cake. Feel free to get creative! Measuring ingredients right is key for great results. Here’s how to do it: - Use a dry measuring cup for solids like cookie crumbs and butter. - For liquids like melted butter and coffee, use a liquid measuring cup. - Level off dry ingredients with a straight edge for accuracy. - When measuring sticky ingredients, like syrup, coat the cup with cooking spray first. These tips help ensure your cake turns out just right. Accurate measuring makes a big difference in baking! First, you need to make the crust. Grab a mixing bowl and add 2 cups of Oreo cookie crumbs. Pour in 1/2 cup of melted unsalted butter. Mix them well until the crumbs look shiny. This means the butter coats each crumb. Next, take an 8-inch springform pan and press the crumb mix into the bottom. Make it even and firm. Then, put the pan in the freezer for about 15 to 20 minutes. This helps the crust set and hold its shape. After the crust is ready, it’s time for the mocha ice cream. Take 3 cups of softened mocha ice cream and spread it over the crust. Use a spatula to smooth the top. Make it nice and even. This layer should be thick and creamy. The ice cream should be soft enough to spread easily but not too runny. Now, let’s add some coffee flavor! Drizzle 1/4 cup of cooled brewed espresso or strong coffee over the mocha ice cream. Use a knife or spatula to gently swirl it into the ice cream. This creates a beautiful marbled effect. Next, take 1 cup of whipped cream and spoon it on top. Spread it evenly across the ice cream. Then, drizzle 1/2 cup of chocolate syrup over the whipped cream. Finally, sprinkle 1/2 cup of crushed Oreos on top. If you like, add 1/2 cup of chocolate chips for extra fun. Cover the pan with plastic wrap and freeze it for at least 4 hours. Once set, you can slice it and enjoy your delicious Mocha Oreo Ice Cream Cake! To soften ice cream fast, take it out of the freezer. Let it sit at room temperature for about 10-15 minutes. If you want it even quicker, scoop some into a bowl. This helps it soften faster. Just don’t leave it too long or it will melt! Layering is key for a great Mocha Oreo Ice Cream Cake. Start with a firm crust. Press the Oreo crumbs into the pan tightly. This keeps the crust from crumbling. When adding the mocha ice cream, spread it evenly. Use a spatula to smooth the top. When you add coffee, swirl it gently for a nice pattern. Want to kick up the flavor? Consider adding chocolate chips. They add a nice crunch and richness. You can also use flavored whipped cream. Try adding a splash of vanilla or a hint of mint. This gives a fresh twist to your cake. Feel free to get creative with toppings too! {{image_2}} You can change the ice cream flavor to fit your taste. Try vanilla, mint, or coffee ice cream. Each flavor gives a new twist to your cake. For a fruity option, use strawberry or raspberry ice cream. This adds a bright color and a fun taste. Just remember, keep the same amounts as in the recipe. Toppings can make your cake even more fun. You can use crushed nuts for crunch or sprinkles for color. You might add different cookies, like Chips Ahoy or Nutter Butter, for a mix of flavors. Try adding a layer of caramel sauce for a sweet surprise. Get creative and use what you love! If you want a lighter cake, skip the crust. You can layer the ice cream and toppings in a bowl. This way, you save time and still enjoy the flavors. Use less ice cream or add more whipped cream for a fluffy texture. This no-bake option is quick and easy, perfect for warm days. To keep your Mocha Oreo Ice Cream Cake fresh, proper freezing is key. First, make sure your cake is fully set. After you layer the whipped cream and toppings, cover the springform pan tightly with plastic wrap. This prevents ice crystals from forming on the cake. You can also use aluminum foil for extra protection. When stored correctly, your cake can last up to two weeks in the freezer. While it may still taste good after this time, the texture may change. Always check for any signs of freezer burn. If you see any, it's best to toss it out. The best container for your cake is the springform pan you used to make it. This allows you to keep the cake in its original shape. If you want to use another container, choose one that seals well. You can use airtight plastic containers or freezer-safe glass dishes. Just remember to cover the top well to keep it fresh! Yes, you can make this cake ahead of time. It freezes well for up to a week. Just make sure to cover it well with plastic wrap. This keeps it fresh. You can make it the day before a party. It will be ready when you are. You can use strong brewed tea instead of espresso. A dark roast coffee also works well. If you want a caffeine-free option, try using decaf coffee. You can also use chocolate milk for a sweeter flavor. These options will change the taste a bit but will still be yummy. To keep the cake from getting too hard, let it sit out for a few minutes before serving. This will help soften the ice cream. You can also try using half-and-half instead of heavy cream in the ice cream layer. This can make it creamier and easier to slice. Enjoy your cake at the perfect texture! This blog post covers all the essential steps for making a Mocha Oreo Ice Cream Cake. We reviewed necessary ingredients, measuring tips, and possible substitutes. I shared clear, step-by-step instructions to help you prepare the crust, add layers, and finalize the cake. You learned useful tips for softening ice cream and adding flavors. Variations allow you to customize your cake for your taste. Lastly, I provided storage advice to keep your cake fresh. Enjoy making this delicious dessert! It’s fun and simple, so dive in and create your own version.

Mocha Oreo Ice Cream Cake Delightful and Easy Treat

- 2 cups cooked chicken breast, shredded - 4 large whole wheat tortillas - 1 cup romaine lettuce, chopped - 1/2 cup cherry tomatoes, halved - 1/4 cup grated Parmesan cheese - 1/2 cup Caesar dressing (store-bought or homemade) - 1 tsp lemon zest - 1/2 tsp garlic powder - Salt and pepper to taste These ingredients create a tasty and easy meal. Using whole wheat tortillas boosts the fiber content. The chicken gives protein, while romaine and tomatoes add crunch and fresh flavor. Parmesan cheese adds a rich taste. Caesar dressing ties it all together with its creamy goodness. - Sliced avocado - Cooked bacon bits - Red onion, thinly sliced - Fresh herbs like basil or parsley Adding sliced avocado brings creaminess. Bacon bits add a delightful crunch. Red onion gives a sharp bite, while fresh herbs add brightness. Feel free to mix and match these options! - Chicken breast: A great source of lean protein, low in fat. - Romaine lettuce: Full of vitamins A and K, it helps your bones. - Cherry tomatoes: Packed with antioxidants and vitamin C. - Parmesan cheese: Offers calcium and protein but is high in sodium. - Caesar dressing: Adds flavor but watch for calories and fat. Understanding these ingredients helps you make healthy choices. You can adjust portions based on your needs. Enjoy preparing your Chicken Caesar Wraps! To start, gather your ingredients. You will need: - 2 cups cooked chicken breast, shredded - 4 large whole wheat tortillas - 1 cup romaine lettuce, chopped - 1/2 cup cherry tomatoes, halved - 1/4 cup grated Parmesan cheese - 1/2 cup Caesar dressing (store-bought or homemade) - 1 tsp lemon zest - 1/2 tsp garlic powder - Salt and pepper to taste Begin by placing the shredded chicken in a large bowl. Add the chopped romaine lettuce, halved cherry tomatoes, and grated Parmesan cheese. Mix well to combine all the flavors. Next, grab a small bowl. In there, mix the Caesar dressing with lemon zest, garlic powder, salt, and pepper. Stir until it blends nicely. This will add extra flavor to your wraps. Now, drizzle the dressing mixture over the chicken and veggie mix. Use a spatula to gently toss everything together. Make sure all the pieces get coated in the dressing. Lay one tortilla flat on a clean surface. Use a spoon to scoop an even amount of the chicken Caesar mixture. Place it in the center of the tortilla. Fold the sides of the tortilla over the filling. Start rolling from the bottom up. Keep it tight to secure the filling inside. This will help prevent spills when you eat. Repeat this process with the remaining tortillas and filling. If you like, slice each wrap in half at a diagonal. This makes them easier to eat and look nice on the plate. To serve, place the wraps on a platter. For a colorful touch, garnish with extra cherry tomato halves. You can sprinkle more Parmesan on top too. This adds a nice look and taste. If you want to take it up a notch, serve the wraps with fresh lemon wedges. This will give a nice zest to every bite. Enjoy your Chicken Caesar Wraps! To make your Chicken Caesar Wraps burst with flavor, start with fresh ingredients. Use bright romaine lettuce and ripe cherry tomatoes. For extra zing, add lemon zest and garlic powder to your dressing. Mixing those into your Caesar dressing enhances the taste. You can also sprinkle some extra Parmesan on top when serving. This adds a nice touch and makes the wraps look appetizing. When meal prepping, keep the ingredients separate until you're ready to eat. This keeps your tortillas from getting soggy. Store the chicken, veggies, and dressing in separate containers. This way, you can assemble the wraps fresh each time. Lay out your tortilla, add the filling in the center, and roll tightly. Make sure to tuck in the sides as you roll. This keeps everything snug and prevents spills. For making Chicken Caesar Wraps, you need a few basic tools. A sharp knife is key for chopping your veggies. A large bowl helps mix your filling well. If you have a cutting board, it makes assembly easier. I recommend keeping a spatula handy for mixing too. Using these tools will make your wrap-making process smooth and fun! {{image_2}} You can change the protein in your wrap. Try shrimp for a seafood twist. Cook shrimp in garlic and lemon for extra flavor. Tofu is another great option. Use firm tofu and pan-fry it until golden. Marinate it in soy sauce or a spicy sauce for more taste. These proteins work well with the Caesar flavor. While Caesar dressing is classic, there are many other options. Try ranch dressing for a creamy touch. Or use a tangy vinaigrette for a fresh flavor. A yogurt-based dressing gives a lighter option. You can also add spices like sriracha or chili powder for heat. These different dressings can change the whole taste of your wrap. Mixing up the veggies can add fun to your wraps. Swap romaine for spinach or kale for a twist. Add sliced bell peppers for crunch and color. You can also include cucumbers for a refreshing bite. Try adding shredded carrots or avocado for creaminess. These simple swaps keep your wraps exciting and tasty. To keep your Chicken Caesar Wraps fresh, wrap each one tightly in plastic wrap. This helps keep air out and moisture in. You can also place them in a sealed container. Make sure to remove any excess air. This method will help prevent sogginess. Use airtight containers for the wraps. Glass or BPA-free plastic containers work well. If you want to save space, consider using a flat container. You can stack the wraps without squishing them. Another option is to use freezer bags, but lay them flat in the fridge. You can keep Chicken Caesar Wraps in the fridge for about three days. After that, they may lose their taste and texture. If you want to store them longer, consider freezing. Frozen wraps can last up to three months. Just remember to thaw them in the fridge before eating. You can use ranch dressing if you want a milder taste. Greek yogurt adds creaminess too. Try a homemade dressing with yogurt, lemon, and garlic for a fresh twist. If you like a kick, add a bit of hot sauce. You can mix and match until you find what you love! Yes, you can make these wraps ahead. Prepare the chicken and veggies and store them in the fridge. Keep the tortillas and dressing separate until you are ready to eat. This keeps the wraps fresh and crunchy. You can assemble them in about five minutes when you are ready. Pair these wraps with a side salad for a fresh crunch. Chips or sweet potato fries add a nice touch too. You can also serve fruit for a sweet note. For drinks, try iced tea or lemonade. Check the full recipe for more ideas on how to make your meal complete! In this post, I covered how to make Chicken Caesar Wraps. You learned about key ingredients, preparation steps, and tips for flavor. I also shared storage info and answered common questions. Embrace the chance to try new variations or ingredients. Don't hesitate to get creative. With these wraps, you can enjoy a simple meal any day. Happy cooking!

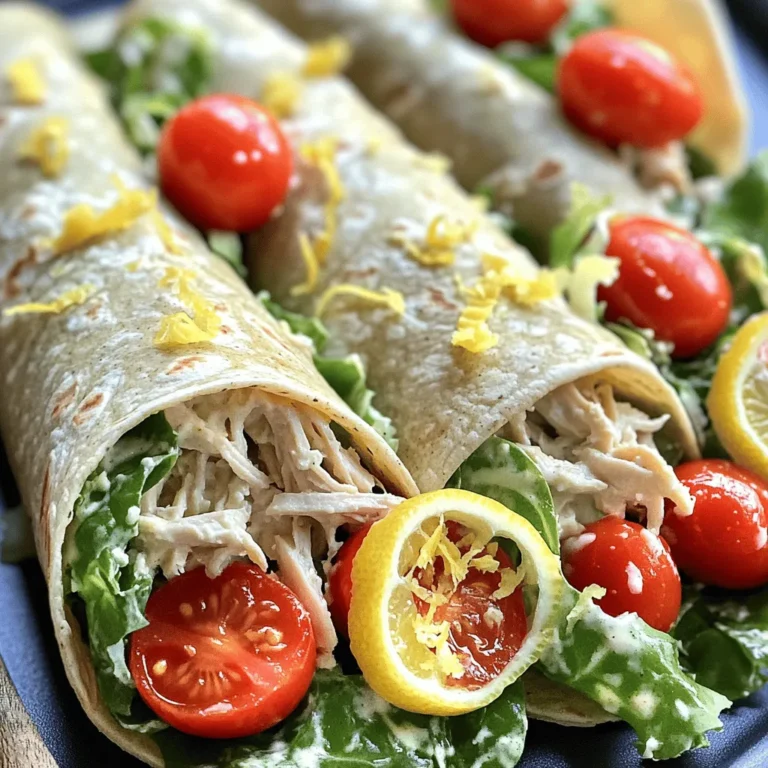
Chicken Caesar Wraps Easy and Tasty Meal Prep Tips

To make a delicious Strawberry Spinach Smoothie, gather these simple ingredients: - 1 cup fresh spinach, washed and chopped - 1 cup strawberries, hulled and halved - 1 banana, sliced - 1/2 cup Greek yogurt (plain or vanilla) - 1 cup almond milk (or any milk of choice) - 1 tablespoon honey or maple syrup (optional, to taste) - 1 tablespoon chia seeds - Ice cubes (optional, for a chilled smoothie) You can change this smoothie to fit your taste. Here are some options: - Swap almond milk for coconut milk or oat milk. - Use any fresh fruit like blueberries or mango instead of strawberries. - If you want a creamier texture, try adding avocado. - You can replace Greek yogurt with a dairy-free yogurt or silken tofu. Each ingredient in this smoothie has amazing health benefits. - Spinach: It packs vitamins A, C, and K. It also has iron, which helps your blood. - Strawberries: They are full of vitamin C and antioxidants. They can help your heart. - Bananas: They give you energy and contain potassium. This can help your muscles. - Greek Yogurt: It has protein and probiotics, which are good for your gut. - Chia Seeds: They are high in fiber and omega-3 fatty acids. They can keep you full longer. This smoothie is not just tasty; it is a treat for your body too! First, gather your ingredients. You need fresh spinach, strawberries, and a banana. Make sure to wash the spinach well and chop it. Hull and halve the strawberries. Slice the banana into small pieces. This helps the blender mix everything smoothly. Next, add the spinach, strawberries, and banana to the blender. Pour in the Greek yogurt and almond milk. If you want it sweeter, add honey or maple syrup. Sprinkle in the chia seeds for extra nutrition. Secure the lid tightly. Blend on high speed until the mix is smooth and creamy. If you like a thicker smoothie, toss in a handful of ice cubes. Blend again until you reach the texture you want. Remember to taste your smoothie. If it needs more sweetness, just add a little more honey or syrup. This way, you can make it perfect for your taste! To make the best Strawberry Spinach Smoothie, start with fresh ingredients. Look for vibrant spinach and bright red strawberries. Fresh spinach adds a crisp taste and vital nutrients. Choose strawberries that smell sweet and are firm. Always wash your spinach and strawberries well. This removes dirt and pesticides. For the best flavor, use ripe bananas. They should be yellow with a few brown spots. Want to boost the taste? Try adding a splash of vanilla extract. This gives a rich flavor to the smoothie. You can also use flavored Greek yogurt for a twist. For a fun kick, add a pinch of cinnamon. It adds warmth and depth. If you like a tangy taste, squeeze in some lemon juice. This brightens up the flavors. Adjust the sweetness based on your taste. Start with one tablespoon of honey or maple syrup. Blend and taste. If you want it sweeter, add more. You can control the texture too. For a thicker smoothie, add more ice cubes. For a thinner texture, add more almond milk. Keep blending until you reach your desired consistency. {{image_2}} You can mix fruits to change the flavor. Try using blueberries or raspberries. These berries add a nice twist. You can also use mango for a tropical taste. Adjust the amount of spinach if you want more fruit. Each fruit brings its own benefits and flavors. To make this smoothie dairy-free, swap Greek yogurt for coconut yogurt. Almond milk works well, but you can use oat or soy milk too. For sweetness, use maple syrup instead of honey. This keeps the smoothie vegan and still tasty. Want more nutrition? Add a scoop of protein powder. You can also add more seeds like flaxseed. Nut butters, like almond or peanut, add creaminess and protein. For a vitamin boost, toss in some kale. These additions make your smoothie even healthier. If you have smoothie left, store it in the fridge. Use a sealed jar or bottle. Drink it within one day for the best taste. The smoothie can lose its freshness and nutrients over time. You can freeze leftover smoothie for later. Pour it into ice cube trays or freezer-safe bags. This way, you can use it for quick drinks or snacks. To thaw, place it in the fridge overnight. Choose glass jars or BPA-free plastic containers. These keep the smoothie fresh and safe. Make sure the container seals tightly. This helps keep air out and flavor in. To make a Strawberry Spinach Smoothie, gather your ingredients. You need fresh spinach, strawberries, banana, Greek yogurt, almond milk, chia seeds, and optional sweeteners. Start by washing and chopping the spinach. Then hull and half the strawberries. Slice the banana. In a blender, combine the spinach, strawberries, and banana. Add Greek yogurt and almond milk. If you want more sweetness, add honey or maple syrup. Then, sprinkle in chia seeds for extra nutrition. Blend everything on high speed until smooth. If you want it colder, add ice cubes and blend again. Taste it, and adjust sweetness if needed. Pour into a glass and enjoy! Yes, you can use frozen strawberries! They make your smoothie cold and thick. Frozen fruit often has a similar taste and nutrition as fresh fruit. If you use frozen strawberries, you might not need ice cubes. Just blend the frozen strawberries with the other ingredients. This will give your smoothie a nice, chilled texture. This smoothie is packed with health benefits. Spinach is rich in vitamins and minerals. It helps with digestion and boosts your immune system. Strawberries are full of antioxidants. They support heart health and can help lower blood pressure. Bananas provide energy and potassium. Greek yogurt adds protein, which keeps you full longer. Chia seeds are a great source of fiber, which aids digestion. Overall, this smoothie delivers essential nutrients and supports a healthy diet. In this article, we explored how to create a delicious smoothie. We covered the complete ingredient list, optional substitutions, and the nutritional benefits. You learned step-by-step instructions for blending and mixing. Tips for fresh ingredients, flavor boosts, and customizing sweetness were also shared. Finally, we discussed variations, storage methods, and answered common questions. Make your smoothie fun, tasty, and healthy. Enjoy experimenting with flavors and ingredients to find your favorite blend!

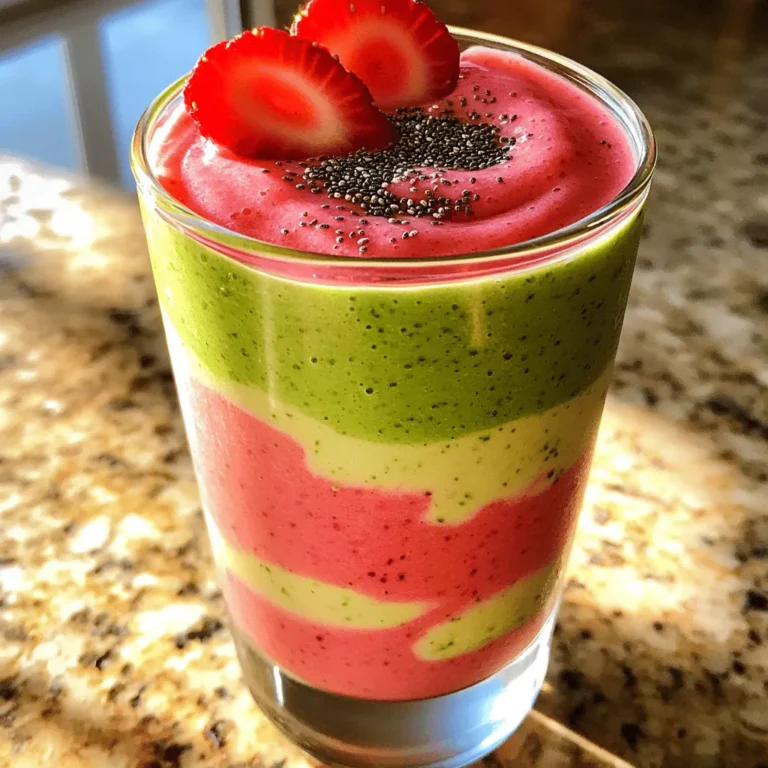
Strawberry Spinach Smoothie Healthy and Refreshing Treat

- 2 ripe avocados, pitted and peeled - 2 cloves garlic, minced - 2 tablespoons fresh lemon juice - 3 tablespoons olive oil - 1/4 cup fresh basil leaves - 1/4 teaspoon red pepper flakes (optional) - Salt and pepper to taste - 8 oz pasta (spaghetti or linguine recommended) - 1/4 cup cherry tomatoes, halved (for garnish) - Grated Parmesan cheese (optional) For this creamy avocado pasta, you need simple and fresh ingredients. Start with ripe avocados; they give a great texture. Garlic adds a nice kick, while lemon juice brightens the flavor. Olive oil helps blend everything smoothly. Fresh basil gives a lovely aroma. The red pepper flakes add a hint of heat but are optional. Use your choice of pasta; I like spaghetti or linguine. To finish, cherry tomatoes add color and a hint of sweetness. Grated Parmesan is a nice touch for extra flavor if you want it. Gather all these ingredients before you start cooking. This makes the process smooth and fun. To start, fill a large pot with water. Add a good amount of salt to the water. Bring the water to a boil over high heat. Once boiling, add 8 oz of your chosen pasta, like spaghetti or linguine. Cook the pasta according to the package instructions until it is al dente. This means the pasta should still have a slight bite to it. To check, taste a piece a minute or two before the time is up. When done, drain the pasta in a colander. Remember to save a little pasta water for later. This water will help adjust the sauce's thickness. Now, let's make the creamy avocado sauce. Take 2 ripe avocados, pit them, and peel them. Place the avocados in a food processor. Add 2 minced garlic cloves, 2 tablespoons of fresh lemon juice, and 3 tablespoons of olive oil. Toss in 1/4 cup of fresh basil leaves and 1/4 teaspoon of red pepper flakes if you like some heat. Blend everything until it is smooth and creamy. If the sauce is too thick, slowly add some of the reserved pasta water. Blend again until you reach your desired consistency. You want it to be thick but spreadable. In a large bowl, combine the drained pasta with the avocado sauce. Use tongs to toss everything together. Make sure the pasta is well coated in the creamy sauce. After mixing, taste a bit. Add salt and pepper as needed to make it perfect. Now, it’s time to plate! Serve the pasta in shallow bowls. Top it with halved cherry tomatoes for a pop of color. If you like, add some grated Parmesan cheese for extra flavor. Enjoy your delicious dish! To make your creamy avocado pasta even better, think about adding herbs and spices. Fresh herbs like cilantro or parsley can give your dish a bright taste. You may also try adding a pinch of garlic powder for extra depth. If you want some heat, red pepper flakes work well. Balancing creaminess and acidity is key. The lemon juice in the sauce helps cut through the richness of the avocado. If it tastes too creamy, add a little more lemon juice. A splash of pasta water can also help thin it out. When it comes to serving, how you plate your pasta matters. Use shallow bowls for a nice look. Twirl the pasta into a nest shape in the center. This adds height and makes it appealing. You can drizzle extra olive oil over the top for shine and flavor. Garnish with halved cherry tomatoes for color. Fresh basil leaves on top add a pop of green. If you enjoy cheese, sprinkle some grated Parmesan for a savory touch. This creamy avocado pasta is quick to make. Here’s a breakdown of the time needed: - Prep Time: 10 mins - Total Time: 20 mins - Servings: 2-3 You can have a delicious meal ready in just 20 minutes! {{image_2}} To make this dish vegan, swap the Parmesan cheese for a plant-based alternative. Nutritional yeast is a great choice. It adds a cheesy flavor without any dairy. You can also try adding cooked lentils or chickpeas for extra protein. These options keep the meal hearty and satisfying while staying true to vegan values. If you want a gluten-free meal, choose gluten-free pasta made from rice or corn. These options work well with the avocado sauce. When cooking gluten-free pasta, watch the time closely. It often cooks faster than regular pasta. Make sure to taste it to get the right texture. If you don’t have avocados, you can use blended cooked peas for a similar creaminess. Another option is to use silken tofu, which also gives a smooth texture. For the pasta, you can use zucchini noodles or spaghetti squash for a lighter dish. To change the flavor, try adding spinach, arugula, or even sun-dried tomatoes. Each adds a new twist to this easy and flavorful recipe. To keep your creamy avocado pasta fresh, store it in an airtight container. Glass or plastic containers work well. Make sure to cool the pasta before sealing it. This helps prevent condensation, which can make the pasta soggy. If you have leftover sauce, store it separately to keep its creamy texture. Freezing this avocado sauce is simple. First, blend the sauce as usual. Then, pour it into a freezer-safe bag, leaving some space for expansion. Flatten the bag to save space. To reheat, thaw it in the fridge overnight. Once thawed, gently warm it in a pan over low heat. Stir well to bring back its smooth consistency. In the fridge, your creamy avocado pasta lasts about 2-3 days. If you notice any changes in color or smell, it’s best to throw it away. Look for brown spots on the pasta or a sour scent, which means it has spoiled. Always trust your senses! To keep your avocado pasta green, use these tips: - Choose ripe avocados: Ripe avocados stay fresh longer. - Cover tightly: Store in an airtight container to limit air exposure. - Use lemon juice: The acid in lemon juice slows browning. Citrus juice works great! Add two tablespoons of fresh lemon juice to the sauce. This not only adds flavor but also keeps the avocado vibrant. Yes, you can prep this dish ahead of time. Here’s how: - Make the sauce: Blend the avocado sauce first. Store it in the fridge for up to a day. - Cook pasta: You can cook the pasta a day in advance too. When you are ready to serve, just heat the pasta and mix it with the avocado sauce. Add salt and pepper to taste. Creamy avocado pasta pairs well with several sides. Try these ideas: - Salads: A simple green salad or a fresh tomato salad works nicely. - Bread: Serve with crusty bread for a filling meal. For drinks, a light white wine like Pinot Grigio complements the dish well. If you prefer non-alcoholic, a sparkling lemon water is refreshing! This blog post showed you how to make creamy avocado pasta. We covered the key ingredients, step-by-step instructions, and helpful tips. You learned about variations, storage, and ways to prevent browning. In summary, this dish is easy and quick to prepare. Enjoy using fresh ingredients and customizing to your taste. It's perfect for any meal. Now, get cooking and savor every bite!

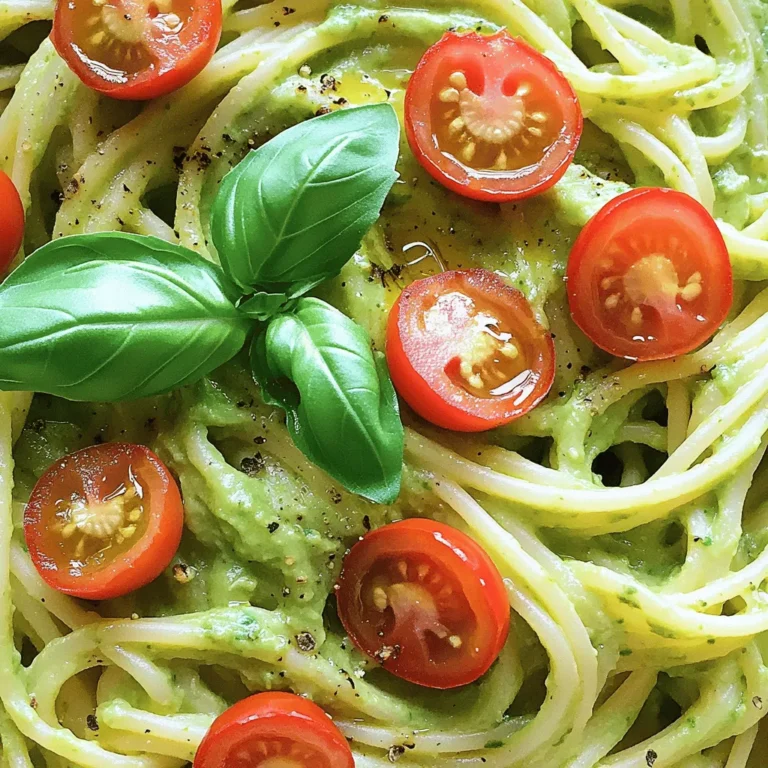
Creamy Avocado Pasta Easy and Flavorful Recipe

To make these snickerdoodle blondies, gather these simple ingredients: - 1 cup unsalted butter, melted - 1 cup brown sugar, packed - 1/2 cup granulated sugar - 2 large eggs - 2 teaspoons vanilla extract - 2 cups all-purpose flour - 1 teaspoon baking powder - 1/2 teaspoon baking soda - 1 teaspoon ground cinnamon - 1/2 teaspoon salt - 1/4 cup granulated sugar (for topping) - 2 teaspoons cinnamon (for topping) You can substitute some ingredients if needed. Use coconut oil instead of unsalted butter for a dairy-free option. For a gluten-free version, try a gluten-free flour blend. If you lack brown sugar, use regular sugar with a bit of molasses mixed in. This recipe yields about 20 squares. It’s perfect for sharing or enjoying over a few days. Each square is rich and flavorful, making it a great treat for any occasion. First, you need to preheat your oven to 350°F (175°C). This makes sure the heat is ready when you bake. Next, grab a 9x13 inch baking pan. You can grease it with butter or line it with parchment paper. This step helps the blondies come out easily after baking. In a large mixing bowl, combine the melted butter, brown sugar, and granulated sugar. Use a whisk or a spatula to mix until it is smooth and creamy. This should take about one to two minutes. Then, add the eggs one at a time. Beat each egg in well before adding the next. Stir in the vanilla extract, making sure it is fully mixed. This will add flavor to your blondies. Now, take another bowl and whisk together the flour, baking powder, baking soda, cinnamon, and salt. This mixture adds structure and flavor. Gradually add this dry mix to your wet ingredients. Stir until just combined. Do not overmix; you want the batter to be thick and smooth. Pour the batter into your prepared pan, spreading it evenly with a spatula. Before baking, mix the 1/4 cup sugar and 2 teaspoons cinnamon in a small bowl. Sprinkle this mix over the top of the batter. This gives a sweet, crunchy layer. Bake in the oven for 20-25 minutes. You know they are done when a toothpick comes out clean from the center. After baking, let the blondies cool for about 15 minutes in the pan. Then, slice them into squares and enjoy! To get the best texture in your Snickerdoodle Blondies, focus on how you mix. Start with melted butter and sugars; mix until smooth. This makes your blondies chewy. When you add flour, mix just until combined. Overmixing can lead to tough blondies. Remember, a few lumps are okay! Letting your batter rest for a few minutes can also help improve texture. Want to jazz up your blondies? Add nuts or chocolate chips! Chopped walnuts or pecans work well. They add crunch and flavor. Chocolate chips also blend nicely with the cinnamon. A half cup of either will make your blondies even better. You can even swirl in some peanut butter for a twist. Here are some mistakes to avoid for perfect blondies. First, don’t skip the baking powder. It helps your blondies rise. Second, make sure your oven is preheated. This ensures even baking. Lastly, avoid opening the oven door too early. This can cause them to sink in the middle. Keep these tips in mind, and your blondies will be a hit! {{image_2}} You can easily make vegan snickerdoodle blondies. Use plant-based butter and flax eggs. To make one flax egg, mix one tablespoon of flaxseed meal with three tablespoons of water. Let it sit for five minutes. This mixture works great in place of eggs. Use coconut sugar for a deeper flavor. The taste stays rich and sweet, just like the original recipe. For gluten-free blondies, swap all-purpose flour with a gluten-free blend. Look for a blend that includes xanthan gum for best results. This helps give the blondies a nice texture. Ensure all other ingredients are gluten-free, like the baking powder. You’ll enjoy a chewy, tasty treat that everyone can enjoy. You can mix in different flavors to keep things exciting. Pumpkin spice adds warmth for fall treats. Just replace some cinnamon with pumpkin spice. Nutmeg is another great option. A pinch can elevate the flavor profile. Try these fun twists to keep your baking fresh and fun. To keep your snickerdoodle blondies fresh, store them in an airtight container. Place parchment paper between layers to prevent sticking. Keep the container at room temperature for up to four days. If you live in a humid area, consider refrigerating them to extend their shelf life. Freezing blondies is easy. First, let them cool completely. Then, cut them into squares. Wrap each square in plastic wrap and place them in a freezer-safe bag. They can last up to three months in the freezer. Label the bag with the date for easy reference. When you're ready to enjoy your frozen blondies, remove the desired amount from the freezer. Let them thaw at room temperature for about an hour. For a warm treat, pop them in the microwave for 10-15 seconds. You can also reheat them in the oven at 350°F (175°C) for about 5-10 minutes. Enjoy them warm for the best flavor! Snickerdoodle blondies are soft, chewy bars that mix flavors of snickerdoodle cookies with blondies. They are made with butter, brown sugar, and sweet vanilla. The cinnamon adds warmth and spice to each bite. These treats are a twist on classic desserts, perfect for sharing. You can check if your blondies are done by inserting a toothpick into the center. If it comes out clean or with a few crumbs, they are ready. If it has wet batter, they need more time. Bake them for 20-25 minutes for the best results. Yes, you can use brown sugar instead of granulated sugar. Brown sugar adds moisture and a deeper flavor. It will make your blondies even more rich and chewy. Just remember to pack the brown sugar when measuring for the right amount. Blondies are made with brown sugar, giving them a butterscotch flavor. They don't have cocoa powder like brownies. Blondies are lighter in color and taste sweeter. Brownies are denser and chocolatey. Both are delicious, but they offer different flavors and textures. You can find the full recipe right here! Just follow the step-by-step instructions I shared. You will need simple ingredients and about 40 minutes to make these tasty blondies. Enjoy baking and sharing them with your friends! In this blog post, we explored how to make delicious Snickerdoodle Blondies. We covered key ingredients, step-by-step baking instructions, and helpful tips for the perfect treat. I shared ways to customize your blondies and ensure proper storage. Enjoy your baking journey. These blondies will surely impress friends and family!

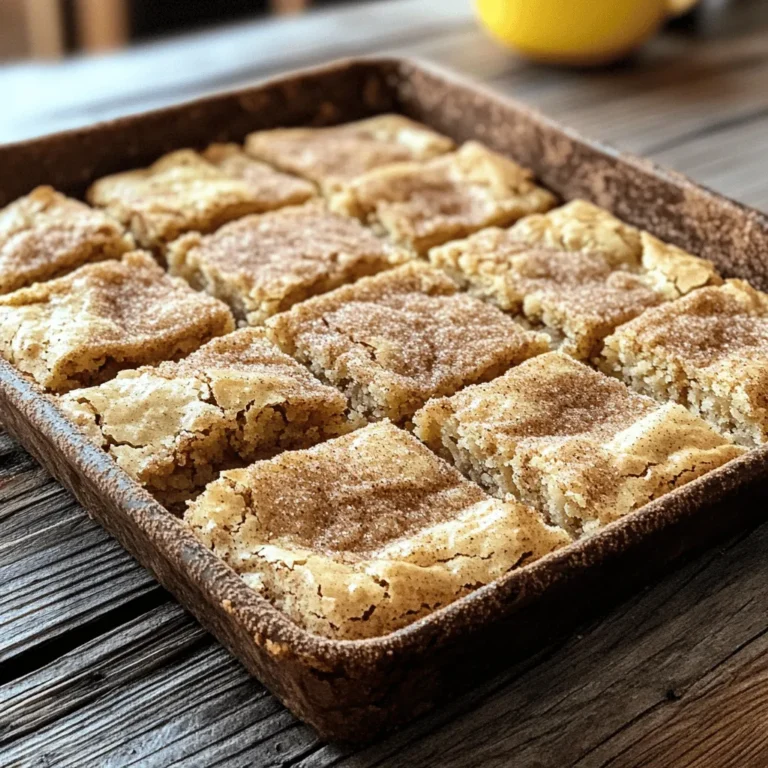
Snickerdoodle Blondies Tasty and Easy Dessert Recipe

PREV 1 … 40 41 42 … 57 NEXT
meal twig

explore

DessertsDinnerAppetizersDrinks

Our Policies

  • Cookie Policy
  • Copyright Policy
  • Disclaimer
  • GDPR Policy
  • Terms Of Use
Back to Top
  • About
  • Contact Us
  • Privacy Policy
© 2025 meal twig