FREE DINNER EBOOK! Get your copy!
  • Cookie Policy
  • GDPR Policy
  • Disclaimer
  • Terms Of Use
  • Visit my other site: Fun Cookie Recipes
meal twig
  • Home
  • Dinner
  • Desserts
  • Drinks
  • Appetizers
  • Contact
  • About
  • Privacy Policy
  • Home
  • Dinner
  • Desserts
  • Drinks
  • Appetizers
  • Contact
  • About
  • Privacy Policy
  • Cookie Policy
  • GDPR Policy
  • Disclaimer
  • Terms Of Use
Visit my other site: Fun Cookie Recipes

HOME / CATEGORIES /

Latest

You need 2 cups of cottage cheese for this recipe. I like using 1% or 2% fat for a nice creaminess. Cottage cheese brings protein and a smooth texture to your ice cream. It serves as the base and gives it a rich taste without being too heavy. For sweetness, use 1/4 cup of honey or maple syrup. You can adjust this to fit your taste. If you prefer less sugar, try using a sugar substitute. The sweetener balances the flavor of the cottage cheese well. It makes your ice cream delightful and satisfying. You will also need 1/2 cup of unsweetened almond milk. This helps blend everything smoothly. Add 1 teaspoon of vanilla extract for a warm, inviting flavor. If you want extra creaminess and protein, include 1/2 cup of Greek yogurt. For a treat, mix in 1/4 cup of dark chocolate chips. Finally, a pinch of sea salt enhances all the flavors. To start, gather your ingredients. You need: - 2 cups cottage cheese (preferably 1% or 2% for creaminess) - 1/2 cup unsweetened almond milk (or any milk of your choice) - 1/4 cup honey or maple syrup (adjust based on sweetness preference) - 1 teaspoon vanilla extract - 1/2 cup Greek yogurt (for extra creaminess and protein) - 1/4 cup dark chocolate chips (optional, for chocolate lovers) - A pinch of sea salt Now, grab a blender or food processor. Add the cottage cheese, almond milk, and sweetener. Don’t forget the vanilla extract and Greek yogurt. Blend all the ingredients until smooth. You want a creamy texture. If you notice lumps, scrape the sides and blend again. Taste the mixture. If it needs more sweetness, add more honey or maple syrup. A pinch of sea salt boosts the flavor. If you love chocolate, fold in the dark chocolate chips gently after blending. This adds a rich touch to your ice cream. Pour the blended mixture into your ice cream maker. Churn it according to the manufacturer's instructions. This usually takes about 20 to 25 minutes. You’ll see it transform into a soft-serve texture. If you prefer a firmer ice cream, transfer it to a freezer-safe container. Freeze it for 2 to 3 hours. Before serving, let it warm up for a few minutes. This makes scooping easier. Enjoy your healthy, high-protein treat! To get a smooth and creamy texture, use 1% or 2% cottage cheese. Blend it well with almond milk and Greek yogurt. If your ice cream is too soft, freeze it for a few hours. This helps it firm up nicely. Let it sit out for a few minutes before serving. This makes it easier to scoop. Vanilla extract adds a sweet touch. You can also play with sweeteners like honey or maple syrup. Adjust the sweetness to fit your taste. For chocolate lovers, fold in dark chocolate chips after blending. A pinch of sea salt also boosts the flavor. Don't skip this step; it makes a big difference! Serve this ice cream in elegant bowls. Top with fresh berries or a drizzle of honey for extra flair. Crushed nuts or coconut flakes add a nice crunch. You can also use colorful sprinkles for a fun look. A beautiful presentation makes your treat even more tempting! {{image_2}} This cottage cheese ice cream packs a protein punch. Each serving has about 15 grams of protein. It comes mainly from the cottage cheese and Greek yogurt. Together, they boost this sweet treat's nutrition. This is much higher than regular ice cream, which often has little protein. Cottage cheese is a true superfood. It is low in fat and rich in calcium. Calcium helps keep bones strong. It also helps you feel full longer. This means you might eat less later. The probiotics in Greek yogurt can aid your gut health. This makes cottage cheese ice cream a smart choice for your diet. Traditional ice cream can be high in sugar and fat. It often has fewer nutrients, too. In contrast, cottage cheese ice cream offers a healthier option. It keeps the creamy texture while cutting down on calories. You get a delicious dessert without the guilt. Enjoying a scoop of this ice cream means treating yourself well. You can change the flavor of your cottage cheese ice cream easily. Here are some fun ideas: - Chocolate: Add cocoa powder or melted dark chocolate. - Fruit: Blend in fresh fruits like strawberries or mangoes. - Nutty: Stir in almond butter for a creamy, nutty taste. - Coffee: Mix in brewed coffee for a classic coffee flavor. These ideas make the ice cream exciting every time you make it. If you want a dairy-free version, swap the cottage cheese with silken tofu. It still gives a creamy texture. Use coconut milk instead of almond milk for more flavor. Maple syrup stays a great choice for sweetening. This way, you can enjoy the ice cream without dairy! Add fun textures and flavors with mix-ins and toppings. Here are some great options: - Nuts: Chopped almonds or walnuts give a crunchy bite. - Choc Chips: Dark chocolate chips add a sweet touch. - Coconut Flakes: Add unsweetened coconut for tropical vibes. - Fresh Fruit: Top with berries or banana slices for extra freshness. You can mix these in right before churning or top them when serving. This makes each scoop a surprise! You can use Greek yogurt instead of cottage cheese. Greek yogurt gives a creamy texture. It also adds extra protein. However, the taste will change slightly. If you like the tangy flavor of yogurt, go for it! Just remember to adjust the liquid in your recipe. Greek yogurt is thicker, so you may want to add a bit more almond milk. This swap makes the ice cream lighter but still tasty. Cottage cheese ice cream lasts about two weeks in the freezer. After that, it may lose its best taste and texture. To keep it fresh, store it in a tight container. Make sure to press plastic wrap on top before putting on the lid. This helps to avoid ice crystals. If you notice any freezer burn, don’t eat it. It will affect the flavor and texture. Yes, this recipe is great for weight loss diets. Cottage cheese is low in fat and high in protein. This helps you feel full longer. Using honey or maple syrup keeps added sugar low. You control how sweet it is. You can also skip the chocolate chips to cut calories. This ice cream is a healthy choice. It allows you to enjoy a sweet treat without guilt. This blog post explored how to make delicious cottage cheese ice cream. We covered the key ingredients, like cottage cheese and sweeteners, and how to prepare and blend them. I shared tips for the perfect texture and flavor, plus nutritional info. You can try different flavors, dairy-free options, and fun toppings. Remember, this ice cream is a healthy treat that can fit into your diet. Enjoy mixing, tasting, and creating your own unique version!

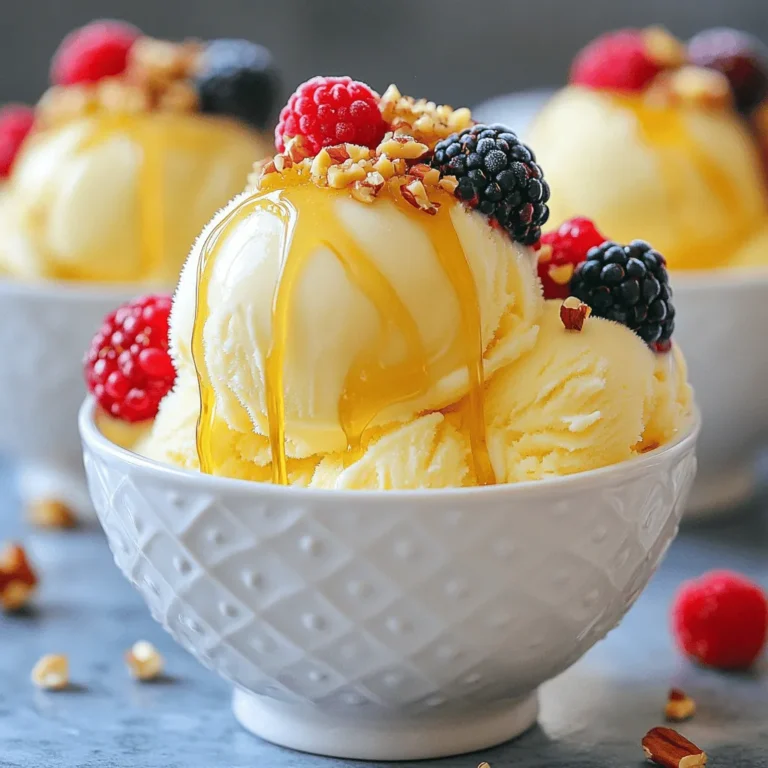
Cottage Cheese Ice Cream High Protein Sweet Treat

- 1 block (14 oz) firm tofu, drained and pressed - ¼ cup teriyaki sauce - 2 tablespoons cornstarch - 1 tablespoon sesame oil - 1 cup cooked brown rice or quinoa - 1 cup broccoli florets - ½ red bell pepper, thinly sliced - ½ cup shredded carrots - 2 green onions, chopped for garnish - 1 tablespoon sesame seeds - Salt and pepper to taste These main ingredients create a balanced and tasty bowl. The firm tofu gives protein and texture. Teriyaki sauce adds a sweet and salty flavor. Cornstarch helps the tofu get that perfect crunch. Sesame oil adds richness and depth to each bite. - Chopped green onions - Sesame seeds - Extra teriyaki sauce for drizzling - Sliced avocado - Crushed red pepper flakes Garnishes enhance the dish. Green onions add freshness. Sesame seeds offer a nice crunch. You can drizzle more teriyaki sauce for extra flavor. Avocado adds creaminess, while red pepper flakes bring heat. - Tofu can be replaced with tempeh or chickpeas for a different protein. - Brown rice can be swapped for quinoa or cauliflower rice for a low-carb option. - Broccoli can be substituted with snap peas or bell pepper for variety. - Sesame oil can be replaced with olive oil or avocado oil. These substitutions keep the dish exciting. You can mix flavors and textures based on what you have. Try different proteins and grains to suit your taste. This flexibility helps you enjoy a new meal each time you make it. To start, we need to get the tofu ready. First, drain and press the tofu. This step helps remove extra water. Wrap the tofu in a clean kitchen towel. Place a heavy pan on top for about 10 minutes. This makes the tofu firmer and better for cooking. Once pressed, cut the tofu into bite-sized cubes. Now it's time to add flavor to the tofu. Place the tofu cubes in a mixing bowl. Pour ¼ cup of teriyaki sauce over the tofu. Let it marinate for 2-3 minutes. This short time allows the tofu to soak up the sauce. Next, we’ll cook the tofu and veggies. Toss the marinated tofu with 2 tablespoons of cornstarch. Make sure each piece is coated well. This will help the tofu get crispy when cooked. Heat 1 tablespoon of sesame oil in a non-stick skillet over medium-high heat. Add the tofu cubes and fry for 6-8 minutes. Look for a golden brown color on all sides. Once the tofu is crispy, take it out and set it aside. In the same pan, add 1 cup of broccoli florets, ½ thinly sliced red bell pepper, and ½ cup of shredded carrots. Stir-fry these for about 3-4 minutes. You want the veggies to be tender but still crisp. Season with a pinch of salt and pepper. Finally, add the crispy tofu back into the pan. Drizzle any leftover teriyaki sauce on top. Toss everything together to coat well. Now it's ready to serve! Place the tofu and veggie mix over cooked brown rice or quinoa. Don't forget to garnish with chopped green onions and sprinkle sesame seeds on top for added flavor and crunch. Enjoy your delicious bowl! Tofu can be tricky. To get that perfect crisp, start by pressing the tofu. This step removes extra moisture. Wrap the tofu in a clean kitchen towel. Place a heavy pan on top for about 10 minutes. After pressing, cut the tofu into bite-sized cubes. Toss them in cornstarch. This coating is key for crispiness. When you fry the tofu, use medium-high heat. This helps achieve a golden brown color. Don't overcrowd the pan. Cook in batches if needed. Meal prep can make your week easier. You can press and marinate the tofu in advance. Store it in the fridge for up to two days. Just remember to coat it with cornstarch right before cooking. You can also chop the veggies earlier. Keep them in sealed bags to stay fresh. Cooked rice or quinoa can last in the fridge for up to five days. This makes it easy to grab and go. Want to mix things up? Try different sauces. Swap teriyaki for sweet chili sauce. You can also use peanut sauce for a nutty kick. Add spices like garlic powder or smoked paprika for extra flavor. Fresh herbs can brighten the dish too. Try cilantro or basil as a garnish. If you're feeling adventurous, toss in some pineapple chunks for sweetness. These variations keep the dish exciting and fresh. {{image_2}} If you want to shake things up, try using tempeh instead of tofu. Tempeh has a firmer texture and a nutty taste. You can also use seitan for a chewy, protein-rich option. For a lighter dish, swap the tofu for chickpeas. Simply roast them with some teriyaki sauce for added flavor. For a gluten-free alternative, make sure to choose a gluten-free teriyaki sauce. Many brands offer this option, and it tastes just as good. Pair your crispy tofu with quinoa, as it is naturally gluten-free. You can also use cauliflower rice for a low-carb choice that still packs flavor. Serve your crispy teriyaki tofu over cooked brown rice or quinoa for a filling meal. Add a side of steamed edamame for extra protein. You can also top your bowl with avocado slices or pickled ginger for a fresh twist. Don’t forget the green onions and sesame seeds for that final crunch! To store leftovers, wait until the dish cools. Place the tofu and veggies in an airtight container. You can keep them in the fridge for up to three days. If you want to keep it fresh longer, separate the rice or quinoa. This helps maintain texture. To reheat, use the microwave or a skillet. For the microwave, place the bowl in for one to two minutes. Stir halfway through to heat evenly. If you use a skillet, add a splash of water. Heat on medium until warm. This keeps the tofu from drying out. You can freeze the tofu, but it may change texture. To freeze, cool the tofu and veggies completely. Place them in a freezer-safe bag or container. Squeeze out excess air to avoid frostbite. Use within three months for the best taste. When ready, thaw in the fridge overnight before reheating. Yes, you can use chicken, shrimp, or tempeh. Each protein has a different texture and flavor. Chicken works well, but it takes longer to cook. Shrimp cooks fast, so watch it closely. Tempeh has a nutty taste that pairs nicely with teriyaki sauce. Adjust cooking times based on your choice. To keep tofu crispy, press it well before cooking. Remove moisture to help it crisp up. Coat it with cornstarch; this adds a crunchy layer. Cook it in a hot pan with sesame oil. Avoid crowding the pan; this traps steam and makes it soggy. Serve right away for the best texture. To make it more filling, add grains like quinoa or brown rice. These provide extra fiber and nutrients. You can also add more veggies, like bell peppers or spinach. For protein, sprinkle in some edamame or chopped nuts. These options keep the meal healthy and satisfying. In this blog post, we explored the world of tofu cooking. You learned about the main ingredients, garnishes, and substitutions. The step-by-step guide helped you prep, marinate, and cook tofu and veggies. Tips for crispiness, meal prep, and flavor variations added value. We also covered vegan and gluten-free options, along with storage info. Tofu is versatile and easy to adapt. Use the suggestions here to create tasty meals. Enjoy experimenting with flavors and methods to find your favorite ways to cook tofu!

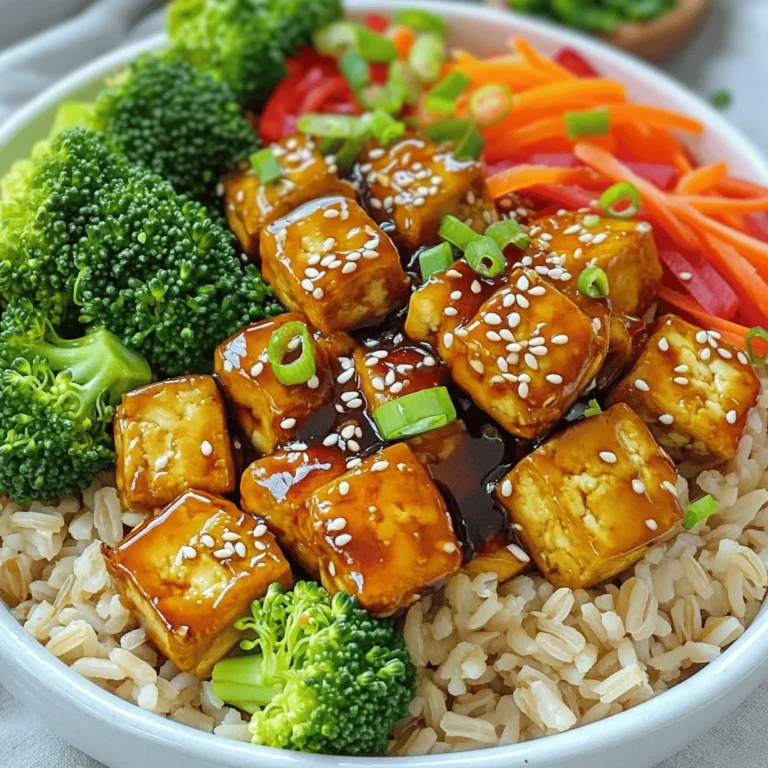
Crispy Teriyaki Tofu Bowls 15-Minute Flavor Boost

In this dish, every ingredient plays a vital role in creating flavor. Here’s what you need: - 4 boneless skinless chicken thighs - 2 cups baby potatoes, halved - 1 cup heavy cream - 1/2 cup basil pesto - 1 teaspoon garlic powder - 1 teaspoon onion powder - Salt and pepper to taste - 2 tablespoons olive oil - 1/2 cup grated Parmesan cheese - Fresh basil leaves for garnish Each ingredient adds its own special touch. The chicken thighs provide a juicy base. Baby potatoes add heartiness. The heavy cream and pesto create a rich sauce. Garlic and onion powder give depth, while Parmesan cheese adds a savory finish. Fresh basil is a must for color and flavor. When you gather these ingredients, you set the stage for a delicious meal. Enjoy the process of cooking and the joy of sharing this dish with others! - Preheat Oven and Prepare Skillet Start by preheating your oven to 400°F (200°C). Grab a large oven-safe skillet. Add two tablespoons of olive oil to the skillet and heat it over medium heat. - Seasoning the Chicken Thighs While the skillet heats, take four boneless, skinless chicken thighs. Season both sides with salt, pepper, garlic powder, and onion powder. Make sure the seasoning is even. - Searing the Chicken Once the oil is hot, carefully add the chicken thighs to the skillet. Sear them for about five minutes on each side until they're golden brown. After searing, remove the chicken and set it aside on a plate. - Tossing Baby Potatoes with Oil and Seasonings In the same skillet, toss in two cups of halved baby potatoes. Use any leftover oil and seasonings. Stir the potatoes for about five to seven minutes. They should start to soften. - Mixing Cream and Pesto In a separate bowl, mix one cup of heavy cream with half a cup of basil pesto. Stir until the mixture is well combined. This creamy sauce will bring great flavor to the dish. - Combining Ingredients in Skillet Pour the creamy pesto mixture over the potatoes in the skillet. Stir to ensure all the potatoes are coated. Next, place the seared chicken thighs back into the skillet, nestling them among the potatoes. Sprinkle half a cup of grated Parmesan cheese over the top. - Baking Process and Timing Now, transfer the skillet to your preheated oven. Bake for 25 to 30 minutes. Check that the chicken is cooked through and the potatoes are tender. After baking, let it cool for a few minutes before serving. - Best Practices for Searing Chicken Start with a hot skillet. This helps brown the chicken well. Season the chicken thighs with salt, pepper, garlic powder, and onion powder. Place them in the pan without crowding. Cook for about 5 minutes on each side. You want a golden crust for flavor. - Ensuring Potatoes Are Tender Cut the baby potatoes in half. This helps them cook faster. Toss them in the skillet with the leftover oil and seasonings. Cook them for about 5-7 minutes. Stir occasionally until they start to soften. - Garnishing with Fresh Basil Once you finish cooking, sprinkle fresh basil leaves on top. This adds color and flavor. The vibrant green contrasts nicely with the creamy dish. - Serving Options (skillet vs. plate) You can serve directly from the skillet. This keeps the dish warm and inviting. If you prefer, plate the chicken and potatoes for a more formal touch. Either way, enjoy the beautiful presentation! {{image_2}} You can switch chicken thighs for chicken breast if you want a leaner option. Chicken breast cooks faster, so check it sooner. If you're looking for a plant-based choice, try tofu. Press the tofu to remove extra water, then cube it. Cook it just like the chicken for a tasty meal. For dairy-free options, swap heavy cream with coconut milk or cashew cream. Both will add creaminess without dairy. Make sure to use dairy-free pesto as well. This way, everyone can enjoy the dish. Adding veggies can make this dish even better. Consider spinach or cherry tomatoes. Spinach wilts down nicely, mixing well with the creamy sauce. Cherry tomatoes add a sweet burst of flavor. Toss them in when mixing the cream and pesto. You can also adjust the amount of pesto and cream to fit your taste. Use more pesto for a bolder flavor. If you like it creamier, just add extra cream. Finding the right balance makes this dish your own. To store leftovers in the fridge, first let the dish cool. Place the chicken and potatoes in an airtight container. This keeps them fresh and tasty. Store in the fridge for up to three days. For reheating, use a microwave or an oven. If using a microwave, heat on medium power. Stir halfway to ensure even heating. In an oven, preheat to 350°F (175°C). Cover the dish with foil to keep it moist. Heat for about 15-20 minutes. To freeze portions, let the dish cool completely. Use freezer-safe containers or bags. Label them with the date. This helps track how long they have been frozen. You can freeze it for up to three months. When you are ready to eat, thaw in the fridge overnight. For a quicker option, you can use a microwave on the defrost setting. After thawing, reheat using the same methods mentioned above. This way, your creamy pesto chicken and potatoes will taste just as good. Yes, you can prepare this dish ahead of time. Cook the chicken and potatoes as directed. Let them cool down. Store them in the fridge for up to two days. When ready to eat, just reheat and serve. This dish pairs well with a simple salad or steamed vegetables. You can also serve it with crusty bread. The bread helps soak up the creamy sauce. Yes, you can use a slow cooker for this recipe. First, brown the chicken in a skillet. Then, place the chicken and potatoes in the slow cooker. Mix the cream and pesto and pour it over the chicken. Cook on low for 4-6 hours. Enjoy the same creamy goodness! This post shared a tasty creamy pesto chicken and potatoes recipe. We covered key ingredients, cooking steps, tips for success, and ideas for variations. You learned how to prepare, cook, and store this dish to keep it fresh. Remember to mix in your favorite veggies for more flavor. I hope you feel inspired to try this simple, delicious recipe soon. Enjoy your cooking and happy eating!

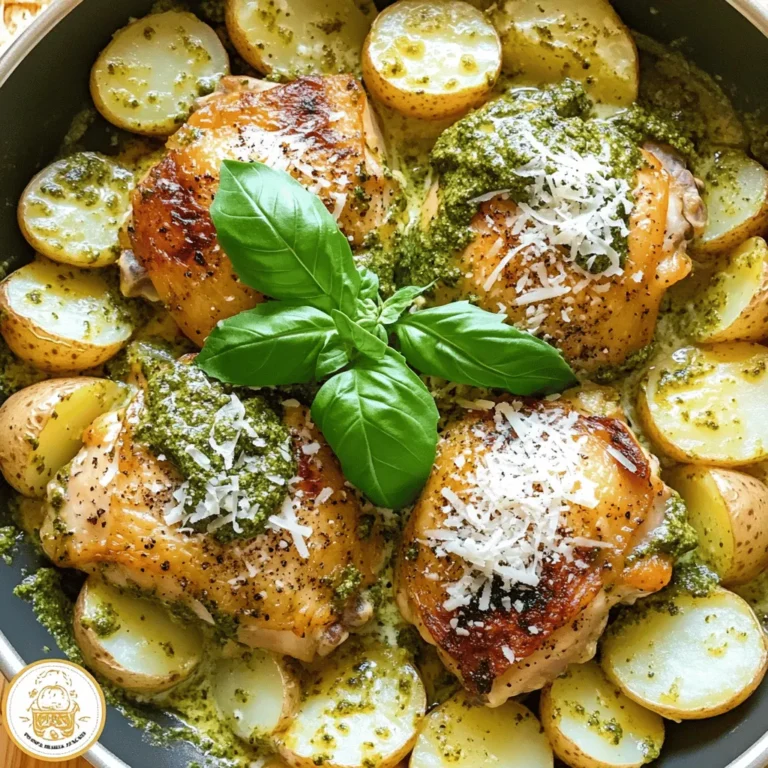
Creamy Pesto Chicken & Potatoes One Pan Delight

- 2 cups rolled oats - 1/2 cup brown sugar, packed - 1 teaspoon baking powder - 1/2 teaspoon salt - 1 teaspoon ground cinnamon - 2 cups almond milk (or regular milk) - 1/4 cup pure maple syrup - 1 large egg - 1 teaspoon vanilla extract - 1 medium ripe banana, mashed - 1/2 cup chopped nuts (walnuts or pecans) - 1/2 cup fresh or dried fruit (blueberries, raisins, or sliced apples) This recipe shines with its simple, wholesome ingredients. Rolled oats provide a great base. They cook well and give a nice chewy texture. Brown sugar adds sweetness. It blends perfectly with maple syrup's rich flavor. Baking powder helps the bake rise, giving it a fluffy feel. Salt and cinnamon enhance the taste. Almond milk makes it creamy, but regular milk works too. A ripe banana adds moisture and natural sweetness. Eggs bind everything together. Nuts and fruits add crunch and flavor. You can change this recipe to fit your taste. Try adding: - Chopped dark chocolate or chocolate chips - Shredded coconut for a tropical twist - Pumpkin puree for a fall flavor - Different nuts like almonds or pecans - Cinnamon or nutmeg for extra spice These options make the dish more fun and tasty. You can mix and match based on what you have at home. This oatmeal bake is not just tasty; it’s also good for you. Here are some benefits: - Rolled oats: High in fiber, great for digestion. - Brown sugar: A less processed sweetener, providing minerals. - Almond milk: Lower in calories than whole milk and dairy-free. - Bananas: Rich in potassium and vitamins. - Nuts: Full of healthy fats and protein. - Fruits: Packed with vitamins, fiber, and antioxidants. Together, these ingredients create a balanced meal. They provide energy and nutrients to start your day right. Start by preheating your oven to 350°F (175°C). This ensures even cooking. Grease a 9x9-inch baking dish to prevent sticking. In a big bowl, mix 2 cups of rolled oats, 1/2 cup of packed brown sugar, 1 teaspoon of baking powder, 1/2 teaspoon of salt, and 1 teaspoon of ground cinnamon. Stir these dry ingredients well. In another bowl, whisk together 2 cups of almond milk, 1/4 cup of pure maple syrup, 1 large egg, 1 teaspoon of vanilla extract, and 1 mashed banana. Make sure to mix until smooth. Now, pour the wet mix into the dry mix and stir until just combined. Don't overmix! Finally, fold in 1/2 cup of chopped nuts and 1/2 cup of your choice of fresh or dried fruit. Transfer your mixture to the greased baking dish. Spread it out evenly. If you want extra crunch, sprinkle more brown sugar and nuts on top. Bake the oatmeal in the preheated oven for about 30-35 minutes. Look for a golden-brown top. Use a toothpick to check if it’s done. If it comes out clean, it’s ready! To get the best texture, don't overmix the batter. This keeps it light and fluffy. If your bake feels too dry, add a splash more almond milk before baking. Let it cool for a few minutes after baking. This helps it set up nicely. When serving, drizzle with extra maple syrup for added sweetness. Enjoy your warm and tasty oatmeal bake! To make your oatmeal bake creamy, use almond milk or any milk you like. The key is to mix the wet and dry ingredients well. Make sure the banana is very ripe. This adds sweetness and moisture. Stir the mixture gently so you don't break the oats. You want them whole for a nice texture, not mushy. Once your bake cools, store it in an airtight container. It stays fresh in the fridge for up to five days. Cut it into squares for easy serving. You can also wrap individual pieces in plastic wrap. This makes it easy to grab for breakfast or a snack. If you want to keep it longer, freeze it. Just wrap tightly and label the date. To boost flavor, try adding a pinch of salt to the batter. This enhances the sweetness of the maple syrup. You can also use different spices like nutmeg or ginger. For texture, mix in some chopped nuts or seeds. They add a nice crunch. Consider adding a layer of fruit on top before baking. This makes it look pretty and adds freshness. {{image_2}} You can switch the almond milk for any other milk you like. Regular cow's milk works great. If you want a nut-free option, try oat milk or soy milk. Each milk adds its own flavor. Choose based on your taste and what you have at home. While I love brown sugar, you can use other sweeteners. Honey or agave syrup can replace brown sugar. Maple syrup gives a nice flavor too. If you want less sugar, try a sugar substitute like stevia. Adjust the amount based on how sweet you want it. Fruits make this dish fun and tasty. You can use blueberries, raisins, or chopped apples. Try mixing dried fruits like cranberries or apricots for a twist. For nuts, walnuts or pecans are great, but you can also use almonds. Experiment with your favorite fruits and nuts for a custom bake! To keep your Maple Brown Sugar Oatmeal Bake fresh, let it cool first. Then, cut it into squares. Place the squares in an airtight container. You can store it in the fridge for up to five days. Make sure to cover the container well. This will help keep the moisture in and prevent it from drying out. If you want to save some for later, freezing is a great option. After cooling, slice the oatmeal bake into squares. Wrap each square tightly in plastic wrap. Then, place them in a freezer-safe bag or container. This way, you can enjoy them for up to three months. When you’re ready to eat, just thaw in the fridge overnight. Reheating your oatmeal bake is easy. For the oven, preheat it to 350°F (175°C). Place a square on a baking sheet and heat for about 10-15 minutes. If you prefer the microwave, place a square on a microwave-safe plate. Heat for about 30-45 seconds. You can drizzle a little extra maple syrup on top for added flavor. Enjoy your warm and tasty treat! Yes, you can use quick oats. However, it may change the texture. Quick oats absorb liquid faster, making the bake softer. If you prefer a firmer texture, stick with rolled oats. To make the oatmeal bake vegan, replace the egg with a flax egg. Mix one tablespoon of ground flaxseed with three tablespoons of water. Let it sit for five minutes to thicken. Use plant-based milk, like almond or oat milk, and ensure your maple syrup is pure. You can try these healthy toppings: - Fresh berries (like blueberries or strawberries) - Sliced bananas - Chopped nuts (walnuts or almonds) - A drizzle of extra maple syrup - A sprinkle of chia seeds or hemp seeds The oatmeal bake lasts about five days in the fridge. Store it in an airtight container to keep it fresh. You can reheat it in the oven or microwave for a quick breakfast. In this article, we explored how to create a delicious Maple Brown Sugar Oatmeal Bake. We covered essential ingredients, step-by-step preparation, and unique tips for perfecting it. You learned about customizing flavors and storing leftovers. This recipe is versatile and nutritious. It fits any meal or occasion. With a few tweaks, you can make it your own. Enjoy experimenting and savoring each bite!

Maple Brown Sugar Oatmeal Bake Easy and Tasty Recipe

For Kung Pao Shrimp, you need: - 1 pound shrimp, peeled and deveined - 1 tablespoon cornstarch - 2 tablespoons sesame oil - 1 red bell pepper, diced - 1 green bell pepper, diced - 1/2 cup unsalted roasted peanuts - 3 green onions, sliced (whites and greens separated) - 3 cloves garlic, minced - 1-inch piece ginger, minced - 2 tablespoons soy sauce - 1 tablespoon rice vinegar - 1 tablespoon hoisin sauce - 1 tablespoon chili paste - Salt and pepper to taste - Cooked white rice or quinoa, for serving Fresh ingredients make a big difference in flavor. The shrimp should be tender and juicy. Fresh bell peppers add crunch and sweetness. Using fresh garlic and ginger gives a strong aroma. When ingredients are fresh, your dish will taste better. This recipe shines with the right quality. You can swap some ingredients based on what you have: - Shrimp: Use chicken or tofu instead if you prefer. - Peppers: Try other colors like yellow or orange bell peppers. - Sauces: If you lack hoisin sauce, use extra soy sauce with a bit of sugar. - Nuts: Swap peanuts for cashews or almonds for a twist. These changes can still give you a delicious meal. Start by grabbing 1 pound of shrimp. Make sure they are peeled and deveined. Place the shrimp in a medium bowl. Sprinkle 1 tablespoon of cornstarch over the shrimp. Toss the shrimp until they are lightly coated. This step helps make the shrimp crispy when we cook them. Next, heat 1 tablespoon of sesame oil in a large skillet or wok. Use medium-high heat for this. Once the oil is hot, add the shrimp. Stir-fry the shrimp for about 2-3 minutes. They should turn pink and be cooked through. Remove the shrimp from the skillet and set them aside. Now, pour in the remaining tablespoon of sesame oil. Add 3 cloves of minced garlic and 1-inch piece of minced ginger. Sauté for about 30 seconds. You want the mixture to smell great. Add diced red and green bell peppers to the skillet. Stir-fry these veggies for about 3-4 minutes. They should be slightly tender but still crisp. Now, stir in the whites of 3 sliced green onions. Add 2 tablespoons of soy sauce, 1 tablespoon of rice vinegar, 1 tablespoon of hoisin sauce, and 1 tablespoon of chili paste. Cook everything together for another minute. This melds all the flavors. Finally, return the shrimp to the skillet along with 1/2 cup of unsalted roasted peanuts. Toss everything until it is well coated and heated through. Season with salt and pepper to taste. Serve your Kung Pao Shrimp over cooked white rice or quinoa. Garnish with the green onion tops for a fresh touch. To make your Kung Pao Shrimp pop, focus on the sauce. Use quality soy sauce and hoisin sauce. These give depth to the dish. Fresh garlic and ginger are key too. They add a bright, bold taste. A splash of rice vinegar balances the flavors. Adjust the chili paste for your spice level. This way, you can control the heat just how you like it. For perfect shrimp, start with cornstarch. Lightly coating the shrimp helps it crisp up. Stir-fry over medium-high heat for just a few minutes. Look for the shrimp to turn pink. Don't overcook them; they will become rubbery. Always remove the shrimp from the pan before adding veggies. This keeps them juicy and tender. Presentation matters. Serve your Kung Pao Shrimp in a large bowl. Add a sprinkle of roasted peanuts on top. Slice green onions for garnish, adding color and crunch. A lime wedge on the side brings brightness. Serve with cooked white rice or quinoa. This makes it a complete and satisfying meal. Enjoy the restaurant feel right at home! {{image_2}} If you want a twist, try adding tofu. Tofu makes the dish even heartier. To do this, cut firm tofu into cubes. Sauté the tofu in sesame oil until golden. Then mix it with the shrimp in the final steps. This gives you a great contrast in texture. Adjusting spice levels is easy. If you like it mild, use less chili paste. You can skip it altogether if you want no heat. For extra spice, add more chili paste or red pepper flakes. Taste as you go to find what you love. You can mix in various vegetables for fun. Broccoli, snap peas, or carrots work well. Just chop them into bite-sized pieces. Stir-fry them after the garlic and ginger. This adds color and nutrition to your meal. Make it your own by using what you have on hand. To store your Kung Pao Shrimp, let it cool first. Place it in an airtight container. It will stay fresh in the fridge for up to three days. Make sure to keep the rice or quinoa separate. This helps the texture stay nice. If you add rice, it may get soggy. When you want to eat your leftovers, use the stovetop for the best results. Heat a non-stick skillet over medium heat. Add a splash of water or oil to keep it moist. Stir it often until warm. This keeps the shrimp juicy. You can also use the microwave. Just cover it to keep moisture in, and heat for 1-2 minutes. If you want to freeze Kung Pao Shrimp, cool it completely first. Place it in a freezer-safe bag or container. It can stay in the freezer for up to two months. When ready to eat, thaw it overnight in the fridge. Then, reheat it on the stovetop as mentioned. Avoid freezing it with rice, as it won't taste the same once thawed. This Kung Pao Shrimp is fresher and tastier than takeout. You control the quality of ingredients. The flavors are vibrant, and you can adjust them to your liking. Cooking at home lets you experiment. I use fresh shrimp, crunchy peanuts, and colorful bell peppers. The homemade sauce gives it a unique twist. You won't find that in most takeout. Yes, you can use frozen shrimp. Just make sure to thaw them first. Place them in cold water for about 15-20 minutes. Pat them dry before using. This helps the cornstarch stick better. It also keeps the shrimp from being watery. Frozen shrimp can work well, but fresh is best. To change the spice level, adjust the chili paste. Start with a little and taste as you go. You can always add more if you like it spicier. If you want less heat, skip the chili paste altogether. You can also add sweet bell peppers. They balance the heat and add flavor. Another option is to serve with a side of lime wedges. This way, you can squeeze fresh lime juice over your dish for a zesty kick. This blog post covered how to make Kung Pao Shrimp from key ingredients to cooking techniques. Fresh ingredients boost flavor and can be swapped when needed. There are tips on achieving that authentic taste and serving like a pro. We explored variations, from adding tofu to changing the spice level. Lastly, I shared how to store leftovers safely. With these steps, you can create a tasty dish at home, impressing friends and family. Enjoy cooking!

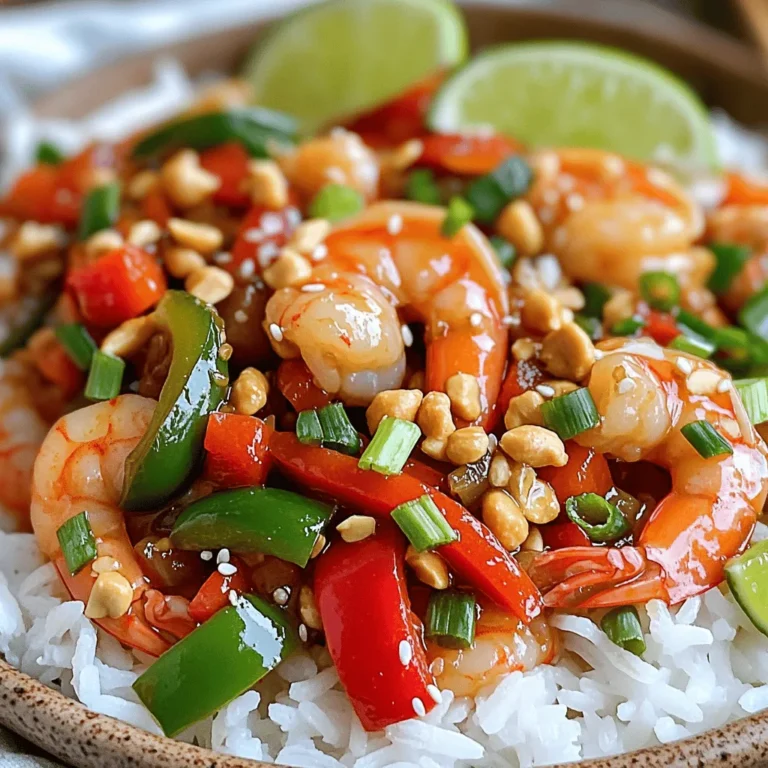
Kung Pao Shrimp Better Than Takeout Simple Recipe

- Cream cheese mixture - 8 oz cream cheese, softened - 1/2 cup powdered sugar - 1 teaspoon vanilla extract - 1 cup heavy whipping cream - 1 cup fresh strawberries, diced - Zest of 1 lemon - Pinch of salt To create the cream cheese mixture, you need soft cream cheese. This helps it blend smoothly. The powdered sugar adds sweetness. Vanilla gives flavor, while heavy cream adds fluffiness. Fresh strawberries and lemon zest brighten the taste. - Crunch topping components - 1 cup graham cracker crumbs - 1/2 cup unsweetened shredded coconut - 1/4 cup granulated sugar - 1/2 cup unsalted butter, melted The crunch topping is key for texture. Graham cracker crumbs give a sweet base. Shredded coconut adds chewiness, while sugar enhances sweetness. The melted butter binds everything together and creates a golden, crispy topping. - Taco shell options - 8 mini taco shells (store-bought or homemade) You can use store-bought taco shells for ease. They are quick and ready to fill. If you want a fun project, make your own. Homemade shells can be crisp and tailored to your taste. These ingredients come together to make a fresh, tasty treat. Each part adds flavor and texture for a delightful dessert. {{ingredient_image_1}} - Preheat the oven to 350°F (175°C). This step is key for a perfect crunch. - In a bowl, mix 1 cup of graham cracker crumbs, 1/2 cup of shredded coconut, and 1/4 cup of granulated sugar. - Pour in 1/2 cup of melted butter and stir until combined. - Spread the mixture evenly on a baking sheet. Bake for 8-10 minutes until golden brown. - Let it cool completely before using. This cooling lets the topping firm up. - In a clean bowl, beat 8 oz of softened cream cheese. - Add 1/2 cup of powdered sugar and 1 teaspoon of vanilla extract. - Mix until the filling is smooth and creamy. This texture is important for your tacos. - In another bowl, pour 1 cup of heavy whipping cream. - Whip until soft peaks form; this usually takes a few minutes. - Gently fold the whipped cream into the cheesecake mixture. Do this slowly to keep it light. - Dice 1 cup of fresh strawberries. These add freshness to your filling. - Add the diced strawberries and the zest of 1 lemon to the mixture. - Include a pinch of salt to enhance the flavors. Mix everything until well combined. - Take 8 mini taco shells. Spoon the cheesecake filling into each shell. - Sprinkle the cooled crunch topping generously over the filled tacos. This adds texture and flavor. - Arrange the tacos on a colorful platter. - Garnish with extra diced strawberries or a sprinkle of lemon zest. - For a lovely touch, you can line the plate with fresh mint leaves. This makes your dish pop! You can prepare parts of this recipe early. Make the crunch topping and cheesecake filling a day before. Store the crunch topping in an airtight container. Keep the filling in the fridge in a separate bowl. This way, you save time on the big day. To keep your cheesecake smooth, don’t over-mix the cream cheese. Mix just until it’s smooth. When you fold in the whipped cream, use a gentle motion. This helps keep the air in the cream, making it fluffy. These tacos pair well with fresh fruit. Try serving them with extra strawberries or blueberries. For a tasty drink, consider lemonade or iced tea. Both will balance the sweetness of the tacos nicely. Pro Tips Use Fresh Ingredients: Always opt for fresh strawberries for the best flavor and texture in your cheesecake tacos. Chill Before Serving: Allow the filled taco shells to chill in the refrigerator for at least 30 minutes to enhance the flavors and set the filling. Customize the Crunch: Feel free to mix in nuts or other cereals to the crunch topping for an added texture and flavor twist. Presentation Matters: For an impressive presentation, consider drizzling a strawberry sauce over the tacos before serving. {{image_2}} You can swap strawberries for other berries. Blueberries and raspberries taste great too. They add different colors and flavors. You can also use seasonal fruits. Peaches in summer or apples in fall work well. Try mixing fruits for a fun twist! Want to change the flavor? You can add extracts or spices. A dash of almond extract adds a nice touch. Cinnamon gives a warm flavor that pairs well with fruits. You can also customize the crunch topping. Try adding crushed nuts or even chocolate chips. This boosts the taste and texture! If you need gluten-free options for taco shells, look for corn shells. They work just as well and taste great. For vegan substitutions, use dairy-free cream cheese and coconut cream. These options keep your tacos creamy and delicious. Enjoy the same flavors while meeting your dietary needs! To keep your assembled tacos fresh, store them in an airtight container. This helps prevent them from getting soggy. If you plan to enjoy them later, keep the filling and the shells separate. Store the taco shells in a cool, dry place. This keeps them crunchy until you are ready to eat. You can freeze the cheesecake mixture for later use. Place it in a freezer-safe container. Make sure to leave some space for expansion. When you want to enjoy it, thaw it in the fridge overnight. This keeps the texture smooth. Always avoid thawing at room temperature to keep it safe. In the fridge, the tacos last about three days. Look for signs that they are no longer good. If you see any mold or if they smell off, it’s time to toss them. Enjoy them fresh for the best taste and texture! Yes, you can use pre-made cheesecake filling. This option saves time. However, store-bought filling might lack flavor or texture. Check the label for quality ingredients. If you want a fresh taste, homemade is better. You can easily whip it up in minutes. Making mini taco shells at home is simple. Just use flour or corn tortillas. Cut them into smaller circles. Then bake them in a muffin tin at 350°F (175°C) for about 10 minutes. This way, they get crispy and hold your filling well. If you want a cream cheese alternative, try Greek yogurt or cashew cream. Both options work well for different diets. Greek yogurt adds a tangy flavor. Cashew cream is dairy-free and creamy, perfect for vegan diets. Choose based on your needs. Absolutely! These tacos are perfect for parties. They look colorful and taste great. Arrange them on a bright platter. You can add some fresh strawberries on top for decoration. Guests will love the fun twist on cheesecake. Making strawberry sauce is quick and easy. Start with 1 cup of fresh strawberries. Chop them and add to a small pot with 1/4 cup of sugar. Cook on medium heat until the sugar melts and the strawberries soften. Mash lightly for a chunky sauce or blend for smoothness. Let it cool before serving. This blog post explored how to make delicious cheesecake tacos. We covered the key ingredients, step-by-step instructions, and creative variations for your tacos. Remember to mix your fillings carefully and try different fruits or toppings. You can make these ahead of time or adjust them for dietary needs. Whether for a party or a snack, these tacos promise to impress. With a little planning and creativity, you can enjoy this fun treat anytime. Enjoy crafting your tasty cheesecake tacos!

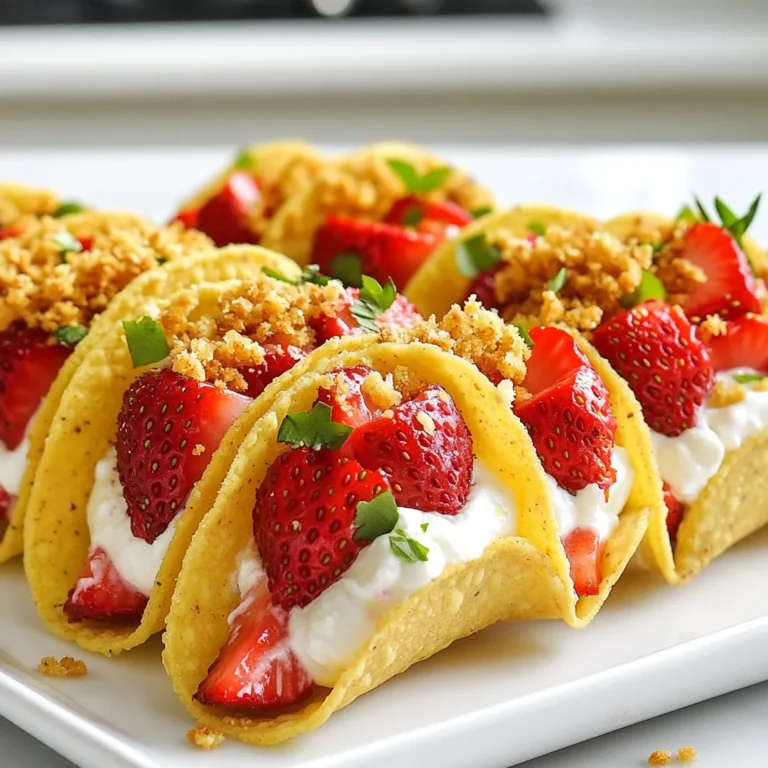
Strawberry Crunch Cheesecake Tacos Simple Delight

- 1 pound ground chicken - 1 cup breadcrumbs - 1/2 cup grated Parmesan cheese You need ground chicken for a lean meatloaf. It keeps the dish light and tasty. Breadcrumbs help bind the meatloaf together. They also add texture. Grated Parmesan cheese brings a rich, cheesy flavor to every bite. - 2 cloves garlic, minced - 1 small onion, finely chopped - 1/4 cup fresh parsley, chopped Minced garlic adds a strong, savory taste. It gives the meatloaf its name! Finely chopped onion adds sweetness and moisture. Fresh parsley brings a bright color and fresh flavor. - 1/2 cup milk - 1 large egg - 1 teaspoon dried oregano Milk keeps the meatloaf moist. The large egg binds all the ingredients together. Dried oregano adds a warm, earthy taste. Each of these ingredients works together to create a perfect meatloaf. {{ingredient_image_1}} First, set your oven to 350°F (175°C). This step is key for the best bake. While the oven warms up, grease your loaf pan with oil or cooking spray. You can also line it with parchment paper for easy cleanup. This helps the meatloaf come out easily after baking. In a large bowl, combine 1 pound of ground chicken with 1 cup of breadcrumbs. Add 1/2 cup of grated Parmesan cheese and 1 small finely chopped onion. Then, mix in 2 cloves of minced garlic, 1/4 cup of chopped fresh parsley, and 1/2 cup of milk. Don’t forget to add 1 large egg, 1 teaspoon of dried oregano, 1 teaspoon of salt, and 1/2 teaspoon of black pepper. Use your hands or a spatula to mix everything gently. Be careful not to overmix. This keeps the meatloaf tender and moist. Now, transfer the mixture into the prepared loaf pan. Press it down evenly to shape it well. Next, spread 1/4 cup of ketchup over the top for extra flavor. If you want, sprinkle some extra Parmesan cheese on top for a cheesy crust. Bake your meatloaf in the oven for about 45-55 minutes. It’s done when the inside reaches 165°F (74°C). After baking, let the meatloaf rest for about 10 minutes. This makes it easier to slice and serve. To keep your meatloaf tender, avoid overmixing. When you mix the ingredients, do it gently. Overmixing makes the meatloaf tough. Use your hands or a spatula to combine everything until it is just mixed. After baking, let the meatloaf rest for ten minutes. This helps the juices settle. If you slice it right away, juices run out. Resting makes each slice moist and flavorful. Adding herbs and spices can boost flavor. Try fresh thyme or basil for a twist. You can also mix in some red pepper flakes for heat. Customize the topping too. Instead of ketchup, try BBQ sauce or a mix of mustard and honey. This will change the taste and make it exciting. Serve your meatloaf with sides that match well. Mashed potatoes are a classic choice. Steamed veggies like broccoli or green beans add color. For a beautiful presentation, slice the meatloaf evenly. Arrange the slices on a platter and sprinkle fresh parsley on top. This makes your meal look appealing and inviting. Pro Tips Use Fresh Ingredients: Fresh garlic and parsley can significantly enhance the flavor of your meatloaf, making it more aromatic and vibrant. Don’t Overmix: When combining the ingredients, mix gently to maintain a tender texture. Overmixing can make the meatloaf dense. Check for Doneness: Use a meat thermometer to ensure the internal temperature reaches 165°F (74°C) for safe consumption and optimal texture. Rest Before Slicing: Allow the meatloaf to rest for 10 minutes after baking. This helps retain juices and makes slicing easier. {{image_2}} You can swap ground chicken for ground turkey. Turkey has a similar taste and texture. It is leaner and still gives great flavor. This option works well if you want a lighter meal. For a vegetarian option, use lentils or chickpeas instead of meat. Mash cooked lentils or chickpeas and add your usual ingredients. This gives a hearty texture and keeps it tasty. Adding veggies can boost flavor and nutrition. Try mixing in finely chopped bell peppers or grated carrots. They add color and moisture to the meatloaf. You can also use different cheeses. Instead of Parmesan, try mozzarella or cheddar. Each cheese gives a unique taste. Mixing cheeses can add a nice twist too! For a Mediterranean style, add feta cheese and olives. You can also mix in dried herbs like basil or thyme. This gives a fresh, savory flavor. If you want Asian-inspired flavors, add soy sauce and ginger. You can also include water chestnuts for crunch. These changes create a fun, new taste that surprises the palate. To store leftovers, first let the meatloaf cool. Place it in an airtight container. You can also wrap it tightly in plastic wrap or foil. This helps keep it fresh. Leftovers will last up to three days in the fridge. Make sure to eat them before that time is up for the best taste. For long-term storage, freezing is a great option. Wrap the cooled meatloaf in plastic wrap, then in foil. This double layer helps protect against freezer burn. You can freeze it up to three months. When you're ready to eat, thaw it overnight in the fridge. For a faster method, use the microwave's defrost setting. When it comes to reheating, the oven gives the best results. Preheat your oven to 350°F (175°C). Place the meatloaf in a baking dish. Cover it with foil to keep it moist. Heat for about 20-25 minutes or until it's hot. The microwave is faster but can make the meatloaf a bit rubbery. If using the microwave, heat it in short bursts. Check often to avoid overcooking. Yes, you can use other meats! Ground turkey works well as a substitute for ground chicken. It has a similar texture and flavor. You can also try ground beef or pork if you want a richer taste. Just keep in mind that cooking times may vary based on the type of meat you choose. Always check the internal temperature for safety. To make the meatloaf gluten-free, swap the breadcrumbs with gluten-free alternatives. You can use crushed gluten-free crackers or oats. Both options provide a great texture without the gluten. Another choice is to use ground almond flour or coconut flour. These options can help bind the meatloaf while keeping it gluten-free. The meatloaf should reach an internal temperature of 165°F (74°C). This ensures it is safe to eat. I recommend using a meat thermometer to check the temperature. If you don’t have one, you can cut into the meatloaf to see if the juices run clear. Let it rest for 10 minutes before slicing. This helps keep the meatloaf juicy. In this article, we explored the key ingredients for a tasty meatloaf, from ground chicken to seasonings. I guided you through step-by-step instructions for mixing, forming, and baking. You learned useful tips to keep your meatloaf tender and flavorful. We also discussed creative variations, storage tips, and answered common questions. Now, you can create a delicious meatloaf that suits your taste and dietary needs. Enjoy making it your own!

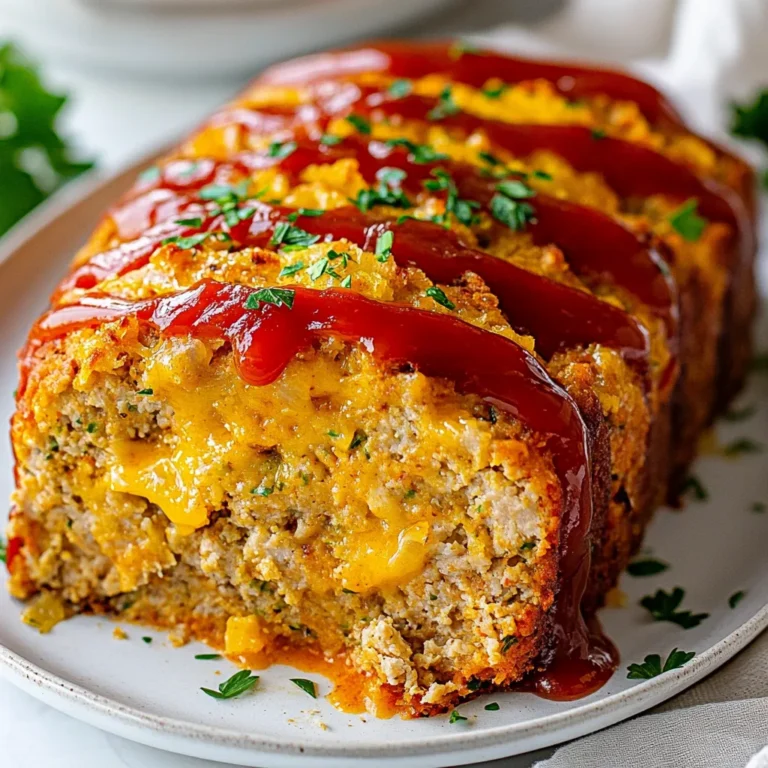
Garlic Parmesan Chicken Meatloaf Easy Dinner Recipe

- 1.5 lbs chicken thighs, boneless and skinless - 1 cup teriyaki sauce (store-bought or homemade) - 2 cups broccoli florets - 1 red bell pepper, sliced - 1 cup snap peas - 1 medium carrot, sliced thinly - 2 tablespoons olive oil - 1 teaspoon fresh ginger, minced - 3 cloves garlic, minced - 1 tablespoon sesame seeds, for garnish - Green onions, sliced, for garnish - Salt and pepper to taste - You can add mushrooms for extra flavor. - Try adding zucchini for a different texture. - Pineapple chunks can add a sweet touch. - A large mixing bowl for marinating. - A zip-top bag or shallow dish for marinating chicken. - A large baking sheet lined with parchment paper. - A sharp knife and cutting board for prepping veggies. - A measuring cup for the teriyaki sauce. First, gather your ingredients. You need chicken thighs, teriyaki sauce, and fresh veggies. For this recipe, I love using broccoli, red bell pepper, snap peas, and carrots. They add color and crunch! Next, you need to marinate the chicken. In a bowl, mix the teriyaki sauce, minced ginger, and minced garlic. This step brings out great flavors. Place the chicken thighs in a bag or dish. Pour half of the sauce over the chicken. Let it marinate for at least 30 minutes. You can even marinate overnight for more flavor. While the chicken marinates, prepare the veggies. In another bowl, toss the broccoli, bell pepper, snap peas, and carrots with olive oil. Add some salt and pepper to taste. This adds flavor to your veggies. Now, it’s time to bake! Preheat your oven to 425°F (220°C). Line a large baking sheet with parchment paper. This helps with easy cleanup later. Place the marinated chicken in the center of the sheet. Spread the veggies around the chicken. Drizzle the remaining teriyaki sauce over the chicken and veggies. This adds even more flavor. Bake in the preheated oven for 25 to 30 minutes. Stir everything halfway through to ensure even cooking. The chicken should be cooked through and the veggies tender. Once cooked, take the pan out of the oven. Let it rest for 5 minutes. This helps keep the chicken juicy. Before serving, sprinkle sesame seeds and sliced green onions on top. They make the dish look pretty and add a nice crunch. Serve this meal warm. It pairs well with rice or noodles if you want. Enjoy your delightful sheet-pan teriyaki chicken and veggies! For the best flavor, marinate the chicken for at least 30 minutes. If you can, let it sit overnight. This lets the teriyaki sauce soak into the meat. You can use a zip-top bag or a shallow dish. Make sure the chicken is well-coated. Add a pinch of salt and pepper for extra taste. You can change up the veggies based on what you like. Instead of broccoli, try Brussels sprouts or green beans. If you want more color, use yellow bell pepper instead of red. Zucchini or squash can work well, too. Just remember to cut them into similar sizes for even cooking. Cooking time can change based on your oven and the size of the chicken pieces. If you use chicken breasts, they may need a few extra minutes. Always check if the chicken is fully cooked. It should reach 165°F (74°C). For softer veggies, cook them a bit longer. Just stir halfway through to ensure even cooking. {{image_2}} You can switch the chicken thighs for other proteins. Chicken breast is a leaner choice. It cooks well and stays juicy with teriyaki sauce. Salmon is another great option. It adds a rich flavor and cooks quickly. If you prefer plant-based proteins, try tofu. Firm tofu absorbs the sauce nicely and gives a satisfying bite. Just be sure to press out extra moisture before marinating. While teriyaki is a classic, you can explore other sauces. Hoisin sauce adds a sweet and savory twist. You can also use a sweet chili sauce for a spicy kick. For a tangy flavor, try orange or sesame sauce. This keeps the dish fresh and exciting. Feel free to mix sauces for a unique blend. Just remember to adjust the seasoning as needed. Using seasonal vegetables makes your meal more vibrant. In spring, add asparagus or peas for a fresh taste. Summer veggies like zucchini and corn bring a sweet crunch. In fall, try Brussels sprouts or butternut squash for a hearty feel. Winter can include root vegetables like sweet potatoes and parsnips. Each season offers unique flavors to enhance your dish. Always pick what’s fresh for the best taste. To keep your sheet-pan teriyaki chicken and veggies fresh, let them cool first. Place the leftovers in an airtight container. You can store this meal in the fridge for up to four days. If you want to save it longer, consider freezing it. When you’re ready to eat, reheat the dish in the oven. Preheat it to 350°F (175°C). Place the chicken and veggies on a baking sheet. Cover with foil to keep moisture in. Heat for about 15-20 minutes, or until warm. You can also use the microwave. Heat for 1-2 minutes, stirring halfway through. Freezing is a great option for this dish. Use a freezer-safe container or a heavy-duty zip-top bag. Make sure to remove as much air as possible. Label the bag with the date so you remember when you made it. It will keep well for up to three months. When you’re ready, thaw it overnight in the fridge before reheating. Yes, you can use chicken breast instead of thighs. Chicken breast is leaner and cooks faster. It may not be as juicy, but it will still taste great. Just watch the cooking time. Cook until the chicken reaches 165°F to ensure it is safe to eat. You can make teriyaki sauce with simple ingredients. Mix soy sauce, honey, ginger, and garlic in a bowl. Combine: - 1 cup soy sauce - 1/2 cup honey - 2 tablespoons minced ginger - 2 cloves minced garlic - 1 tablespoon cornstarch mixed with 2 tablespoons water for thickening Heat the mix in a saucepan until it simmers. Stir until it thickens, then cool before use. Teriyaki chicken pairs well with many sides. Here are some tasty options: - Steamed rice or jasmine rice - Quinoa for a healthy twist - Fried rice for extra flavor - A simple salad with a light dressing - Roasted sweet potatoes for sweetness These sides balance the savory flavor of the chicken and veggies. Enjoy experimenting to find your favorite! This post covered essential ingredients for teriyaki chicken and optional additions for flavor. It included clear steps for preparation, baking, and serving suggestions. I shared tips for marinade and cooking times, along with variations using different proteins and sauces. Lastly, I explained how to store and reheat leftovers. With this knowledge, you can create a delicious meal at home. Enjoy experimenting with flavors and serving it your way!

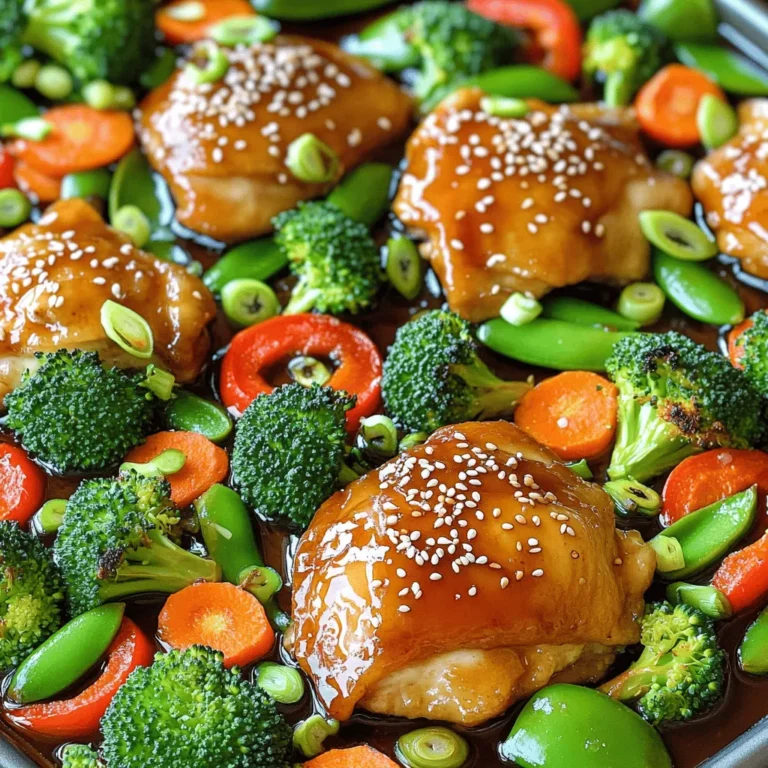
Sheet-Pan Teriyaki Chicken and Veggies Delightful Meal

You will need a few key ingredients to make these parfaits. Here’s what you need: - 1 cup cream cheese, softened - 1 cup pumpkin puree (not pumpkin pie filling) - 1/2 cup powdered sugar - 1 teaspoon vanilla extract - 1 teaspoon ground cinnamon - 1/2 teaspoon ground nutmeg - 1/2 teaspoon ground ginger - 1 cup heavy cream - 1 cup graham cracker crumbs - 1/4 cup melted butter - Whipped cream and cinnamon for garnish These ingredients combine to create a rich and tasty pumpkin cheesecake mix. The cream cheese gives it a smooth texture, while the pumpkin adds a lovely flavor. You can make your parfaits even more special with some fun toppings. Here are some ideas: - Crushed nuts for crunch - Chocolate shavings for sweetness - Caramel drizzle for extra flavor - Fresh pumpkin seeds for a festive touch These add-ons can enhance the taste and look of your parfaits. You can choose what matches your style and taste. For the best results, always pick high-quality ingredients. Here are some tips: - Choose full-fat cream cheese for a rich texture. - Use pure pumpkin puree, not pie filling, for the best flavor. - Opt for fresh spices instead of old ones for a brighter taste. - Get heavy cream that is fresh for the best whipped cream. Using quality ingredients helps your parfaits taste fresh and delicious. It makes a big difference in your final dish. Start by taking your softened cream cheese. Place it in a mixing bowl. Beat it until it's smooth and creamy. Next, add the pumpkin puree to the bowl. Make sure it is pure pumpkin, not pie filling. Then, mix in the powdered sugar, vanilla extract, ground cinnamon, nutmeg, and ginger. Stir everything until it is fully combined and smooth. This mixture will be the heart of your parfait. In a clean bowl, pour in the heavy cream. Use a mixer to whip it until stiff peaks form. This means the cream will hold its shape well. Be gentle when folding the whipped cream into the pumpkin mixture. Use a spatula and mix slowly. You want to keep the air in the whipped cream for a light texture. This step makes the parfait fluffy and delicious. Take your serving glasses and grab a spoon. Start by adding a spoonful of the graham cracker mixture at the bottom. This will give a nice crunch. Next, layer in a spoonful of the pumpkin cheesecake mixture. Keep repeating these layers. Add graham cracker, then pumpkin, until your glasses are filled. End with a layer of pumpkin cheesecake. After that, place the parfaits in the fridge. Chill them for at least 2 to 4 hours. This helps the flavors meld together perfectly. Before you serve, top each parfait with whipped cream and a sprinkle of cinnamon. This adds a lovely touch to your treat! To get a smooth and creamy pumpkin cheesecake, start with room-temperature cream cheese. Cold cream cheese can lead to lumps. Beat the cream cheese well until it's silky. When you mix in the pumpkin puree, make sure it is smooth too. Fold in the whipped cream gently. This keeps the mixture airy and light. One common mistake is using pumpkin pie filling instead of pumpkin puree. They are not the same! The filling has added spices and sugar. This can change the taste of your parfaits. Another mistake is not letting the parfaits chill long enough. Chilling helps the flavors blend and firm up the texture. You can prepare these parfaits a day in advance. Just follow the recipe and layer the ingredients in glasses. Cover them tightly with plastic wrap and store them in the fridge. This way, they will be ready to serve when you need them. Just add the whipped cream and cinnamon right before serving for the best look. {{image_2}} You can change the flavors for your parfaits. Here are some ideas: - Chocolate Pumpkin: Add cocoa powder to the pumpkin mix. - Maple Pumpkin: Swap the powdered sugar for maple syrup. - Spiced Pumpkin: Mix in cardamom or allspice for more warmth. - Nutty Pumpkin: Stir in crushed pecans or walnuts for crunch. These variations make your dessert fun and unique. If you want a different crust, try these options: - Oreo Crust: Use crushed Oreo cookies instead of graham crackers. - Almond Crust: Blend almond flour with melted butter for a nutty taste. - Ginger Snap Crust: Use ginger snap cookies for a spicy twist. These crusts can add new tastes to your parfaits. Serve these parfaits in creative ways for any event: - Holiday Gatherings: Use festive glasses and garnish with holiday sprinkles. - Picnics: Pack them in mason jars for easy transport. - Dinner Parties: Layer in clear glasses for a fancy look. Adjust your serving style to fit any occasion. To store leftover parfaits, cover them tightly with plastic wrap or a lid. This keeps them fresh. Place them in the fridge. They can stay good for up to three days. Make sure to keep them chilled until you’re ready to enjoy them again. You can freeze the pumpkin cheesecake mixture if you have extras. Before freezing, place the mixture in an airtight container. Leave some space at the top for expansion. It can last in the freezer for up to two months. When you want to eat it, thaw it overnight in the fridge. Then mix it gently before serving. These parfaits are best within three days of making them. After that, they may lose their creamy texture. If you want to keep them longer, consider freezing. Always check for any off smells or changes in texture before eating. Enjoy your delicious treat fresh for the best flavor! No, you should not use pumpkin pie filling. Pumpkin pie filling has extra sugar and spices. This can change the taste of your parfaits. Always use pure pumpkin puree for the best flavor. The parfaits need to chill for at least 2-4 hours. This time helps the layers set well. Chilling also lets the flavors blend together, making each bite taste better. Yes, you can use low-fat cream cheese. It will still give a creamy texture. However, the taste might be a bit different. Full-fat cream cheese gives a richer flavor. You can use crushed cookies like Oreos or vanilla wafers. You can also use crushed nuts or oats for a gluten-free option. Just mix them with melted butter like the recipe says. In this blog post, we explored how to make no-bake pumpkin cheesecake parfaits. We discussed key ingredients and optional toppings that enhance flavor. You learned easy step-by-step instructions for mixing and assembling. We shared tips to ensure creamy texture and highlighted common mistakes to avoid. Variations and storage tips help you adapt this treat to any occasion. Enjoy making these parfaits! They’re simple, tasty, and perfect for any time.

No-Bake Pumpkin Cheesecake Parfaits Delightfully Easy

Here’s what you need for honey garlic roasted sweet potatoes. Gather these simple items: - Sweet Potatoes: Use 4 medium sweet potatoes, peeled and cubed. - Olive Oil: You will need 3 tablespoons of olive oil. - Honey: Measure out 3 tablespoons of honey. - Garlic: Use 4 cloves of garlic, minced. - Spices and Seasonings: Add 1 teaspoon of smoked paprika and ½ teaspoon of cayenne pepper. Adjust cayenne for spice level. Season with salt and black pepper to taste. - Garnish Suggestions: Fresh parsley, chopped for a bright finish. These ingredients blend perfectly to create sweet, savory, and spicy flavors. The sweet potatoes shine with honey and garlic, making a tasty dish. Preheating the Oven Start by preheating your oven to 425°F (220°C). This step is key for getting crispy sweet potatoes. Preparing the Baking Sheet Line a baking sheet with parchment paper. This makes cleanup easy and helps the sweet potatoes cook well. Combining Ingredients for Marinade In a large mixing bowl, combine three tablespoons of olive oil, three tablespoons of honey, and four minced garlic cloves. Add one teaspoon of smoked paprika and half a teaspoon of cayenne pepper. Season with salt and black pepper to taste. Mix until all ingredients blend into a smooth marinade. Ensuring Even Coating Now, add the cubed sweet potatoes to the bowl. Toss them well to coat each piece with the honey-garlic mixture. This coating adds flavor and helps caramelize during roasting. Spacing and Placing on Baking Sheet Spread the coated sweet potatoes evenly on your prepared baking sheet. Ensure they have space between them. This allows hot air to circulate, creating crispy edges. How to Check for Doneness Roast the sweet potatoes for 25 to 30 minutes. Halfway through, turn them for even cooking. They are done when they’re tender and caramelized. You can test this by poking them with a fork. If it goes in easily, they are ready to enjoy! To get the best results, you want even cooking. Here are some tips to help: - Cut Sweet Potatoes Evenly: Make sure all pieces are about the same size. This way, they cook at the same rate. - Don’t Overcrowd the Pan: Spread the sweet potatoes out on the baking sheet. If they touch, they will steam instead of roast. You can add extra flavor to your sweet potatoes. Here are some ideas: - Add Herbs and Spices: Consider adding fresh thyme or rosemary. These herbs pair well with honey and garlic. - Variations with Other Sweeteners: If you want a twist, try maple syrup or agave instead of honey. Each brings a unique taste. These tips will help you make the most of your honey garlic roasted sweet potatoes! Enjoy exploring different flavors and techniques. {{image_2}} Air Fryer Instructions You can make honey garlic roasted sweet potatoes in an air fryer. First, prepare the sweet potatoes just like in the oven method. Toss them with the marinade. Set your air fryer to 400°F (200°C). Cook the sweet potatoes for about 15-20 minutes. Shake the basket halfway through cooking. This method gives a crispy texture. Grilling Techniques Grilling sweet potatoes adds a smoky flavor. Start by slicing the sweet potatoes into thick rounds. Toss them in the marinade. Preheat your grill to medium heat. Place the sweet potatoes on the grill for about 10-15 minutes. Flip them once for even cooking. The grill marks will add a nice look. Using Maple Syrup or Agave If you don’t have honey, try maple syrup or agave. Both give a sweet flavor. Replace honey with the same amount of either syrup. This change works well for different taste preferences. Different Types of Sweet Potatoes You can use various sweet potatoes for this recipe. Try Japanese sweet potatoes for a nuttier taste. Garnet sweet potatoes are sweeter and softer. Each type will change the flavor and texture slightly. How long do honey garlic roasted sweet potatoes last? They can last 3 to 5 days in the fridge. To keep them fresh, place them in a container with a tight seal. This helps prevent air from getting in. What are the proper containers for storage? Use glass or plastic containers with lids. These work best for keeping food safe. If you have a lot, split them into smaller portions. This makes it easy to grab what you need later. What are the best ways to reheat for taste? The oven is my favorite method. Preheat it to 350°F (175°C). Place the sweet potatoes on a baking sheet and heat for 10 to 15 minutes. This keeps them crispy and full of flavor. How do you ensure the right texture? If you use a microwave, cover the potatoes with a damp paper towel. This helps keep them moist. Heat in short bursts, about 1 minute at a time. Stir between heats to keep them even. Enjoy your tasty sweet potatoes again! Roasted sweet potatoes last about 3 to 5 days in the fridge. Store them in an airtight container. Keeping them sealed helps maintain their moisture and flavor. You can also place a paper towel in the container to absorb excess moisture. Yes, you can make this recipe vegan! Substitute honey with maple syrup or agave nectar. Both options give a great sweet taste. Use the same amount as honey in the recipe. This keeps the dish both tasty and plant-based. The spice level depends on the cayenne pepper. If you want less heat, use less cayenne. Start with a pinch and taste the mix. You can also skip it if you prefer no spice at all. For extra heat, add more cayenne or a dash of hot sauce before roasting. Roasting sweet potatoes brings a warm, sweet flavor to your meals. We covered the key ingredients like olive oil and garlic, along with a simple marinade to ensure every bite is tasty. I also shared tips for perfect roasting and alternative cooking methods. Remember, you can play with spices or sweeteners to find what you love. Store leftovers properly to enjoy later. No matter how you prepare them, roasted sweet potatoes are a delicious addition to any dish. Enjoy experimenting with this versatile ingredient!

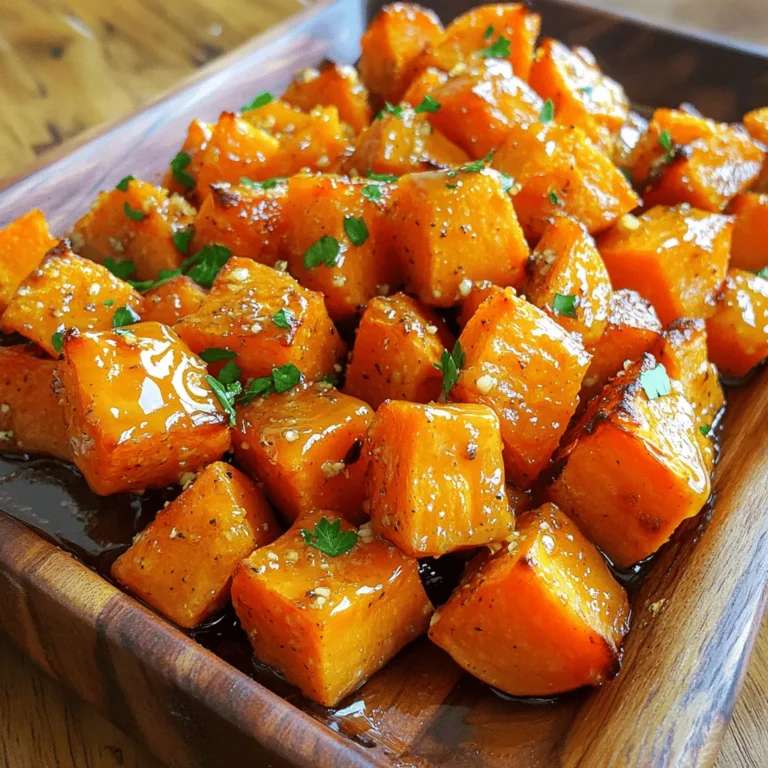
Honey Garlic Roasted Sweet Potatoes Flavorful Recipe

PREV 1 … 28 29 30 … 57 NEXT
meal twig

explore

DessertsDinnerAppetizersDrinks

Our Policies

  • Cookie Policy
  • Copyright Policy
  • Disclaimer
  • GDPR Policy
  • Terms Of Use
Back to Top
  • About
  • Contact Us
  • Privacy Policy
© 2025 meal twig