FREE DINNER EBOOK! Get your copy!
  • Cookie Policy
  • GDPR Policy
  • Disclaimer
  • Terms Of Use
  • Visit my other site: Fun Cookie Recipes
meal twig
  • Home
  • Dinner
  • Desserts
  • Drinks
  • Appetizers
  • Contact
  • About
  • Privacy Policy
  • Home
  • Dinner
  • Desserts
  • Drinks
  • Appetizers
  • Contact
  • About
  • Privacy Policy
  • Cookie Policy
  • GDPR Policy
  • Disclaimer
  • Terms Of Use
Visit my other site: Fun Cookie Recipes

HOME / CATEGORIES /

Latest

- 1 cup unsalted butter - 1 cup brown sugar, packed - 2/3 cup granulated sugar - 2 large eggs - 2 teaspoons vanilla extract - 2 cups all-purpose flour - 1 teaspoon baking powder - 1/2 teaspoon baking soda - 1/2 teaspoon salt - 1 cup pecans, chopped - 1 cup toffee bits or chopped toffee bars You can swap some ingredients for different flavors or dietary needs. Use almond butter if you want a nutty twist instead of unsalted butter. For a healthier option, coconut sugar works well in place of brown sugar. If you follow a vegan diet, use flax eggs or applesauce as egg replacements. These swaps keep your blondies tasty and fun! - Step 1: Preheat the oven and prepare the baking pan Start by preheating your oven to 350°F (175°C). Grease a 9x13 inch baking pan. You can also use parchment paper. This helps with easy removal. - Step 2: Brown the butter and cool it slightly Melt 1 cup of unsalted butter in a medium saucepan over medium heat. Stir it often. Cook until it turns a nice golden brown color and smells nutty, about 5 to 7 minutes. Then, take it off the heat and let it cool a bit. - Step 3: Combine sugars with brown butter In a large mixing bowl, mix 1 cup of brown sugar and 2/3 cup of granulated sugar. Pour the warm brown butter over the sugars. Stir until it all comes together. - Step 4: Incorporate eggs and vanilla extract Add 2 large eggs and 2 teaspoons of vanilla extract to the sugar mixture. Whisk it all together until smooth. - Step 5: Sift dry ingredients In another bowl, sift together 2 cups of all-purpose flour, 1 teaspoon of baking powder, 1/2 teaspoon of baking soda, and 1/2 teaspoon of salt. This helps to mix the dry ingredients well. - Step 6: Fold in dry ingredients and add nuts Gradually fold the dry mix into the wet mix. Be gentle so you do not overmix. Next, fold in 1 cup of chopped pecans and 1 cup of toffee bits. You can save some for topping. - Step 7: Spread batter in the pan Pour the batter into your prepared pan. Spread it out evenly. If you saved some pecans and toffee bits, sprinkle them on top now. - Step 8: Bake and check for doneness Place the pan in your preheated oven. Bake for 25 to 30 minutes. Use a toothpick to test. It should come out with a few moist crumbs. - Step 9: Cool before cutting After baking, let the blondies cool in the pan on a wire rack for at least 20 minutes. This helps them set up nicely before you cut them into squares. - How to achieve the perfect brown butter: Start with unsalted butter in a medium saucepan. Melt it over medium heat. Stir often. Watch for it to foam and change color. When it turns golden brown and smells nutty, it's ready. Cool it slightly before mixing with sugars. This gives your blondies a rich, deep flavor. - Avoiding overbaking for chewy blondies: Set your timer for 25 minutes. Check the blondies with a toothpick. You want a few moist crumbs to stick to it, not clean. If you bake too long, the blondies become dry. Trust your instincts. Remove them as soon as they look set. - Serving suggestions with ice cream and caramel sauce: Serve warm blondies with a scoop of vanilla ice cream. The cold ice cream contrasts nicely with the warm blondies. Drizzle caramel sauce on top for extra sweetness and flavor. This makes every bite a treat. - Creative ways to decorate blondies: After baking, sprinkle a few extra pecans and toffee bits on top. You can also dust powdered sugar over the blondies. This adds a nice touch for special occasions. Use a sharp knife for clean cuts. - Why your blondies may turn out dry: Dry blondies often come from overbaking. Make sure to check them early. Another reason could be too much flour. Always measure flour by spooning it into the cup, then leveling it off. This prevents packing too much into your measuring cup. - Fixing overly greasy blondies: If your blondies are greasy, it might be due to too much butter. Make sure to measure accurately. If they still seem greasy, let them cool completely before cutting. This helps them firm up. {{image_2}} You can boost the flavor of your blondies by adding chocolate chips. Just fold in one cup of your favorite chocolate chips into the batter. The chocolate melts, creating gooey pockets of sweetness. Another way to enhance the taste is by adding spices. A pinch of cinnamon or nutmeg can warm up the flavors. These spices pair well with the sweetness of the brown butter and toffee. If you need a gluten-free option, try using almond flour instead of all-purpose flour. Make sure to adjust the amount slightly, as almond flour is denser. This swap keeps your blondies rich and tasty. For a vegan version, you can use flax eggs. Mix one tablespoon of flaxseed meal with three tablespoons of water for each egg. Also, use plant-based butter in place of unsalted butter. This keeps the texture and flavor intact. You can change up the flavors based on the season. In fall, try adding pumpkin puree and a bit of pumpkin spice. For spring, mix in fresh apple chunks with a hint of cinnamon. Both options give your blondies a festive twist and excite the palate! To keep your blondies fresh, store them in an airtight container. Use parchment paper between layers to avoid sticking. Keep the container at room temperature for up to five days. For longer storage, place them in the fridge. This can extend their life by a week. To freeze blondies, let them cool completely first. Then, cut them into squares. Wrap each piece tightly in plastic wrap. Place the wrapped blondies in a freezer-safe bag. They can last up to three months in the freezer. When you're ready to enjoy, take them out. Thaw the blondies in the fridge overnight. For a quick option, set them out for an hour. This keeps them soft and chewy. To reheat, preheat your oven to 350°F (175°C). Place the blondies on a baking sheet. Heat for about 5-10 minutes. This restores their warm, gooey texture. For a fun twist, serve them with vanilla ice cream. A drizzle of caramel sauce adds extra sweetness. Enjoy your delicious treat in style! How do I know when blondies are done baking? You can tell when blondies are done by using a toothpick. Insert the toothpick into the center. If it comes out with a few moist crumbs, they are ready. Avoid overbaking. This keeps them soft and chewy. Can I make these blondies ahead of time? Yes, you can make blondies ahead of time. Bake them and let them cool completely. Then, store them in an airtight container. They stay fresh for about a week. What can I substitute for toffee bits? If you don't have toffee bits, use chopped chocolate bars. You can also use butterscotch chips. Both will add a sweet touch. Can I use white sugar instead of brown sugar? You can use white sugar in place of brown sugar. However, it will change the flavor and texture. Brown sugar adds moisture and a hint of caramel. What happens if I add too much flour? Adding too much flour can make your blondies dry. They may become thick and crumbly. Make sure to measure flour carefully for the best results. What is the difference between brownies and blondies? Brownies are chocolatey and dense, while blondies are sweet and buttery. Blondies often have brown sugar, which gives them a rich flavor. How can I keep blondies chewy and moist? To keep blondies chewy, avoid overbaking. Bake until a toothpick shows a few crumbs. Also, store them in an airtight container to retain moisture. You now have all the steps and tips to make delicious blondies. We covered ingredients, substitutions, and variations to fit your taste. Remember to keep an eye on baking time for chewy results. Try adding spices or chocolate chips for more fun flavors. Store them right to keep them fresh longer. Enjoy your tasty blondies with friends or family, and don’t forget to share! Baking can be both easy and exciting. Now, it's your turn to create a treat everyone will love. Happy baking!

Brown Butter Toffee Pecan Blondies Irresistible Treat

- 1 cup cottage cheese - 1/2 cup dark chocolate chips - 1/4 cup hazelnut spread - 2 tablespoons cocoa powder - 2 tablespoons honey or maple syrup - 1 teaspoon vanilla extract - A pinch of salt The main ingredients create a rich and creamy mousse. Cottage cheese gives a nice base. Dark chocolate chips add deep flavor. Hazelnut spread brings sweetness and nuttiness. Cocoa powder intensifies the chocolate taste. Honey or maple syrup sweetens the mix, while vanilla adds warmth. A pinch of salt enhances all the flavors. - Chopped hazelnuts - Fresh berries (optional) Garnishes make your mousse look pretty and tasty. Chopped hazelnuts add crunch and more hazelnut flavor. Fresh berries, like strawberries or raspberries, can add a pop of color and freshness. They also provide a nice contrast to the rich mousse. - Dairy-free options for chocolate and cottage cheese - Alternative sweeteners If you want a dairy-free mousse, use dairy-free chocolate chips. For a creamy base, try a dairy-free cottage cheese made from nuts. You can also swap honey for agave syrup or use stevia for a low-calorie option. This way, you can still enjoy the mousse while meeting your dietary needs. Start by melting the chocolate chips. Use a microwave-safe bowl. Heat the chocolate in 30-second bursts. Stir after each interval until it becomes smooth. Next, blend the cottage cheese and other components. In a blender or food processor, add the cottage cheese. Pour in the melted chocolate, hazelnut spread, cocoa powder, honey or maple syrup, vanilla extract, and a pinch of salt. Blend until you achieve a smooth consistency. This is key for a rich mousse. Stop the blender to scrape down the sides. This helps mix in any bits that stick to the walls. Taste the mousse after blending. If you want it sweeter, add more honey or maple syrup. Blend again to mix it well. Chill the mousse in the fridge for at least one hour. This helps it set and become thick. When ready to serve, spoon the mousse into clear cups or bowls. This shows off the creamy texture. Top with chopped hazelnuts and fresh berries for a beautiful finish. To get a smooth and creamy mousse, blend well. Start with soft cottage cheese. This helps avoid lumps. When you melt the dark chocolate, make sure it's not too hot. If it’s too hot, it can cook the cheese. Blend the melted chocolate with the other ingredients until smooth. Don't rush; scrape down the sides as needed. Chilling is key for the best texture. After blending, chill the mousse for at least one hour. This allows it to set and become firm. The cold helps the flavors mix well too. Store your mousse in an airtight container. This keeps it fresh and tasty. If you have leftovers, try to finish them within three days. To maintain freshness, place plastic wrap directly on the mousse's surface. This prevents it from forming a crust. For a stunning presentation, use clear glass cups. This shows off the mousse's rich color. You can add a dollop of whipped cream on top for extra flair. Pair your mousse with a cup of coffee or a glass of almond milk. The flavors work well together. You can also serve it with fresh fruit for a pop of color and flavor. {{image_2}} You can play with flavors in your Chocolate Hazelnut Cottage Cheese Mousse. Adding spices can make a big difference. A pinch of cinnamon gives warmth to the mousse. If you love coffee, try adding a dash of espresso. This can bring out the chocolate flavor even more. You can also switch up the nut spreads. Instead of hazelnut, try almond or cashew spread. Each one will give you a new taste. Mixing in peanut butter can also create a fun twist. If you follow a vegan diet, you can still enjoy this mousse. Use dairy-free chocolate and a plant-based cottage cheese alternative. There are many brands that offer great options. You can also opt for maple syrup instead of honey. This keeps the recipe vegan-friendly. For those needing gluten-free options, you’re in luck! This mousse is naturally gluten-free. Just make sure all your ingredients are labeled gluten-free. This way, you can enjoy it without worry. How you serve the mousse can change the experience. You can serve it in small cups for individual servings. This makes it easy to share and looks nice on a table. If you prefer, you can put it in a larger bowl for a family-style dessert. Just scoop out portions as needed. Garnish ideas can also be fun. Besides chopped hazelnuts, you can add fresh berries on top. They add color and a fruity taste. You could also drizzle some melted chocolate for extra flair. Cottage cheese is a great source of protein. One cup offers around 28 grams. It also has calcium, which helps build strong bones. The probiotics in cottage cheese aid digestion and gut health. Dark chocolate has its own perks. It is rich in antioxidants. These antioxidants help fight free radicals in the body. Dark chocolate may also improve heart health and boost mood. A small amount can make you feel good. Each serving of this mousse has about 230 calories. You get a mix of protein and healthy fats from the cottage cheese and hazelnut spread. The dark chocolate adds flavor and some sweetness. Here’s the macronutrient breakdown per serving: - Protein: 10 grams - Carbohydrates: 25 grams - Fats: 10 grams You can easily lower the sugar in this mousse. Swap honey or maple syrup for a sugar-free sweetener. This change keeps the taste while cutting calories. Adding ingredients like chia seeds or ground flaxseed can boost fiber. These additions help with digestion and keep you full longer. You can swap the cottage cheese for silken tofu. It blends well and keeps the mousse creamy. Use dairy-free dark chocolate chips for a vegan option. Replace honey with maple syrup for sweetening. This way, you keep all the flavors without dairy. Yes, you can! Cream cheese gives a rich taste. Ricotta adds a light texture. Just blend until smooth. Each cheese will change the taste slightly, but they all work. Experiment with what you like best. The mousse stays fresh for about 3 to 5 days. Store it in an airtight container. This keeps it from drying out or picking up other smells. Always check for any changes in smell or texture before eating. Yes, you can freeze it! Just scoop the mousse into a freezer-safe container. It can last for about a month in the freezer. When ready to eat, thaw it overnight in the fridge. The texture may change slightly, but it will still taste great. This blog post showcased how to make a delicious Chocolate Hazelnut Cottage Cheese Mousse. We covered key ingredients, step-by-step instructions, and helpful tips. I shared variations to fit different diets and tastes, along with nutritional details. You now have the tools to create this treat at home. Enjoy personalizing it for your needs. I’m excited for you to try these recipes. Have fun mixing flavors and impressing your friends!

Chocolate Hazelnut Cottage Cheese Mousse Delight

- 4 boneless, skinless chicken breasts - 1/4 cup pure maple syrup - 2 tablespoons Dijon mustard - 2 tablespoons olive oil For this recipe, I love using boneless, skinless chicken breasts. They cook evenly and stay juicy. The blend of pure maple syrup and Dijon mustard gives the chicken a sweet and tangy flavor. Olive oil adds moisture and helps the marinade stick. - 2 cups broccoli florets - 1 cup baby carrots - 1 red bell pepper, sliced - 1 medium red onion, sliced I choose broccoli, baby carrots, red bell pepper, and red onion for their color and taste. Broccoli adds crunch, while carrots bring sweetness. The red bell pepper and onion add a nice touch of flavor and texture. - 2 cloves garlic, minced - 1 teaspoon dried thyme - 1 teaspoon smoked paprika - Salt and pepper to taste Garlic gives a strong aroma and taste to the dish. Dried thyme adds a lovely herbal note. Smoked paprika brings warmth and depth. I add salt and pepper to enhance all the flavors. This mix makes the chicken and veggies burst with flavor! 1. Preheating the oven Start by preheating your oven to 425°F (220°C). This step is key for cooking the chicken and veggies evenly. 2. Preparing the marinade In a small bowl, whisk together the following ingredients until they blend well: - 1/4 cup pure maple syrup - 2 tablespoons Dijon mustard - 2 tablespoons olive oil - 2 cloves garlic, minced - 1 teaspoon dried thyme - 1 teaspoon smoked paprika - Salt and pepper to taste 3. Marinating the chicken Place 4 boneless, skinless chicken breasts in a large baking dish. Pour half of the maple Dijon mixture over the chicken. Make sure each piece is well-coated. If you can, let it marinate for about 10-15 minutes for more flavor. 4. Tossing the vegetables In another bowl, add the following vegetables: - 2 cups broccoli florets - 1 cup baby carrots - 1 red bell pepper, sliced - 1 medium red onion, sliced Toss these veggies with the remaining maple Dijon mixture until they are coated. 5. Arranging ingredients in the baking dish After marinating, place the seasoned vegetables around the chicken in the same baking dish. This way, everything cooks together and shares those great flavors. 6. Baking and broiling instructions Bake the dish in the preheated oven for 25-30 minutes. The chicken should reach an internal temperature of 165°F (74°C) and the veggies should be tender. For a nice caramelized finish, broil for an additional 2-3 minutes. Watch closely to avoid burning. This step-by-step guide makes it easy to create a delicious Maple Dijon Chicken and Veggies dinner. Enjoy your cooking! Marinating adds great flavor to the chicken. It helps the meat soak up the spices and sauce. I recommend marinating for at least 10-15 minutes. If you have more time, go for 30 minutes to an hour. This longer time will make the chicken even tastier. To check for doneness, use a meat thermometer. The chicken should reach 165°F (74°C). This ensures it is safe to eat and juicy. When broiling, keep a close watch. It only takes 2-3 minutes to caramelize. Stay nearby to prevent burning. For plating, place the chicken on a plate with veggies around it. Drizzle some of the pan sauce over the chicken. This adds flavor and looks nice. For garnishing, fresh thyme or parsley works well. It gives a pop of color and freshness to your dish. {{image_2}} You can easily switch up the protein in this dish. If you prefer tofu, use firm tofu instead of chicken. For a different meat option, pork tenderloin works well too. Both choices absorb the maple Dijon flavor nicely. When it comes to veggies, the sky's the limit! Try adding zucchini, asparagus, or snap peas. Each veggie brings its own twist to the dish. You can mix and match based on what you have at home or what is in season. If you love heat, add some red pepper flakes or cayenne pepper. A little goes a long way in boosting the flavor. You can also try using different mustards. Spicy brown mustard gives a nice kick. Honey mustard adds sweetness if you want a milder taste. You can grill the chicken and veggies for a smoky flavor. Just marinate as usual and cook on a hot grill for about 6-8 minutes per side. If you prefer a slow cooker, combine all ingredients in the pot. Cook on low for 6-8 hours or high for 3-4 hours. This method keeps everything super tender and flavorful. After enjoying your Maple Dijon Chicken and Veggies, store any leftovers right away. Place the chicken and veggies in a container with a tight lid. You can use glass or plastic containers. Make sure to cool them to room temperature first. This helps keep the food fresh. Store in the fridge for up to three days. When you are ready to eat leftovers, you can use several methods to reheat. The oven works best for even heating. Preheat your oven to 350°F (175°C) and place the food in a baking dish. Heat for about 15-20 minutes or until warm. You can also use a microwave. Heat on medium power for 2-3 minutes, stirring halfway. Check that the chicken reaches 165°F (74°C) for safety. Freezing is a great option if you want to save your meal for later. Make sure the chicken and veggies are cool before freezing. Use freezer-safe bags or containers. Label them with the date. You can freeze for up to three months. When you want to eat it, thaw in the fridge overnight. If you’re in a hurry, you can use the microwave’s defrost setting. You can pair this dish with many sides. Here are a few suggestions: - Rice: White or brown rice works great. - Quinoa: This adds a nutty flavor. - Mashed Potatoes: Creamy and comforting. - Crusty Bread: Perfect for soaking up sauce. - Side Salad: A fresh green salad adds crunch. These options balance the sweet and savory flavors of the chicken and veggies. Yes, you can prep this dish ahead. Here are some tips: - Marinate Chicken: You can marinate the chicken overnight. This boosts flavor. - Chop Veggies: Cut the vegetables a day in advance. Keep them in the fridge. - Store Separately: Keep chicken and veggies in separate containers until cooking. This way, you save time on busy days. Just bake them when ready. This dish is mild with a sweet and tangy taste. The Dijon mustard adds a slight kick, but it is not too hot. If you want more heat, consider these options: - Add Red Pepper Flakes: A pinch will spice things up. - Use Spicy Mustard: Swap for a hotter mustard. - Include Jalapeños: Toss in some diced fresh jalapeños with the veggies. Adjust these to your taste for a dish that fits your spice level. In this blog post, we explored the simple yet tasty Maple Dijon Chicken. I outlined key ingredients like chicken, maple syrup, and fresh veggies. We talked about easy steps for preparation and cooking, along with useful tips for marinating and serving. I also shared variations for different tastes and how to store leftovers. This dish is not only healthy but also adaptable. Enjoy making it for quick dinners or special occasions. Your kitchen will smell amazing, and your taste buds will thank you!

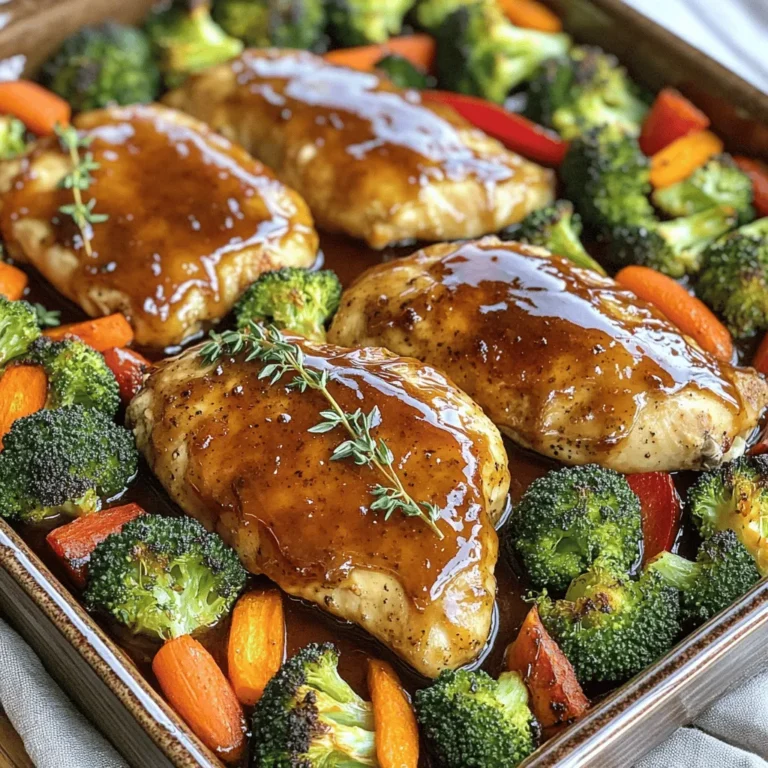
Maple Dijon Chicken and Veggies Delicious Dinner Idea

- 2 cups all-purpose flour - 1 ½ teaspoons baking powder - 1 teaspoon baking soda - 1 teaspoon ground cinnamon - ½ teaspoon ground nutmeg - ½ teaspoon ground ginger - ¼ teaspoon ground cloves - ½ teaspoon salt - 1 cup granulated sugar - ½ cup unsalted butter, softened - 2 large eggs - 1 cup canned pumpkin puree - 1 teaspoon vanilla extract - ½ cup buttermilk - ½ cup packed brown sugar - 1 tablespoon ground cinnamon - 2 tablespoons all-purpose flour - ½ cup chopped pecans or walnuts - 2 tablespoons granulated sugar - 1 teaspoon ground cinnamon When making pumpkin spice coffee cake, you need the right mix of ingredients. For the dry ingredients, you start with flour, baking powder, and baking soda. These help the cake rise. The spices like cinnamon, nutmeg, ginger, and cloves give it that warm fall flavor. Don't forget the salt; it balances the sweet. For the wet ingredients, you’ll need sugar and softened butter. Cream these together for a fluffy base. Then, add the eggs one by one, mixing well each time. Next comes the star of the show: canned pumpkin puree. It adds moisture and flavor. Finally, stir in some vanilla extract and buttermilk for richness. For the cinnamon swirl, mix brown sugar, ground cinnamon, and flour. This adds a sweet, spiced layer. Lastly, the topping includes chopped nuts, sugar, and more cinnamon. This gives your cake a nice crunch and a sweet finish. Each component plays a key role in creating a rich, flavorful cake that is perfect for fall. 1. Preheat your oven to 350°F (175°C). Grease and flour a 9x13 inch baking pan. This step ensures your cake will not stick. 2. In a medium bowl, whisk together 2 cups of all-purpose flour, 1 ½ teaspoons baking powder, 1 teaspoon baking soda, 1 teaspoon ground cinnamon, ½ teaspoon ground nutmeg, ½ teaspoon ground ginger, ¼ teaspoon ground cloves, and ½ teaspoon salt. Set this mix aside. 3. In a large mixing bowl, cream together 1 cup of granulated sugar and ½ cup of softened unsalted butter. Mix until light and fluffy. 4. Now, mix in 2 large eggs, one at a time. Then add 1 cup of canned pumpkin puree and 1 teaspoon of vanilla extract. Blend until well mixed. 5. Gradually add the dry ingredients to the pumpkin mixture. Alternate with ½ cup of buttermilk. Mix until just combined. Be careful not to overmix. 6. In a small bowl, combine ½ cup of packed brown sugar, 1 tablespoon of ground cinnamon, and 2 tablespoons of all-purpose flour to make the cinnamon swirl. 7. Pour half of the coffee cake batter into your prepared pan. Spread it evenly. Sprinkle the cinnamon swirl mixture over this layer. Then top with the remaining batter, spreading it to cover the swirl. 8. In a separate bowl, mix together ½ cup of chopped pecans or walnuts, 2 tablespoons of granulated sugar, and 1 teaspoon of ground cinnamon. Sprinkle this mixture over the top of the batter. 9. Bake in the preheated oven for 25-30 minutes. Check if a toothpick inserted in the center comes out clean. 10. Allow the cake to cool in the pan for about 10 minutes. Then transfer it to a wire rack to cool completely. 11. For presentation, slice the coffee cake into squares. Serve it warm or at room temperature on a decorative platter. Pair it with a cup of hot coffee or tea. Optionally, dust with powdered sugar for an elegant touch. To avoid overmixing, mix just until the ingredients blend. Overmixing makes the cake tough. I recommend using a rubber spatula to fold in the dry ingredients. This gentle method keeps the cake light and fluffy. For even baking, make sure to preheat your oven to 350°F. Use an oven thermometer to check the real temperature. Place the cake in the center of the oven for uniform heat. You can add chocolate chips or raisins to the batter for extra flavor. These add sweetness and texture to each bite. Fresh spices, like ground cinnamon or nutmeg, can boost the cake's taste. Always use fresh spices, as they pack more flavor than old ones. You can buy whole spices and grind them at home for the best results. Pair your coffee cake with a warm cup of coffee or tea. The flavors complement each other very well. This cake is perfect for fall gatherings or cozy family breakfasts. Consider serving it at brunch or during a festive get-together. For a special touch, dust the top with powdered sugar before serving. This adds a nice look and a hint of sweetness. {{image_2}} You can try using brown sugar instead of granulated sugar. Brown sugar adds moisture and depth. It gives the cake a richer flavor. For a healthier choice, consider coconut sugar or honey. Coconut sugar has a lower glycemic index. Honey adds a lovely floral note to the cake. If you're gluten-free, swap all-purpose flour with almond flour. Almond flour makes the cake moist and adds protein. You can also use gluten-free flour blends. These blends work well in many recipes. Just ensure they contain a binding agent like xanthan gum. Want to mix things up? Add orange zest for a bright twist. It pairs well with pumpkin spice. You can also try other spices like cardamom or allspice. They add unique flavors that enhance the cake. For a crunchy texture, incorporate different nuts like pecans or walnuts. Dried fruits like cranberries or raisins also work well. They add sweetness and chewiness to each bite. To keep your pumpkin spice coffee cake fresh, store it at room temperature. Use a cake dome or cover it with plastic wrap. This method keeps the cake moist and tasty. It will stay fresh for about 3-5 days. If you want to save some for later, freezing works well. First, let the cake cool completely. Then wrap it tightly in plastic wrap and foil. This will keep it safe from freezer burn. You can freeze the cake for up to three months. When you’re ready to eat it, thaw it in the fridge overnight. This keeps the texture nice. To enjoy a warm slice, reheat the cake in the oven. Set your oven to 350°F (175°C). Place the cake on a baking sheet and warm it for about 10-15 minutes. You can also use the microwave. Heat a slice for about 15-20 seconds. This warms it up quickly. Enjoy your cake with a cup of coffee or tea for a cozy treat! Pumpkin spice is a mix of warm flavors. It usually has: - Ground cinnamon - Ground nutmeg - Ground ginger - Ground cloves These spices come together to create a cozy fall taste. Each spice adds its unique flavor, making the mix special. Yes, you can use fresh pumpkin! To prepare fresh pumpkin puree: 1. Cut the pumpkin in half and remove the seeds. 2. Roast the halves in the oven until soft. 3. Scoop out the flesh and blend it until smooth. This fresh puree adds a vibrant flavor to your cake. To check if your cake is done, look for these signs: - The edges pull away from the pan. - A toothpick inserted in the center comes out clean. If it meets these points, your cake is ready to enjoy! You can prepare this recipe ahead of time! Here are some tips: - Make the batter a day before and store it in the fridge. - You can also bake the cake and let it cool. Then, wrap it tightly and keep it in the fridge for up to three days. This makes serving easy on busy mornings! This blog post outlined a tasty pumpkin coffee cake recipe. We covered ingredients, step-by-step instructions, and helpful baking tips. You learned about mixing, baking, and serving ideas. We discussed variations for different diets and flavor twists. Remember, baking is fun and creative. Don't hesitate to try new flavors or methods. Enjoy sharing your delicious creation with loved ones. Your kitchen adventure starts now—happy baking!

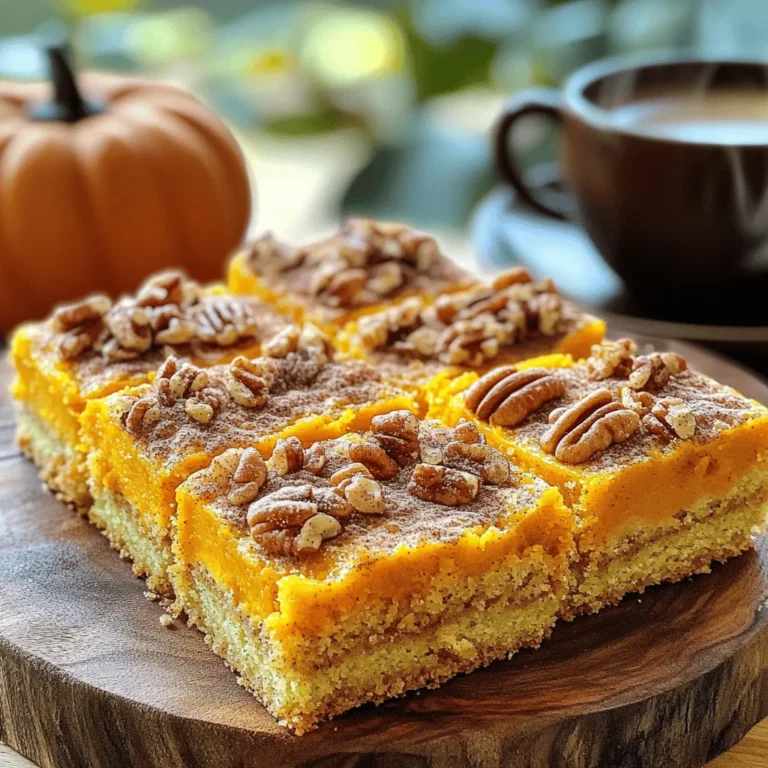
Pumpkin Spice Coffee Cake Flavorful Fall Treat

- Shrimp: 1 lb, peeled and deveined - Chicken sausage: 1 lb, sliced - Vegetables: 1 bell pepper, sliced; 1 medium onion, chopped - Aromatics: 4 cloves garlic, minced - Honey: 1/3 cup - Soy sauce: 2 tablespoons - Sesame oil: 1 tablespoon - Red pepper flakes: 1 teaspoon (optional) - Seasoning: Salt and pepper to taste - Green onions: 2, sliced - Sesame seeds The Honey Garlic Shrimp Sausage Skillet uses simple, tasty ingredients. You start with fresh shrimp and savory chicken sausage. The bell pepper and onion add great flavor and color. Garlic gives the dish a nice kick. You then mix honey and soy sauce for a sweet and salty sauce. Sesame oil adds a rich, nutty flavor. If you want some heat, sprinkle in red pepper flakes. Finally, garnish with green onions and sesame seeds for a bright finish. These ingredients come together quickly. They make a meal that is not only easy to cook but also fun to eat. You’ll enjoy the sweet and savory mix on your plate. {{ingredient_image_1}} How to peel and devein shrimp To prepare shrimp, start by rinsing them under cold water. Hold the shrimp firmly in one hand. With your other hand, grab the shell at the head end and pull it off. Next, remove the tail by pinching it and pulling it away from the body. To devein, make a small cut along the back. Use a toothpick or knife to lift out the dark vein. Rinse the shrimp again to clean them well. Slicing chicken sausage and vegetables Take the chicken sausage and place it on a cutting board. Use a sharp knife to slice it into thin rounds. Next, grab your bell pepper and onion. Cut the bell pepper in half, remove the seeds, and slice it into strips. For the onion, cut off the ends, peel off the outer layer, and chop it into small pieces. Heating sesame oil and sautéing sausage In a large skillet, pour in the sesame oil. Turn the heat to medium and let the oil warm up. Once hot, add the sliced chicken sausage. Sauté it for about five minutes. You want it to turn a nice brown color. Adding vegetables and cooking until soft Now, toss in the chopped onion and bell pepper. Stir everything together and let it cook for another four to five minutes. You want the veggies to soften but not lose their color. Incorporating garlic and shrimp Next, add the minced garlic to the skillet. Stir it for one to two minutes. This will make your kitchen smell amazing! After that, add the peeled shrimp. Cook for about three to four minutes, until the shrimp turn pink and opaque. Mixing honey sauce and adding to skillet In a small bowl, whisk together the honey, soy sauce, and red pepper flakes if you like some heat. Pour this honey mixture over the shrimp and sausage in the skillet. Seasoning and garnishing before serving Add salt and pepper to taste. Cook for another two to three minutes to let the sauce thicken. Remove from heat and garnish with sliced green onions and sesame seeds. Now, it’s ready to serve! - Best practices for cooking shrimp: Always thaw shrimp before cooking. Cook shrimp on medium heat for 3-4 minutes until they turn pink. Remove them from heat right after they turn opaque to avoid overcooking. - Tips for perfectly browned sausage: Sauté chicken sausage in sesame oil over medium heat. Let it cook for 5 minutes without stirring too much. This helps it get a nice golden color. - Suggestions for adding more spices: Add a pinch of smoked paprika for a smoky taste. Try a dash of cumin for warmth. You can also use fresh ginger for a zesty kick. - Substitutions for honey and soy sauce: If you need a honey substitute, maple syrup works great. For soy sauce, use tamari for a gluten-free option, or coconut aminos for a sweeter flavor. - Ideal side dishes to pair with skillet: Serve this dish with steamed rice or quinoa. A fresh green salad also pairs well and adds crunch. - Creative ways to serve leftovers: Use leftovers in tacos or wraps. You can make a hearty soup by adding broth and more veggies. Pro Tips Perfectly Cooked Shrimp: Be careful not to overcook the shrimp; they should turn pink and opaque in just 3-4 minutes on medium heat. Flavor Boost: For an extra layer of flavor, marinate the shrimp in soy sauce and a little honey for 15-30 minutes before cooking. Vegetable Variations: Feel free to add other vegetables like snap peas, carrots, or broccoli for added color and nutrition. Serving Suggestion: Serve over rice, quinoa, or noodles to soak up the delicious honey garlic sauce for a complete meal. {{image_2}} You can swap shrimp for tofu or fish. Tofu absorbs flavors well and is a great choice. If you prefer fish, choose firm types like cod or halibut. Different types of sausage work too. Try pork, turkey, or even plant-based sausage. Each will bring a new taste to your Honey Garlic Shrimp Sausage Skillet. To make a vegetarian version, use only tofu or plant-based sausage. You can add extra veggies like mushrooms or zucchini for more texture. For a vegan sauce, replace honey with maple syrup or agave. This keeps the dish sweet and tasty while sticking to plant-based choices. You can add citrus like lime or lemon for a fresh kick. Just a squeeze over the finished dish brightens the taste. Herbs like cilantro or parsley also enhance flavor. Toss them in just before serving for added freshness. If you like heat, mix in more red pepper flakes or add sliced jalapeños. Adjust based on your spice level, so it’s just right for you. To keep your Honey Garlic Shrimp Sausage Skillet fresh, follow these tips: - Cool the skillet: Let it cool to room temperature. - Use airtight containers: Store leftovers in glass or plastic containers. - Label and date: Write the storage date on your container. In the fridge, this dish stays good for up to three days. You can freeze the Honey Garlic Shrimp Sausage Skillet! Here’s how: - Cool completely: Make sure it’s fully cooled before freezing. - Use freezer-safe bags: Place the dish in a zip-top bag or container. - Remove as much air as possible: This helps prevent freezer burn. To thaw, move it to the fridge overnight. For reheating: - Microwave: Heat on medium power until hot. - Stovetop: Warm in a pan over low heat, stirring often. Meal prep makes weeknight cooking easy! Try these tips: - Chop veggies ahead: Slice bell peppers and onions in advance. - Pre-cook sausage: Cook the chicken sausage and store it in the fridge. - Portion shrimp: Keep shrimp in the fridge, ready to add when cooking. For quick dinners, assemble the skillet in 15 minutes if you prep ahead! Can I use frozen shrimp for this recipe? Yes, you can use frozen shrimp. Just thaw them first. Place them in cold water for about 15 minutes. This makes cooking easier. Is this recipe gluten-free? Yes, this recipe is gluten-free if you use gluten-free soy sauce. Always check labels to be sure. What can I substitute if I don’t have sesame oil? You can use olive oil or canola oil instead. They won't give the same flavor but will work fine. How do I know when the shrimp is fully cooked? Shrimp turn pink and opaque when cooked. They should also curl into a C shape. If they stay straight, they might be overcooked. Can I use different vegetables in this dish? Yes, feel free to use any veggies you like. Broccoli, snap peas, or carrots work well. Mix and match for fun flavors. What is the best type of honey to use? Any pure honey is great. Local honey can add unique flavor. Avoid honey blends with added sugars for the best taste. This recipe combines shrimp and chicken sausage with fresh veggies and a sweet sauce. You can substitute proteins and adapt flavors easily. Remember to store leftovers properly for later use. With just a few simple steps, you can serve a tasty meal with great variety. Explore your options and enjoy the cooking process. Happy cooking!

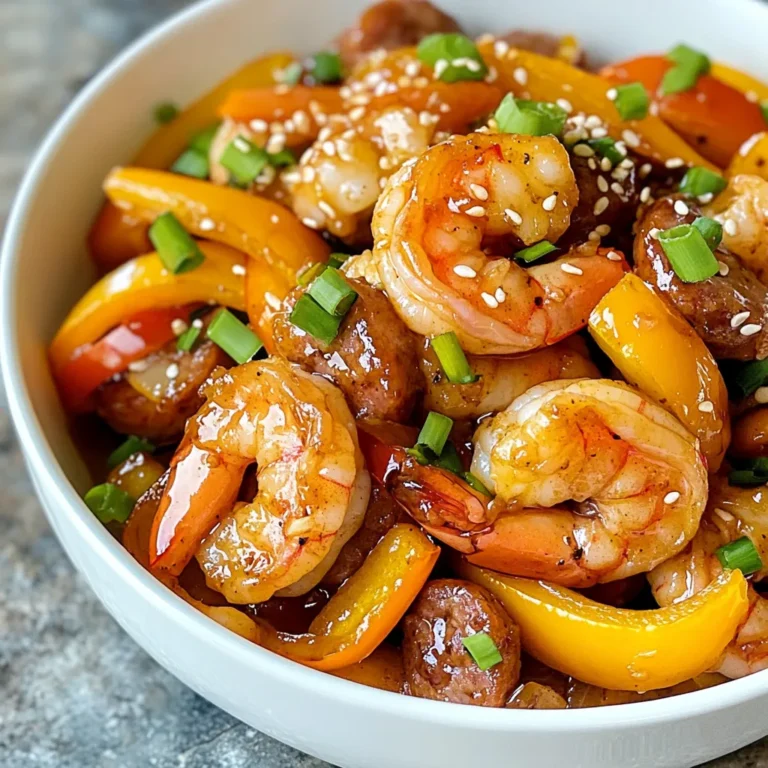
Honey Garlic Shrimp Sausage Skillet Quick Dinner Meal

- 1 lb boneless, skinless chicken breasts - 1 can (10 oz) enchilada sauce (red or green) - 1 can (15 oz) black beans, rinsed and drained - 1 can (15 oz) corn, drained - 1 can (14.5 oz) diced tomatoes with green chilies - 1 medium onion, chopped - 2 cloves garlic, minced - 4 cups low-sodium chicken broth - 1 cup cream cheese, softened - 1 teaspoon cumin - 1 teaspoon paprika - Salt and pepper to taste - 1 cup shredded cheddar cheese - Fresh cilantro for garnish - Tortilla strips for topping For the main ingredients, I love using boneless, skinless chicken breasts. They shred well and soak up flavor. The enchilada sauce is key. Choose red or green based on your taste. Black beans and corn add texture and fiber. Diced tomatoes with green chilies bring a spicy kick. Chopped onion and minced garlic add a savory base. Low-sodium chicken broth keeps the soup rich but not too salty. The cream cheese inside gives it that creamy feel we all love. Cumin and paprika add warmth and depth. Finally, salt and pepper balance everything out. - Additional spices (e.g., chili powder, oregano) - Substitutes for shredded cheese (e.g., Monterey Jack, pepper jack) You can boost the flavor with more spices like chili powder or oregano. If you want a twist on cheese, try Monterey Jack or pepper jack. These options can make the soup even more delicious. 1. First, layer the chicken breasts at the bottom of your slow cooker. 2. In a medium bowl, mix together several key ingredients. Combine the enchilada sauce, black beans, corn, and diced tomatoes. 3. Add the chopped onion, minced garlic, chicken broth, cumin, paprika, salt, and pepper. Stir well until everything is mixed. 1. Pour this sauce mixture over the chicken in the slow cooker. Ensure the chicken is well covered with the sauce. 2. Cover the slow cooker and set it on low for 6 to 7 hours or high for 3 to 4 hours. The chicken should be fully cooked and tender by then. 1. Once cooking is done, take the chicken out of the soup. Use two forks to shred it into bite-sized pieces. 2. Return the shredded chicken back to the slow cooker. Stir in the softened cream cheese until it melts and blends into the soup. 3. Let it cook on low for an extra 30 minutes to mix those great flavors. 4. Finally, stir in the shredded cheddar cheese until it melts. Serve hot, and top with fresh cilantro and tortilla strips for a crunchy finish. - Use low-sodium ingredients for a healthier option. This choice cuts down on salt and helps you enjoy the pure flavors of the soup. - Adjust cook times based on slow cooker models. Each slow cooker heats differently. If you find yours cooks faster, check the soup often. - To melt cream cheese properly, cut it into small cubes. This helps it blend smoothly into the soup. Stir it in after shredding the chicken for the best results. - Enhance flavor depth in the soup by adding extra spices like chili powder or oregano. You can also mix in fresh herbs for a bright taste. {{image_2}} You can switch up the protein in this soup. Try using shredded rotisserie chicken. This saves time and adds great flavor. Just mix it in at the end. For a vegetarian option, use beans or tofu instead of chicken. Black beans work well. You can also use firm tofu for a good texture. Feel free to get creative with add-ins! Adding vegetables can boost nutrition and flavor. Try bell peppers for a sweet crunch. Zucchini also adds a nice texture. If you like heat, adjust the spice level. Use mild enchilada sauce for a subtle kick. Go for spicy sauce if you want more heat. You can even mix both for a balanced flavor. To store your creamy chicken enchilada soup, let it cool first. Then, transfer it to an airtight container. Make sure to leave some space at the top for expansion. Store the soup in the fridge for up to three days. This way, you can enjoy it later without losing flavor. If you want to freeze the soup, use freezer-safe containers. Divide the soup into portions for easier use. Label each container with the date. The soup can last in the freezer for up to three months. To thaw, place it in the fridge overnight or use the microwave. You can reheat the soup in two easy ways. For the microwave, place it in a bowl. Heat on high for two to three minutes, stirring halfway through. For the stove, pour the soup into a pot. Heat on medium-low, stirring often until hot. Enjoy it warm with your favorite toppings! You can swap out some ingredients for lighter options. Here are a few ideas: - Use skinless chicken thighs instead of breasts for more flavor. - Choose low-fat cream cheese instead of regular cream cheese. - Replace regular cheese with a reduced-fat version. - Add more veggies like spinach or bell peppers for added nutrients. Yes, you can use other broths. Here are some good swaps: - Vegetable broth gives a light, fresh taste. - Beef broth adds a richer flavor profile. - You can even use homemade broth for better taste. This soup stays fresh for about 3 to 4 days in the fridge. Store it in an airtight container for best results. If you want to enjoy it later, consider freezing it as well. This blog post covered how to make a delicious slow cooker soup. You learned about key ingredients and steps for cooking. I shared tips to enhance flavor and texture. You can adjust recipes to fit your taste or dietary needs. Don’t forget to store leftovers properly for later enjoyment. Remember, this dish is flexible and simple to prepare. Enjoy your cooking adventure and the tasty soup you will create!

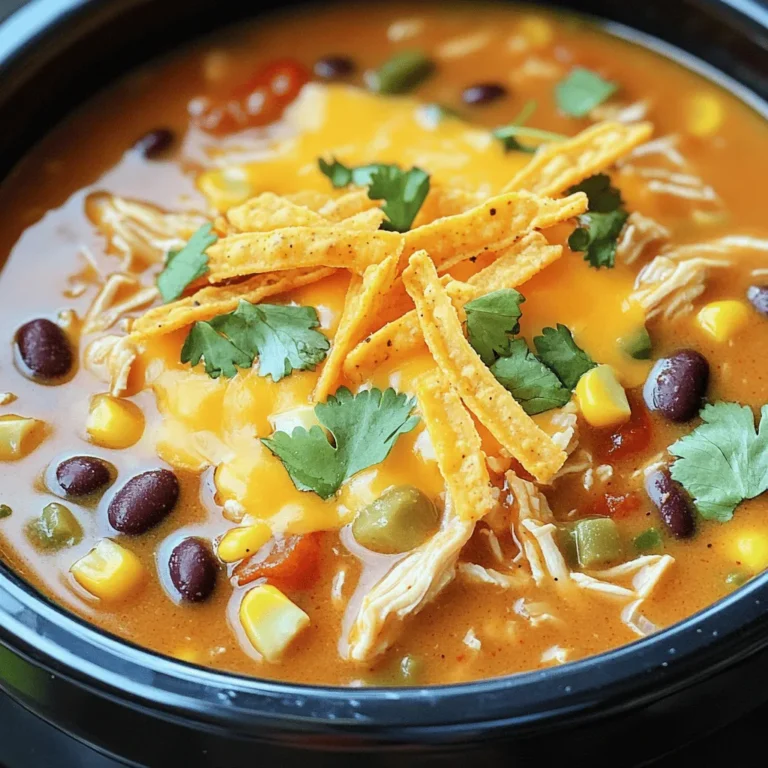
Creamy Chicken Enchilada Soup Slow Cooker Delight

For this salad, you need: - 2 medium sweet potatoes, peeled and cubed - 2 tablespoons olive oil - 3 tablespoons pure maple syrup - Salt and pepper to taste - 1 teaspoon cinnamon Sweet potatoes bring a nice sweetness. The olive oil helps them roast well. Maple syrup gives a lovely glaze. Salt and pepper add flavor. Cinnamon adds warmth and depth. You will also need: - 1 cup mixed salad greens (spinach, arugula, or your choice) - 1/2 cup pecans, toasted Mixed greens add freshness. Spinach or arugula works great. Toasted pecans give a nice crunch. They add a nutty flavor that pairs well with sweet potatoes. To make it even better, you can add: - 1/2 cup crumbled feta cheese - 1/4 cup dried cranberries - 2 tablespoons apple cider vinegar - 1 tablespoon Dijon mustard Feta adds creaminess and tang. Dried cranberries bring a fruity note. The apple cider vinegar and Dijon mustard make a simple, tasty dressing. These additions create a balance of flavors in the salad. Start by peeling the sweet potatoes. Then, cut them into small cubes. This size helps them cook evenly. Next, place the cubed sweet potatoes in a mixing bowl. Add two tablespoons of olive oil, three tablespoons of pure maple syrup, salt, pepper, and one teaspoon of cinnamon. Toss the sweet potatoes well. You want them fully coated in the mixture. Preheat your oven to 400°F (200°C). Spread the sweet potatoes on a parchment-lined baking sheet in a single layer. This helps them roast well. Place the tray in the oven and roast for about 25 to 30 minutes. Toss them halfway through to ensure even cooking. They should be tender and caramelized when done. While the sweet potatoes roast, grab a small bowl. Whisk together two tablespoons of apple cider vinegar and one tablespoon of Dijon mustard. This simple dressing adds great flavor to the salad. Make sure it blends well. Set the dressing aside until the sweet potatoes are ready. Once the sweet potatoes cool for a few minutes, it’s time to assemble your salad. In a large salad bowl, combine one cup of mixed salad greens, the roasted sweet potatoes, and half a cup of toasted pecans. If you like, add half a cup of crumbled feta cheese for extra flavor. Toss in a quarter cup of dried cranberries for sweetness. Finally, drizzle the salad dressing over everything and gently toss to combine. Enjoy your colorful and tasty salad! Roasting the sweet potatoes brings out their natural sweetness. First, cut them into even cubes. This helps them cook at the same speed. Spread the cubes on a parchment-lined sheet. Make sure they are in a single layer. This way, they roast evenly. Toss them halfway through cooking for the best results. Bake at 400°F for about 25 to 30 minutes. They should be tender and lightly caramelized. To make the sweet potatoes shine, use a good mix of flavors. Toss them with olive oil, maple syrup, salt, and pepper. Add a teaspoon of cinnamon for warmth. The cinnamon pairs well with sweet potatoes. You can taste the sweet and spicy notes in every bite. This mix gives your salad a lovely, rich flavor. A beautiful salad makes the meal even better. Serve it in a large shallow bowl for a family-style meal. For individual servings, use nice plates. Top the salad with extra pecans and feta for crunch and creaminess. A drizzle of maple syrup adds a glossy finish. You can also sprinkle some dried cranberries on top for color. This makes the salad pop on the table! {{image_2}} You can easily make this salad vegetarian or vegan. To do this, skip the feta cheese. Instead, add some avocado for creaminess. You can also use a vegan salad dressing. A mix of olive oil and lemon juice works well. This keeps the salad fresh and tasty. If you want to switch up the nuts, walnuts or almonds are great choices. They add crunch and flavor. For fruits, try using apple slices or pomegranate seeds. These can give a nice burst of sweetness. You can mix and match to find your favorite combo. You can use different greens in this salad. If you want a peppery taste, arugula is a good option. Kale adds a hearty feel. If you like mild greens, use romaine or butter lettuce. Each green will change the flavor and texture of your salad. After enjoying your Maple Roasted Sweet Potato Pecan Salad, store leftovers in an airtight container. This keeps the salad fresh and tasty. The salad holds well for up to three days in the fridge. If you want to warm the sweet potatoes, do so gently. Use a microwave or oven. Heat them until just warm to keep the salad fresh. Avoid reheating the greens and nuts, as they should stay crisp. To keep your salad fresh, store the dressing separately. Combine it when you're ready to eat. This step helps keep the greens crisp and prevents wilting. Also, if you can, add nuts just before serving for extra crunch. Yes, you can prep some parts ahead. Roast the sweet potatoes and store them. Keep the salad greens and dressing separate in the fridge. Mix everything together when you are ready to serve. This keeps the salad fresh and crisp. You can try many dressings. A simple balsamic vinaigrette works well. A honey mustard dressing can add a nice twist. You can even use a yogurt-based dressing for creaminess. Just pick what you enjoy most! Yes, this salad is already gluten-free! All the ingredients are free from gluten. Just check any dressings or extras to ensure they are also gluten-free. Enjoy without worry. Absolutely! Grilled chicken, chickpeas, or tofu are great options. They add protein and make the salad more filling. Choose what you like best for a healthy boost. To make this salad vegan, skip the feta cheese. You can add more nuts or seeds for creaminess. Also, check your dressing to ensure it is vegan-friendly. There are many tasty options out there! Store leftovers in an airtight container. Keep the salad greens and dressing separate to avoid sogginess. The roasted sweet potatoes can stay with the other ingredients. They last for about 2-3 days in the fridge. Yes, fresh herbs add great flavor! Try adding parsley, cilantro, or mint. Chop them finely and mix them in with the salad. This adds a fresh and vibrant taste. This salad pairs well with grilled meats or fish. It also complements sandwiches or wraps nicely. You can enjoy it as a light lunch or a side dish for dinner. To make it heartier, add grains like quinoa or farro. These grains blend well with sweet potatoes and add texture. You can also toss in more nuts or seeds for crunch. This blog post covered how to make a tasty sweet potato salad. We discussed key ingredients like sweet potatoes, nuts, and greens, along with optional add-ins. I shared easy step-by-step instructions, from prepping to serving. Tips on roasting and flavoring added fun. We explored variations for different diets and how to store leftovers. In conclusion, this salad is healthy and flexible. You can easily adjust it to fit your tastes. Enjoy making your own version!

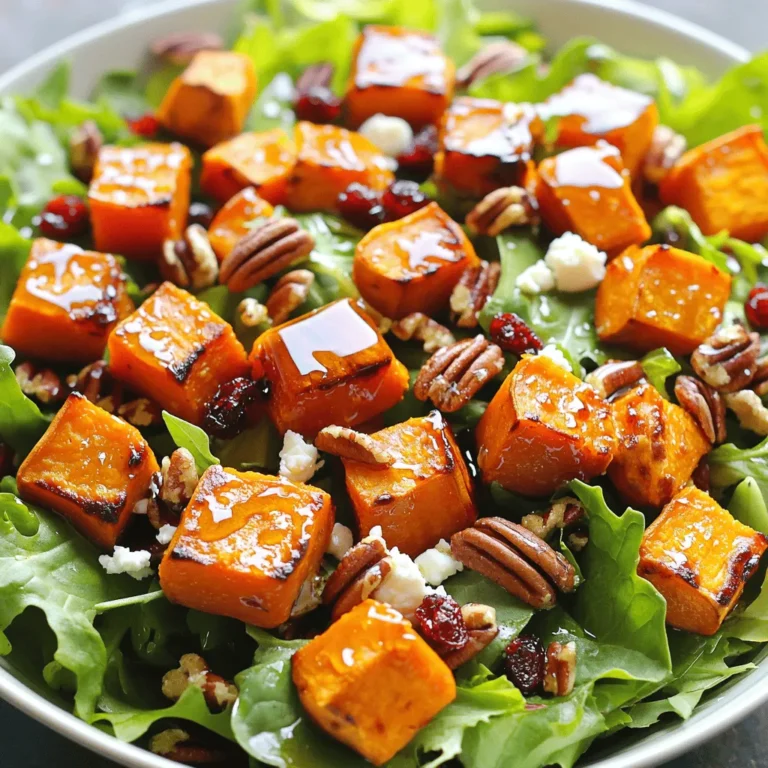
Maple Roasted Sweet Potato Pecan Salad Delight

- 1 lb beef sirloin, thinly sliced - 2 cups mixed bell peppers (red, yellow, green), sliced - 1 cup broccoli florets - 1 cup snap peas For this dish, use beef sirloin. It is tender and cooks quickly. Slice it thinly for even cooking. Mixed bell peppers add great color and taste, while broccoli and snap peas give nice crunch. - 3 tablespoons soy sauce - 2 tablespoons oyster sauce - 1 tablespoon sesame oil - 1 tablespoon vegetable oil The sauces are key to flavor. Soy sauce brings saltiness, while oyster sauce adds depth. Sesame oil gives a nutty aroma. Use vegetable oil to cook the beef. - Sesame seeds - Green onions For a lovely finish, sprinkle sesame seeds on top. Chopped green onions add freshness and a pop of color. These simple touches make your dish look and taste great. Heating the vegetable oil Start by heating 1 tablespoon of vegetable oil in a large skillet or wok. Set the heat to medium-high. This step is key for a nice sear. Searing and sautéing the beef Next, add 1 pound of thinly sliced beef sirloin to the pan. Spread it out in a single layer. Let it sear for 1-2 minutes without stirring. This helps it brown nicely. After that, sauté it for about 4-5 minutes until it is fully cooked and browned. Once done, remove the beef from the pan and set it aside. Adding garlic and ginger In the same skillet, add 3 cloves of minced garlic and 1 tablespoon of minced fresh ginger. Stir quickly for about 30 seconds. This step adds great flavor but be careful not to burn them. Stir-frying bell peppers, broccoli, and snap peas Now, toss in 2 cups of mixed sliced bell peppers, 1 cup of broccoli florets, and 1 cup of snap peas. Stir-fry these colorful veggies for 4-5 minutes. You want them to be tender, but still crisp and vibrant. Returning beef to the skillet Once the veggies are ready, return the cooked beef to the skillet. This makes sure all the flavors mix well. Adding sauces and final cooking Pour in 3 tablespoons of soy sauce, 2 tablespoons of oyster sauce, and 1 tablespoon of sesame oil. Toss everything together to coat the beef and veggies in the sauce. Cook for an additional 2-3 minutes to heat through. Now, your Beef Veggie Stir Fry is ready to serve over jasmine rice! Enjoy the blend of flavors and colors on your plate. - Cut beef thinly for tender results: Thin slices cook quickly. This keeps the beef juicy and tender. Aim for slices about 1/4 inch thick. A sharp knife helps with this task. - Don’t overcrowd the pan: If you add too much beef at once, it will steam instead of sear. Cook in batches if needed. This way, you will get a nice brown color. - Use fresh ingredients: Fresh veggies bring bright colors and tastes. Choose firm, crisp bell peppers and vibrant snap peas. Fresh garlic and ginger add a punch. - Adjusting sauce to taste: Start with the sauce amounts in the recipe. After mixing, taste the dish. If it needs more flavor, add more soy sauce or oyster sauce. You can also try adding a pinch of sugar for balance. - Best rice options to pair: Jasmine rice is the go-to choice. Its soft texture complements the stir fry well. You can also use brown rice for a healthier option. Quinoa works too if you want a grain swap. - Additional garnishing ideas: Top your dish with sesame seeds and green onions for crunch. You can also add chopped cilantro or a squeeze of lime for a fresh twist. {{image_2}} You can easily switch the beef for chicken. Chicken breast works well here. Just slice it thin and follow the same steps. Cook the chicken until it is no longer pink. This change keeps the dish tasty and healthy. If you want a vegetarian option, use tofu. Firm tofu is best. Cut it into cubes and press it to remove water. Then, sauté it until golden brown. This adds a nice texture to the stir fry. For gluten-free needs, use gluten-free soy sauce. This sauce gives the same salty flavor without gluten. Brands like Tamari or coconut aminos work well. You can also try other sauces. Hoisin sauce or teriyaki sauce can add a nice twist. Just check the labels to ensure they are gluten-free. Feel free to add seasonal veggies. Zucchini, carrots, or snap peas add color and crunch. You can mix and match based on what you have at home. For a creative twist, try adding fruits like pineapple or mango. These add sweetness and a fun flavor. Experiment with different veggies to find your favorite combo! To keep your beef veggie stir fry fresh, store leftovers in an airtight container. Place it in the fridge right after it cools down. This helps keep the flavors and textures intact. Your stir fry will last up to three days in the fridge. Make sure to reheat only the amount you need to avoid sogginess. If you want to store your stir fry for longer, freezing is a great option. First, let the dish cool completely. Then, place it in a freezer-safe bag or container. Remove as much air as possible before sealing. This prevents freezer burn. Your stir fry can last in the freezer for about three months. When you’re ready to eat, thaw it in the fridge overnight. Reheat it in a skillet over medium heat for the best results. Preparing meals in advance can save you a lot of time. Cook a larger batch of the stir fry and divide it into portions. Use separate containers for each meal. This way, you have quick and easy meals ready for busy days. You can also pair it with rice or other grains when you’re ready to eat. Enjoying homemade meals was never this easy! For stir fry, I recommend using beef sirloin. This cut is tender and cooks quickly. It has good flavor and stays juicy. To prepare, slice the beef thinly against the grain. This helps keep it tender. You can also try flank steak or ribeye for added richness. Each option will give you a delicious meal. Yes, you can use frozen vegetables. They are handy and save time. However, fresh veggies often taste better. Frozen veggies can lose some crunch. If you use frozen, cook them for a shorter time. This keeps them vibrant and colorful. Fresh vegetables offer more flavor and texture. So, choose based on what you prefer. To add some heat, try these tips: - Add crushed red pepper flakes to the oil. - Mix in sliced jalapeños or Thai chilies. - Use a spicy sauce, like Sriracha, for a kick. - Top with fresh chili slices before serving. Adjust the spice level to your taste. Enjoy experimenting with flavors! This blog post detailed how to create a tasty stir fry. You learned about key ingredients like beef, fresh vegetables, and flavorful sauces. I shared important cooking steps, tips for great taste, and fun variations. As you explore this dish, remember to cut beef thinly and use fresh veggies. Enjoy experimenting with different proteins and seasonal vegetables. Each stir fry can be unique. With practice, you’ll master this quick and delicious meal for any night.

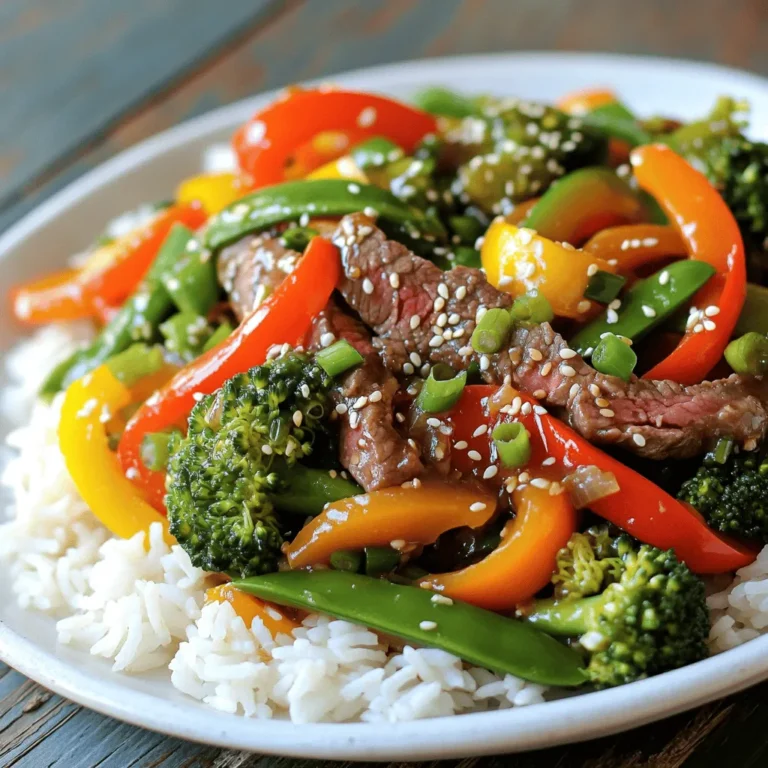
Beef Veggie Stir Fry Over Rice Flavorful Dinner Recipe

To make Air Fryer Garlic Butter Shrimp Skewers, gather these main ingredients: - 1 pound large shrimp, peeled and deveined - 4 tablespoons unsalted butter, melted - 4 cloves garlic, minced - 1 tablespoon fresh parsley, chopped - 1 teaspoon lemon juice - 1 teaspoon paprika - Salt and pepper to taste - Skewers (soaked in water if using wooden ones) These ingredients work together to create a tasty dish. The shrimp absorb the buttery flavor well. You can add some optional ingredients to boost flavor: - Red pepper flakes for heat - Lemon zest for extra citrus - Other herbs like thyme or cilantro These add-ins can change the taste to match your style. Feel free to mix and match. To make this recipe easier, have these tools ready: - Medium bowl for mixing - Air fryer for cooking - Skewers for threading the shrimp - Basting brush for the garlic butter Using the right tools helps you cook shrimp perfectly. Enjoy the process and get ready for a delicious meal! First, grab a medium bowl. Add 4 tablespoons of melted butter. Then, toss in 4 minced garlic cloves. Next, add 1 tablespoon of chopped fresh parsley and 1 teaspoon of lemon juice. Sprinkle in 1 teaspoon of paprika. Finally, add salt and pepper to taste. Mix well until all ingredients blend together. This garlic butter will give the shrimp a rich flavor. Now, take 1 pound of large shrimp that are peeled and deveined. Add the shrimp to your bowl with the garlic butter mixture. Toss the shrimp gently to coat each piece. Let them marinate for 15 to 20 minutes. This step helps the shrimp soak up all that tasty garlic butter flavor. Preheat your air fryer to 400°F (200°C). While it heats up, take your marinated shrimp and thread them onto skewers. Make sure to leave a little space between each shrimp. This helps them cook evenly. Once your air fryer is hot, place the skewers in the basket in a single layer. Cook for 6 to 8 minutes. Flip the skewers halfway for even cooking. The shrimp should turn pink and be cooked through. When done, remove them from the air fryer. Garnish with more parsley and a squeeze of lemon juice for extra brightness. Enjoy your tasty shrimp skewers! To get the best shrimp, choose large ones. Fresh shrimp tastes great, but frozen works too. Make sure they are peeled and deveined. This saves time and gives a clean bite. Marinate the shrimp for 15-20 minutes to soak up all the flavors. This makes them juicy and tasty. Set your air fryer to 400°F (200°C). This high heat cooks shrimp fast. Place the skewers in a single layer. This helps them cook evenly. Flip them halfway through cooking for even browning. Cook for 6-8 minutes. Check for a pink color. That means they are done! Garnish your shrimp skewers with fresh parsley. A squeeze of lemon juice adds brightness. Serve them with rice or a fresh salad. You can also pair them with a dipping sauce. Enjoy your delicious meal with friends or family! {{image_2}} You can change the taste of your shrimp skewers easily. Try adding some spices like cumin or cayenne pepper for heat. A dash of soy sauce or a splash of sesame oil brings a nice twist. If you love citrus, add lime juice instead of lemon. For herb lovers, try fresh dill or cilantro. Each choice creates a new flavor and keeps things fun. No shrimp? No problem! You can use firm tofu or veggies like bell peppers, zucchini, or mushrooms. These options soak up flavors well. If you want seafood, consider using scallops or chunks of salmon. Both cook nicely and taste great with garlic butter. Make sure to adjust cooking times to suit the ingredient you pick. Pair your shrimp skewers with great sides. A fresh salad with mixed greens and tomatoes works well. Rice or quinoa adds a nice touch, too. For a bit of crunch, serve them with crispy sweet potato fries. You can even add some grilled corn on the cob for a summer vibe. All these sides make your meal more exciting and tasty. To store leftovers, let the shrimp cool first. Place them in an airtight container. You can keep them in the fridge for up to two days. Make sure to layer parchment paper between the skewers to avoid sticking. Reheat shrimp in the air fryer for best results. Set the air fryer to 350°F (175°C). Heat for about 3-4 minutes until warmed through. You can also use a microwave, but the shrimp may lose some crispiness. If you want to freeze shrimp skewers, wrap them well in plastic wrap. Then, place them in a freezer bag. They can last up to three months in the freezer. When ready to eat, thaw in the fridge overnight before reheating. You cook shrimp in an air fryer for 6-8 minutes. At 400°F (200°C), shrimp cook quickly. Flip them halfway for even heat. They turn pink when done. This quick cooking keeps them juicy. Yes, you can use frozen shrimp. Just thaw them first. Run cold water over them for a few minutes. Pat them dry before marinating. This helps the garlic butter stick. Soak wooden skewers in water for at least 30 minutes. This keeps them from burning in the air fryer. Make sure they are fully submerged. You can also add a bit of salt to the water for extra flavor. Shrimp are done when they turn pink and opaque. The flesh should be firm to the touch. If you cut one open, it should not be translucent. This means it is cooked fully and safe to eat. We covered the key ingredients for shrimp skewers, from garlic butter to the best tools. I shared step-by-step instructions to make cooking easy and fun. You now have tips for perfect shrimp, plus ideas for variations and storage. Remember, cooking should bring joy. Using fresh ingredients and following these steps will help you make delicious shrimp every time. Enjoy your tasty creations!

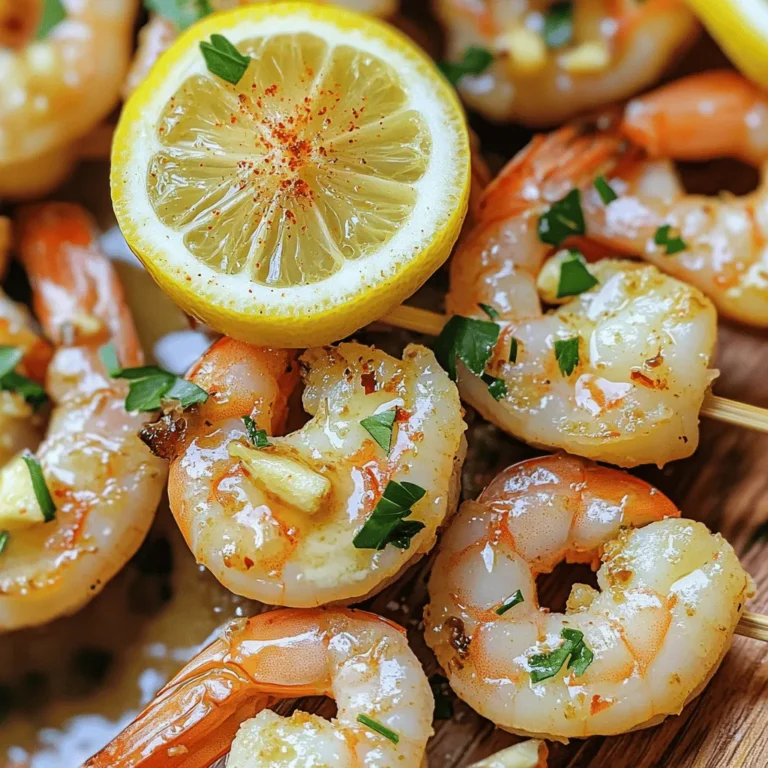
Air Fryer Garlic Butter Shrimp Skewers Tasty Delight

- 1 cup all-purpose flour - 1 cup whole wheat flour - 1 teaspoon baking powder - 1 teaspoon baking soda - 1 teaspoon ground cinnamon - ½ teaspoon ground nutmeg - ½ teaspoon ground ginger - ½ teaspoon salt I love using both all-purpose and whole wheat flour. This mix gives the muffins a nice texture. Baking powder and baking soda help them rise. The spices add warmth. Cinnamon, nutmeg, and ginger bring that cozy fall vibe. A pinch of salt balances everything out and enhances the flavors. - 1 cup pumpkin puree (canned or fresh) - ½ cup granulated sugar - ½ cup brown sugar, packed - 2 large eggs - ½ cup vegetable oil - 1 teaspoon vanilla extract - 4 ounces cream cheese, softened - 1 tablespoon milk Pumpkin puree is the star here. It gives moisture and rich flavor. I use both granulated and brown sugars for sweetness. Brown sugar adds depth. Eggs bind everything together and create a soft texture. Vegetable oil keeps the muffins moist, while vanilla extract provides a lovely aroma. Cream cheese adds creaminess, making these muffins special. A splash of milk helps blend everything smoothly. - ½ cup all-purpose flour - ¼ cup brown sugar, packed - ¼ teaspoon ground cinnamon - ¼ cup unsalted butter, softened - ¼ cup oats (optional) The streusel topping is a must. It adds crunch and sweetness. I mix all-purpose flour and brown sugar for flavor. Ground cinnamon gives it warmth, too. The softened butter brings it all together. Oats are optional, but they add extra texture and heartiness. First, preheat your oven to 350°F (175°C). This step gets your oven ready for baking. Next, prepare your muffin tin. You can use paper liners or grease it well with oil or butter. This helps the muffins come out easily. In a large bowl, whisk together the all-purpose flour, whole wheat flour, baking powder, and baking soda. Add in the ground cinnamon, nutmeg, ginger, and salt. Mix these dry ingredients until they blend well. This creates a strong base for your muffins. In another bowl, mix the pumpkin puree with the granulated sugar and brown sugar. Then, add the eggs, vegetable oil, and vanilla extract. Whisk this mixture until it is smooth. This adds moisture and flavor to the muffins. Gradually add the wet mixture to the dry ingredients. Stir gently until they are just combined. Be careful not to over-mix. Over-mixing can make the muffins tough instead of light and fluffy. In a small bowl, beat the softened cream cheese with 1 tablespoon of milk. Mix until it is creamy. This filling adds a rich taste to the muffins. In another bowl, combine the all-purpose flour, brown sugar, and ground cinnamon. If you like, add oats for extra texture. Cut in the softened butter with a fork until it looks like coarse crumbs. This topping adds a sweet crunch to each muffin. Start by dividing half of the muffin batter evenly among the muffin cups. Then, add a small dollop of the cream cheese mixture into the center of each cup. After that, top with the remaining muffin batter, filling each cup about three-quarters full. Place the muffin tin in the oven and bake for 20-25 minutes. Check with a toothpick to see if they are done. If it comes out clean, they are ready. Once baked, let the muffins cool in the pan for about five minutes. Then, transfer them to a wire rack to cool completely. To keep your muffins moist, avoid over-mixing the batter. Mix just until the dry and wet ingredients blend. Over-mixing creates tough muffins. Also, use quality ingredients. Fresh pumpkin puree makes a big difference. Fresh spices add great flavor, too. Serve your muffins warm for the best taste. A light dusting of powdered sugar makes them look fancy. You can also add a dollop of whipped cream cheese on top. For a pretty display, place muffins on a decorative plate. Add a few mint leaves around them for color. If your muffins turn out dry, check your baking time. Overbaking can dry them out fast. Always set a timer and check a few minutes early. If you notice your muffins are too brown, lower the oven temperature next time. {{image_2}} You can make these muffins even better with a few fun additions. Adding nuts like walnuts or pecans gives them a nice crunch. Just chop the nuts and fold them into the batter before you fill the muffin cups. You could also mix in chocolate chips for a sweet twist. Use semi-sweet or dark chocolate chips, depending on your taste. These additions can really brighten up each muffin. If you want to try different sweeteners, honey or maple syrup work well. Both add a unique flavor and moisture to the muffins. When using honey or maple syrup, replace the granulated sugar. Use about ¾ of the amount listed for sugar. For example, if the recipe calls for ½ cup of sugar, use about ⅓ cup of honey or maple syrup. This change keeps your muffins sweet and delicious. You can make these muffins a bit healthier too. Try using gluten-free flour alternatives, like almond flour or coconut flour. These options will change the flavor but still taste great. If you want to reduce sugar, cut down the granulated and brown sugar by ¼ cup. You can also add applesauce to keep the muffins moist. These swaps help everyone enjoy this treat, no matter their diet. To keep your muffins fresh, store them at room temperature. Use an airtight container to seal in moisture. This helps prevent them from drying out. Muffins stay good for about three days when stored this way. If you want to save muffins for later, freezing is a great option. Place the muffins in a freezer-safe bag or container. Make sure to remove as much air as possible. They can last up to three months in the freezer. When you’re ready to enjoy them, reheating is easy. Simply take the muffins out and let them thaw. You can warm them in the oven at 350°F for about 10-15 minutes. This will bring back their soft texture and delicious flavor. To check if your muffins are done, use the toothpick test. Insert a toothpick into the center of a muffin. If it comes out clean or with a few crumbs, your muffins are ready. If it has wet batter, bake for a few more minutes. This test is quick and reliable. Yes, you can easily make these muffins dairy-free. Instead of cream cheese, use dairy-free cream cheese alternatives. There are many great brands available that work well in baking. You can also use coconut milk or almond milk to replace regular milk. If you don’t have pumpkin puree, you can use applesauce or sweet potato puree as alternatives. Both add moisture and sweetness to the muffins. They will also give a nice flavor. Make sure to use unsweetened varieties to control the sugar levels. Yes, you can prepare the batter in advance. Store it in the fridge overnight. Just cover the bowl tightly with plastic wrap. When you are ready to bake, give the batter a quick stir. This way, you save time in the morning and enjoy fresh muffins! Making pumpkin muffins is fun and rewarding. You learned about key ingredients like pumpkin puree and spices. I showed you how to mix both dry and wet ingredients for a tasty batter. Remember to make a streusel topping for extra flavor. In the end, you can customize recipes to suit your taste. With the right tips and tricks, even beginners can create soft, moist muffins. Enjoy baking and share your results with friends and family!

Pumpkin Cream Cheese Streusel Muffins Delightful Treat

PREV 1 … 21 22 23 … 57 NEXT
meal twig

explore

DessertsDinnerAppetizersDrinks

Our Policies

  • Cookie Policy
  • Copyright Policy
  • Disclaimer
  • GDPR Policy
  • Terms Of Use
Back to Top
  • About
  • Contact Us
  • Privacy Policy
© 2025 meal twig