FREE DINNER EBOOK! Get your copy!
  • Cookie Policy
  • GDPR Policy
  • Disclaimer
  • Terms Of Use
  • Visit my other site: Fun Cookie Recipes
meal twig
  • Home
  • Dinner
  • Desserts
  • Drinks
  • Appetizers
  • Contact
  • About
  • Privacy Policy
  • Home
  • Dinner
  • Desserts
  • Drinks
  • Appetizers
  • Contact
  • About
  • Privacy Policy
  • Cookie Policy
  • GDPR Policy
  • Disclaimer
  • Terms Of Use
Visit my other site: Fun Cookie Recipes

HOME / CATEGORIES /

Latest

To make the best Ingredient Crack Dip, you need just a few key items. Here’s what you will gather: - 1 cup cream cheese, softened - 1 cup sour cream - 1 cup shredded cheddar cheese - 1/2 cup diced tomatoes, drained - 1/2 cup green onions, chopped - 1/2 teaspoon garlic powder - 1/2 teaspoon onion powder - 1/4 teaspoon cayenne pepper (optional) - Salt and pepper to taste - 1/2 cup cooked and crumbled sausage (optional) - Tortilla chips or veggie sticks for serving Each ingredient brings a unique flavor. Cream cheese and sour cream create a rich base. The cheddar cheese adds a sharp taste. Diced tomatoes give freshness, while green onions add a nice crunch. Garlic and onion powders enhance the dip's savory notes. If you like heat, add cayenne pepper for a little kick. The sausage, while optional, adds depth and heartiness. I love serving this dip with crunchy tortilla chips or crisp veggie sticks. They make perfect dippers. Gather these ingredients, and you will be ready to create something truly delightful. {{ingredient_image_1}} Combining creamy ingredients First, grab a medium bowl. Add 1 cup of softened cream cheese and 1 cup of sour cream. Mix them well until you have a smooth and creamy base. This step sets the foundation for your dip. Mixing in spices and vegetables Next, stir in 1 cup of shredded cheddar cheese. Then, fold in 1/2 cup of diced tomatoes and 1/2 cup of chopped green onions. These ingredients give your dip its flavor and texture. Don’t forget to add 1/2 teaspoon of garlic powder and 1/2 teaspoon of onion powder. If you like heat, sprinkle in 1/4 teaspoon of cayenne pepper. Salt and pepper it to taste. Adding optional sausage and seasoning If you want extra flavor, you can add 1/2 cup of cooked and crumbled sausage. Gently fold it into your mixture. This step is all about making the dip richer and more tasty. Transferring to serving dish Now it’s time to move your dip. Transfer it to a serving dish. Spread it out evenly so everyone can enjoy it. Importance of chilling the dip Cover the dish with plastic wrap and let it chill in the fridge for at least 30 minutes. Chilling helps all the flavors blend together. This step makes your dip even more delicious when it’s time to serve. Enjoy with tortilla chips or veggie sticks! You can easily swap cheeses in this dip. Try using cream cheese for a rich flavor. You can also use mozzarella for a milder taste. For a sharper twist, go for pepper jack. To make your dip creamier, add a bit more sour cream. You can also use Greek yogurt for a healthier option. Mixing in a touch of milk helps too. It makes the dip smooth and easy to scoop. For the best pairing, serve your dip with tortilla chips. They add a nice crunch. Veggie sticks like carrots and celery work great too. They bring a fresh taste to the dip. Get creative with serving options. Use a bread bowl for a fun twist. You can also serve it in mini cups for easy grabbing. Garnish with extra green onions or diced tomatoes for a pop of color. Pro Tips Use Room Temperature Ingredients: Allow your cream cheese and sour cream to come to room temperature for easier mixing and a smoother dip. Boost the Flavor: Add a splash of Worcestershire sauce or hot sauce for an extra kick and depth of flavor. Customize Your Toppings: Feel free to top your dip with additional green onions, diced peppers, or even a sprinkle of bacon bits for added texture and taste. Chill for Best Results: Let the dip chill in the refrigerator for a few hours if possible, as this will enhance the flavors even more. {{image_2}} To make a spicy crack dip, add jalapeños. Fresh jalapeños bring a bright heat. You can chop them finely and mix them in. This adds a nice kick to the dip. If you want more heat, use pickled jalapeños. They give a tangy flavor too. Just remember to adjust the cayenne if you add more jalapeños. This dip will surely please heat lovers. For a vegetarian option, skip the sausage. You can replace it with more veggies. Chopped bell peppers and spinach work well. You could also add olives for extra flavor. These veggies make the dip colorful and tasty. Plus, they add crunch. This version is great for gatherings where you want to please everyone. Cheese lovers will enjoy a version with mixed cheeses. Instead of just cheddar, try adding mozzarella or cream cheese. You could even use pepper jack for a bit of spice. Mixing different cheeses creates a rich, creamy dip. It adds depth to the flavor. Just remember to keep the balance so one cheese doesn't overpower the others. This version is sure to impress! To keep your crack dip fresh, store it in an airtight container. Make sure to cover the dip tightly with plastic wrap before sealing the lid. This helps keep out air and moisture. Place the container in the fridge. Your dip will stay good for about three to four days. If you notice any change in smell or texture, it’s best to toss it. Yes, you can freeze crack dip. However, freezing may change the texture a bit. To freeze, place the dip in a freezer-safe container. Leave some space at the top for expansion. Seal it tightly and label it with the date. It can last in the freezer for up to three months. When ready to eat, let it thaw in the fridge overnight. Stir well before serving again. Homemade crack dip lasts about 3 to 5 days in the fridge. Make sure you store it in an airtight container. This keeps the dip fresh and tasty. If it smells off or changes color, it is best to toss it. Yes, you can make crack dip ahead of time. Prepare it up to a day before your gathering. This allows the flavors to blend and get even better. Just remember to chill it for at least 30 minutes before serving. I love serving crack dip with tortilla chips or veggie sticks. They add a nice crunch. You can also try pita chips or breadsticks. For a twist, serve it with crackers or sliced baguette. These options make the dip even more fun to eat! This blog covered how to make a delicious Ingredient Crack Dip. You learned about essential ingredients, easy steps to prepare, and tips to perfect it. Variations like spicy or vegetarian options can suit any taste. You now know how to store leftovers and frequently asked questions. Enjoying this dip with friends and family can make any gathering special. Try different flavors and serving ideas to make it your own. I hope you have fun making and sharing this tasty treat!

Irresistible Ingredient Crack Dip for Any Gathering

You need these simple items to make white chocolate cranberry blondies: - 1 cup unsalted butter, melted - 1 1/2 cups brown sugar, packed - 2 large eggs - 1 teaspoon vanilla extract - 2 cups all-purpose flour - 1 teaspoon baking powder - 1/2 teaspoon salt - 1 cup white chocolate chips - 1 cup dried cranberries - 1/2 cup chopped nuts (e.g., walnuts or pecans, optional) If you don't have some ingredients, here are a few easy swaps: - Butter: Use coconut oil or margarine for a dairy-free option. - Brown Sugar: White sugar or a sugar substitute can work, but they change the taste. - Eggs: Use flaxseed meal mixed with water for a vegan choice. - Flour: Almond or oat flour can replace all-purpose flour for gluten-free blondies. Add these items to change the flavor or texture: - Nuts: Add walnuts or pecans for a crunchy bite. - Spices: A dash of cinnamon or nutmeg can add warmth. - Fruits: Try dried cherries or apricots for a different fruit flavor. These ingredients make your blondies rich and sweet. Enjoy experimenting! {{ingredient_image_1}} First, preheat your oven to 350°F (175°C). This step is key for even baking. Next, grab a 9x13 inch baking pan. Grease it well and line it with parchment paper. Make sure to leave some paper hanging over the edges. This makes it easier to lift out the blondies later. In a large bowl, melt 1 cup of unsalted butter. Add 1 ½ cups of packed brown sugar and mix them well. Whisk until smooth. Then, crack in 2 large eggs, adding one at a time. Stir after each egg to blend it in. Now, add 1 teaspoon of vanilla extract for flavor. Your wet mix should look creamy and inviting. Take another bowl and mix together 2 cups of all-purpose flour, 1 teaspoon of baking powder, and ½ teaspoon of salt. It’s important to measure these accurately for the best results. Gradually add this dry mix to your wet ingredients. Stir gently until just combined. Avoid overmixing to keep your blondies soft. Now, fold in 1 cup of white chocolate chips and 1 cup of dried cranberries. If you like, add ½ cup of chopped nuts. Pour your beautiful batter into the prepared pan. Spread it evenly so it bakes nicely. Place it in the preheated oven and bake for 25-30 minutes. Keep an eye on the edges; they should turn golden brown. To check if they are done, insert a toothpick into the center. If it comes out clean, they are ready. Once baked, take them out and let them cool in the pan for about 10 minutes. Use the parchment paper to lift them out and put them on a wire rack to cool completely. Finally, cut them into squares and enjoy this sweet treat! To get that soft, chewy texture, do not overmix your batter. After adding the dry ingredients, stir just until combined. Overmixing can make your blondies tough. Also, use melted butter. It adds moisture and richness. Bake at 350°F for 25 to 30 minutes. The edges should turn golden brown. A toothpick should come out clean but moist from the center. This ensures a perfect, gooey middle. One common mistake is not measuring the flour correctly. Too much flour can dry out your blondies. Use a spoon to scoop flour into your measuring cup, then level it off. Another mistake is opening the oven door too soon. This can cause your blondies to sink. Wait until the baking time is almost up before checking. Finally, don’t forget to line your pan with parchment paper. This helps you remove the blondies easily. These blondies taste great warm or at room temperature. Serve them plain or dust with powdered sugar for a pretty touch. Pair them with a scoop of vanilla ice cream for a fun dessert. You can also serve them with a drizzle of caramel sauce. For a festive touch, add a sprinkle of sea salt on top. It enhances the sweet and tart flavors. Enjoy your delicious treat! Pro Tips Use Room Temperature Eggs: Allow your eggs to come to room temperature before adding them to the batter for better emulsification and a smoother texture. Don’t Overmix: Gently fold the dry ingredients into the wet mixture until just combined to ensure your blondies remain soft and chewy. Chill the Dough: If you have time, refrigerate the batter for about 30 minutes before baking. This helps to intensify the flavors and improve texture. Check for Doneness: Start checking your blondies a few minutes before the minimum baking time to prevent overbaking. They should be golden around the edges and slightly soft in the center. {{image_2}} Mix-ins can change the taste and feel of your blondies. You can add nuts like walnuts or pecans for crunch. Nuts give a nice texture and flavor. If you want more fruity bites, try adding other dried fruits. For example, dried cherries or apricots work well. You can also use a mix of nuts and fruits for more fun. This way, you make your blondies truly your own. Adding spices or extracts can bring new flavors to your blondies. You can try a pinch of cinnamon for warmth or a dash of nutmeg for depth. Vanilla extract is great, but you can also use almond extract for a twist. It adds a nutty flavor that pairs well with white chocolate. Experimenting with these flavors can help you create your perfect blondie. You can make these blondies fit different diets. To go gluten-free, swap all-purpose flour for a gluten-free blend. Make sure the blend has good texture and flavor. If you want vegan blondies, use flax eggs instead of regular eggs. Mix one tablespoon of flaxseed meal with three tablespoons of water. Let it sit for a few minutes to thicken. Replace the butter with coconut oil or vegan butter. These adjustments keep the blondies tasty while meeting your needs. To keep your white chocolate cranberry blondies fresh, store them in an airtight container. This helps keep them moist. Place a piece of parchment paper between layers to avoid sticking. They stay good at room temperature for about 3 days. If you want them to last longer, refrigerate them for up to a week. Freezing blondies is easy. First, let them cool completely. Then, cut them into squares. Wrap each square tightly in plastic wrap. Place the wrapped blondies in a freezer bag or an airtight container. They can stay frozen for up to 3 months. When you're ready to enjoy them, just thaw them at room temperature or in the fridge overnight. To reheat blondies, use the microwave for quick results. Place one square on a microwave-safe plate. Heat it for about 10-15 seconds. If you want them warm but not too hot, check after 10 seconds. You can also reheat them in the oven. Preheat the oven to 350°F (175°C). Place the blondies on a baking sheet for about 5-10 minutes. This method helps keep them soft and delicious. Blondies and brownies both use similar ingredients. However, blondies do not have cocoa. Blondies are sweet and buttery. They often have brown sugar, which gives them a rich flavor. Brownies are denser and chocolatey. They use cocoa or melted chocolate. So, if you want a sweet treat without chocolate, blondies are perfect! Yes, you can use other types of chocolate! If you want a twist, try dark chocolate or milk chocolate. You can also mix them. For example, add some dark chocolate chips with the white chocolate. This mix gives a rich flavor. Just remember, the sweetness level can change. Adjust the sugar if you use dark chocolate. To check if blondies are done, look at the edges. They should be golden brown. You can also use a toothpick. Insert it into the center. If it comes out clean, they are ready! If it has wet batter, bake for a few more minutes. Let them cool after baking. Enjoy the delicious taste! This guide covers everything you need for perfect blondies. We looked at key ingredients, substitutions, and add-ins. I shared step-by-step baking instructions and helpful tips to avoid common mistakes. You can also explore variations to suit your taste or diet. Lastly, I included storage tips for freshness. With all this, you can bake with confidence and enjoy delightful blondies whenever you want. Happy baking!

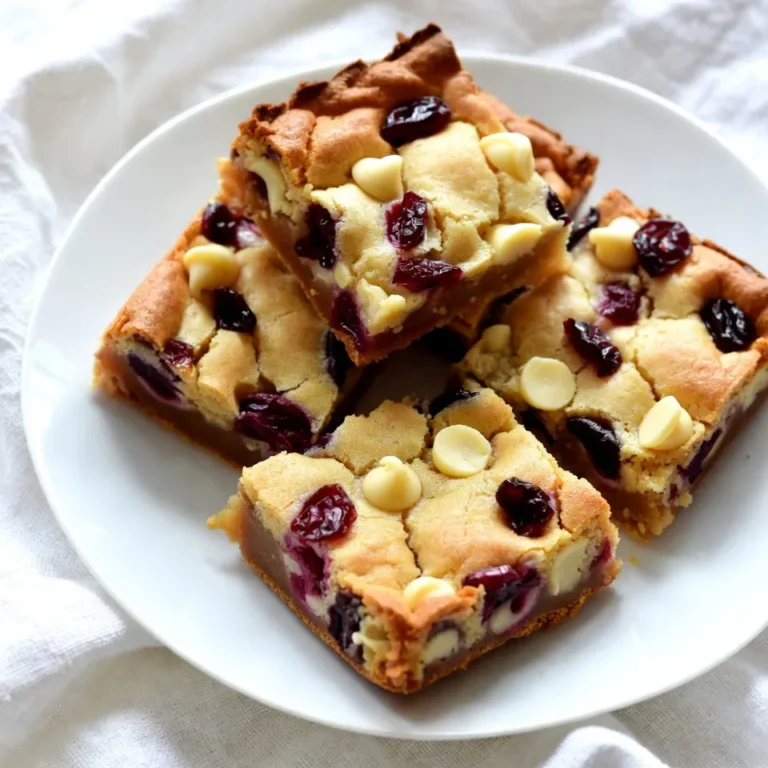
White Chocolate Cranberry Blondies Easy and Delicious Treat

- 2 ripe mangoes, peeled and diced - 1 cup coconut milk - ½ cup Greek yogurt - 2 tablespoons honey or maple syrup - 1 tablespoon lime juice - Pinch of salt - Optional garnishes: Chopped mint or shredded coconut Fresh mangoes give these popsicles a sweet taste. The coconut milk adds creaminess. Greek yogurt makes them smooth and rich. Honey or maple syrup sweetens the mix. Lime juice brightens the flavor. A pinch of salt enhances the taste. You can add garnishes like chopped mint or shredded coconut for fun. These ingredients make the popsicles not just tasty but also beautiful. When you gather these items, you set the stage for a fantastic summer treat. {{ingredient_image_1}} Start by peeling and dicing two ripe mangoes. Place them in a blender. Add one cup of coconut milk, half a cup of Greek yogurt, two tablespoons of honey or maple syrup, one tablespoon of lime juice, and a pinch of salt. Blend everything until smooth. After blending, taste the mixture. If you want it sweeter, add more honey or syrup. Next, take the blended mixture and pour it into popsicle molds. Make sure to leave some space at the top. This space allows the popsicles to expand as they freeze. Now, insert the popsicle sticks into the molds. Carefully place the molds in the freezer. Let them freeze for at least four to six hours. This time ensures they become solid and ready to enjoy. When you’re ready to eat, take the molds out of the freezer. To release the popsicles, run warm water over the outside of the molds for a few seconds. This warmth helps loosen them. Gently pull the popsicles out and enjoy your refreshing treat! To get that smooth and creamy texture, start with ripe mangoes. The sweeter the mango, the better the flavor. Look for mangoes that feel slightly soft to the touch. This softness means they are juicy and ready to use. When it comes to yogurt, I prefer Greek yogurt for this recipe. It gives a richer taste and thicker texture. Regular yogurt works too, but it may not be as creamy. Both options add a nice tang, which balances the sweetness of the mango. You might want to play around with sweetness. Start with two tablespoons of honey or maple syrup. Blend the mixture and taste it. If it needs more sweetness, add a bit more. Remember, the ripeness of the mango affects sweetness too. To enhance the flavor, add lime juice. The lime's tartness brightens the mixture. You can also try adding other fruits, like pineapple or berries. They will blend well with the coconut and mango. Garnishing makes your popsicles look and taste better. Chopped mint adds a fresh touch. You can sprinkle it on top before serving. Shredded coconut is another tasty option. It gives a nice crunch and extra coconut flavor. If you want to get creative, try using different toppings. Crushed nuts or a drizzle of honey can add unique flavors. You can also use colorful fruits for a fun twist. Experiment to find your favorite combinations! Pro Tips Use Frozen Mango: If fresh mangoes are out of season, you can use frozen mango chunks for a creamy texture without the need for additional ice. Experiment with Sweeteners: Feel free to try different sweeteners like agave syrup or stevia to suit your dietary preferences. Layer Flavors: For a fun twist, layer the mango mixture with a coconut layer made of just coconut milk and a bit of sweetener before freezing. Keep them Smooth: Make sure to blend the mixture thoroughly to avoid any chunks, ensuring a smooth popsicle consistency. {{image_2}} You can mix coconut with many fruits. Pineapple adds a sweet and tangy taste. Berries like strawberries or blueberries bring a burst of color and flavor. If you want a tropical fruit blend, try adding banana or passion fruit. Blend fruits for a smooth texture or leave chunks for fun bites. This makes every popsicle unique! You can easily make these popsicles dairy-free. Use almond or soy yogurt instead of Greek yogurt. These options still give you creaminess without dairy. When using these yogurts, you might need to add a bit more sweetener. This helps balance the flavors and keeps them tasty. If you want a lower-sugar treat, try using sweeteners like stevia or erythritol. These can replace honey or syrup in the recipe. Just use less than you would with sugar, as they are often sweeter. Adjust to your taste, and you can enjoy these popsicles while keeping them diet-friendly. To keep your creamy coconut mango popsicles fresh, follow these tips: - Use airtight containers: After freezing, store popsicles in airtight bags or containers. This helps prevent freezer burn. - Label your containers: Write the date on the bag. This way, you know how long they have been in the freezer. - Leave space for expansion: When filling molds, leave a little room at the top. The mixture will expand as it freezes. These simple steps help you enjoy your popsicles at their best. How long do creamy coconut mango popsicles last in the freezer? They can stay fresh for about 2 to 3 months. After that, they may lose flavor and texture. Watch for signs of spoilage. If you see ice crystals forming or the popsicles change color, it’s time to toss them. Trust your senses. If it looks or smells off, don’t risk it! To make these popsicles vegan, swap Greek yogurt for a plant-based yogurt. Look for coconut or almond yogurt. Use maple syrup instead of honey for sweetness. Both changes work well. You still keep the great flavor! If you lack popsicle molds, use small cups. You can also use ice cube trays. Just insert sticks into the cups or trays. Cover them with foil to hold the sticks in place. This way, you can still enjoy your popsicles! Yes, canned coconut milk is a good option. It adds creaminess and flavor. However, check the label for added sugars or preservatives. Fresh coconut milk may taste lighter and fresher. Both choices work, so use what you have! These popsicles bring lots of health benefits. Mangoes are rich in vitamins A and C. They support your immune system. Coconut milk offers healthy fats, which are good for energy. Greek yogurt adds protein and probiotics for gut health. Enjoy a tasty treat that's good for you! Making your own mango coconut popsicles is simple and fun. We covered the key ingredients, step-by-step instructions, and useful tips. You can mix flavors, try dairy-free options, and get creative with toppings. Remember to store them properly for freshness. These popsicles are not just tasty; they're healthy too! Enjoy them as a cool treat or a nutritious snack. Try this recipe, and you'll have a delightful treat ready for hot days!

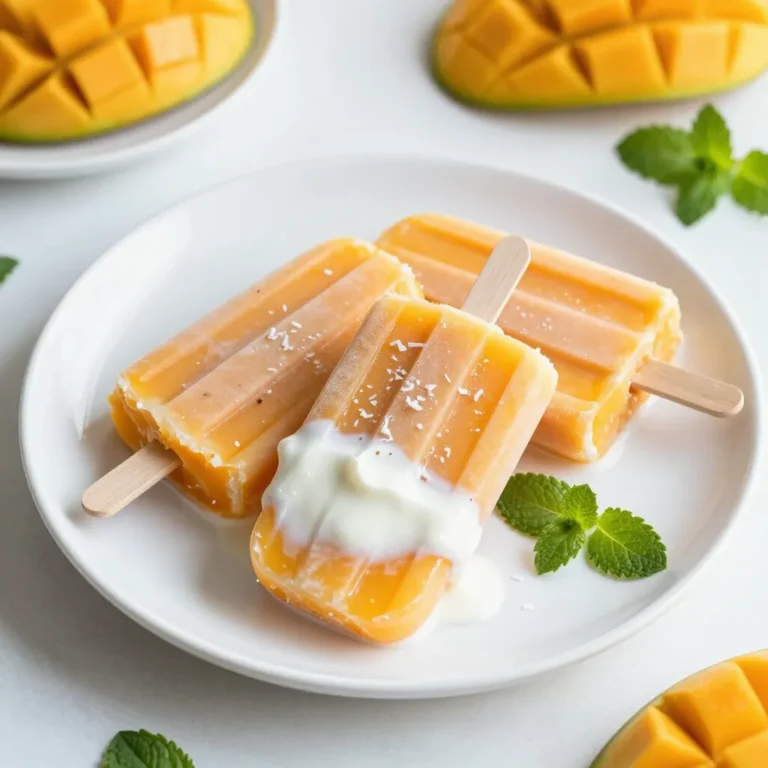
Creamy Coconut Mango Popsicles Refreshing Summer Treat

To make a delightful Strawberry Shortcake Trifle, gather these fresh ingredients: - 2 cups fresh strawberries, hulled and sliced - 1/4 cup granulated sugar - 1 teaspoon lemon juice - 1 pound angel food cake, cubed (store-bought or homemade) - 2 cups heavy cream - 1/2 cup powdered sugar - 1 teaspoon vanilla extract - Fresh mint leaves for garnish Fresh strawberries shine in this trifle. They offer bright color and juicy flavor. You can use frozen strawberries, but they lose some texture. If you choose frozen, thaw them fully. Drain excess liquid before mixing with sugar and lemon juice. Fresh strawberries will give you that classic, sweet crunch. You can swap angel food cake for other options. Pound cake or sponge cake works well. Both add a rich taste and texture. If you want a lighter option, use ladyfingers. They soak up the strawberry juices nicely. Just adjust the layering to keep it tasty and fun! {{ingredient_image_1}} First, take 2 cups of fresh strawberries. Hull them and slice them into thin pieces. Place the strawberries in a medium bowl. Add 1/4 cup of granulated sugar and 1 teaspoon of lemon juice. Toss the mixture gently so the strawberries coat well. Let the strawberries sit for about 15 minutes. This resting time helps the strawberries release their tasty juice. You will see a bright red syrup form at the bottom of the bowl. Next, grab a large bowl. Pour in 2 cups of heavy cream. Use an electric mixer to whip the cream. Start on low speed and then increase it to medium. Whip until you see soft peaks form. This means the cream has thickened nicely. Gradually add 1/2 cup of powdered sugar and 1 teaspoon of vanilla extract. Keep whipping until firm peaks form. This cream should be smooth and hold its shape well. Now, it's time to layer your trifle. Start with a trifle dish or individual serving glasses. Place a layer of cubed angel food cake at the bottom. Use about half of the cake. Spoon a layer of the prepared strawberries over the cake. Make sure to include some of the strawberry juice. Next, add a layer of whipped cream on top of the strawberries. Smooth it out with a spatula. Repeat these layers until you run out of ingredients. Finish with a layer of whipped cream. For a beautiful touch, garnish with fresh strawberries and mint leaves on top. To make the best whipped cream, start with cold cream. Use heavy cream for thick and rich texture. Whip the cream until it forms soft peaks. Then, add powdered sugar and vanilla extract. Whip until firm peaks form. This gives your trifle a light and airy feel. Be careful not to overwhip, or it may turn grainy. When slicing strawberries, use a sharp knife for clean cuts. Remove the green tops first, then slice them in half or quarters. Make sure the pieces are even in size. This helps with even layering in your trifle. For a nice look, place the slices cut-side out against the glass. This makes your trifle look beautiful and inviting. Chill your trifle before serving. This enhances the taste and texture. After you finish layering, cover the trifle with plastic wrap. Refrigerate it for at least an hour. Chilling allows the flavors to blend perfectly. Plus, it makes each bite refreshing. For the best taste, serve the trifle cold. Pro Tips Use Ripe Strawberries: Choose strawberries that are fully ripe for the best flavor and sweetness. Look for bright red berries with a natural shine. Chill Your Dish: For the best texture, chill your trifle in the refrigerator for at least 30 minutes before serving. This helps the flavors meld together. Layer Wisely: To create an impressive visual effect, alternate the layers of cake, strawberries, and whipped cream, ensuring not to compress the layers too tightly. Garnish Creatively: Get creative with your garnishes! Fresh mint, edible flowers, or a drizzle of chocolate can elevate the presentation and flavor. {{image_2}} You can easily make a chocolate version of the trifle. Start by swapping the angel food cake for chocolate cake. Use the same layers of strawberries and whipped cream. The rich chocolate pairs well with the sweet strawberries. This variation is perfect for chocolate lovers. It adds a new twist to the classic dessert. If you need a gluten-free option, don't worry! Use gluten-free angel food cake instead. You can find it in stores or make it at home. Just check the ingredients to ensure it's gluten-free. The rest of the recipe stays the same. You'll still enjoy the sweet strawberries and fluffy cream. Feel free to get creative with your trifle! You can add other fruits like blueberries or raspberries. These fruits add more color and flavor. You can also mix in some lemon or orange zest for a bright taste. Use your favorite flavors to make it your own. Each time, you'll create a new and tasty treat! To keep your strawberry shortcake trifle fresh, cover it tightly. Use plastic wrap or a lid. Store it in the fridge. This helps keep the layers from getting soggy. Try to store it in a glass dish. This way, you can see the pretty layers. Your trifle will stay fresh for about 2 to 3 days in the fridge. After that, the cake may lose its soft texture. The strawberries can also start to wilt. Always check for any off smells before eating leftovers. You can freeze the trifle, but it’s best to freeze layers separately. The cake can freeze well for up to 3 months. Make sure to wrap it tightly. The whipped cream and strawberries do not freeze well. They can become watery when thawed. If you want to keep it for longer, make the cake ahead. Then layer it when you are ready to serve. Yes, you can make this trifle ahead of time. It tastes great when chilled. To do this, prepare the layers and assemble the trifle. Cover it with plastic wrap. Store it in the fridge for up to 24 hours. As the trifle sits, the flavors will mix. Just be aware that the cake may absorb some juice. This can make it softer. You can serve your trifle in many fun ways. Use a large trifle bowl for a stunning display. Alternatively, use individual glasses for a personal touch. This makes it easy for guests to enjoy. Consider adding a sprig of mint on top for color. You could also place fresh strawberries around the bowl. This adds charm and makes it look inviting. To make a healthier version of this trifle, you have options. First, swap heavy cream for Greek yogurt. This cuts down on fat but keeps it creamy. You can also use a sugar substitute for the strawberries. Fresh fruit can add natural sweetness. If you want even fewer calories, use a lighter cake. A sponge cake can work well here. These changes make it lighter but still tasty. This article detailed how to make a delicious Strawberry Shortcake Trifle. We covered ingredients, from fresh strawberries to easy cake swaps. I shared step-by-step guides for preparation, from whipping cream to the perfect layering. You learned helpful tips for presentation and flavor enhancement. In summary, this dessert is fun to make and enjoy. Feel free to explore variations to suit your taste. Save leftovers for later, or freeze if you have extra. Happy creating your trifle! It will impress your friends and family.

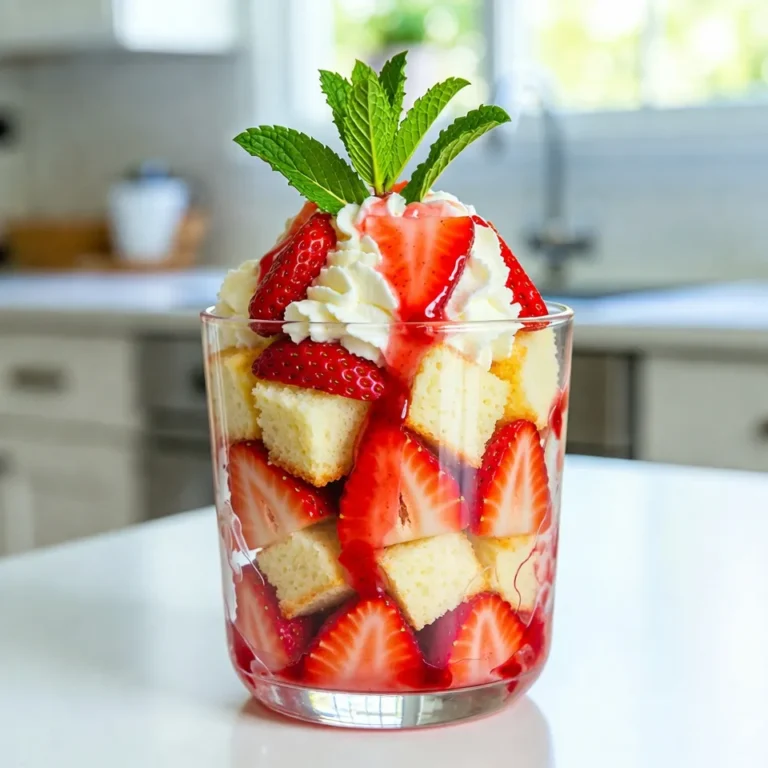
Strawberry Shortcake Trifle Fresh and Tasty Delight

To make these delightful Raspberry White Chocolate Scones, you need some simple ingredients. Each one plays a key role in creating the perfect balance of flavor and texture. Here’s what you will need: - 2 cups all-purpose flour - 1/4 cup granulated sugar - 1 tablespoon baking powder - 1/2 teaspoon salt - 1/2 cup cold unsalted butter, cubed - 1/2 cup heavy cream - 1 large egg - 1 teaspoon vanilla extract - 1 cup fresh raspberries - 1/2 cup white chocolate chips - 1 tablespoon milk (for brushing) Each ingredient has its purpose. The all-purpose flour gives structure. The sugar adds sweetness. Baking powder helps the scones rise, while salt enhances the flavor. Cold butter creates a flaky texture when baked. Heavy cream adds richness, and the egg provides moisture and binding. Vanilla extract brings warmth to the flavor. Raspberries give a fruity burst, and white chocolate chips add a sweet creaminess. Finally, brushing with milk helps the tops turn golden brown. Make sure to gather all these ingredients before you start. It makes the process smoother and more fun! {{ingredient_image_1}} First, set your oven to 400°F (200°C). This heat gets the scones nice and golden. Line a baking sheet with parchment paper. This helps prevent sticking and makes clean-up easy. In a large bowl, add 2 cups of all-purpose flour, 1/4 cup of granulated sugar, 1 tablespoon of baking powder, and 1/2 teaspoon of salt. Whisk them together. This step is key for even mixing. It helps your scones rise and taste great. Now, add 1/2 cup of cold, cubed unsalted butter to your dry mix. Using a pastry cutter or your fingers, work the butter into the flour. Stop when it looks like coarse crumbs. In another bowl, whisk together 1/2 cup of heavy cream, 1 large egg, and 1 teaspoon of vanilla extract. Pour this mix into the flour and gently stir. Be careful not to over-mix. Once mixed, fold in 1 cup of fresh raspberries and 1/2 cup of white chocolate chips. Use a spatula to do this. Be gentle! You don’t want to squish the raspberries too much. Their juicy goodness should stay intact. Turn the dough onto a floured surface. Knead it gently a few times until it holds together. Pat it into a circle about 1 inch thick. Use a sharp knife to cut it into 8 wedges. Place these on the baking sheet. Brush the tops of the scones with a little milk. This helps them turn golden. Bake for 15 to 20 minutes. They should look lightly golden. Insert a toothpick into the center to check. It should come out clean. Remove them from the oven and let them cool on a wire rack. Using cold butter is key to great scones. Cold butter makes the scones flaky. It keeps the butter from melting too fast. Cut your butter into small cubes and chill it. This helps create pockets of steam while baking. You want the scones to rise well and stay light. Mix your dough gently. Over-mixing can lead to tough scones. When you combine the wet and dry ingredients, mix until just combined. A few lumps are okay. Gently fold in raspberries and white chocolate. This keeps the raspberries whole and juicy, adding to the scone's texture. Store leftover scones in an airtight container. They can stay fresh for up to three days. If you want to keep them longer, freeze them. Wrap each scone in plastic wrap, then place them in a freezer bag. When you’re ready, thaw them at room temperature. Serve scones warm for the best taste. Dust them with powdered sugar for a sweet touch. Pair them with fresh raspberries or a dollop of whipped cream. A cup of tea or coffee makes the perfect drink. Enjoy these scones as a special treat any time of day! Pro Tips Use Cold Butter: Make sure your butter is very cold to achieve a flaky texture in your scones. Don’t Overmix: Mix the dough just until combined to keep the scones light and tender. Fresh Raspberries: Use fresh raspberries for the best flavor; frozen ones may make the dough soggy. Brush with Milk: Brushing the tops with milk before baking gives the scones a beautiful golden color. {{image_2}} You can change the flavor by using different berries. Blueberries or blackberries work great. Strawberries are also a fun choice. Just keep the amount the same, about one cup. Make sure to keep the berries fresh. This helps with taste and texture. If you prefer dark chocolate, swap the white chocolate chips. Use half a cup of dark chocolate chips. Dark chocolate gives a rich flavor. It pairs well with the tartness of the raspberries. This option can make the scones feel more sophisticated. Adding nuts can provide a nice crunch. Chopped almonds or pecans are excellent choices. You can also add a touch of lemon zest for a bright flavor. It’s fun to experiment with spices like cinnamon or nutmeg too. Just remember to keep the amounts small so they don’t overpower the scones. To keep your scones fresh, store them in an airtight container. Place parchment paper between layers to avoid sticking. This method keeps them soft and moist. You can store them at room temperature for up to two days. If you want to keep them longer, consider freezing. To reheat your scones, preheat your oven to 350°F (175°C). Place the scones on a baking sheet. Heat them for about 5 to 10 minutes. This step will restore their warmth and crispness. You can also use a microwave for quick reheating. Just heat for about 15 to 20 seconds. However, this method may make them a bit soft. You can freeze scones to enjoy later. First, let them cool completely. Wrap each scone in plastic wrap. Then, place them in a freezer bag. They can stay in the freezer for up to three months. When you are ready to eat, thaw them overnight in the fridge. Reheat as mentioned for the best taste. Yes, you can make these scones ahead of time. Prepare the dough, cut it into wedges, and place the wedges on your baking sheet. Cover them with plastic wrap and chill in the fridge. You can bake them fresh later. This keeps them tasting great. Check the scones after 15 minutes. They should be lightly golden on top. Insert a toothpick in the center. If it comes out clean, they are done. If not, bake for a few more minutes. Keep an eye on them to avoid burning. You can use frozen raspberries if fresh ones aren’t available. Just make sure to thaw and drain them first. You can also try other berries like blueberries or strawberries. Each will give a different taste but still be delicious. Scones taste best fresh but can last for 2 to 3 days. Store them in an airtight container. If you want to keep them longer, freeze them. They can last up to 3 months in the freezer. Just reheat when ready to enjoy. This post covered how to make raspberry white chocolate scones. You learned the key ingredients and step-by-step instructions for baking. I shared tips to ensure your scones turn out perfect every time. We explored fun variations and how to store extras. Making these scones can fill your kitchen with joy. Enjoy trying new flavors and sharing them with friends or family! Happy baking!

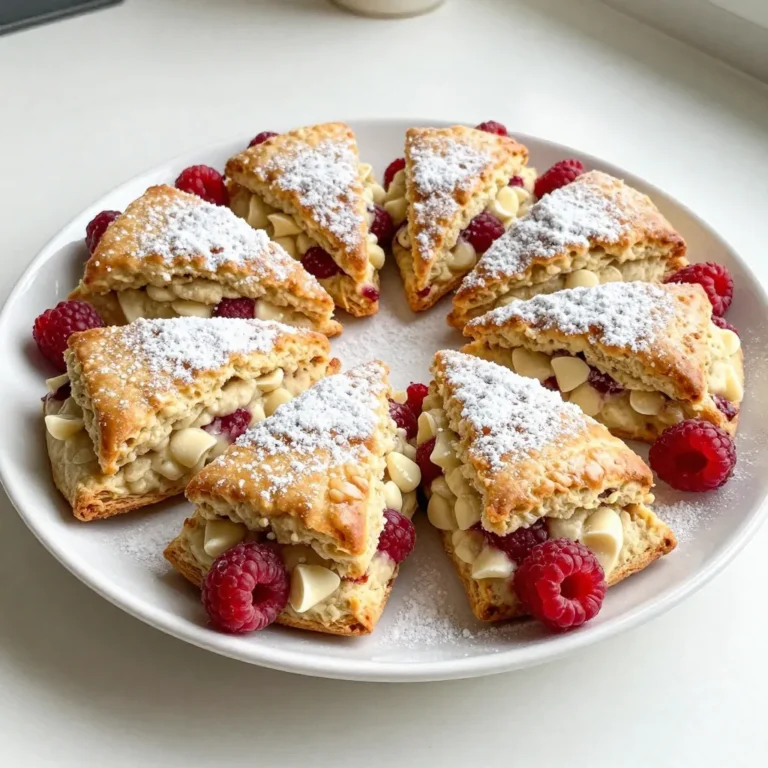
Raspberry White Chocolate Scones Scrumptious Treat

- 1 cup all-purpose flour - 2 tablespoons sugar - 1 tablespoon baking powder - 1/2 teaspoon salt - 1 cup milk - 1 large egg - 2 tablespoons melted butter - 1 teaspoon vanilla extract - 1/4 cup brown sugar - 1 tablespoon ground cinnamon - 1/4 cup unsalted butter, softened - 1/2 cup cream cheese, softened - 1 cup powdered sugar - 2 tablespoons milk (for the frosting) To make cinnamon roll pancakes, start with simple and fresh ingredients. All-purpose flour gives the pancakes a nice base. Sugar and brown sugar add sweetness, while baking powder helps with fluffiness. Salt brings out all the flavors. You need milk and an egg for moisture and richness. Melted butter and vanilla extract give them a lovely taste. The cinnamon and brown sugar mixture creates that classic cinnamon roll swirl. For the cream cheese frosting, cream cheese and powdered sugar provide that sweet finish. - Toppings such as nuts or whipped cream - Additional spices for flavor You can enhance your pancakes with toppings. Nuts add crunch, and whipped cream adds creaminess. If you like, sprinkle in extra spices. A pinch of nutmeg or even a little cardamom can give unique flavors. Let your creativity shine! {{ingredient_image_1}} 1. First, grab a large mixing bowl. 2. In that bowl, whisk together the following dry ingredients: - 1 cup all-purpose flour - 2 tablespoons sugar - 1 tablespoon baking powder - 1/2 teaspoon salt 3. Mix these well until they are combined. 4. Next, take a separate bowl. 5. In that bowl, mix these wet ingredients: - 1 cup milk - 1 large egg - 2 tablespoons melted butter - 1 teaspoon vanilla extract 6. Stir these until they blend nicely. 7. Now, pour the wet mix into the dry mix. 8. Gently stir until just combined. A few lumps are okay. 1. In a small bowl, combine: - 1/4 cup brown sugar - 1 tablespoon ground cinnamon 2. Mix these to create your cinnamon swirl. 3. Heat a non-stick skillet over medium heat. 4. Lightly grease it so the pancakes do not stick. 5. Pour about 1/4 cup of batter onto the skillet. 6. Immediately drizzle some cinnamon swirl mix over the pancake. 7. Use a toothpick or spoon to swirl it gently into the batter. 1. Let the pancakes cook for about 3-4 minutes. 2. Watch for bubbles to form on the surface. 3. Flip the pancakes and cook for another 2-3 minutes. 4. They should turn golden brown. 5. Repeat this for the remaining batter and cinnamon mix. 6. Enjoy your warm pancakes topped with cream cheese frosting. To make the best cinnamon roll pancakes, focus on the texture. You want them fluffy and soft. - Avoiding overmixing: When you mix the batter, do it gently. Stir just enough to combine the wet and dry ingredients. A few lumps are okay. Overmixing makes pancakes tough. - Ensuring proper cooking temperature: Heat your skillet to medium. If it's too hot, pancakes will burn outside and stay raw inside. A non-stick skillet works best for easy flipping. How you serve your pancakes matters. A great presentation makes the meal more fun. - Stacking and serving tips: Stack pancakes high for a beautiful tower. Drizzle with extra cream cheese frosting on top. - Enhancements with toppings: Add a sprinkle of cinnamon and some chopped nuts for a tasty finish. Fresh fruit like bananas or berries also works great. You can prepare ahead for busy mornings. - Storing batter for later use: If you want to make the batter in advance, cover it and store it in the fridge. Use it within 24 hours for the best results. - Reheating cooked pancakes: If you have leftover pancakes, reheat them in a microwave for about 20 seconds. You can also warm them in a skillet on low heat for a few minutes. Pro Tips Use Room Temperature Ingredients: Make sure your egg and cream cheese are at room temperature for a smoother batter and frosting, resulting in better texture. Don’t Overmix the Batter: A few lumps in your pancake batter are perfectly fine. Overmixing can lead to tough pancakes. Control the Heat: Keep the skillet at medium heat. If it’s too hot, the pancakes will burn on the outside while remaining raw inside. Experiment with Toppings: Besides cream cheese frosting, try adding fresh fruits, nuts, or a drizzle of maple syrup for extra flavor and texture. {{image_2}} You can jazz up your cinnamon roll pancakes with fun flavors. Adding chocolate chips gives a sweet twist. Try fresh fruits like blueberries or bananas for added taste. You can also sprinkle walnuts or pecans on top. Drizzle some maple syrup or sprinkle nuts for extra crunch. These small changes will make your breakfast even more special. If you need gluten-free options, use gluten-free flour blends. They work well and taste great. For a dairy-free frosting, swap cream cheese with coconut cream. You can also use almond milk in place of regular milk. These choices keep your pancakes tasty while meeting dietary needs. Serve your pancakes with crispy bacon or fluffy eggs for a complete meal. You can stack the pancakes high for a fun presentation. Add extra cream cheese frosting and a sprinkle of cinnamon on top. For brunch, try serving them with fresh fruit or yogurt on the side. These ideas will impress your guests and make breakfast memorable! After you cook the pancakes, let them cool. Place them in an airtight container. You can store them in the fridge for up to three days. To keep the cream cheese frosting fresh, store it in a separate airtight container. It will last about a week in the fridge. To freeze the pancakes, first let them cool completely. Then, stack them with parchment paper in between each pancake. Wrap the stack in plastic wrap, then place it in a freezer bag. This will help them stay fresh. When you want to eat them, take the pancakes out and let them thaw in the fridge overnight. To reheat, warm them in the microwave for about 30 seconds or until hot. Cooked cinnamon roll pancakes last about three days in the fridge. If you freeze them, they can last for about two months. Always check for any signs of spoilage before eating. Cinnamon roll pancakes are a fun twist on the classic breakfast dish. They combine fluffy pancakes with a sweet cinnamon swirl. This mix gives you the warm flavors of cinnamon rolls in a pancake form. You cook the pancakes and add a cinnamon sugar mixture. This creates a beautiful swirl inside. Top them with cream cheese frosting for a sweet finish. Yes, you can use whole wheat flour instead of all-purpose flour. Whole wheat flour adds a nutty flavor and extra fiber. It may make the pancakes a bit denser. To keep them light, you can mix half all-purpose flour and half whole wheat flour. This blend boosts nutrition while keeping the pancakes fluffy. To make the frosting thinner, simply add more milk. Start by adding one teaspoon at a time. Mix well after each addition. Keep adding until you reach your desired consistency. If it gets too runny, you can add more powdered sugar to thicken it back up. There are many tasty toppings for cinnamon roll pancakes. Here are some ideas: - Chopped nuts for crunch - Fresh fruit like bananas or berries - Whipped cream for extra sweetness - Maple syrup for a classic touch - Extra cinnamon or chocolate chips for flavor These toppings can enhance the taste and make your dish more fun! This blog post explored the tasty world of cinnamon roll pancakes. You learned about key ingredients, like flour, cream cheese, and vanilla. We covered step-by-step instructions for making the batter and swirling the cinnamon mix. I shared tips for perfect texture and fun serving ideas. You also discovered variations, storage methods, and answers to common questions. In the end, these pancakes can add joy to your breakfast. Enjoy making them your own!

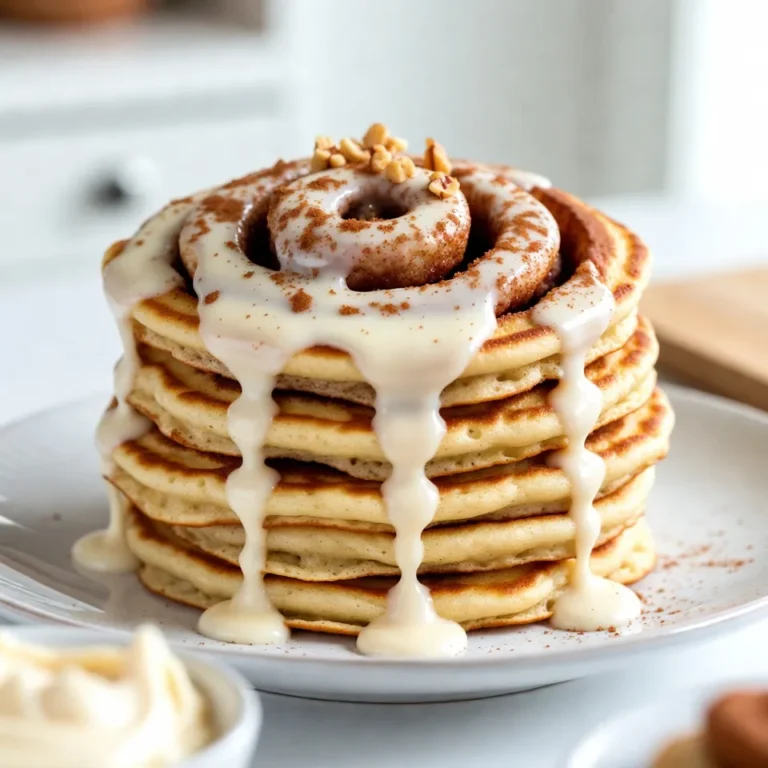
Cinnamon Roll Pancakes Simple and Delicious Breakfast

- 4 boneless, skinless chicken thighs - 4 medium Yukon Gold potatoes, quartered - 1 red onion, sliced - 4 cloves garlic, minced - 1 lemon, juiced and zested - 2 teaspoons dried oregano - 1 teaspoon dried thyme - 1/2 teaspoon paprika - Salt and pepper, to taste - 3 tablespoons olive oil - 1/2 cup Kalamata olives, pitted - Fresh parsley, chopped (for garnish) In this recipe, each ingredient plays a key role. The chicken thighs offer a juicy base. Yukon Gold potatoes add creaminess and texture. Red onion brings sweetness, while garlic delivers a robust flavor. For seasoning, lemon juice and zest brighten the dish. The dried oregano and thyme add depth. Paprika gives a slight smoky note, while salt and pepper enhance all the flavors. I use olive oil to help crisp the potatoes and chicken. Kalamata olives give a briny touch that complements the dish. Finally, fresh parsley adds color and freshness before serving. Each ingredient works together to create a vibrant and tasty meal. Enjoy the process of combining these elements, knowing they will come together beautifully in the oven. {{ingredient_image_1}} - Preheat your oven to 425°F (220°C). This high heat helps cook everything well. - Grab a large mixing bowl. Cut the Yukon Gold potatoes into quarters. Slice the red onion. Mince the garlic. - In the bowl, mix the potatoes, onion, garlic, lemon juice, lemon zest, oregano, thyme, paprika, salt, and pepper. Drizzle in 2 tablespoons of olive oil. Toss everything together to coat the potatoes evenly. - Get a large oven-safe skillet or baking dish. Spread the seasoned potatoes in a single layer. - Next, season the chicken thighs with salt, pepper, and the remaining olive oil. Place the chicken on top of the potatoes. - Scatter the Kalamata olives around the chicken and potatoes for added flavor. - Place the dish in your preheated oven. Bake for 30-35 minutes. - Use a meat thermometer to check if the chicken reaches 165°F (75°C). The potatoes should also be fork-tender. - Once done, take it out of the oven. Let it rest for about 5 minutes before serving. To keep the chicken juicy, use bone-in thighs. If you only have boneless ones, do not overcook. Bake until the chicken hits 165°F. Let it rest before serving to seal in juices. For the potatoes, cut them into even quarters. This helps them cook well. Toss them with oil and seasoning. Bake until golden brown and fork-tender. This ensures they are crispy on the outside. If chicken thighs are not available, use bone-in breasts. They work well, but may dry out faster. For a lighter option, try turkey thighs or firm tofu. For the potatoes, you can swap in sweet potatoes or carrots. These add different flavors and nutrients. If you want a low-carb option, cauliflower florets also work great. Fresh herbs make a big difference. Try using dill or mint for a fresh taste. These herbs pair well with the Greek flavors. When serving, sprinkle chopped parsley on top. This adds a nice pop of color. You can also serve with lemon wedges for extra zest. Pro Tips Marinate for Extra Flavor: Allow the chicken to marinate in the lemon juice, oregano, and spices for at least 30 minutes before cooking. This enhances the flavor and tenderness of the chicken. Use Fresh Herbs: Fresh oregano and thyme can elevate the dish by adding vibrant flavor. If you have them on hand, consider substituting dried herbs with fresh ones. Potato Variety Matters: While Yukon Golds are great, feel free to mix in other varieties like red potatoes or fingerlings for a different texture and taste. Rest Before Serving: Let the dish rest for about 5 minutes after baking. This allows the juices to redistribute in the chicken, making it juicier when served. {{image_2}} You can easily change this dish to a Mediterranean style. Start by adding feta cheese. Feta adds a creamy, salty flavor that pairs well with the chicken and potatoes. Crumble some feta on top in the last few minutes of baking. This will let it soften without melting away. Next, incorporate bell peppers. Slice some bell peppers and toss them in with the potatoes. They add color and a sweet crunch. Choose red, yellow, or green peppers based on your taste. They cook well and enhance the dish's flavor. If you want a vegetarian version, swap chicken for chickpeas. Use one can of rinsed chickpeas for extra protein. Mix them with the same seasonings as the chicken. This keeps the dish flavorful and hearty. You can also use seasonal vegetables. Try zucchini, asparagus, or carrots. Cut them into bite-sized pieces and add them to the mix. This makes the meal colorful and fresh. You can enjoy this dish even if you skip the meat. You can adapt this recipe for a slow cooker. Start by browning the chicken in a skillet. This step enhances the flavor. Then, place all the ingredients in the slow cooker. Set it on low for 6-8 hours or high for 3-4 hours. The chicken will be tender, and the potatoes will soak up all the flavors. Adjust times and temperatures based on your slow cooker. Check on it occasionally to ensure everything cooks well. This method is great for busy days when you want a warm meal ready when you get home. To keep your One-Pan Greek Chicken and Potatoes fresh, store leftovers in an airtight container. This helps lock in flavor and moisture. Place the container in the fridge as soon as possible. It’s best to let it cool to room temperature first. Leftovers will last up to three days in the fridge. If you want to store the dish longer, freezing is a great option. Allow the chicken and potatoes to cool completely. Then, use a freezer-safe container or bag. Squeeze out as much air as you can. This helps prevent freezer burn. The dish can stay frozen for up to three months. To reheat, the oven works best. Preheat your oven to 350°F (175°C). Place the chicken and potatoes in an oven-safe dish. Cover it with foil to keep it moist. Heat for about 20-25 minutes, or until hot. If you prefer the microwave, place a portion in a microwave-safe bowl. Cover it with a damp paper towel. Heat in short bursts, stirring in between, until hot. Yes, you can use chicken breasts. However, they cook faster and can dry out. Chicken thighs stay moist and tender. Adjust the cooking time to around 25-30 minutes for breasts. Make sure they still reach 165°F (75°C). Leftovers will last about 3-4 days in the fridge. Store them in an airtight container. For best flavor, reheat gently. You can also freeze leftovers for up to 3 months. This meal pairs well with several sides. Consider serving: - Greek salad - Tzatziki sauce - Steamed green beans - Quinoa or rice These options add freshness and balance to the rich flavors of the chicken and potatoes. This post covered a tasty chicken and potato dish. We looked at the key ingredients, from chicken thighs to Yukon Gold potatoes. I shared step-by-step guidance to help you create it perfectly. Plus, I offered tips for juicier chicken and delicious variations. You can enjoy this meal in many ways, whether baked or slow-cooked. And don’t forget about storage tips to keep leftovers fresh. With all these ideas, I hope you feel ready to make and enjoy this dish!

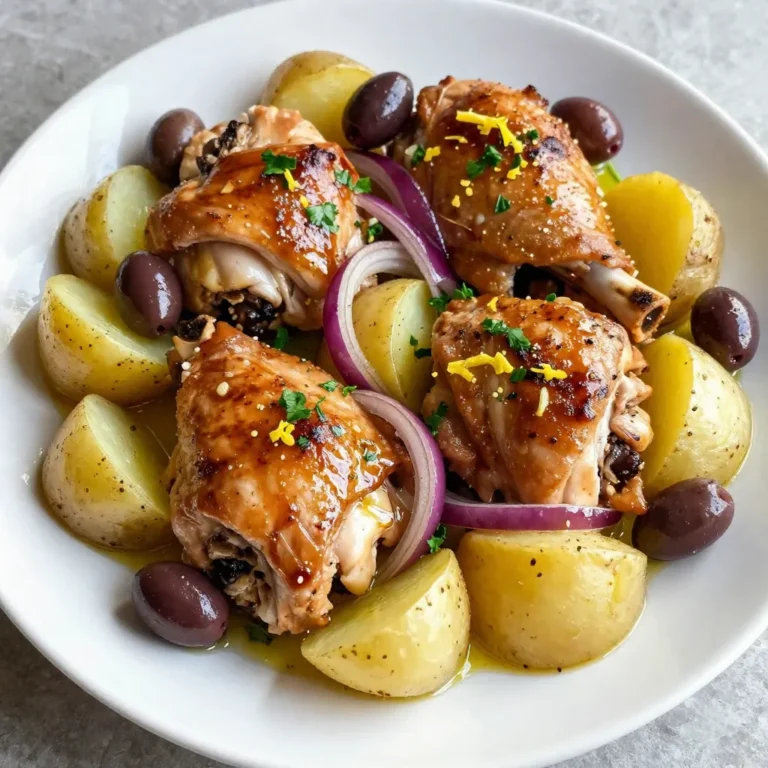
One-Pan Greek Chicken Potatoes Easy and Flavorful Meal

To make delicious Buffalo Chicken Pinwheels, you need the right ingredients. Here’s what you will use: - 2 cups shredded cooked chicken - 1/2 cup cream cheese, softened - 1/2 cup buffalo sauce (hot sauce) - 1 cup shredded cheddar cheese - 1/2 cup chopped celery - 1/4 cup green onions, finely sliced - 4 large flour tortillas - 1/4 cup ranch dressing (for serving) Each ingredient adds a unique taste and texture. The chicken brings protein, while cream cheese gives a creamy base. The buffalo sauce adds heat, and the cheddar cheese enhances the flavor. Celery and green onions add crunch and freshness. You can make your pinwheels even better with a few garnishes. Here are some options: - Fresh parsley for color and taste - Extra ranch dressing for dipping Garnishes make your dish more appealing and flavorful. They can also add a nice pop of color to your plate, making it a feast for the eyes. If you don’t have some ingredients on hand, don’t worry! Here are some easy swaps: - Use shredded rotisserie chicken instead of cooked chicken - Swap cream cheese for Greek yogurt for a lighter option - Try a different cheese, like pepper jack, for a spicy kick - Use whole wheat tortillas for a healthier choice These substitutions help you adapt the recipe to what you have available. You can still enjoy tasty Buffalo Chicken Pinwheels without missing out on flavor. {{ingredient_image_1}} To start, take a mixing bowl. Add 2 cups of shredded cooked chicken. Next, include 1/2 cup of softened cream cheese. Pour in 1/2 cup of buffalo sauce. Mix these ingredients well. You want the chicken to be fully coated. Then, add 1 cup of shredded cheddar cheese. Toss in 1/2 cup of chopped celery and 1/4 cup of finely sliced green onions. Stir until every ingredient is mixed. This mixture has a great flavor and texture. Now, you need large flour tortillas. Lay one tortilla flat on a clean surface. Spoon about 1/4 of the chicken mixture in the middle. Spread it out a bit, but leave space at the edges. This helps when you roll it up. Carefully roll the tortilla tightly from one end to the other. Keep the filling snug as you roll. Repeat this with the rest of the tortillas and chicken mixture. Each roll should be filled and rolled well. After rolling all the tortillas, wrap them in plastic wrap. Place them in the fridge for at least 30 minutes. This step firms up the rolls. Once chilled, take them out. Slice each roll into bite-sized pieces. Make sure your cuts are even for a nice look. Arrange the pinwheels on a colorful platter. Drizzle with ranch dressing for added flavor. If you like, add fresh parsley on top for a nice touch. Enjoy your tasty Buffalo chicken pinwheels! To make the best Buffalo chicken pinwheels, use shredded cooked chicken. You can use rotisserie chicken for ease. Mix the chicken with cream cheese and buffalo sauce until smooth. This step is key to getting all the flavors blended. Spread the mixture evenly across the tortilla. Leave some space so you can roll it tightly. Rolling too loose can make the filling fall out. Once you roll your tortillas, chill them. This helps the pinwheels hold their shape. These pinwheels are great for parties. Serve them on a colorful platter to catch eyes. A drizzle of ranch dressing on top adds a creamy touch. Pair them with celery sticks for crunch. You can also add carrot sticks for extra color and taste. If you want a fun twist, serve them with extra buffalo sauce on the side. Guests love to dip! To boost flavors, add chopped celery and green onions. These give a nice crunch and freshness. You can also mix in some blue cheese for a classic flavor. If you like it spicy, add more buffalo sauce to the mix. Try using flavored tortillas, like spinach or sun-dried tomato, for added taste. This small change makes a big difference! Experiment with different ingredients to find your favorite mix. Pro Tips Use Leftover Chicken: This recipe is a great way to use up leftover rotisserie chicken, saving time and enhancing flavor. Customize Heat Level: Adjust the amount of buffalo sauce to control the spiciness. You can also try different hot sauce brands for varied flavors. Chill Before Slicing: Refrigerating the rolled pinwheels for at least 30 minutes helps them hold their shape and makes slicing easier. Experiment with Fillings: Feel free to add other ingredients like diced pickles, jalapeños, or different cheeses to create your ideal flavor combination. {{image_2}} If you love heat, try adding more buffalo sauce. Mix in 1 teaspoon of cayenne pepper for extra spice. You can also use spicy ranch dressing as a dip. This gives a nice kick and makes your taste buds dance! For a vegetarian option, swap the chicken for shredded jackfruit or chickpeas. Use vegan cream cheese and dairy-free cheese. You still get the creamy texture and bold flavors. It’s a great way to enjoy pinwheels without meat! You can get creative with fillings! Add roasted red peppers for sweetness. Fresh spinach gives a nice crunch. Try different cheeses like pepper jack or feta for a unique twist. You can even include black beans for a hearty addition. To keep leftover Buffalo Chicken Pinwheels fresh, wrap them tightly in plastic wrap. This helps keep them moist and tasty. Store them in the fridge for up to three days. If you want to save them longer, freezing is a great option. You can freeze Buffalo Chicken Pinwheels too! After you roll them up, wrap each pinwheel in plastic wrap. Then, place them in a freezer bag. Squeeze out any air before sealing. They can last in the freezer for up to three months. When you're ready to eat, just thaw them in the fridge overnight. For the best flavor and texture, eat the pinwheels within three days when stored in the fridge. If frozen, aim to enjoy them within three months. This ensures you get the best taste and freshness from your pinwheels. Yes, you can make Buffalo Chicken Pinwheels ahead of time. I often prepare them a day in advance. Just wrap them well in plastic wrap and store them in the fridge. This helps the flavors blend nicely. When you’re ready to serve, slice them up, and they’re good to go! Buffalo Chicken Pinwheels pair well with many tasty sides. Here are some ideas: - Celery sticks - Carrot sticks - Extra ranch dressing - A fresh veggie platter - Chips or pretzels These sides add a nice crunch and balance the flavors. You can mix and match based on what you like. To make pinwheels less spicy, use mild buffalo sauce. You can also mix in more cream cheese to cool down the heat. Adding more shredded cheddar cheese helps too. Another option is to serve the pinwheels with extra ranch dressing. This will tone down the spice for anyone who prefers a milder flavor. You learned how to make tasty Buffalo Chicken Pinwheels. We covered the key ingredients, plus options to customize your pinwheels. I shared steps to prepare, assemble, and chill them for the best taste. Tips for serving and flavor ideas were included, along with tasty variations and storage options. These pinwheels are simple and fun to make. Enjoy them at your next gathering. You can impress friends and family with these easy recipes. Get ready to have fun in the kitchen!

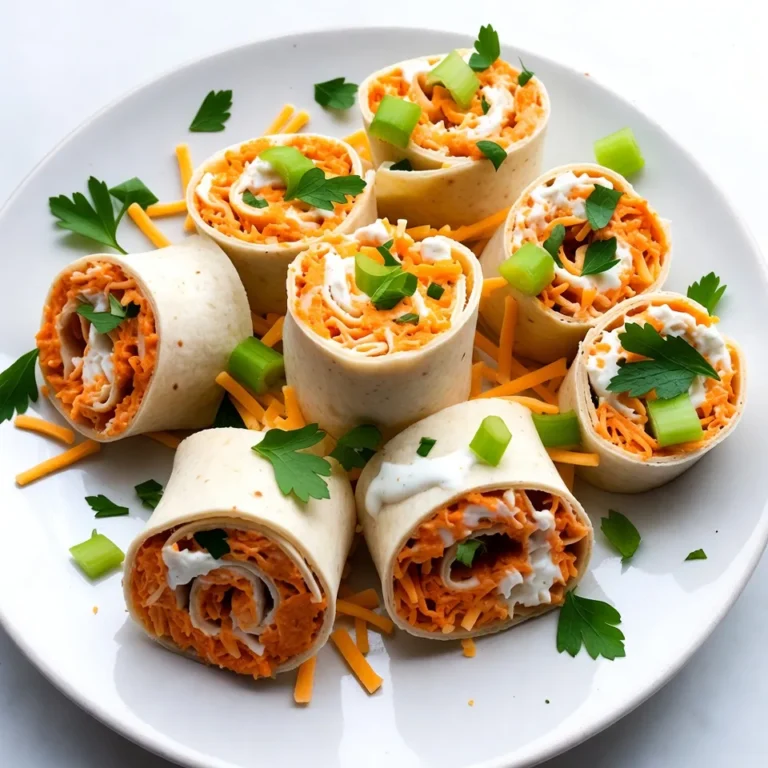
Buffalo Chicken Pinwheels Flavorful Easy Party Snack

- 1 cup rolled oats - 1 cup almond milk (or any milk of your choice) - 1/2 cup Greek yogurt - 1/2 cup cream cheese, softened I love using rolled oats for this recipe. They soak well and give a nice texture. Almond milk works great, but you can use any milk you like. Greek yogurt adds creaminess. The cream cheese makes it rich and helps create that cheesecake flavor. - 2 tablespoons honey or maple syrup - 1 teaspoon vanilla extract - 1/2 teaspoon ground cinnamon Sweetening with honey or maple syrup brings out the flavors. Use vanilla extract for warmth. Ground cinnamon adds a cozy touch to the oats, making them even tastier. - 1 cup fresh strawberries, diced - 2 tablespoons crushed graham crackers - Pinch of salt Fresh strawberries are the star of this dish. They add brightness and a pop of color. Crushed graham crackers give a nice crunch, just like a cheesecake crust. Don't forget the pinch of salt; it enhances all the flavors. {{ingredient_image_1}} Start by mixing all the main ingredients. In a large mixing bowl, combine these items: - 1 cup rolled oats - 1 cup almond milk (or any milk of your choice) - 1/2 cup Greek yogurt - 1/2 cup cream cheese, softened - 2 tablespoons honey or maple syrup - 1 teaspoon vanilla extract - 1/2 teaspoon ground cinnamon - A pinch of salt Make sure to stir until everything blends well. This step creates a creamy base for your oats. Now, it’s time to add the strawberries. Gently fold in 1 cup of diced fresh strawberries. This helps keep the fruit intact, so you get nice bites of strawberry in every spoonful. Next, divide the mixture evenly into two jars or airtight containers. This makes it easy to grab in the morning. After that, sprinkle 2 tablespoons of crushed graham crackers on top of each jar. This step adds a nice crunch and gives a taste of cheesecake. Cover the jars with lids, then refrigerate them overnight, or for at least four hours. This soaking time allows the oats to absorb the milk and flavors. In the morning, stir the oats well before serving. Enjoy the tasty, creamy goodness! For the best texture, soak the oats for at least four hours. This time allows them to absorb the liquid. If you have time, soaking overnight is perfect. Before serving, stir the oats well. This mixes all the flavors and ensures even consistency. Serve your strawberry cheesecake overnight oats in clear glass jars. This way, you can show off the lovely layers. It adds a nice touch to your breakfast. Top each jar with whole strawberries. This makes the dish look fresh and inviting. If you want more sweetness, add extra honey or maple syrup. Taste the mixture before you serve to check the flavor. You can also get creative with toppings. Try adding a dollop of whipped cream or a sprinkle of nuts. These can enhance both taste and texture. Pro Tips Use Fresh Strawberries: Opt for ripe, fresh strawberries for the best flavor and sweetness. This will enhance the overall taste of your overnight oats. Customize the Sweetness: Adjust the amount of honey or maple syrup based on your preference. You can also use mashed bananas or a sugar substitute for a different flavor profile. Make It Ahead: These overnight oats can be prepared up to 3 days in advance. Just store them in the fridge and enjoy a quick breakfast throughout the week! Add a Protein Boost: For an extra protein punch, mix in some protein powder or nut butter into the base mixture before refrigerating. {{image_2}} You can play with flavors to make your overnight oats even more fun. - Chocolate cheesecake overnight oats: Add cocoa powder and use chocolate yogurt. This twist gives a rich taste. - Berry medley overnight oats: Swap strawberries for mixed berries. Blueberries, raspberries, and blackberries add a burst of flavor. Many people have dietary needs. You can easily adjust this recipe. - Gluten-free options: Use gluten-free rolled oats. They taste just as good and keep the dish safe for those avoiding gluten. - Dairy-free alternatives: Replace Greek yogurt and cream cheese with vegan versions. You can use coconut yogurt or cashew cream for a creamy texture. Adding superfoods boosts the nutrition in your oats. - Adding chia seeds: Stir in a tablespoon of chia seeds. They add fiber and omega-3 fatty acids. - Using protein powder: Mix in a scoop of your favorite protein powder. This extra boost helps keep you full longer. These variations and modifications let you enjoy your strawberry cheesecake overnight oats in many ways! Store your strawberry cheesecake overnight oats in airtight containers. This keeps them fresh and tasty. I recommend eating them within 3 to 5 days. The oats may thicken as they sit, so you can add a splash of milk before serving. You can freeze overnight oats for longer storage. Use freezer-safe containers and fill them to about 80% full. This gives room for expansion. When ready to eat, thaw them overnight in the fridge. To serve, stir well and add fresh toppings if you like. Making larger batches is easy and saves time. Simply double or triple the recipe. Portion the oats into individual jars or containers. This way, you have a quick breakfast ready to go. You can store your overnight oats in the refrigerator for up to five days. Make sure you keep them in airtight containers. This way, they stay fresh and tasty. I love making a batch at the start of the week. It saves time on busy mornings! Absolutely! You can use many different fruits. Try blueberries, raspberries, or bananas instead of strawberries. Each fruit adds its unique flavor. If you want a tropical twist, mango works great too. Get creative with what you like! Yes, this recipe is very customizable. You can swap Greek yogurt for dairy-free yogurt if needed. If you want it sweeter, add more honey or maple syrup. You can even try adding nuts or seeds for crunch. Mix and match to find your perfect flavor! You learned how to make delicious overnight oats using simple ingredients. We covered the main ingredients and tips for perfect texture. Customizing flavors and storing your oats properly can make them even better. Remember, you can adjust sweetness and add toppings for fun. These oats fit different diets, making them great for everyone. Enjoy experimenting with this easy recipe, and don’t hesitate to make it your own! Your breakfast can be tasty, healthy, and quick all at once.

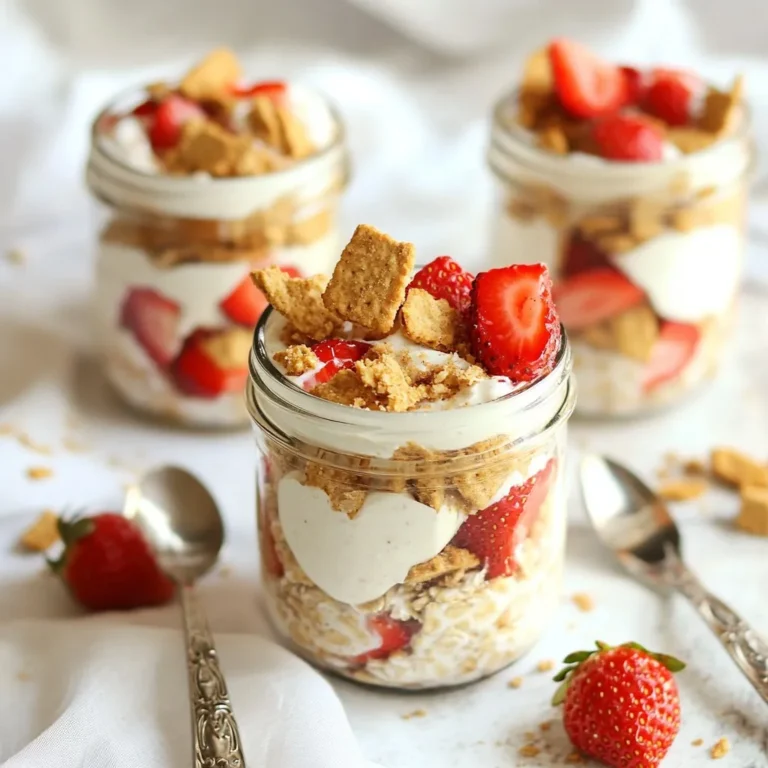
Strawberry Cheesecake Overnight Oats Delightful Recipe

To make Greek lemon chicken soup, you need a few key items. Here’s the list: - 1 lb boneless, skinless chicken thighs - 8 cups chicken broth - 1 large onion, diced - 2 carrots, sliced - 2 celery stalks, chopped - 3 cloves garlic, minced - 1 large lemon (zest and juice) - 1 cup orzo pasta - 1 teaspoon dried oregano - 1 teaspoon dried thyme - Salt and pepper to taste - 2 tablespoons olive oil Each ingredient plays a big role in flavor. The chicken thighs give a rich taste and tender texture. The chicken broth forms a warm base. Onion, carrots, and celery add sweetness and depth. Garlic brings a nice punch. The lemon zest and juice add zesty brightness. Oregano and thyme offer that classic Greek flavor. You can make this soup even better with some optional ingredients. Here are a few ideas: - 2 cups fresh spinach or kale - Fresh dill, for garnish Adding spinach or kale boosts the soup with more nutrients and color. Fresh dill gives a lovely finish with its unique taste. You can mix and match these extras to find your perfect bowl of comfort. {{ingredient_image_1}} To start, heat 2 tablespoons of olive oil in a large pot over medium heat. Once hot, add the diced onion, sliced carrots, and chopped celery. Sauté these veggies for about 5-7 minutes. You want them soft but not mushy. Their natural sweetness adds depth to the soup. Next, add 3 cloves of minced garlic. Cook this for another minute until it smells great. This step builds a strong flavor base for your soup. Now it’s time for the chicken. Add 1 pound of boneless, skinless chicken thighs to the pot. Sprinkle in 1 teaspoon of dried oregano and 1 teaspoon of dried thyme. Season with salt and pepper to your taste. Cook the chicken for about 2-3 minutes until it’s lightly browned. This browning adds a nice color and flavor. Pour in 8 cups of chicken broth. Make sure the chicken is fully submerged. Bring this mixture to a boil, then reduce the heat. Let it simmer for 20 minutes, uncovered. This allows the chicken to cook through and the flavors to blend. After 20 minutes, remove the chicken from the pot. Use two forks to shred it into bite-sized pieces. Return the shredded chicken back into the soup. Now, it’s time to add the orzo. Toss in 1 cup of orzo pasta and cook it according to the package instructions, usually about 8-10 minutes. The orzo will absorb some of the broth, making it heartier. Once the pasta is cooked, stir in the zest and juice of one large lemon. This step is key for that zesty flavor. If you want to add a boost of nutrition, toss in 2 cups of fresh spinach or kale. Let it wilt in the heat of the soup for a few minutes. Finally, taste your soup. Adjust the seasoning with more salt, pepper, or lemon juice as needed. This ensures the flavors shine through. Serve the soup hot and garnish with fresh dill. This adds a lovely touch and extra flavor. Enjoy your warm bowl of Greek Lemon Chicken Soup! To make your chicken tender, choose boneless, skinless thighs. They stay juicy and cook well. Sauté them briefly with veggies to add flavor. Always season your soup with lemon. It brightens the taste and balances the richness of the broth. You want a zesty kick in each bite. Pair this soup with crusty bread or a fresh salad. They add texture and freshness. For garnishing, use fresh dill. It adds a pop of color and flavor. A sprinkle of lemon zest on top also looks nice. Enjoy your bowl of comfort! Pro Tips Use Fresh Herbs: Fresh dill and parsley can enhance the flavor profile of the soup significantly, giving it that authentic Greek taste. Mind the Orzo: Keep an eye on the orzo while cooking; it can quickly become mushy if overcooked. Add it towards the end of your cooking time. Adjust Lemon to Taste: The acidity of lemon can vary; start with half the juice, then taste and add more if you prefer a zippier flavor. Make it a Meal: For a heartier version, consider adding more vegetables like zucchini or bell peppers, or serve with crusty bread on the side. {{image_2}} You can change ingredients in Greek Lemon Chicken Soup to suit your taste. If you don’t have orzo, use rice or quinoa. Both add a nice texture and flavor. Rice takes a bit longer to cook, so keep an eye on it. Quinoa cooks faster and adds a nutty taste. For protein, try turkey or tofu. Turkey works well because it has a similar flavor to chicken. Just make sure to cook it fully before adding the broth. Tofu is a great choice for a vegetarian option. You can cube it and add it in when you add the orzo. Herbs and spices can really change the soup's taste. You can try adding fresh parsley or basil for a different twist. Cilantro gives a fresh kick as well. If you want some heat, add a pinch of red pepper flakes. Greek chicken soup has regional flavors, too. In some areas, they use a mix of lemon and vinegar. This gives a tangy taste that some people love. You can also find variations that use lentils instead of chicken. These changes keep the soup exciting and new every time you make it. To keep your Greek lemon chicken soup fresh, store it in an airtight container. This helps avoid any strong smells in your fridge. Let the soup cool before sealing it. The soup lasts up to four days in the fridge. If you want to keep it longer, try freezing it instead. Freezing Greek lemon chicken soup is easy! First, let the soup cool completely. Then, pour it into freezer-safe bags or containers. Leave some space at the top, as soup expands when frozen. You can freeze it for up to three months. To reheat, take it out of the freezer and thaw it overnight in the fridge. Then, heat it on the stove over medium heat. Stir it well to bring back the flavors. Enjoy a warm bowl of comfort! Can I use chicken breasts instead of thighs? Yes, you can use chicken breasts. They are leaner than thighs. However, they may not give as rich a flavor. Thighs add more moisture and taste to the soup. If you choose breasts, cook them carefully to avoid dryness. What makes Greek Lemon Chicken Soup different from chicken noodle soup? Greek Lemon Chicken Soup has a bright, zesty flavor from lemon juice and zest. It uses orzo pasta instead of traditional noodles. The herbs like oregano and thyme add a warm, earthy taste. This soup is light and refreshing, while chicken noodle soup is often richer and heartier. Is this soup healthy? Yes, this soup is quite healthy. It is low in fat and high in protein. The vegetables add fiber and vitamins. The lemon gives a boost of vitamin C. Using fresh ingredients keeps it nutritious and satisfying. What are the benefits of ingredients like lemon and chicken? Lemon has many health benefits. It helps with digestion and boosts immune health. Chicken is a great source of protein. It helps build muscles and keeps you full. Together, they make a tasty and nourishing dish that warms you up and keeps you healthy. In this blog post, we explored how to make Greek Lemon Chicken Soup. We discussed the main and optional ingredients that add flavor and nutrition. The step-by-step instructions helped you prepare and cook the soup easily. I shared tips to make it perfect, plus variations for personal taste. Lastly, we covered storage methods to keep your soup fresh. Enjoy this tasty dish; it warms both heart and soul.

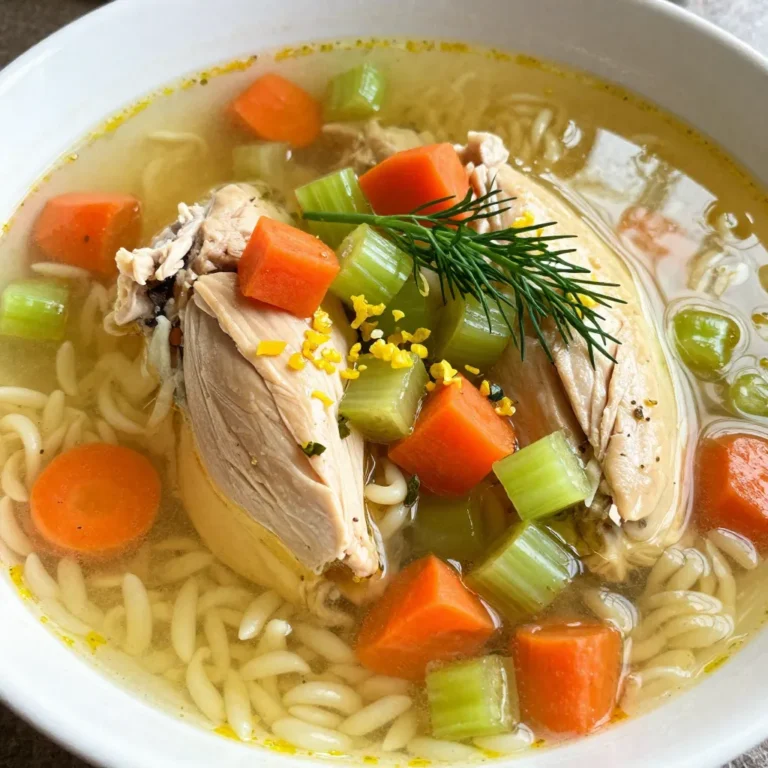
Greek Lemon Chicken Soup Comforting and Flavorful Dish

PREV 1 2 3 … 86 NEXT
meal twig

explore

DessertsDinnerAppetizersDrinks

Our Policies

  • Cookie Policy
  • Copyright Policy
  • Disclaimer
  • GDPR Policy
  • Terms Of Use
Back to Top
  • About
  • Contact Us
  • Privacy Policy
© 2026 meal twig