FREE DINNER EBOOK! Get your copy!
  • Cookie Policy
  • GDPR Policy
  • Disclaimer
  • Terms Of Use
  • Visit my other site: Fun Cookie Recipes
meal twig
  • Home
  • Dinner
  • Desserts
  • Drinks
  • Appetizers
  • Contact
  • About
  • Privacy Policy
  • Home
  • Dinner
  • Desserts
  • Drinks
  • Appetizers
  • Contact
  • About
  • Privacy Policy
  • Cookie Policy
  • GDPR Policy
  • Disclaimer
  • Terms Of Use
Visit my other site: Fun Cookie Recipes

HOME / CATEGORIES /

Latest

- 1 cup white chocolate chips - 1/4 cup coconut oil - 2 tablespoons matcha green tea powder - 1/2 cup crushed digestive biscuits or plain cookies - 1/4 cup unsweetened shredded coconut (optional) - 1/4 cup chopped nuts (e.g., almonds or pistachios) - Pinch of sea salt - Microwave-safe bowl - 8x8 inch baking pan - Parchment paper - Spatula The first step to making these bars is to gather your ingredients. First, you need white chocolate chips, which add sweetness and creaminess. Then, coconut oil makes the chocolate smooth and rich. Matcha green tea powder gives the bars their vibrant green color and unique flavor. Next, you can add crushed digestive biscuits or plain cookies for a crunchy texture. If you want to enhance the flavor, shredded coconut is a great optional addition. Chopped nuts, like almonds or pistachios, add more crunch and taste. A pinch of sea salt will balance the sweetness of the bars. You will also need a few tools to make this treat. A microwave-safe bowl helps melt the chocolate. The 8x8 inch baking pan is perfect for setting the bars. Parchment paper makes it easy to lift the bars out. Finally, a spatula is great for spreading the mixture evenly in the pan. Now that you have everything ready, you are set to create these delicious no-bake matcha white chocolate bars! - First, take a medium microwave-safe bowl. Add 1 cup of white chocolate chips and 1/4 cup of coconut oil to the bowl. - Microwave the bowl in 20-second intervals. Stir after each interval until the mixture is smooth and melted. Be careful not to overheat. - Once melted, whisk in 2 tablespoons of matcha green tea powder. Make sure it blends well and has no lumps. The color should be bright green. - Next, add in 1/2 cup of crushed digestive biscuits. If you want, you can also mix in 1/4 cup of unsweetened shredded coconut and 1/4 cup of chopped nuts. Don't forget a pinch of sea salt. Stir until everything is evenly coated. - Prepare your 8x8 inch baking pan by lining it with parchment paper. Leave some paper hanging over the edges for easy removal. - Pour the matcha mixture into the pan. Use a spatula to spread it evenly. Press down firmly to pack it. - Place the pan in the refrigerator. Let it set for at least 2 hours, or until it is firm. How to avoid lumps in the matcha mixture To keep your matcha smooth, sift the matcha powder before adding it to the melted chocolate. This step breaks up any clumps. Whisk the matcha in well after combining it with the chocolate. If you see lumps, keep whisking until the mixture is bright green and smooth. Ensuring the bars hold their shape To make sure the bars are firm, press the mixture into the pan firmly. Use a spatula to spread it evenly. Refrigerate the bars for at least two hours, or until they are set. If they are too soft after chilling, you might need to add more crushed biscuits next time. Garnishing ideas for visual appeal For a beautiful finish, sprinkle some extra matcha powder on top of the bars. You can also drizzle melted white chocolate over the bars. Add some chopped nuts on top for a nice crunch and color. Serving them on a decorative plate will make them look fancy. Serving suggestions for best experience Serve the bars cold straight from the fridge. Pair them with a warm cup of tea or coffee. The rich flavors of matcha and white chocolate go well with many drinks. Cut them into small squares for easy sharing. Tips for preparing in advance You can make these bars a day or two ahead of time. Just follow the recipe and store them in the fridge. They taste even better after chilling in the fridge for a while. Best practices for storage and freshness Keep the bars in an airtight container in the fridge. This way, they stay fresh for up to a week. If you want to keep them longer, you can freeze them. Just wrap each bar in plastic wrap before freezing for best results. {{image_2}} You can change the taste of your matcha bars easily. Add other flavor extracts like vanilla or almond. A few drops will enhance the taste without overpowering it. Mixing in different nuts or seeds can also add crunch. Try almonds, pistachios, or sunflower seeds for a twist. Each choice adds a unique flavor to your bars. If you want a different texture, swap out coconut oil. Use butter or a nut butter instead. These will change the flavor and mouthfeel of the bars. You can also experiment with different types of biscuits or cookies. Graham crackers or oreos can create a fun base. Just crush them well before mixing. Making these bars vegan or dairy-free is simple. Use dairy-free white chocolate chips and coconut oil. For gluten-free options, choose gluten-free biscuits. This way, everyone can enjoy these tasty treats, no matter their diet. These adjustments keep the flavor while making them suitable for more people. Store your No Bake Matcha White Chocolate Bars in the fridge. Use an airtight container to keep them fresh. This helps maintain their taste and texture. Place a piece of parchment paper between layers to avoid sticking. If you want to freeze the bars, wrap them tightly in plastic wrap. Then, place them in a freezer-safe container. They can stay frozen for up to three months. Just remember to thaw them in the fridge before enjoying. In the fridge, these bars stay fresh for about a week. Keep an eye on them for the best quality. Check for any changes in smell or texture. If they feel dry or crumbly, it's time to toss them. You should also look for any signs of mold. If you see any green or fuzzy spots, do not eat them. Safety first! After refrigeration, the bars are best served chilled. You can cut them into squares or rectangles. For an extra touch, drizzle some melted white chocolate on top. Pair these bars with a warm cup of green tea or a glass of almond milk. The flavors blend well and create a lovely snack experience. Enjoy your treat! Yes, you can use other types of chocolate. Dark chocolate or milk chocolate works well. If you want a dairy-free option, try dairy-free chocolate chips. Just keep in mind that the flavor will change. These bars need at least 2 hours to set in the fridge. This time helps them firm up and hold their shape. If you can wait longer, let them chill for 3 to 4 hours for the best texture. If you don’t have matcha powder, you can use green tea powder instead. The flavor will be lighter but still tasty. You can also skip it completely and make plain white chocolate bars. Yes, you can make these bars nut-free. Just skip the chopped nuts or replace them with seeds. Sunflower seeds or pumpkin seeds are great options. They add crunch without the nuts. You can use sweetened shredded coconut if you like. Just remember that it will make the bars sweeter. If you want to control the sweetness, stick with unsweetened coconut. This blog post covers how to make delicious matcha bars. You learned about the main ingredients, like white chocolate chips and matcha powder. I shared step-by-step instructions for melting, mixing, and setting your bars. Tips helped you avoid common issues and suggested ways to present your treats. Remember, you can customize these bars to fit your taste and dietary needs. Have fun experimenting with new flavors and ingredients. These matcha bars are easy, tasty, and a great treat for any occasion. Enjoy making your own version!

No Bake Matcha White Chocolate Bars Simple Treat

- 1 lb boneless, skinless chicken breast - 1 cup all-purpose flour - 1 cup panko breadcrumbs - 2 large eggs, beaten - 1/2 cup honey - 2 tablespoons soy sauce (low sodium) - 4 cloves garlic, minced - 1 teaspoon ginger, grated - 1/2 teaspoon black pepper - 1 teaspoon salt - 1 tablespoon olive oil - Sesame seeds (for garnish) - Chopped green onions (for garnish) Gather these ingredients before you start cooking. Fresh chicken is key for tender bites. The panko breadcrumbs give that extra crunch. Using low sodium soy sauce keeps the dish from being too salty. Honey adds sweetness and a nice glaze. Garlic and ginger pack in flavor! Season your flour mix with salt and pepper to enhance taste. Don’t skip the olive oil; it helps the chicken crisp up in the oven. The sesame seeds and green onions make for a lovely garnish that adds color and flavor. - Preheat the oven to 400°F (200°C). - Line a baking sheet with parchment paper. First, we need to set the stage for our crispy honey garlic chicken bites. Preheating the oven is key. It helps the chicken cook evenly and become golden. The parchment paper makes cleanup easy and ensures the chicken won’t stick. - Mix flour, salt, and pepper in a bowl. - Dip chicken in flour, then egg, and coat with panko. Now, we’ll bread the chicken. In a bowl, combine flour, salt, and pepper. This mix gives the chicken a nice flavor. Dip each piece of chicken into the flour, then the beaten eggs. Finally, coat the chicken with panko breadcrumbs. The panko adds a lovely crunch. Make sure to shake off any extra flour or egg. - Bake chicken bites for 20-25 minutes, flipping halfway. - Combine sauce ingredients in a saucepan and boil until thick. It’s time to bake! Place the chicken on your lined baking sheet. Bake for 20-25 minutes. Flip the chicken halfway through to get even crispiness. While the chicken bakes, let’s make the sauce. In a saucepan, mix honey, soy sauce, minced garlic, and grated ginger. Stir this over medium heat until it boils and thickens. This sauce is sweet and savory. It will coat the chicken perfectly. Once the chicken is golden and crispy, remove it from the oven. Toss it with the honey garlic sauce. Then, put it back in the oven for five more minutes. This lets the sauce caramelize and adds more flavor. Enjoy the crunchy bites! To get the best crunch on your chicken bites, use panko breadcrumbs. They are lighter and crispier than regular bread crumbs. This gives your bites that amazing texture. If you want them extra crispy, try baking at a higher temperature, around 425°F (220°C). This will help them brown and crisp up faster. You can adjust the sweetness and saltiness of your sauce. If you like it sweeter, add more honey. For saltiness, add a bit more soy sauce. To thicken the sauce, let it simmer longer. Stir it constantly until it reaches the right consistency. This will make the sauce stick perfectly to your chicken bites. Serve your crispy honey garlic chicken bites with tasty side dishes. Some great options are rice, steamed veggies, or a fresh salad. For dips, try ranch or sweet chili sauce. When plating, stack the chicken bites high. Sprinkle sesame seeds and chopped green onions on top for a beautiful finish. This makes your meal look as great as it tastes! {{image_2}} You can switch the chicken for shrimp or tofu. Shrimp cooks fast and absorbs flavor well. Tofu gives you a nice plant-based option. Just cut them into bite-sized pieces. Follow the same steps for breading and cooking. Want more heat? Add chili flakes to the honey garlic sauce. This will give your bites a spicy kick. You can also try different types of honey. Each honey has its own taste. From clover to wildflower, find what you like best. Baking is a great choice over frying. It keeps the bites crispy without extra oil. You can also use whole wheat flour instead of all-purpose flour. This makes the breading healthier and adds a nice nutty flavor. To keep your crispy honey garlic chicken bites fresh, cool them first. Let them sit at room temperature for about 30 minutes. This cooling step helps avoid steam buildup in the container. Once cool, store them in airtight containers. Glass containers work well, but plastic ones are fine too. Make sure to leave some space for air. This keeps the chicken crispy longer. When it's time to enjoy your leftovers, you have two good options: the oven or the microwave. The oven is best. Preheat it to 350°F (175°C). Place the chicken bites on a baking sheet and heat for about 10-15 minutes. This method keeps them crispy. If you use a microwave, place the bites on a microwave-safe plate. Heat in short bursts of 30 seconds. Check often to avoid sogginess. If you want to freeze your chicken bites, place them in a single layer on a baking sheet first. This prevents them from sticking together. Freeze for about 1-2 hours, then transfer them to a freezer bag. Remove as much air as possible to avoid freezer burn. When you're ready to eat, thaw them in the fridge overnight. Reheat them in the oven for best results. Crispy honey garlic chicken bites stay fresh in the fridge for about 3 to 4 days. Store them in an airtight container to keep them safe and tasty. If you notice any changes in smell or texture, it's best to throw them out. Yes, you can make this recipe ahead of time. You can prep the chicken bites and store them uncooked in the fridge for a day. When you're ready, just coat them in the honey garlic sauce and bake. This makes it easy to serve on busy nights. Several side dishes go great with crispy honey garlic chicken bites. Consider serving them with: - Steamed rice - Fried rice - Mixed vegetables - A fresh salad These sides balance the sweet and savory flavors of the dish. To adjust the recipe, simply scale the ingredients up or down. For example, if you want to serve six people, use 1.5 pounds of chicken and adjust the sauce ingredients too. Keep the same cooking time, but check the chicken for doneness. Yes, you can try different sauces. For a spicy kick, use sriracha or chili sauce. For a sweet twist, try a teriyaki sauce. Just make sure to adjust the cooking time if the sauce needs to thicken. Experiment to find your favorite flavor! This blog post laid out a simple recipe for crispy honey garlic chicken bites. You learned the main ingredients and how to prepare them step by step. I shared tips for crispiness and variations to explore. Serving suggestions and storage info also help keep your chicken bites fresh. Whether you try shrimp, tofu, or different sauces, enjoy experimenting with flavors. Remember, cooking is fun and a chance to be creative in your kitchen!

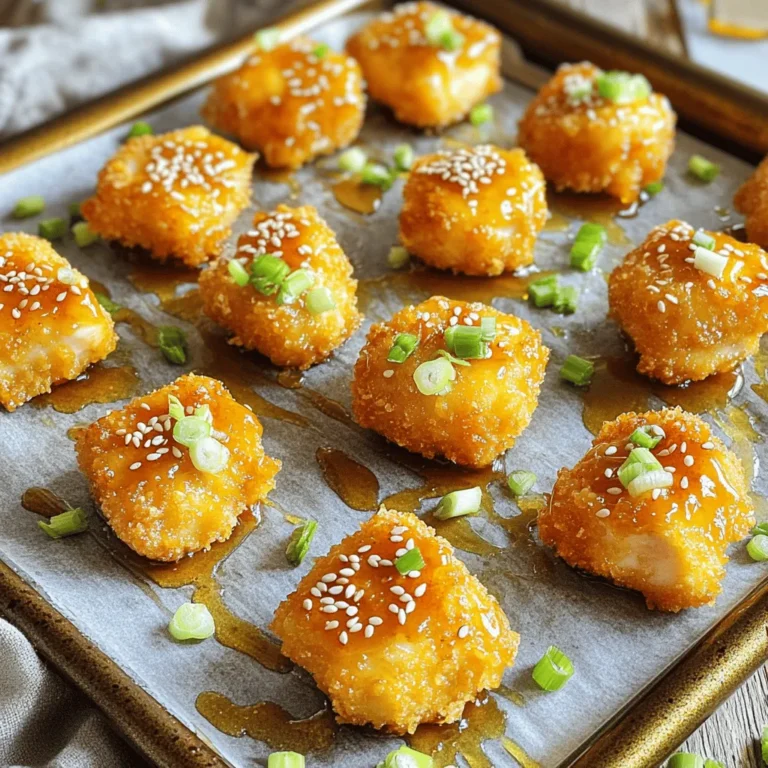
Crispy Honey Garlic Chicken Bites Delightful Treat

- 24 Oreo cookies, crushed - 1/4 cup unsalted butter, melted - 16 oz cream cheese, softened - 1 cup powdered sugar - 1 teaspoon vanilla extract - 1 cup heavy whipping cream - 12 Oreo cookies, chopped (for mixing in) - Extra chopped Oreo cookies (for topping) - 9x9-inch baking dish - Medium mixing bowl - Large mixing bowl - Electric mixer - Rubber spatula For this no-bake Oreo cheesecake bars recipe, the ingredients are simple and easy to find. You need a mix of Oreo cookies, cream cheese, and some heavy cream. Each ingredient plays a key role in creating a rich and creamy texture. The crushed Oreo cookies form the crust, giving a nice crunch. The melted butter makes it stick together well. Cream cheese adds that smooth, creamy filling. Powdered sugar adds sweetness, while vanilla brings in a nice flavor boost. Heavy whipping cream is crucial; it helps make the filling light and fluffy. The chopped Oreos mixed into the filling add extra flavor and fun. Finally, you can top the bars with extra chopped Oreos for a nice look and taste. This mix of flavors and textures makes these bars an irresistible treat. To start, combine 24 crushed Oreo cookies and 1/4 cup of melted butter in a medium bowl. Mix until each crumb is coated. Next, press this mixture firmly into the bottom of a 9x9-inch baking dish. Make sure it’s even. Place the dish in the fridge to set while you prepare the filling. In a large mixing bowl, beat 16 ounces of softened cream cheese using an electric mixer. Add in 1 cup of powdered sugar and 1 teaspoon of vanilla extract. Mix these ingredients until the mixture is smooth and creamy. In a separate bowl, whip 1 cup of heavy whipping cream until stiff peaks form. This step is key for a light texture. Be careful not to overwhip, as it can turn grainy. Gently fold the whipped cream into the cream cheese mixture. Be sure to mix carefully to keep the air in the whipped cream. Then, fold in 12 chopped Oreo cookies for extra flavor. Pour this filling over the chilled crust. Smooth it out to create an even layer. Cover the dish with plastic wrap. Refrigerate for at least 4 hours. This step lets the bars set completely and makes them easier to cut. Once the cheesecake has set, remove it from the fridge. Cut it into squares and sprinkle extra chopped Oreo cookies on top before serving. Enjoy these easy and delicious treats! To ensure a smooth filling, start with softened cream cheese. Cold cream cheese can cause lumps. Use an electric mixer to beat the cream cheese until it’s creamy and free of lumps. Add the powdered sugar slowly and mix until fully blended. Preventing overwhipping the cream is key. Whip the heavy cream until stiff peaks form, but stop there. If you whip too long, the cream can turn grainy. Gently fold the whipped cream into the cream cheese mix to keep it light and airy. For an attractive display, serve the cheesecake bars on a colorful platter. You can add a dollop of whipped cream on each bar for a nice touch. Consider placing whole Oreo cookies alongside the bars for added flair. Using garnishes like fresh berries or chocolate drizzle can enhance appeal. These small details can make your dessert look gourmet and special. To avoid a soggy crust, press the crushed Oreo mixture firmly into the baking dish. Make sure the crust is even and compact. This will help it hold its shape when you slice the bars. Ensuring even chilling is also important. Cover the dish tightly with plastic wrap to keep moisture out. Refrigerate for at least 4 hours to set properly. This helps the flavors meld, making your bars taste even better! {{image_2}} You can change the flavor of your no-bake Oreo cheesecake bars by using different cookies for the crust. For example, try using chocolate graham crackers or peanut butter cookies. These will give a new twist to the taste. You can also add extracts to enhance the flavor. A bit of almond or mint extract can elevate the taste. Just remember, a little goes a long way! If you need gluten-free options, there are gluten-free Oreo cookies available. These work just as well in your recipe. For those who want a dairy-free version, you can use dairy-free cream cheese. Brands like Tofutti or Kite Hill offer great alternatives. This way, everyone can enjoy these tasty bars! You can pair your cheesecake bars with various sauces or toppings. A drizzle of chocolate sauce or a scoop of strawberry puree adds a nice touch. If you want to switch up the crust, consider using crushed pretzels for a salty-sweet mix. This gives your bars an extra crunch and flavor depth. Serve them on a nice platter for a stunning presentation! To keep your No-Bake Oreo Cheesecake Bars fresh, store them in the fridge. Place the bars in an airtight container. This way, they won’t absorb any odors. If you want to freeze leftovers, wrap each bar in plastic wrap, then put them in a freezer bag. This helps keep them safe from freezer burn. In the fridge, these bars last about 5 to 7 days. Always check for signs of spoilage. If they smell off or develop a strange texture, it’s best to throw them out. If you need to revive the texture, let them sit at room temperature for 10 minutes. This can help restore their creamy feel. Avoid using heat, as it may change the structure. Yes, you can use homemade Oreos. They can add a fresh touch to your cheesecake bars. Make sure they are firm enough to crush well. You want a nice, even crust. If you go this route, use a similar recipe to the original Oreo cookie. This will help maintain the taste and texture you want. If you don’t have heavy cream, you can use alternatives. Milk and butter is a great substitute. Mix 1/4 cup of melted butter with 3/4 cup of milk. Another option is using half-and-half. Just keep in mind that the texture may not be as rich. Yes, you can make these bars ahead of time. In fact, they taste better after chilling. Make them a day before serving to let the flavors blend. Just cover them well to keep them fresh. They will hold up nicely in the fridge. To make your cheesecake bars firmer, adjust a few ingredients. Use more cream cheese and less whipped cream. You can also chill them longer to help them set better. Another option is to add a bit of gelatin. This will give you that perfect slice you want. You can make delicious Oreo cheesecake bars with just a few simple steps. First, crush Oreos and mix them with butter for the crust. Then, create a creamy filling with cream cheese, sugar, and whipped cream. Chill it all for a rich treat. Remember to follow our tips for the best texture and presentation. You can also explore fun flavor twists and storage tips to enjoy these sweets longer. Get creative with your choices and enjoy making these bars anytime!

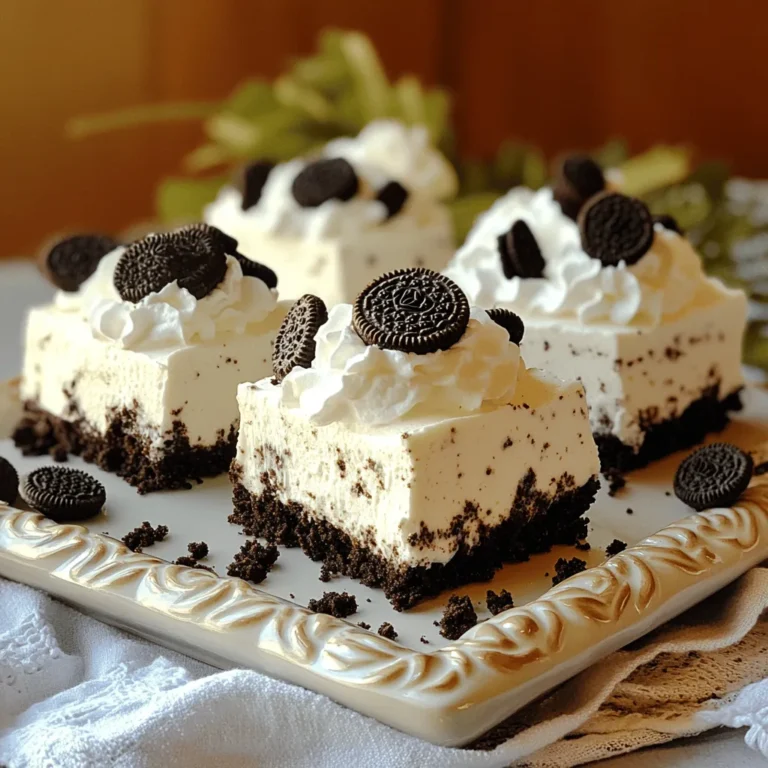
No-Bake Oreo Cheesecake Bars Easy and Irresistible Treat

For this tasty dish, you will need: - 1 lb fresh salmon fillet, skinless and cut into bite-sized pieces - 1/4 cup low-sodium soy sauce - 2 tablespoons honey - 1 tablespoon rice vinegar - 2 teaspoons sesame oil - 1 teaspoon grated fresh ginger - 1 garlic clove, minced - 1 tablespoon sesame seeds (optional, for garnish) - 2 green onions, sliced (for garnish) Choosing fresh salmon is key. Look for bright, moist flesh. The fish should have a slight sheen. Avoid any that smells fishy or has brown spots. If possible, buy from a trusted fish market. Ask the seller when it was caught. This ensures you get the best quality for your teriyaki salmon bites. You can swap ingredients if needed. If you don't have low-sodium soy sauce, try tamari for a gluten-free option. Maple syrup can replace honey for a vegan dish. Rice vinegar can be swapped with apple cider vinegar. If fresh ginger isn’t available, ground ginger works in a pinch. Get creative and use what you have! To make the marinade, grab a medium bowl. Whisk together 1/4 cup of low-sodium soy sauce, 2 tablespoons of honey, 1 tablespoon of rice vinegar, 2 teaspoons of sesame oil, 1 teaspoon of grated fresh ginger, and 1 minced garlic clove. Mix it well until all ingredients blend together. This marinade gives the salmon its sweet and savory flavor. Next, take your fresh salmon fillet, cut it into bite-sized pieces. Add the salmon to the bowl with the marinade. Gently toss the salmon pieces until they are fully coated. Cover the bowl with plastic wrap. Let it sit in the fridge for 15 to 20 minutes. This step allows the flavors to soak in. Now, preheat your air fryer to 400°F (200°C). While it heats up, arrange the marinated salmon bites in a single layer in the air fryer basket. Be careful not to overcrowd them. Cook the salmon for 8 to 10 minutes. Flip the bites halfway through for even cooking. Check that they are cooked through and slightly crispy. Cooking time can vary, so keep an eye on them. After cooking, let the salmon rest for a couple of minutes. Drizzle any remaining marinade over the bites and top with sesame seeds and sliced green onions. Enjoy your delicious air fryer teriyaki salmon bites! To get salmon bites just right, pay attention to size. Cut each piece into uniform bites. This helps them cook evenly. Aim for about one-inch pieces. Use a meat thermometer to check doneness. The inside should reach 145°F. If you don’t have one, look for opaque flesh that flakes easily. Avoid overcooking. This keeps the bites moist and tender. Want to take your teriyaki salmon to the next level? Try adding a splash of orange juice to the marinade. It brings a fresh, fruity note. You can also mix in chili flakes for some heat. If you enjoy crunch, toss in chopped bell peppers or snap peas before cooking. These add texture and flavor. Don’t forget, you can adjust the honey for sweetness based on your taste. Make your dish pop with a beautiful presentation. Use a white plate to highlight the vibrant colors of the salmon. Arrange the bites in a circular pattern for an appealing look. Drizzle extra marinade over the top for shine. Add a sprinkle of sesame seeds and green onions for color. Serve with a side of rice or steamed veggies for a complete meal. Enjoy the compliments from your friends and family! {{image_2}} You can switch up the flavor of your Air Fryer Teriyaki Salmon Bites. Try using miso paste instead of soy sauce for a deeper taste. You can add a splash of orange juice for a citrus twist. For a spicy kick, mix in some sriracha or chili flakes. Each option brings a new layer of flavor to this simple dish. While the air fryer is quick, you can also grill or bake the salmon bites. If you grill them, just make sure to use a grill basket to prevent them from falling through. Baking takes about 12-15 minutes at 400°F. Both methods give you a tasty result and keep the salmon moist. Serve your teriyaki salmon bites over a bed of rice or quinoa. Add steamed veggies for a colorful and healthy plate. You can also use them in lettuce wraps for a fun twist. Garnish with sesame seeds and green onions for a pop of color. These bites are great for meal prep or a quick dinner. After enjoying your air fryer teriyaki salmon bites, you may have leftovers. Store them in an airtight container. Keep the salmon bites in the fridge. They will stay fresh for up to three days. Make sure the container is sealed well to avoid any odors. When you’re ready to eat your leftovers, reheating is simple. Preheat your air fryer to 350°F (175°C). Place the salmon bites in the basket. Heat them for about 3-5 minutes. This will help keep them crispy. Check that they’re hot all the way through before serving. If you want to save your salmon bites for a later meal, freezing is a great option. First, let the salmon bites cool completely. Then, place them in a freezer-safe bag. Remove as much air as possible before sealing. You can freeze them for up to three months. When ready to eat, thaw them overnight in the fridge and reheat as described above. It takes about 8-10 minutes to cook salmon bites in an air fryer. Flip them halfway through for even cooking. Make sure to check the salmon for doneness. The fish should be opaque and flake easily with a fork. Yes, you can use frozen salmon. Just thaw it first before marinating. This ensures the flavors soak in well. Frozen salmon may cook a bit longer, so keep an eye on it while it cooks. You can serve teriyaki salmon bites with rice or quinoa. Steamed vegetables like broccoli or snap peas pair well too. A fresh salad with a light dressing is also a nice touch. If you like, add some dipping sauce on the side for extra flavor! In this article, we explored key ingredients and tips for making delicious salmon bites. I shared how to prepare the marinade, marinate your salmon, and use air frying techniques. You learned ways to enhance flavor and serve it well. Remember to store leftovers properly and check reheating tips. These simple steps can make your salmon dishes shine. I hope you enjoy making these tasty bites for family and friends!

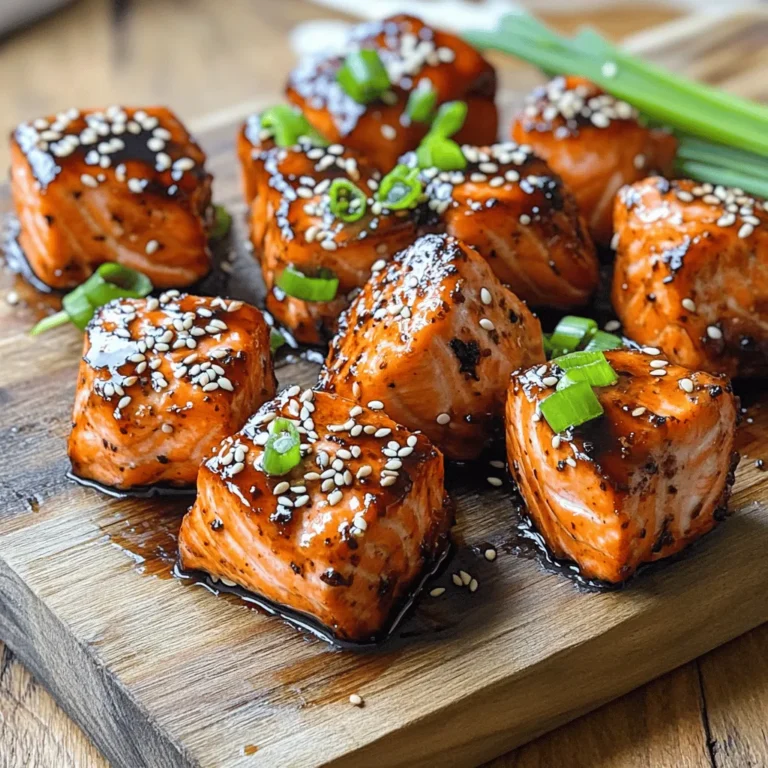
Air Fryer Teriyaki Salmon Bites Quick and Simple Dish

- 2 boneless, skinless chicken breasts - 1 cup fresh spinach, chopped - 1 can (14 oz) artichoke hearts, drained and quartered - 1 cup cream cheese, softened - 1/2 cup chicken broth - 1/2 cup grated Parmesan cheese The main ingredients create a rich and tasty dish. The chicken breasts are the base and give you protein. Spinach adds color and nutrients. Artichoke hearts bring a nice texture. Cream cheese makes the sauce creamy and smooth. Chicken broth adds flavor. Parmesan cheese gives a salty kick. - 1 teaspoon garlic powder - 1 teaspoon onion powder - Salt and pepper to taste - 2 tablespoons olive oil Seasoning is key to flavor. Garlic powder and onion powder boost the taste. Salt and pepper balance all the flavors. Olive oil helps cook the chicken and adds richness. - Fresh basil Fresh basil adds a pop of color and a hint of freshness. It makes your dish look beautiful and tastes great. You can add it just before serving for the best effect. First, season the chicken breasts. Use garlic powder, onion powder, salt, and pepper. Sprinkle these on both sides. This adds great flavor. Next, heat olive oil in a pot over medium heat. Add the chicken to the pot. Cook for 5-7 minutes on each side. Look for a golden brown color. Check the center to ensure it's fully cooked. The chicken should reach 165°F. Remove the chicken and set it aside. In the same pot, add cream cheese, chicken broth, and Parmesan cheese. Stir well until the cheese melts. This creates a creamy sauce. Keep mixing until the sauce is smooth and velvety. Now, stir in the chopped spinach and artichoke hearts. Cook for about 3-4 minutes. The spinach should wilt but keep its bright color. This step adds freshness and flavor to the dish. Return the cooked chicken to the pot. Spoon the creamy sauce over the chicken. Let everything simmer for 3-5 minutes. This helps the chicken soak up the flavors. Once heated and bubbling, remove from heat. For a nice touch, garnish with fresh basil. Serve straight from the pot or on a plate. Make sure the creamy sauce covers the chicken well. Enjoy your meal! Best Method for Cooking Chicken I always recommend searing chicken on medium heat. This gives it a nice brown crust. Use a heavy pot for even heat. Cook each side for about 5-7 minutes. To check if it's done, the inside should reach 165°F. Let it rest before slicing to keep it juicy. Tips for a Creamy Sauce Start with softened cream cheese. This helps it melt smoothly in the pot. Stir in chicken broth slowly to mix well. If the sauce is too thick, add a bit more broth. A gentle heat will keep it creamy without burning. Alternatives for Cream Cheese If you need a change, try Greek yogurt. It adds tang and creaminess. Another option is mascarpone cheese, which is rich and smooth. You can also use cottage cheese blended until smooth for a lighter choice. Dairy-Free Option Suggestions For a dairy-free sauce, use cashew cream. Blend soaked cashews with water until smooth. Nutritional yeast can add a cheesy flavor. Coconut milk is also a great choice for richness. Adding Herbs and Spices Fresh herbs like basil or parsley can brighten the dish. Add them at the end for the best flavor. A pinch of red pepper flakes can give it a nice kick too. Experiment with your favorite spices to make it your own. Using Different Cheese Varieties Swap out Parmesan for mozzarella or Gouda for a different taste. A mix of cheeses can also add depth. Just be mindful of the melting point to keep the sauce creamy. {{image_2}} You can swap chicken for turkey or tofu. Turkey gives a nice, lean option. It adds a new flavor while keeping it healthy. Tofu is great for a plant-based meal. It soaks up the sauce well. Just make sure to press the tofu to remove excess water before cooking. This helps it get crispy and tasty. Feel free to mix in other veggies. Mushrooms, bell peppers, or zucchini all work well. They add color and crunch to your dish. Try using frozen peas for a quick option. You can also add some cherry tomatoes for a sweet burst of flavor. Add different herbs to change the taste. Italian herbs such as oregano and basil can bring a fresh twist. A pinch of red pepper flakes adds a bit of heat. Try lemon zest for a bright flavor boost. Experiment to find your favorite mix! For a spicy kick, add cayenne or chili powder. Start with a small amount, then taste. You can always add more heat if needed. Instead of cream cheese, you can use Greek yogurt or sour cream. These options make the dish lighter but still creamy. Coconut milk is a good choice for a dairy-free version. It adds a subtle sweetness, which works well with spinach and artichokes. To keep your One-Pot Creamy Spinach Artichoke Chicken fresh, use airtight containers. Glass or plastic containers work well. Make sure the chicken is cool before sealing. This meal lasts about 3 to 4 days in the fridge. Always check for any signs of spoilage before eating. For the best taste, reheat on the stove. Place the chicken and sauce in a pot over low heat. Stir often to avoid burning. You can also use the microwave, but check every 30 seconds. To keep the sauce creamy, add a splash of chicken broth or milk while reheating. This will help maintain the texture. You can freeze this dish for up to 2 months. Use freezer-safe containers or bags. Make sure to remove as much air as possible. When you are ready to eat, thaw the dish in the fridge overnight. Reheat it gently, adding a little liquid to keep it creamy. Enjoy your flavorful meal even after a freeze! To make One-Pot Creamy Spinach Artichoke Chicken healthier, consider these tips: - Use skinless chicken thighs for leaner meat. - Substitute cream cheese with Greek yogurt for fewer calories. - Add more fresh spinach to boost fiber and nutrients. You can also try these alternative ingredients: - Use low-fat cheese options to cut fat. - Replace white pasta with whole grain or zucchini noodles. - Use vegetable broth instead of chicken broth for less sodium. Yes, you can make this recipe ahead of time. Here’s how: - Cook the chicken and sauce as directed, then let it cool. - Store it in an airtight container in the fridge for up to three days. For recommended storage methods: - Use glass or plastic containers with tight lids for best results. - Label the container with the date for easy tracking. Here are some delicious side dish suggestions: - Garlic bread pairs well and soaks up the sauce. - Steamed broccoli adds color and nutrients to your meal. - A simple rice pilaf can balance the creamy flavors. You can also pair it with salads or bread: - A light Caesar salad complements the rich chicken. - Crusty baguette or breadsticks are great for dipping. - A fresh garden salad adds crunch and freshness. This blog post guided you through making One-Pot Creamy Spinach Artichoke Chicken. We discussed the main ingredients, step-by-step cooking instructions, and tips for success. You learned how to create a creamy sauce with the right techniques. Plus, you explored ways to customize the dish with various proteins and veggies. I hope you feel ready to make this dish your own. Enjoy every creamy bite!

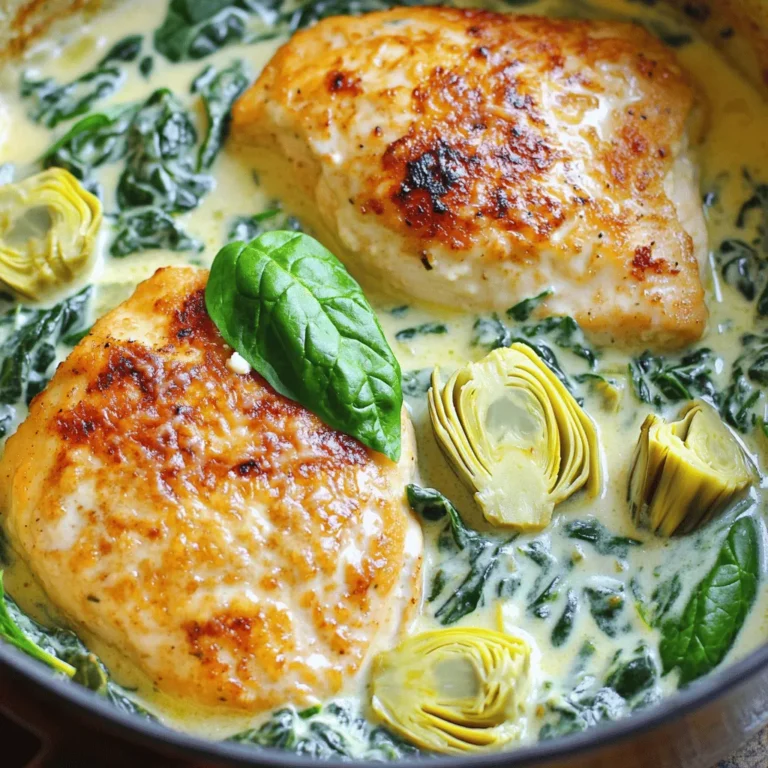
One-Pot Creamy Spinach Artichoke Chicken Delight

- 200g pasta (penne or fusilli) - 200g feta cheese block - 400g cherry tomatoes (mixed colors preferred) - 4 cloves garlic, minced - 1/4 cup olive oil - 1 teaspoon dried oregano - Salt and pepper to taste - 2 cups fresh spinach - Fresh basil for garnish - Zest of 1 lemon - Selecting ripe tomatoes: Look for firm, shiny tomatoes. They should feel heavy for their size. Check for rich color and slight softness. This means they are ripe and full of flavor. - Choosing the best feta cheese: Go for a block of feta in brine. It stays moist and has a creamier taste. Avoid crumbled feta; it might lack the same rich flavor. - Importance of fresh herbs: Fresh herbs bring brightness to the dish. Always use fresh basil over dried for better flavor. Fresh spinach also adds nutrition and taste, so don’t skip it! To start, preheat your oven to 400°F (200°C). This helps the feta and tomatoes cook evenly. It’s best to set the oven before you prepare the dish. While it heats up, you can focus on the baking dish. Grab a large baking dish. It should have enough room for the feta and tomatoes. This way, everything cooks well together without being too crowded. Now, let’s combine our main ingredients. In your baking dish, add the cherry tomatoes, minced garlic, dried oregano, olive oil, salt, and pepper. Stir these until the tomatoes are well coated. Next, place the block of feta cheese right in the center. Make sure it sits among the seasoned tomatoes. Bake this in the preheated oven for 25-30 minutes. Look for blistered tomatoes and soft, golden feta. While the feta and tomatoes bake, it’s time to cook the pasta. Use penne or fusilli for this dish. Follow the package instructions and cook the pasta until it is al dente. This means it should be firm yet tender. After cooking, drain the pasta well. Set it aside so it is ready for mixing later. When the feta and tomatoes are done, take the baking dish out of the oven. Use a fork to mash the feta into the tomatoes. This creates a creamy sauce that is rich in flavor. Now, add the cooked pasta to the dish along with fresh spinach. Toss everything together until the pasta is well coated in the creamy sauce. For serving, garnish your dish with fresh basil and a sprinkle of lemon zest. This adds a bright flavor that enhances the meal. Enjoy your delightful baked feta tomato pasta! To make this dish truly your own, adjust the flavors to your taste. You can add more garlic for a stronger kick or even a pinch of red pepper flakes for heat. Mixing ratios matter, too. Use enough olive oil to coat the tomatoes, but don’t drown them. Balance is key for a tasty sauce. Timing is very important when making this dish. Sync the baking and cooking times for the best results. Start cooking your pasta just before the feta and tomatoes are done baking. This way, everything is hot and ready at the same time. To avoid overcooking, keep an eye on the feta. It should be soft and slightly golden, not burnt. The right tools make cooking easier. Use a ceramic or glass baking dish to roast the tomatoes and feta evenly. A good quality pot for boiling pasta also helps. Don't forget a sturdy fork to mash the feta into the creamy sauce. These tools will make your cooking experience smooth and fun. {{image_2}} If you need gluten-free options, try using gluten-free pasta. Pasta made from rice or chickpeas works great. These options keep the dish tasty and safe for those with gluten sensitivities. For vegan choices, substitute the feta cheese with a plant-based option. Look for vegan feta made from nuts or tofu. You can also use cashew cream to get that creamy texture without dairy. Want to add more protein? Grilled chicken or sautéed shrimp adds flavor and makes the dish heartier. Simply cook your protein of choice separately and mix it in at the end. You can also boost the veggie content. Try adding bell peppers, zucchini, or mushrooms. These veggies enhance the dish's color and nutrition. Just roast them alongside the tomatoes for an easy addition. To elevate the taste, consider adding spices like red pepper flakes or smoked paprika. A pinch of these spices brings warmth and depth to the dish. Fresh herbs can also change the flavor profile. Besides basil, try using parsley or thyme. These herbs offer fresh notes that brighten each bite. You can even mix them in before serving for added flavor. To keep your baked feta tomato pasta fresh, store it in an airtight container. This helps prevent moisture loss and keeps flavors intact. You can refrigerate it for up to three days. For longer storage, you can freeze this dish. Let it cool completely before placing it in a freezer-safe container. It will stay good for about three months in the freezer. When you're ready to enjoy your leftovers, reheating is key. To maintain the creamy texture, gently reheat in the oven at 350°F (175°C). Cover the dish with foil to avoid drying out. Heat for about 20 minutes or until warmed through. You can also use a microwave. Heat in short bursts, stirring in between, to ensure even warming. Aim for a temperature of 165°F (74°C) before serving. How long can I store baked feta pasta? You can store baked feta pasta in the fridge for about 3-5 days. Just put it in an airtight container to keep it fresh. If you want to eat it later, you can freeze it too. It lasts for about 2-3 months in the freezer. Can I use different types of cheese? Yes, you can swap feta cheese for goat cheese or ricotta. Each cheese will add a different flavor. Just remember, the cooking time may change slightly. Is it possible to make this recipe ahead of time? You can prep the dish ahead. Combine the tomatoes, garlic, and cheese, then cover and chill. When ready to cook, just add the pasta and bake. What pasta is best for this recipe? Penne or fusilli works great. Both shapes hold the sauce well. You can also use gluten-free pasta if needed. How to ensure creamy consistency To get that creamy sauce, mash the feta well with the tomatoes. Make sure to mix in the pasta and spinach thoroughly. This way, every bite is rich and flavorful. Best ways to prevent pasta from sticking Make sure to stir the pasta while it cooks. This helps keep it from clumping together. Also, rinse it with cold water after draining to remove extra starch. In this post, we explored how to make a tasty baked feta pasta. We discussed key ingredients, like pasta choices, feta cheese, and ripe tomatoes. You learned helpful tips for selecting quality items and how to bake perfectly. Timing is key for cooking pasta and avoiding overcooking. Variations allow for dietary needs, and storage tips ensure leftovers stay fresh. Mastering this dish enables you to impress your friends and family with ease and flavor!

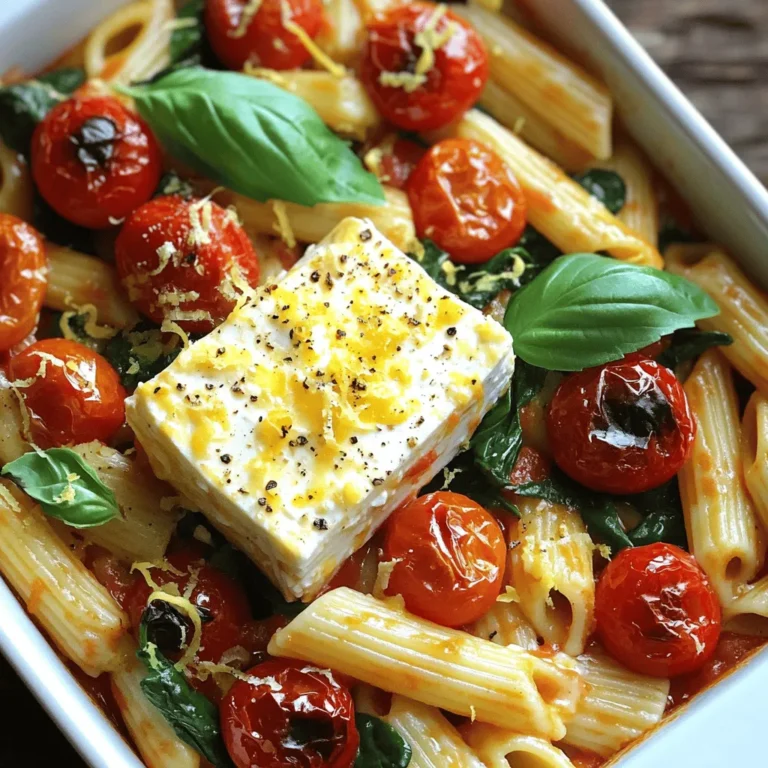
Baked Feta Tomato Pasta TikTok Style Delightful Dish

- 4 cups apple cider - 1 orange, sliced - 5-6 whole cloves - 2-3 star anise - 2-3 cinnamon sticks - 1 tablespoon grated fresh ginger - 1 tablespoon brown sugar - Pinch of nutmeg - Fresh apple slices or cranberries for garnish When I prepare spiced mulled cider, I like to use fresh ingredients. The apple cider is the base of this drink. It gives a sweet and tangy flavor that warms you up. I add slices of orange for a bright citrus taste. Whole cloves and star anise give it a warm, spicy kick. The cinnamon sticks add a cozy aroma that fills my kitchen. Grated fresh ginger adds a zesty note that balances the sweetness. I use brown sugar to sweeten the cider, but I always taste it first. A pinch of nutmeg adds depth, enhancing the spices. For garnishing, I love using fresh apple slices or cranberries. They make the drink look beautiful and add a little extra flavor. - Alcoholic variations (e.g., rum, whiskey) - Sweeteners adjustment (honey, maple syrup) - Alternative spices (cardamom, allspice) If you want to be adventurous, try adding a splash of rum or whiskey. It gives the cider a fun twist, perfect for a cozy night. For sweetness, you can swap brown sugar with honey or maple syrup. This adds unique flavors, so feel free to experiment. You can also switch up the spices. Cardamom and allspice bring their own warm notes. This drink is flexible, so make it your own! 1. First, take a large pot and pour in the apple cider. 2. Heat it over medium heat. Watch for it to start simmering. 3. Next, add the sliced orange, whole cloves, star anise, and cinnamon sticks. 4. Stir in the grated fresh ginger, brown sugar, and a pinch of nutmeg. 5. Adjust the sweetness based on your taste. 1. Lower the heat and let the cider simmer for 15 to 20 minutes. 2. This time lets the spices blend well with the cider. 3. You will smell a warm aroma as the flavors mix. 1. After simmering, remove the pot from the heat. 2. Strain the mulled cider through a fine sieve. This removes the solid spices. 3. Serve the warm cider in mugs. 4. Garnish with fresh apple slices or cranberries for a nice touch. - Choosing the right apple cider: Look for fresh, unfiltered apple cider. Local orchards often have the best options. This cider has a rich flavor that enhances your drink. - Adjusting spice levels to personal taste: Start with the recipe spices. Then, taste as you go. If you want more warmth, add extra ginger or a bit more cinnamon. - Ensuring proper infusion time: Let the cider simmer for 15-20 minutes. This time allows the spices to blend well with the cider. The longer you simmer, the deeper the flavor gets. - Overheating or boiling the cider: Keep the heat low. Boiling can make the cider taste bitter. Gentle heat gives you a smoother, sweeter drink. - Not straining the cider properly: Always strain your cider after simmering. This step removes solids. You want a clear, smooth drink in your mug. - Additional garnishing options: Consider adding fresh herbs like mint or thyme for a twist. You can also use star anise or extra orange slices for added flavor. - Pairing suggestions with food: Serve spiced mulled cider with sweet treats, like cookies or pies. It also goes well with savory dishes, like roasted meats. This pairing will delight your guests. {{image_2}} You can make spiced mulled cider with or without alcohol. For an adult drink, try adding rum or whiskey. These spirits add warmth and depth. A splash of bourbon gives a nice kick. You can also mix it with some cranberry juice for a fruity twist. For a kid-friendly version, use the same spices in the recipe but skip the alcohol. The warm cider tastes great on its own. You can sweeten it with honey or maple syrup for extra flavor. Kids love it garnished with apple slices or cranberries. Customizing your mulled cider is fun! You can change spices to suit your taste. If you love heat, add a pinch of cayenne pepper. Want a floral note? Try adding cardamom pods. Each spice brings its own flair. Seasonal flavors can also shine. In fall, add a few slices of pear. In winter, try fresh nutmeg or even vanilla bean. These additions make the drink special and unique. Spiced mulled cider is best served warm. Pour it into mugs and savor the warmth. If you prefer it cold, chill it in the fridge. Serve it over ice for a refreshing treat in summer. You can also transform it into cocktails. For a fun twist, mix the cider with ginger beer or club soda. This gives a bubbly and festive touch. You can create a memorable drink for parties or gatherings. To store spiced mulled cider, let it cool first. Pour it into a clean jar. Seal it tightly with a lid. Place it in the fridge. Proper storage keeps the cider fresh for about 3 to 5 days. Always check for any off smells before using it again. To reheat, pour your cider into a pot. Heat it on low. This keeps the flavors intact. Stir gently and watch it closely. Do not let it boil. For serving, warm mugs enhance the experience. You can also add fresh apple slices or cranberries as a garnish. This adds color and flavor to each cup. Spiced mulled cider is a warm drink made from apple cider and spices. It has a rich, sweet taste. Common spices include cinnamon, cloves, and star anise. Often, people add orange slices and ginger for a zesty kick. This cozy drink is perfect for chilly days and gatherings. It fills your home with a lovely, inviting aroma. Yes, you can easily make spiced mulled cider in a slow cooker. Just combine all the ingredients in the pot. Set it on low heat for a few hours. This method allows the flavors to meld well over time. It also keeps the cider warm for serving. This is great for parties or family gatherings. You can adjust the sweetness by adding brown sugar or honey. Start with a little, then taste as you go. This way, you can find the right balance for your preferences. If it’s too sweet, add a splash of lemon juice. This will help cut the sweetness and enhance the flavor. Yes, mulled cider has some health benefits. The spices like cinnamon and ginger can help digestion. They also have anti-inflammatory properties. Apple cider is rich in antioxidants, which are good for your health. Drinking it warm can also provide comfort during cold weather. You can use store-bought apple juice as a substitute. However, it may lack the depth of flavor found in real apple cider. If using juice, you might want to add more spices to boost the taste. Remember, the fresher the ingredients, the better the mulled cider will taste. Spiced mulled cider is warm, flavorful, and fun to make. By using ingredients like apple cider, spices, and ginger, you create a drink that fits any season. Remember to heat your cider without boiling it for the best flavor. You can customize it with alcohol or extra spices to suit your taste. Proper storage keeps leftovers fresh, and reheating is simple. Enjoy this cozy drink at your next gathering, or share it with loved ones. There’s nothing like a cup of spiced mulled cider to brighten your day.

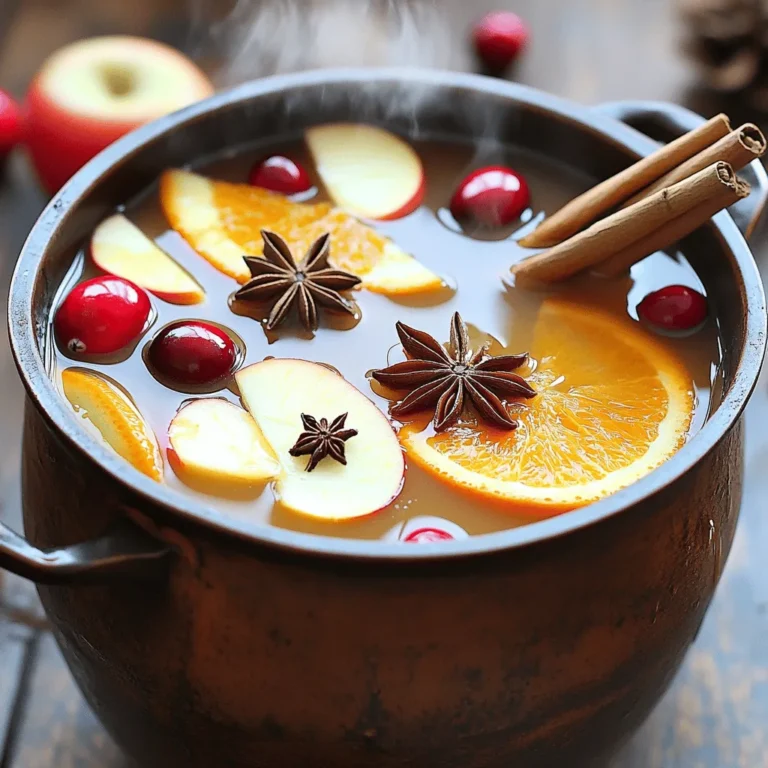
Spiced Mulled Cider Cozy and Heartwarming Drink

- 1 pound boneless, skinless chicken breasts, diced - 1 tablespoon olive oil - 1 cup orzo pasta - 4 cups chicken broth - 1 cup heavy cream - Juice and zest of 2 lemons - 2 cloves garlic, minced - 1 cup baby spinach - 1/2 cup grated Parmesan cheese - Salt and black pepper to taste - Fresh parsley, chopped (for garnish) I love this creamy lemon chicken orzo recipe. It is both simple and full of flavor. Each ingredient plays a part in making the dish shine. First, we have chicken breasts. They add protein and richness. I prefer boneless and skinless for ease. Dicing them makes them cook faster. Next, olive oil is essential for sautéing. It adds a nice, light flavor. The orzo pasta gives a unique texture. It cooks well and absorbs flavors. Chicken broth is a must. It keeps the orzo moist and tasty. Heavy cream brings the dish together. It makes everything creamy and dreamy. Lemons add brightness. The juice and zest balance the rich cream. Garlic gives a lovely aroma and a hint of spice. Baby spinach is not just for color. It adds nutrients and freshness. Parmesan cheese ties everything together. It adds a savory kick. Finally, we season with salt and pepper. They enhance all the flavors. Fresh parsley on top makes the dish pop. It looks great and tastes fresh. These ingredients create a delightful meal that is easy to prepare. You can enjoy it any day of the week! - Heat 1 tablespoon of olive oil in a large skillet over medium heat. - Season 1 pound of diced chicken breasts with salt and black pepper. - Add the chicken to the skillet and sauté until browned. This takes about 6-8 minutes. - Make sure the chicken is no longer pink in the center. - Remove the chicken from the skillet and set it aside. - In the same skillet, add 2 cloves of minced garlic. - Sauté the garlic for 1 minute or until it smells good. - Pour in 4 cups of chicken broth and bring it to a simmer. - Add 1 cup of orzo pasta to the broth. - Cook the orzo according to package instructions. This usually takes about 8-10 minutes. - Stir occasionally to prevent sticking until the orzo is tender. - Reduce the heat to low once the orzo is cooked. - Stir in 1 cup of heavy cream, juice and zest of 2 lemons. - Mix well to combine all the flavors. - Add the cooked chicken back to the skillet. - Toss in 1 cup of baby spinach and 1/2 cup of grated Parmesan cheese. - Stir gently until the spinach wilts and everything is creamy. - Taste and add more salt and pepper if needed. Now you're ready to serve your creamy lemon chicken orzo warm! Choosing the right chicken is key. I prefer using boneless, skinless chicken breasts. They cook evenly and stay juicy. Make sure to dice the chicken into small, even pieces. This helps it cook faster and more evenly. Cooking orzo perfectly takes a bit of care. First, bring your chicken broth to a simmer. Stir in the orzo and watch it closely. Cook it for about 8-10 minutes. Stir often to keep it from sticking. When it's tender, it’s ready to mix. You can add more lemon or garlic for a zesty kick. If you love lemon, squeeze in some extra juice. The zest adds a bright flavor too. For garlic lovers, use three cloves instead of two. This will give your dish a bold taste. Substituting ingredients can change the meal. Spinach is great, but try kale or arugula too. They add different tastes and nutrients. You can also mix in some sun-dried tomatoes for extra color and flavor. {{image_2}} You can change the proteins in this dish easily. Try shrimp for a seafood twist. If you want a plant-based option, use tofu instead of chicken. Both options add unique flavors. You can also add vegetables to boost nutrients and color. Peas are a great choice for sweetness. Bell peppers can add crunch and a pop of color. Just toss them in when you add the orzo. To make this dish gluten-free, swap orzo for gluten-free pasta. Many brands offer rice or quinoa pasta that works well in this recipe. If you want a vegan version, use plant-based cream and skip the chicken. You can add extra veggies like mushrooms for protein. This way, you keep the creaminess and flavor without animal products. To keep your creamy lemon chicken orzo fresh, store it in an airtight container. Make sure it cools down to room temperature before sealing it. Refrigerate the leftovers within two hours of cooking. This dish stays good for 3-4 days in the fridge. When you reheat, do it slowly on the stove or in the microwave. If you use the microwave, stir it every minute to heat evenly. Add a splash of chicken broth or cream if it looks dry. This helps keep it creamy and tasty. You can freeze creamy lemon chicken orzo for later meals. First, let it cool completely. Then, scoop it into freezer-safe bags or containers. Leave some space for it to expand. Label the bags with the date. It can stay in the freezer for up to 3 months. When you are ready to eat, move it to the fridge to thaw overnight. For reheating, warm it on the stove over low heat. Stir often and add a bit of broth or cream to revive the creaminess. Enjoy your meal whenever you like! Creamy lemon chicken orzo can last in the fridge for about three to four days. Be sure to store it in an airtight container. This keeps the dish fresh and safe to eat. If you notice any odd smells or changes in color, it’s best to toss it out. Yes, you can use other types of pasta. Small shapes like ditalini or acini di pepe work well. Just keep an eye on the cooking time. Different pasta may need more or less time to cook. Check the package instructions to ensure it turns out tender. You can serve creamy lemon chicken orzo with a side salad or steamed veggies. A simple green salad adds freshness and crunch. Roasted broccoli or asparagus also pairs nicely. For a light touch, a slice of crusty bread is perfect for soaking up the creamy sauce. This blog post guides you through making creamy lemon chicken orzo. You learned about essential ingredients, step-by-step cooking, and smart tips. I shared ways to customize the dish and store leftovers effectively. Experimenting with flavors and different proteins can make this recipe your own. Each step leads to a tasty meal that warms your heart. Enjoy every bite and share it with those you love!

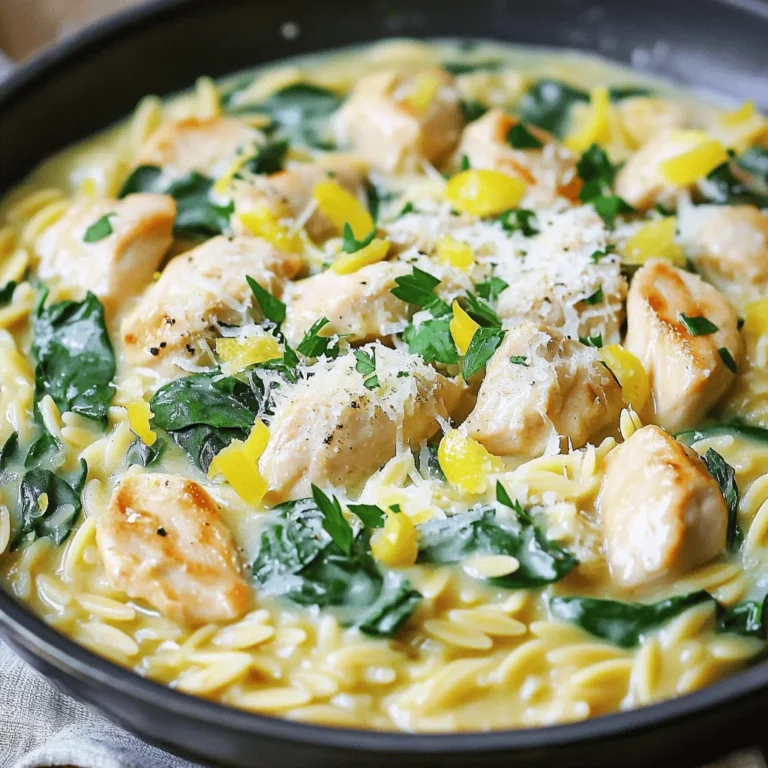
Creamy Lemon Chicken Orzo Savory and Simple Meal

- 4 cups apple cider - 2 cups sparkling water - 1 medium orange, sliced - 1 medium lemon, sliced - 1 medium apple, cored and diced - 1 cup pomegranate seeds - 1 cinnamon stick - Fresh mint leaves for garnish When choosing fruit, look for bright colors. Pick oranges and lemons that feel heavy. They should have smooth skins without bruises. For apples, select firm ones with no soft spots. Choose pomegranates that are plump and have a rich color. Fresh herbs should smell strong. Look for vibrant green mint leaves without wilting. To make this sangria, you need a large pitcher. A cutting board and knife are a must for slicing fruit. Use a stirring spoon to mix the ingredients well. For serving, get some ice-filled glasses. You might want a measuring cup for precise amounts. A fine mesh strainer is helpful if you prefer a smooth drink. To make Apple Cider Sangria, start by gathering your ingredients. You need 4 cups of apple cider, 2 cups of sparkling water, and a medium orange, lemon, and apple. Slice the orange and lemon, and core and dice the apple. Also, grab 1 cup of pomegranate seeds and a cinnamon stick. 1. In a large pitcher, combine the apple cider and sparkling water. Stir gently to mix. 2. Add the sliced orange, lemon, and diced apple into the pitcher. 3. Toss in the pomegranate seeds and the cinnamon stick for added flavor. 4. Stir the mixture gently until all ingredients are evenly mixed. 5. Refrigerate the sangria for at least 1 hour to let the flavors blend. 6. Before serving, give the sangria a light stir. Pour it into glasses filled with ice. 7. Garnish each glass with fresh mint leaves for a nice touch. Mixing is key for great sangria. After adding ingredients, stir gently to keep the fruit intact. When serving, use ice in the glasses. This keeps the drink cold and refreshing. You can also add some mint leaves for extra flavor and a pretty look. If you want to serve a crowd, consider using a larger pitcher. Letting the sangria chill is important. This step allows flavors to blend well. I recommend refrigerating it for at least an hour. If you want stronger flavors, you can chill it longer. If you have leftover sangria, you can still enjoy it. Just remember to stir it again before serving. Adding fresh mint right before serving keeps it vibrant and fresh. You can make Apple Cider Sangria a day early. Just mix the apple cider and sparkling water in a pitcher. Add in the sliced fruits, pomegranate seeds, and cinnamon stick. Then, chill it overnight. This lets the flavors blend well. Just stir before serving, and it’s ready to go! If you need to change some ingredients, that’s easy! You can swap sparkling water for tonic water if you want a different taste. For a sweeter drink, use lemon-lime soda instead. For those who can't have cider, try using a juice blend like pear or white grape juice. You can also skip the pomegranate seeds or use cranberries for a twist. To make your sangria sweeter, add a little honey or maple syrup. Start with a small amount and taste it. You can always add more! If you want a tangy kick, squeeze in some lemon juice. For spice lovers, throw in more cinnamon sticks or even a few cloves. This will give your drink a warm, cozy feel. {{image_2}} You can easily change the fruits in your sangria. Seasonal fruits add color and flavor. Try using pears, cranberries, or figs. These fruits bring a lovely taste for fall. You can also use berries in the summer for a refreshing twist. Remember, the key is to use ripe fruit for the best flavor. You can enjoy apple cider sangria with or without alcohol. For an alcoholic version, add a splash of brandy or rum. This step adds warmth and depth to the drink. If you prefer a non-alcoholic option, just skip the spirits. The blend of apple cider and sparkling water still tastes delicious. Everyone can enjoy this drink at any gathering! For a cozy twist, try making spiced apple cider sangria. Simply add a few spices to your mix. Cinnamon sticks and cloves work well to enhance the flavors. You can also add nutmeg for an extra kick. Let the sangria sit longer to let the spices infuse. This option warms your heart and makes the drink perfect for chilly nights. Store leftover sangria in a clean glass pitcher. Cover it tightly with plastic wrap. This keeps the flavors fresh and prevents spills. If you have extra fruit, you can remove it before storing. This will help the sangria stay crisp. Leftover sangria lasts for about 3 days in the fridge. After that, the fruit may lose its taste. For the best flavor, drink it within the first two days. Always check the smell before serving. If it smells off, it’s best to toss it. You can use leftover fruit in many ways. Try adding the fruit to salads for a fresh twist. You can also blend it into smoothies for extra flavor. If you have excess apple cider, use it in baking. It makes delicious spiced muffins or cakes. Yes, you can make Apple Cider Sangria in advance. I recommend making it a few hours before serving. This gives the flavors time to blend. If you want to prepare it the night before, that works too. Just keep it in the fridge. Remember to add fresh fruit just before serving. This keeps the fruit crisp and fresh. If you don’t have sparkling water, you can use soda or tonic water. Lemon-lime soda adds sweetness and flavor. You can also use club soda for a more neutral taste. If you prefer a less fizzy drink, try using regular water. The sangria will still taste great! Yes, Apple Cider Sangria can be kid-friendly. To make it suitable for kids, skip the alcohol. You can add extra sparkling water for fizz. The fruit and spices will keep it fun and tasty. Kids love the colors and flavors! To make a larger batch, just double or triple the recipe. Use a big pitcher or bowl. Keep the same ratio of apple cider to sparkling water. For big gatherings, I suggest using a large jug with a spout. This makes serving easy. You can still add all the fruit and spices for flavor! This blog post covered how to make Apple Cider Sangria. You learned about the best ingredients, tools, and tips for selecting fresh produce. We went through step-by-step instructions, mixing methods, and how to adjust flavors. I also shared storage tips and variations, like making it ahead or creating a non-alcoholic version. Remember, the right choices lead to a tasty drink. Get creative with flavors and enjoy your sangria for any occasion!

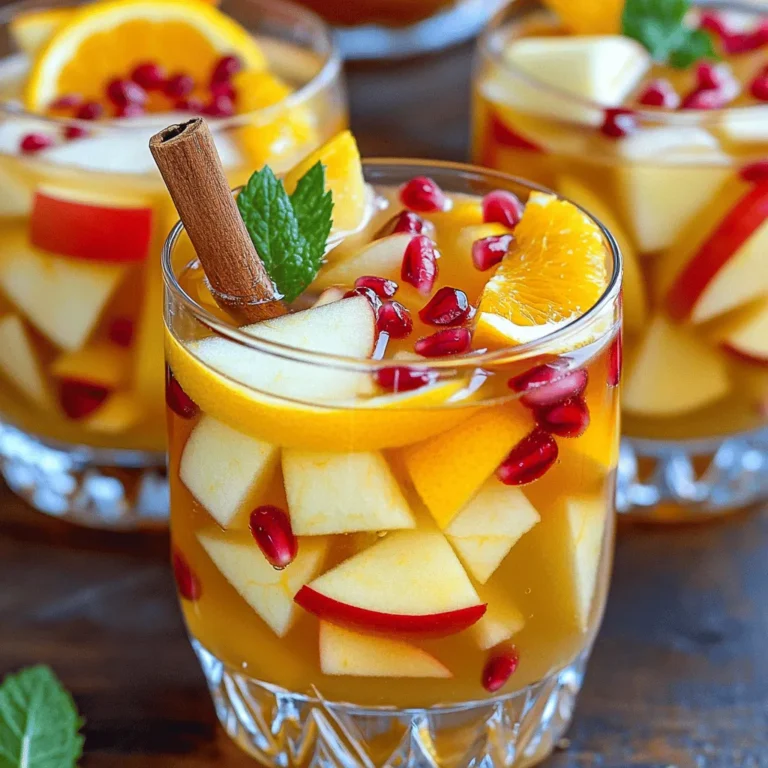
Apple Cider Sangria Refreshing Fall Flavor Drink

To make these tasty sandwiches, here are the main ingredients you will need: - 2 pounds boneless, skinless chicken breasts - 1 cup barbecue sauce (use your favorite brand) - 1/2 cup chicken broth - 1 tablespoon apple cider vinegar - 1 teaspoon garlic powder - 1 teaspoon onion powder - 1 teaspoon smoked paprika - 1 teaspoon ground cumin - Salt and pepper to taste - 4 hamburger buns These ingredients come together to create a juicy and flavorful pulled chicken. The chicken cooks low and slow, soaking up the rich barbecue sauce. While the pulled chicken is delicious on its own, adding toppings can elevate your sandwich. Here are some great options: - Coleslaw (adds crunch and creaminess) - Pickles (for a tangy bite) Feel free to mix and match these toppings to suit your taste. Choosing the right barbecue sauce can enhance your pulled chicken. Here are a few brands I love: - Sweet Baby Ray's (sweet and smoky) - Stubb's (bold and spicy) - Annie's (organic and tangy) These sauces each bring their own unique flavor to the dish, so pick one that you enjoy! Start with two pounds of boneless, skinless chicken breasts. Place the chicken directly into the slow cooker. This meat is tender and easy to shred. Make sure the chicken is in a single layer for even cooking. In a bowl, mix together the barbecue sauce, chicken broth, and apple cider vinegar. Add one teaspoon each of garlic powder, onion powder, smoked paprika, and ground cumin. Season with salt and pepper to taste. Stir well until combined. This sauce adds great flavor to the chicken. Cover the slow cooker with the lid. Set it to low for six to eight hours or high for four hours. The chicken is ready when it is tender. Use two forks to shred the chicken in the slow cooker. Mix the shredded chicken with the remaining sauce for an extra 15 minutes on low. Toast four hamburger buns until they are golden brown. Place a generous amount of pulled chicken on the bottom half of each bun. If you like, add coleslaw and pickles on top. Finally, place the top half of the bun on the sandwich. Enjoy your savory creation! To get perfectly shredded chicken, cook it low and slow. Set your slow cooker to low for 6-8 hours. This makes the chicken tender. Use two forks to shred it easily. Mix it back into the sauce. This adds flavor and keeps it juicy. Toasting the buns can boost the taste. Heat a skillet over medium heat. Add a little butter to the skillet. Place the buns cut side down. Toast them until they are golden brown. This adds a nice crunch. You can also use a toaster if that’s easier. Feel free to adjust the seasonings to match your taste. You can add more garlic powder for a stronger flavor. Want it spicy? Add a dash of cayenne pepper. For a smokier taste, increase the smoked paprika. Always taste the sauce before serving. This way, you ensure it’s just right for you. {{image_2}} You can switch up the meat in this recipe. Instead of chicken, try pork. Pork shoulder works great, too. Just cook it the same way. Shred it after cooking and mix it with the sauce. Beef can also be a tasty option. Use brisket for a rich flavor. Each meat brings its own twist to the dish. For a plant-based choice, use jackfruit. This fruit has a texture like pulled meat. Drain and rinse canned jackfruit. Cook it in the same sauce. It will soak up the flavor well. You can also use tofu or tempeh. Marinate them in the barbecue sauce first. This makes a great vegan pulled 'chicken' sandwich. You can enhance the flavor with extra ingredients. Add chopped onions or bell peppers to the slow cooker. This adds a nice crunch and taste. Try different barbecue sauces, too. A spicy sauce can kick it up a notch. For a smoky flavor, add liquid smoke or smoked spices. Experiment with your favorite flavors to create a unique dish. To store leftover pulled chicken, let it cool first. Place it in an airtight container. Make sure to cover it well. This keeps it fresh and tasty. You can store it in the fridge for up to four days. If you have more than you can eat, freezing is a great option. For long-term storage, use freezer-safe bags or containers. Divide the pulled chicken into meal-sized portions. Squeeze out extra air from bags before sealing. Label the bags with the date. You can freeze it for up to three months. When you’re ready to eat, just thaw it in the fridge overnight. To reheat, you can use the microwave or stovetop. If using a microwave, heat on low power. Stir the chicken every minute for even warmth. For stovetop reheating, add a splash of chicken broth. This keeps it moist. Heat over low until warm. Enjoy your delicious pulled chicken sandwiches again! Yes, you can use frozen chicken breasts. However, I recommend thawing them first. Cooking from frozen can lead to uneven cooking and longer times. If you must use frozen chicken, cook on high for at least 6 hours. Always check that the chicken reaches 165°F for safety. You can keep leftovers in the fridge for about 3 to 4 days. Make sure to store them in an airtight container. This keeps the chicken moist and flavorful. If you want to keep it longer, consider freezing it. Pulled chicken sandwiches go well with many sides. Here are a few ideas: - Coleslaw - Potato salad - Corn on the cob - Baked beans - Sweet potato fries These sides add crunch and flavor to your meal, making it even more enjoyable. Yes, you can make this recipe without a slow cooker. You can use a stovetop or an oven. For stovetop, cook on low heat for about 30-40 minutes. For the oven, bake at 350°F for 25-30 minutes. Just ensure the chicken is tender enough to shred. In this post, we covered how to make slow cooker BBQ pulled chicken sandwiches. We discussed the main ingredients, optional toppings, and choice sauces. I shared step-by-step instructions for cooking and shredding chicken. You learned tips for great texture and flavor. We explored variations with different meats and vegan options. Finally, we detailed storage tips for leftovers. Now, you're ready to make your own delicious sandwiches. Enjoy every bite!

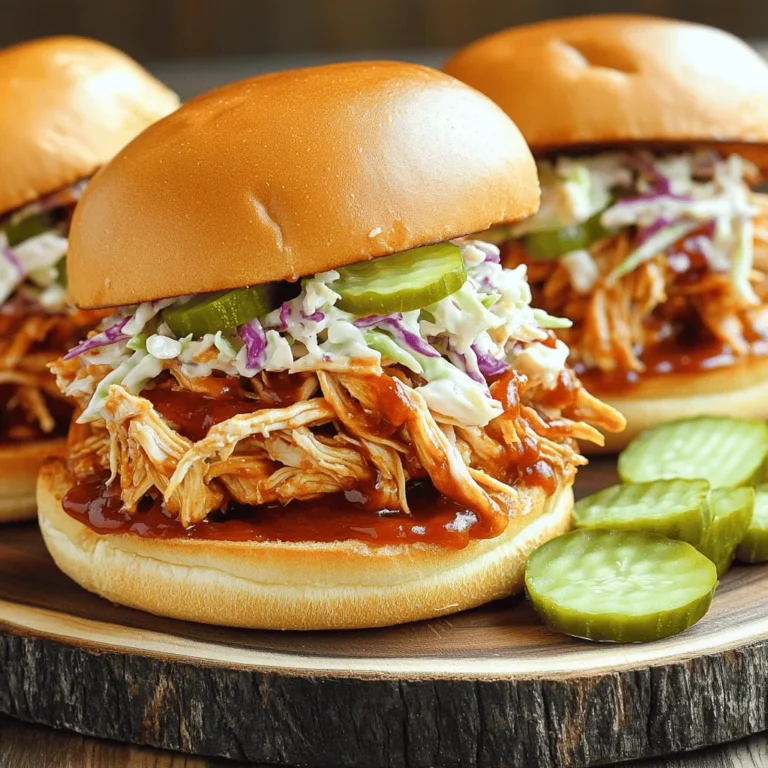
Savory Slow Cooker BBQ Pulled Chicken Sandwiches

PREV 1 … 18 19 20 … 57 NEXT
meal twig

explore

DessertsDinnerAppetizersDrinks

Our Policies

  • Cookie Policy
  • Copyright Policy
  • Disclaimer
  • GDPR Policy
  • Terms Of Use
Back to Top
  • About
  • Contact Us
  • Privacy Policy
© 2025 meal twig