FREE DINNER EBOOK! Get your copy!
  • Cookie Policy
  • GDPR Policy
  • Disclaimer
  • Terms Of Use
  • Visit my other site: Fun Cookie Recipes
meal twig
  • Home
  • Dinner
  • Desserts
  • Drinks
  • Appetizers
  • Contact
  • About
  • Privacy Policy
  • Home
  • Dinner
  • Desserts
  • Drinks
  • Appetizers
  • Contact
  • About
  • Privacy Policy
  • Cookie Policy
  • GDPR Policy
  • Disclaimer
  • Terms Of Use
Visit my other site: Fun Cookie Recipes

HOME / CATEGORIES /

Latest

You need 4 cups of apple cider. Look for fresh, unfiltered cider. It has a rich flavor that makes the float taste amazing. Grab 2 cups of vanilla ice cream. The creamy sweetness of vanilla pairs well with cider. It adds a nice texture too. Use 1/2 cup of caramel sauce. You can choose store-bought or make your own. The warm caramel drizzled on top adds a sweet surprise. Add whipped cream for a fluffy topping. It makes the float look special. Plus, it adds a lightness that balances the flavors. You will need 1/2 teaspoon of ground cinnamon. This spice gives a warm, cozy flavor. It’s perfect for fall treats. For extra flair, use sliced apples and cinnamon sticks. These garnishes make your float look pretty. They also add a bit of crunch and flavor. Start by pouring 4 cups of apple cider into a saucepan. Set the heat to medium. Warm the cider for about 5 to 7 minutes. Stir it gently as it warms. You want it hot but not boiling. Once it's warm, take the saucepan off the heat. Let it cool for a minute or two before you use it. Grab a tall glass. Add one or two scoops of vanilla ice cream to the glass. Pour the warm apple cider over the ice cream. Fill the glass almost to the top, leaving a bit of space for whipped cream. This creates a beautiful float effect. Drizzle half a cup of caramel sauce over the top of the float. Make sure to cover it well. Next, add a big dollop of whipped cream. This makes it look extra special. Finally, sprinkle ground cinnamon on the whipped cream. It adds a nice flavor and a cozy look. For a lovely touch, you can garnish your float. Add sliced apples around the edge of the glass. A cinnamon stick makes a great stirrer and looks nice too. Serve your floats right away. They taste best when cold and warm at the same time. Enjoy your festive fall treat! When picking apple cider, I always look for fresh, unfiltered options. Fresh cider has a rich apple taste. It should smell sweet and a bit spicy. Avoid cider with added sugars or artificial flavors. Local farms are the best places to find great choices. Making your own caramel sauce is easy and fun. You only need sugar, butter, and cream. Start by heating sugar in a pan until it melts. It should turn a golden color. Then, add butter and stir until smooth. Finally, mix in cream slowly, and let it cool. This sauce pairs perfectly with the cider floats. You can personalize your floats in many ways. For a spicier kick, add nutmeg or ginger. You can swap vanilla ice cream for other flavors like caramel or cinnamon. If you want a healthier twist, use coconut cream for a dairy-free option. Topping with sliced apples adds a nice crunch, too! {{image_2}} You can switch up the ice cream to make new flavors. Try using caramel ice cream for a richer taste. Chocolate ice cream adds a fun twist. For a fruity vibe, try apple or cinnamon ice cream. Each flavor brings a unique taste to your float. To make a vegan version, use dairy-free ice cream. Look for almond or coconut ice cream. Use a vegan caramel sauce, which you can find in stores or make at home. This way, you can enjoy the same delicious taste without any animal products. As the seasons change, you can add festive touches. For fall, stir in pumpkin spice or add pumpkin puree. In winter, consider adding a splash of spiced rum for adults. You can also top with crushed candy canes for a sweet holiday twist. These seasonal changes keep the floats exciting and tasty. After making your caramel apple cider floats, you might have some ingredients left. Here’s how to store them: - Apple Cider: Store it in an airtight container in the fridge. It stays fresh for up to a week. - Vanilla Ice Cream: Keep it in its original container or transfer it to a freezer-safe container. It lasts for several weeks in the freezer. - Caramel Sauce: Store it in a jar or container in the fridge. It can last for about two weeks. - Whipped Cream: If you have extra whipped cream, store it in a sealed container in the fridge. Use it within a few days. Yes, you can prepare some parts in advance, but it's best to assemble the floats fresh. You can: - Heat the Apple Cider: You can warm it up and store it in the fridge. Just reheat it when you are ready to serve. - Make the Caramel Sauce: If you are making it homemade, prepare it a day or two ahead. It keeps well in the fridge. - Prepare Garnishes: Slice apples and get your cinnamon sticks ready. Store apples in water with lemon to keep them fresh. Use these containers to keep your leftovers fresh: - Glass Jars: Great for storing caramel sauce or whipped cream. - Plastic Containers: Use these for apple cider. Ensure they are airtight. - Ice Cream Containers: Keep the ice cream in its original tub or a sturdy freezer-safe container. Storing your ingredients properly helps you enjoy your caramel apple cider floats longer! Yes, bottled apple cider works great. It saves time and effort. Just choose a good quality cider with rich flavors. You can store caramel sauce for up to two weeks. Keep it in an airtight container in the fridge. Reheat it gently before using. You can use other flavors like caramel or cinnamon ice cream. Non-dairy ice cream also works if you prefer that option. Absolutely! Kids love the sweet flavors and fun toppings. It's a great treat for family gatherings. Yes, you can easily double or triple the recipe. Just adjust the amounts of each ingredient and use a big pot for warming the cider. This article explored making delicious caramel apple cider floats. We covered ingredients like apple cider, vanilla ice cream, and caramel sauce. You learned simple steps for heating cider and assembling floats. I shared tips on choosing cider and making homemade caramel. Variations let you try different flavors, including vegan options. In the end, this treat is fun and easy to make. Enjoy your floats and share them with friends!

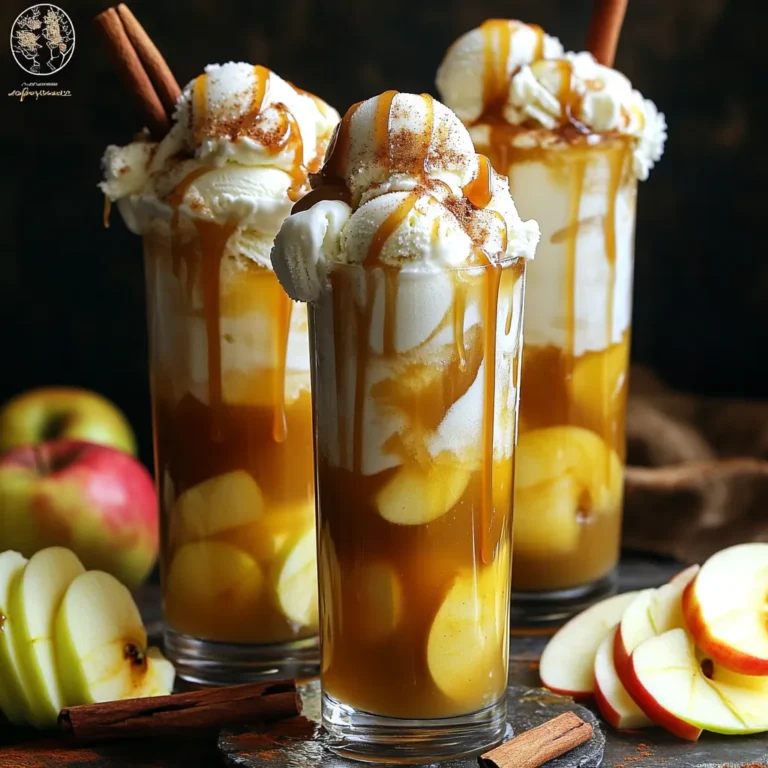
Caramel Apple Cider Floats Festive Treat for Fall

To make bakery-style pumpkin spice donuts, you need: - 1 cup all-purpose flour - 1/2 cup whole wheat flour - 1 teaspoon baking powder - 1/2 teaspoon baking soda - 1 teaspoon ground cinnamon - 1/2 teaspoon ground nutmeg - 1/4 teaspoon ground ginger - 1/4 teaspoon ground cloves - 1/2 teaspoon salt - 1/2 cup granulated sugar - 1/4 cup brown sugar, packed - 1/2 cup canned pumpkin puree - 1/4 cup unsweetened applesauce - 2 large eggs - 1/4 cup vegetable oil - 1 teaspoon vanilla extract - 1/4 cup milk (or non-dairy milk) You can swap some ingredients to fit your needs: - All-purpose flour can be replaced with gluten-free flour for a gluten-free option. - Use coconut sugar instead of granulated sugar for a lower glycemic index. - Substitute applesauce with mashed banana for a fun twist. - Instead of vegetable oil, try melted coconut oil for a richer taste. Add these to elevate your donuts: - Chopped nuts like walnuts or pecans for crunch. - Dark chocolate chips for a sweet surprise. - A touch of maple syrup in the batter for extra sweetness. - For a spice boost, add a pinch of cardamom or allspice. These ingredients create a cozy flavor that warms the heart and home. Bake these donuts to enjoy the joy of fall! Start by preheating your oven to 350°F (175°C). This step is key for even baking. While it heats, grease your donut pan well with cooking spray. This will help the donuts come out easily. In a large bowl, whisk together the dry ingredients. You need 1 cup of all-purpose flour and 1/2 cup of whole wheat flour. Add 1 teaspoon of baking powder, 1/2 teaspoon of baking soda, and spices: 1 teaspoon of ground cinnamon, 1/2 teaspoon of ground nutmeg, 1/4 teaspoon of ground ginger, and 1/4 teaspoon of ground cloves. Don’t forget the 1/2 teaspoon of salt! Mix until everything is combined. In another bowl, mix the wet ingredients. Combine 1/2 cup of granulated sugar and 1/4 cup of packed brown sugar. Add 1/2 cup of canned pumpkin puree and 1/4 cup of unsweetened applesauce. Break in 2 large eggs and pour in 1/4 cup of vegetable oil and 1 teaspoon of vanilla extract. Lastly, add 1/4 cup of milk or non-dairy milk. Stir this mixture until it’s smooth. Carefully pour the wet mixture into the dry mixture. Gently stir until just combined. It’s okay if there are a few lumps; don’t overmix! This keeps the donuts soft and fluffy. Spoon the batter into the donut pan. Fill each cavity about 3/4 of the way full. You can use a piping bag or a zip-lock bag with a corner cut off for easy filling. Bake in the preheated oven for 12-15 minutes. Check with a toothpick; it should come out clean when done. Let the donuts cool in the pan for about 5 minutes. Then, transfer them to a wire rack. If you want, while they are still warm, roll them in cinnamon sugar for extra flavor. Enjoy the warm, cozy smell of pumpkin spice filling your kitchen! To get that perfect bakery-style texture, focus on your flour mix. Use both all-purpose and whole wheat flour. This mix adds flavor and a nice bite. The baking powder and baking soda help the donuts rise. They give you that fluffy feel. Always measure your flour correctly. Too much flour can make them dense. Mix your wet and dry ingredients gently. Stir until just combined. It’s okay if you see some lumps. Overmixing makes donuts tough, not soft. A few lumps mean you keep air in the batter. This helps the donuts rise and stay light. While the donuts are warm, roll them in cinnamon sugar. This adds a sweet crunch. To make the mix, use equal parts sugar and cinnamon. This simple touch makes your donuts extra special. You can also try icing or chocolate glaze for a fun twist. {{image_2}} You can make these donuts gluten-free. Use a gluten-free flour blend instead of all-purpose and whole wheat flour. This swap keeps the texture light and fluffy. Make sure to check the blend for added gum; it helps with structure. If you love bite-sized treats, mini pumpkin donuts are perfect. Use a mini donut pan instead of a standard one. They bake just as well, but watch the time. Mini donuts need about 8 to 10 minutes in the oven. Get creative with your toppings! You can roll the donuts in cinnamon sugar for a classic touch. Or dip them in a maple glaze for a sweet twist. Simply mix powdered sugar with maple syrup and a bit of milk for a smooth glaze. You can also drizzle melted chocolate for a fun flavor. Each option adds its own charm. Store your pumpkin spice donuts in an airtight container. Keep them at room temperature for up to three days. If you want to keep them longer, refrigeration is an option. However, this may change their texture. To avoid drying them out, wrap them in plastic wrap before placing them in the fridge. If you have extra donuts, freezing is a great way to save them. Wrap each donut in plastic wrap tightly. Then, place them in a freezer bag or a container. They will stay fresh for up to three months. When you're ready to eat, simply thaw them at room temperature. To enjoy warm donuts, you can reheat them in the microwave. Heat them for about 10-15 seconds. Check if they are warm enough; if not, add a few more seconds. You can also use an oven. Preheat it to 350°F (175°C) and bake them for about 5-7 minutes. This method helps keep them fluffy and fresh. Enjoy your cozy fall treat! Yes, you can use fresh pumpkin. Just cook and puree it first. Fresh pumpkin will give a nice taste. Make sure to drain excess water to avoid a wet batter. To make these donuts healthier, try these tips: - Use whole wheat flour instead of all-purpose. - Replace granulated sugar with a natural sweetener like maple syrup. - Use unsweetened applesauce in place of oil for a lighter option. These swaps keep the taste while reducing calories. If your batter is too thick, add a little milk. Start with a tablespoon and mix well. Keep adding until it reaches a smoother consistency. This helps the donuts bake evenly. These donuts last for up to three days at room temperature. Store them in an airtight container to keep them fresh. For longer storage, consider freezing them. Yes, you can make these donuts ahead of time. Bake them, let them cool, and store them in the fridge. They stay good for three days. Reheat them briefly before serving for a warm treat. In this post, we covered how to make delicious pumpkin spice donuts. We discussed the ingredients you need, along with some swaps and extras for flavor. You learned step-by-step how to bake and coat your donuts. I shared tips for great texture and preventing overmixing, plus tasty variations. Now you can store your extras and reheat them easily. Enjoy baking these treats, share with others, and impress your friends and family!

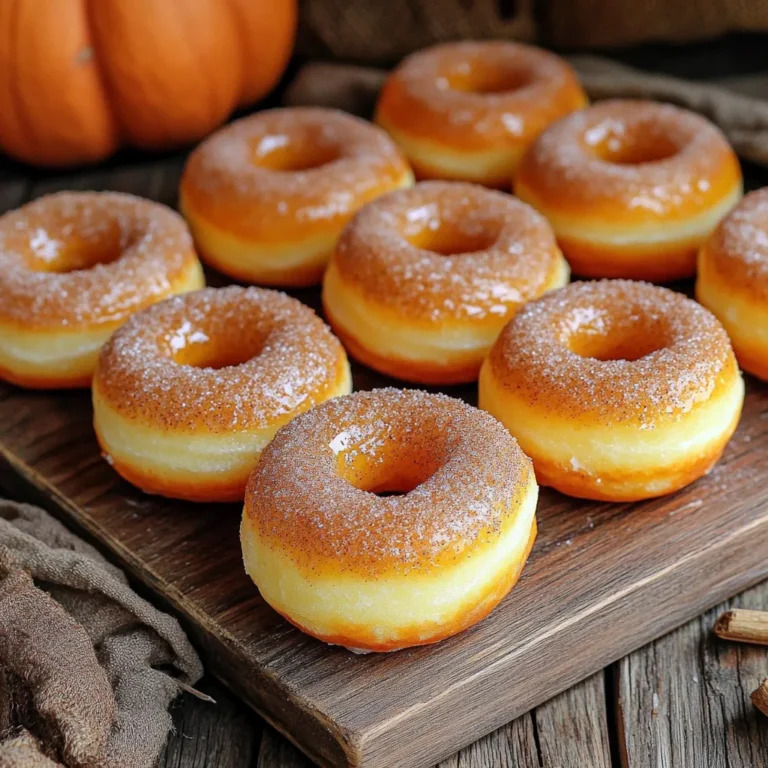
Bakery-Style Pumpkin Spice Donuts Cozy Fall Treat

- 8 oz fettuccine pasta - 1 lb large shrimp, peeled and deveined - 4 cloves garlic, minced - 1 cup heavy cream - 1 cup grated Parmesan cheese - 2 tablespoons olive oil - 1 tablespoon butter - Salt, pepper, and red pepper flakes - Fresh parsley, chopped This dish is all about fresh and simple ingredients. The fettuccine pasta forms a great base. The shrimp adds protein and a lovely texture. Garlic gives the dish its bold flavor. In terms of creaminess, the heavy cream does wonders. Parmesan cheese adds a salty, nutty kick. Olive oil and butter create a rich sauce that binds all the flavors. Don’t forget the seasoning. Salt and pepper elevate the taste. Red pepper flakes add heat if you like spice. Fresh parsley brightens the dish, making it look pretty too. Gather these ingredients before you start cooking. This will make the process quick and easy. With everything ready, you will enjoy this meal in no time! To start, fill a large pot with water and add a generous amount of salt. This step helps flavor the pasta. Bring the water to a boil. Once boiling, add 8 oz of fettuccine. Cook it according to the package instructions until al dente. This means the pasta should be firm but cooked through. After cooking, reserve ½ cup of pasta water before draining the fettuccine. Set the drained pasta aside for later. Next, grab a large skillet and place it over medium-high heat. Add 2 tablespoons of olive oil and 1 tablespoon of butter to the pan. Once the butter melts, add 4 minced garlic cloves. Sauté the garlic for about 30 seconds until it becomes fragrant. Then, add 1 lb of peeled and deveined shrimp to the skillet. Season the shrimp with salt, pepper, and optional red pepper flakes. Cook the shrimp for about 2-3 minutes on each side. Look for the shrimp to turn pink and opaque. Once cooked, remove the shrimp from the skillet and set them aside. In the same skillet, pour in 1 cup of heavy cream. Bring it to a gentle simmer over medium heat. Once it simmers, stir in 1 cup of grated Parmesan cheese. Mix it well until the cheese melts and creates a creamy sauce. If the sauce feels too thick, add a little of the reserved pasta water to adjust the consistency. This step makes the sauce smooth and perfect for coating the pasta. Now, it’s time to bring everything together. Add the cooked fettuccine and the shrimp back into the skillet. Toss all the ingredients together until the pasta and shrimp are well coated in the creamy garlic sauce. For a fresh touch, chop some parsley and sprinkle it over the top before serving. This not only adds color but also a burst of flavor. Divide the pasta among plates, and enjoy your delicious meal! To cook pasta al dente, boil salted water. Add the fettuccine and cook until tender but firm. This keeps the pasta from becoming mushy. After cooking, reserve ½ cup of pasta water. Use a measuring cup to scoop it out before draining the pasta. This water adds flavor and helps the sauce stick. You can add extra spices to boost flavor. Try thyme or basil for a fresh taste. For heat, red pepper flakes work great. To balance the creaminess, start with less cream. Add it slowly to find your perfect texture. If the sauce feels too rich, a splash of pasta water lightens it up. Pair your pasta with a side salad or garlic bread. A crisp green salad cuts through the creaminess. For presentation, use a large bowl or plate. Twirl the pasta for a beautiful look. Top with fresh parsley for color and taste. A sprinkle of extra Parmesan also adds a nice touch. {{image_2}} You can easily change up the seafood in this dish. Adding scallops or crab adds a sweet touch. Just cook them the same way as the shrimp. If you want a twist, try using shrimp alternatives like langoustines or even fish. These options still give you that great seafood flavor. If you prefer a meat-free meal, there are tasty swaps. Substitute shrimp with mushrooms or zucchini for a hearty texture. You can also make a creamy garlic pasta without any seafood. Use the same creamy sauce, but mix in your favorite veggies like spinach or bell peppers. This keeps the dish rich and satisfying. To deepen the flavor of the sauce, consider adding a splash of white wine. This gives the sauce a nice zing. You can also mix in sun-dried tomatoes or fresh spinach. This adds color and extra nutrients. Adjust the sauce to your liking for a fun twist on the classic recipe. To store creamy garlic shrimp pasta, let it cool first. Place the pasta in an airtight container. You can keep it in the fridge for up to three days. If you want to freeze it, use a freezer-safe container. It can last for about two months in the freezer. When reheating, the best method is to use the stove. Add a splash of water or cream to a skillet. Heat it gently on medium-low. This keeps the pasta creamy and soft. Avoid using the microwave as it can dry out the dish. If the sauce thickens after storage, just add a bit more reserved pasta water or cream. This helps restore its smooth texture. This creamy garlic shrimp pasta comes together fast. You need only 5 minutes to prep. Cooking takes about 10 minutes. In total, it takes just 15 minutes to make. Yes, you can make this dish dairy-free. Use coconut cream instead of heavy cream. For cheese, try nutritional yeast or a dairy-free alternative. Both options keep the creamy texture and flavor. Many sides go well with shrimp pasta. A fresh garden salad adds crunch. Garlic bread is great for soaking up sauce. Roasted vegetables also make a nice side. You can use frozen shrimp! Just thaw them first. Place shrimp in cold water for about 15 minutes. Cook them as you would fresh shrimp. They will taste just as good! In this blog post, we explored how to make a delicious creamy garlic shrimp pasta. We covered the key ingredients, step-by-step cooking instructions, and helpful tips. You learned how to enhance flavors and explore variations. Plus, we shared storage and reheating advice. Cooking this dish can be fun and simple. With practice, you can impress anyone with your skills. Enjoy your next meal!

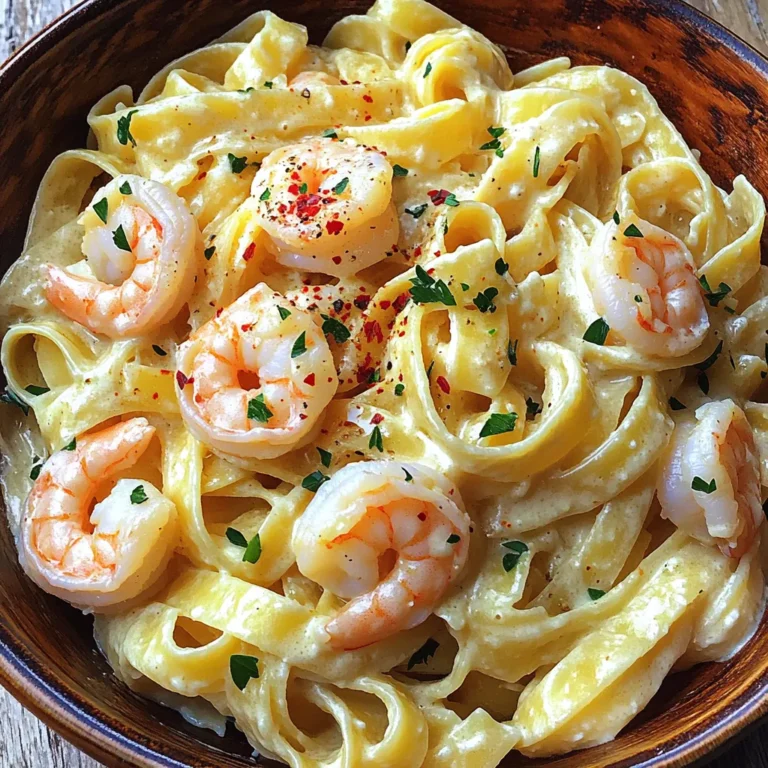
Minute Creamy Garlic Shrimp Pasta Quick and Easy Recipe

- 1 can (8 oz) refrigerated crescent roll dough - 1/4 cup brown sugar - 1 tablespoon ground cinnamon - 2 tablespoons unsalted butter, melted - 1/4 cup powdered sugar (for icing) - 1 tablespoon milk (for icing) - 1/2 teaspoon vanilla extract (for icing) You can use other types of roll dough if you can't find crescent roll dough. For a healthier twist, try using whole wheat dough. If you want to skip the sugar, use a sugar substitute like stevia. You can also mix in chopped nuts or chocolate bits for extra flavor. If you don't have vanilla extract, try almond extract for a different taste. You will need an air fryer for this recipe. It cooks the bites quickly and gets them crispy. You will also need a small bowl for mixing the sugar and cinnamon. A clean surface helps when rolling out the dough. A sharp knife or pizza cutter works well for slicing the dough into bites. Lastly, have a whisk on hand for mixing the icing smoothly. 1. Start by unrolling the crescent roll dough on a clean surface. 2. Press the seams of the triangles together to form a rectangle. 3. In a small bowl, mix the brown sugar and ground cinnamon. 4. Brush the melted butter evenly over the dough. 5. Sprinkle the cinnamon-sugar mixture on the buttered dough. 6. Roll the dough tightly from one end to the other to form a log. 7. Slice the rolled dough into 1-inch pieces. 1. Preheat the air fryer to 350°F (175°C) for about 5 minutes. 2. Arrange the cinnamon roll bites in a single layer in the air fryer basket. 3. Make sure to leave a little space between each piece for even cooking. 1. Cook the bites in the air fryer for 8-10 minutes. 2. Check for a golden brown color and puffed texture to know they are done. 3. While they cook, prepare the icing by mixing powdered sugar, milk, and vanilla extract in a bowl. 4. Adjust the icing's thickness with more milk if needed. 5. Once cooked, let the cinnamon roll bites cool for a couple of minutes. 6. Drizzle the icing over the warm bites before serving. To get the best crispiness from your Air Fryer Cinnamon Roll Bites, follow these tips: - Preheat your air fryer. This step helps the bites cook evenly. - Arrange bites with space. Leave a small gap between each piece in the basket. - Cook in batches. If you have a lot, do not overcrowd the basket. - Check doneness. Look for a golden brown color. This means they are ready. Here are some common mistakes that can ruin your cinnamon roll bites: - Not sealing seams. Make sure to press the dough seams together well. - Skipping the butter. Brushing melted butter is key for flavor and crispness. - Ignoring cooking time. Keep an eye on them; they can burn quickly. - Not cooling before icing. Wait a few minutes after cooking to avoid melting the icing. These cinnamon roll bites shine on their own, but you can enhance the experience: - Serve with coffee or tea. A warm drink pairs perfectly with the bites. - Add fruit. Fresh berries or sliced bananas can brighten the dish. - Try different dips. Cream cheese or chocolate sauce adds variety. - Garnish with nuts. Chopped pecans or walnuts provide a nice crunch. {{image_2}} You can easily make Air Fryer Cinnamon Roll Bites even more exciting. Add nuts or chocolate to the filling. Chopped pecans or walnuts bring a nice crunch. Just sprinkle them on top of the cinnamon-sugar mix. If you love chocolate, try mini chocolate chips. Use about 1/4 cup for a rich flavor. These tweaks make each bite special and fun! If you need a gluten-free treat, don’t worry! You can use gluten-free crescent roll dough. Many brands offer this option. Just follow the same steps as the original recipe. The taste will still be great. Check the package for baking times, as they may vary slightly. Seasonal flavors can make your treats more festive. For fall, consider pumpkin spice. Just mix 1 tablespoon of pumpkin pie spice into the brown sugar. It adds warmth and that cozy autumn feel. In winter, try adding a bit of peppermint extract to the icing. These seasonal twists keep your Air Fryer Cinnamon Roll Bites fun all year round! To keep your cinnamon roll bites fresh, store them in an airtight container. Place a layer of parchment paper between the bites to prevent sticking. They will stay good at room temperature for about two days. If you want them to last longer, refrigerate them. For the best taste, eat them within four days. When you're ready to enjoy your leftovers, reheat them in the air fryer. Set the air fryer to 350°F (175°C) and heat for about 3-5 minutes. This method keeps them warm and crispy. You can also use a microwave, but this may make them a bit soft. Heat them for 10-20 seconds in the microwave if you choose this method. To freeze your cinnamon roll bites, let them cool completely first. Arrange them in a single layer on a baking sheet and freeze for about an hour. Once frozen, transfer the bites to a freezer-safe bag. They can stay in the freezer for up to two months. When ready to enjoy, air fry them straight from the freezer for about 10-12 minutes. Yes, you can use other types of dough. Biscuit dough works well for a fluffy texture. You can also try puff pastry for a flaky version. Each type adds its own flavor. Just roll, fill, and cut as you would with crescent roll dough. Check the bites after 8 minutes. They should be golden brown and puffed up. You can also insert a toothpick into the center. If it comes out clean, they are ready. If not, give them another minute or two. Yes, you can make the icing before cooking. Mix the powdered sugar, milk, and vanilla in advance. Store it in the fridge in a sealed container. Just stir it before using, as it may thicken a bit. This article covered all you need for making tasty cinnamon roll bites. We talked about the right ingredients, measurements, and tools for success. The step-by-step guide will help you cook them perfectly in an air fryer. I shared tips for crispiness and common mistakes to avoid. You also learned about fun flavor variations and how to store leftovers safely. Always feel free to try new ideas. With these tips, you will impress your family and friends with your baking skills!

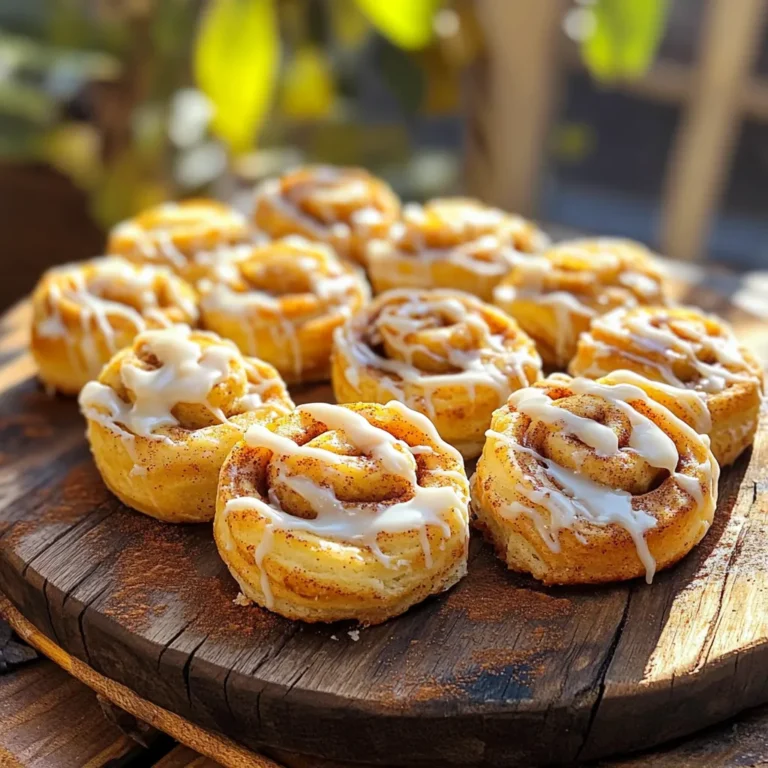
Air Fryer Cinnamon Roll Bites Easy and Delicious Treat

- 2 cups cooked chickpeas (or 1 can, drained and rinsed) - 1 medium onion, finely chopped - 2 cloves garlic, minced - 1 large carrot, diced - 1 red bell pepper, diced - 1 zucchini, diced - 1 can (14 oz) diced tomatoes - 2 cups vegetable broth - 1 tablespoon olive oil - 2 teaspoons ground cumin - 1 teaspoon ground coriander - 1 teaspoon smoked paprika - 1 teaspoon turmeric - 1/2 teaspoon cinnamon - Salt and pepper to taste - 1/4 cup dried apricots, chopped - Fresh cilantro or parsley for garnish - Cooked couscous or quinoa for serving (optional) Using fresh produce makes a big difference. Look for bright, firm vegetables. They taste better and add color to your stew. For the chickpeas, choose high-quality canned ones or cook your own. This adds a nice texture. Spices are key to Moroccan flavors. Use fresh spices if possible. They give a deeper flavor to the dish. For the broth, a low-sodium version is best. It lets you control the salt level. You can easily adjust this recipe to fit your diet. Here are some ideas: - Chickpeas: Use black beans or lentils if you want a change. - Vegetables: Swap in your favorite veggies. Try sweet potatoes or spinach! - Oil: You can use coconut oil or avocado oil instead of olive oil. - Broth: For a richer flavor, use homemade vegetable stock. - Sweetener: If you prefer, use honey or maple syrup instead of dried apricots. These swaps keep your stew tasty while fitting your needs. First, gather all your ingredients. You will need cooked chickpeas, onion, garlic, carrot, bell pepper, zucchini, diced tomatoes, vegetable broth, olive oil, and spices. This mix creates a rich flavor. The dried apricots add a nice touch of sweetness. 1. Start by heating olive oil in a pan over medium heat. 2. Add the chopped onion and minced garlic. Sauté until the onion is clear. 3. Transfer the onion and garlic to your slow cooker. 4. Next, add the broth, diced tomatoes, carrots, bell pepper, zucchini, and chickpeas. 5. In a small bowl, mix cumin, coriander, smoked paprika, turmeric, cinnamon, salt, and pepper. 6. Stir this spice mix into the slow cooker. 7. Toss in the chopped apricots. Mix everything well. 8. Cover the slow cooker. Set it on low for 6-8 hours or high for 3-4 hours. 9. Check if the veggies are soft and flavors blend well. 10. Before serving, taste and change seasoning as needed. 11. Serve hot, topped with fresh cilantro or parsley. Enjoy it over couscous or quinoa. You can cook this stew on low for 6-8 hours. This method lets flavors deepen. If short on time, use high for 3-4 hours. Both methods yield a tasty stew. To boost the taste, use fresh herbs. Fresh cilantro or parsley can brighten the dish. Adding a squeeze of lemon juice right before serving gives a nice zing. If you like heat, try adding a pinch of cayenne pepper. It adds warmth without overpowering the stew. One common mistake is not sautéing the onion and garlic. Sautéing brings out their flavors. Another mistake is adding salt too early. Wait until the dish is nearly done. This lets the flavors build without becoming too salty. Lastly, don’t skip the dried apricots. They add a sweet touch that balances the spices perfectly. Serve the stew over cooked couscous or quinoa for extra texture. This makes it filling and satisfying. You can also pair it with crusty bread to soak up the delicious sauce. For an added crunch, top the stew with toasted almonds or pine nuts. Enjoy it with a side salad for a fresh contrast. {{image_2}} This Slow Cooker Moroccan Chickpea Stew is perfect for vegan and gluten-free diets. The base is already vegan since it uses chickpeas, vegetables, and spices. To ensure it stays gluten-free, always check your vegetable broth. Many brands offer gluten-free options. This stew is rich in flavor and will satisfy everyone at your table. Feel free to adjust the recipe to fit your taste. You can swap chickpeas for lentils or black beans. If you love heat, add diced jalapeños or a pinch of cayenne pepper. Prefer a sweeter stew? Try adding raisins instead of apricots. You can also mix in your favorite veggies, like sweet potatoes or spinach, for extra nutrition. Toppings can enhance the stew's flavor and texture. Consider adding a dollop of plain yogurt or a drizzle of tahini for creaminess. Fresh herbs, like mint or basil, add a pop of freshness. Crushed nuts, like almonds or pistachios, provide a nice crunch. Serve the stew with a side of warm pita or crusty bread to soak up the delicious sauce. After you finish your stew, let it cool down. Store it in an airtight container. This keeps the flavors fresh. You can keep it in the fridge for up to 5 days. If you want to keep it longer, consider freezing it. To reheat, take the stew out of the fridge. You can warm it on the stove over medium heat. Stir it often until it’s hot. You can also use the microwave. Heat it in short bursts, stirring in between. This helps it heat evenly. For freezing, use freezer-safe containers. Leave some space at the top for expansion. The stew can last in the freezer for up to 3 months. When you want to eat it, move it to the fridge to thaw overnight. Then, reheat as mentioned above. This makes meal prep easy and tasty! Yes, you can use dried chickpeas. Just soak them overnight first. After soaking, cook them until tender. This can take about 1 to 2 hours. Using dried chickpeas adds a rich texture. It may also enhance the flavor of your stew. You can serve this stew with cooked couscous or quinoa. Both add great texture and flavor. You can also pair it with warm bread. Try serving it with a side salad for freshness. Add some yogurt for creaminess and a nice touch. You can store this stew in the fridge for up to 4 days. Make sure to keep it in an airtight container. This helps keep the flavors fresh. When ready to eat, just reheat it on the stove or in the microwave. Enjoy it as a quick meal option! This blog post covered the important steps for making Moroccan chickpea stew. We went over the needed ingredients, how to cook it, and the right storage methods. I shared tips to enhance your dish and offered variations for different diets. Remember, using fresh ingredients sets the flavor apart. Avoiding common mistakes makes cooking easier. Try serving it with rice or bread. With these insights, you can create a meal that is tasty and satisfying every time. Enjoy your cooking journey with this dish!

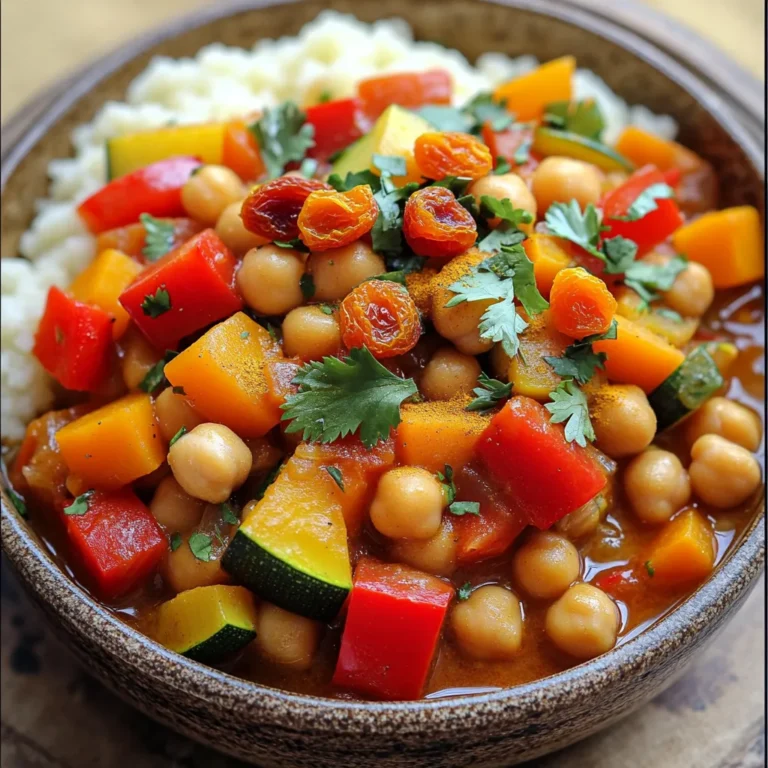
Slow Cooker Moroccan Chickpea Stew Flavorful Meal

To make No-Bake Peanut Butter Oatmeal Cups, you need these simple ingredients: - 1 cup rolled oats - 1/2 cup natural peanut butter - 1/4 cup honey or maple syrup - 1/4 cup mini chocolate chips - 1/4 cup chopped nuts (like almonds or walnuts) - 1/2 teaspoon vanilla extract - A pinch of salt If you can't find some ingredients, don't worry! Here are easy swaps: - Use almond butter instead of peanut butter for a nut-free treat. - Swap honey for agave syrup if you want a vegan option. - Instead of mini chocolate chips, try dried fruit for a healthier twist. - Use sunflower seeds if you need a nut-free alternative for chopped nuts. Each serving of these delightful cups packs a good balance of nutrients: - Calories: 120 - Protein: 3g - Carbohydrates: 15g - Fat: 6g - Fiber: 2g - Sugar: 5g These cups are not only tasty but also provide energy and satisfaction. Enjoy these ingredients to create a fun and healthy snack! To begin, gather all your ingredients. You'll need rolled oats, peanut butter, honey or maple syrup, mini chocolate chips, chopped nuts, vanilla extract, and a pinch of salt. Measure out one cup of rolled oats and put it in a mixing bowl. Add a pinch of salt and stir them together. This helps to evenly distribute the salt. Next, take a microwave-safe bowl. Add half a cup of natural peanut butter and a quarter cup of honey or maple syrup. Microwave this mixture for about 20 to 30 seconds. You want it to be slightly melted so it's easy to mix. Once melted, stir in half a teaspoon of vanilla extract until the mix is smooth. Now pour this peanut butter mixture over the oats in your bowl. Mix well until every oat is coated. Then, fold in the mini chocolate chips and chopped nuts. This adds a nice crunch and sweetness to your cups. Now, it's time to shape your cups. Line a muffin tin with cupcake liners. Evenly distribute your mixture into each liner. Be sure to press down firmly; this helps the cups hold their shape. Once filled, place the muffin tin in the refrigerator. Let it chill for at least 30 minutes. This will help the cups firm up. After they set, gently remove them from the tin. Enjoy your tasty no-bake treats! To get the right texture, use rolled oats. They give a chewy bite. Quick oats can turn mushy. Mix the peanut butter and honey well. This helps the oats stick together. Press the mixture firmly into the muffin tin. A compact cup holds its shape better. Let them chill in the fridge for at least 30 minutes. This will firm them up nicely. You can add more flavor to your cups. Try different nut butters like almond or cashew. Swap the honey for maple syrup for a unique taste. Add spices like cinnamon or cocoa powder for extra depth. For crunch, use different nuts like pecans or pistachios. You can also add dried fruits like cranberries or raisins. This makes your cups more exciting and tasty. Avoid using too much liquid. It can make the cups too soft. If your mixture feels too sticky, add more oats. Don't skip the salt; it brings out the sweetness. Be careful not to overmix. This can break down the oats and change the texture. Lastly, don’t rush the chilling step. If you skip it, your cups may fall apart. {{image_2}} If you want to skip nuts, use sunflower seed butter. It gives a nice taste without the nuts. You can also use tahini for a different flavor. Both options are safe for schools and nut-free zones. Get creative with flavors! Swap honey for maple syrup for a sweet twist. Try adding dried fruits like raisins or cranberries for extra chewiness. You can also mix in spices like cinnamon or cocoa powder for a fun kick. To make these cups vegan, simply use maple syrup instead of honey. For a gluten-free treat, ensure your oats are certified gluten-free. This way, everyone can enjoy these tasty cups without worry. To keep your no-bake peanut butter oatmeal cups fresh, store them in an airtight container. This prevents moisture from getting in and keeps them tasty. You can use a glass jar or a plastic container. Always place a piece of parchment paper between layers if you stack them. This keeps them from sticking together. These tasty cups last about one week in the fridge. If you want to keep them longer, consider freezing them. Place each cup in a small freezer bag. Make sure to remove as much air as possible. They can stay good for up to three months in the freezer. Just remember to label the bags with the date. You don’t need to reheat these cups. They taste great cold or at room temperature. If you prefer them warm, you can microwave them for a few seconds. Just be careful not to overheat them; this can change the texture. Enjoy them as a quick snack or a sweet treat anytime! Yes, you can use other nut butters. Almond butter or cashew butter works well. You can even try sunflower seed butter for a nut-free option. Each nut butter gives a unique flavor and texture. Just make sure the nut butter is smooth for easy mixing. To make these cups healthier, try these tips: - Use less sweetener like honey or maple syrup. - Replace chocolate chips with dried fruit or seeds. - Add chia seeds or flaxseeds for extra fiber. These changes lower sugar and boost nutrients. Yes, these cups are great for kids! They are easy to make and taste yummy. Kids can help mix ingredients. They make a perfect snack or treat. Just be sure to check for nut allergies before serving. You can customize your oatmeal cups in many ways: - Add different mix-ins like dried fruit or seeds. - Swap honey for agave or maple syrup. - Try different flavors of nut butter. - Experiment with spices like cinnamon or cocoa powder. This way, you can create a version that fits your taste! You’ve learned about ingredients, preparation, and storage for oatmeal cups. I shared tips to avoid mistakes and suggested tasty variations. Remember, these cups are flexible and fun to customize. Adjust them to fit your taste and diet. Perfect for kids, they pack nutrition into every bite. Enjoy making them your own, and don't forget to share your results. These oatmeal cups can become a delicious and healthy staple. Dive in, experiment, and make it a treat you love!

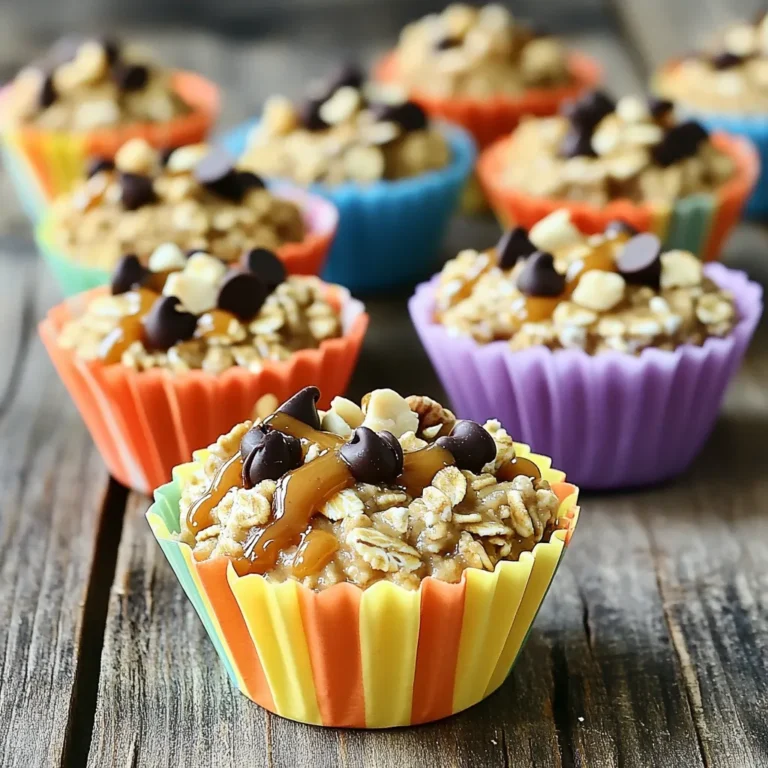
No-Bake Peanut Butter Oatmeal Cups Simple Treat

- 2 boneless, skinless chicken breasts, sliced thinly - 8 oz. rice noodles - 1 cup broccoli florets - 1 bell pepper, thinly sliced (any color) - 1 carrot, julienned - 1/4 cup soy sauce - 2 tablespoons honey - 1 tablespoon sesame oil - 1 teaspoon fresh ginger, grated - 1 teaspoon garlic powder - 1 tablespoon sesame seeds (for garnish) - Green onions, chopped (for garnish) - Salt and pepper to taste It takes just 5 minutes to prep all your ingredients. You will be ready to cook in no time. The total time for this meal is 15 minutes. You can serve this dish for four people. This teriyaki chicken noodle bowl serves four. It is perfect for a quick family meal or a lunch with friends. You can easily double the recipe if you have more guests. Each bowl has a colorful mix of chicken, veggies, and noodles, making it tasty and fun to eat. Start by boiling a pot of water. Use enough water to cover the noodles. Once the water is boiling, add the rice noodles. Cook them for about 4-5 minutes. Check the package for exact times. After they are done, drain the noodles and set them aside. Next, heat a large skillet over medium heat. Add 1 tablespoon of sesame oil to the hot skillet. Then, add the sliced chicken. Season it with salt, pepper, and garlic powder. Cook the chicken for about 3-4 minutes. Make sure it turns golden and is no longer pink inside. This way, you get perfectly cooked chicken. Now it’s time to add some color and crunch. Toss in the broccoli, bell pepper, and julienned carrot. Stir-fry them together for 2-3 minutes. You want the veggies to be tender yet still crisp. This keeps them fresh and tasty. For the sauce, grab a small bowl. Mix together the soy sauce, honey, and grated ginger. Pour this mixture over the chicken and veggies in the skillet. Cook everything together for about 2 minutes. This helps the sauce thicken and coat your mix with flavor. Now, it’s time to bring it all together. Add the cooked rice noodles to the skillet. Gently toss everything together. Make sure the noodles are coated with the teriyaki sauce and heated through. This step makes each bite delicious. Once everything is mixed and heated, remove the skillet from heat. Let it rest for a minute. Then, serve the noodle bowls in individual dishes. For a nice touch, garnish with sesame seeds and chopped green onions. This adds flavor and looks great! To cook fast, prep work is key. Gather all your ingredients first. Measure and slice everything before you start cooking. This saves time and helps you stay organized. Using pre-cut vegetables can also speed things up. You can find them in stores, and they taste great. For extra flavor, try adding spices. A pinch of red pepper flakes can give heat. You can also add sesame seeds to boost taste and crunch. If you want a different flavor, swap soy sauce for tamari for gluten-free. Honey can be replaced with maple syrup for a vegan option. Be careful not to overcook your chicken. It should be juicy, not dry. Vegetables should stay crisp, so stir-fry them quickly. Also, let your sauce thicken properly. If it's too runny, it won't cling well to the noodles. This can make your dish less tasty. {{image_2}} You can switch up the protein in your teriyaki chicken noodle bowls. Try using tofu for a tasty vegan option. Firm tofu absorbs flavors well and gives a nice texture. Shrimp is another great choice. It cooks fast and adds a sweet flavor. For a beef option, use thinly sliced flank steak. Seasonal vegetables can add a fresh twist. Zucchini and snap peas work great in the spring. In the fall, add butternut squash or mushrooms for warmth. You can also toss in some baby corn or bean sprouts for crunch. For more flavor, add garlic or scallions when cooking the veggies. If you need a gluten-free option, use rice noodles or quinoa instead of regular noodles. For soy sauce, choose a gluten-free version made from tamari or coconut aminos. These options keep the taste bold and delicious. Always check labels to ensure your choices are truly gluten-free. To keep your teriyaki chicken noodle bowls fresh, store them in an airtight container. Make sure the dish cools down to room temperature before sealing. This helps prevent moisture buildup. You can enjoy your leftovers for up to four days in the fridge. For best results, reheat your noodle bowls in a skillet over low heat. This method warms the dish evenly and helps maintain the texture. You can add a splash of water or soy sauce to keep them moist. Stir often until heated through. If you want to freeze your noodle bowls, use freezer-safe containers. Divide the dish into portions for easy thawing later. When ready to eat, move a portion to the fridge overnight to thaw. To reheat, use a microwave or skillet, and add a bit of liquid to keep it from drying out. It takes about 15 minutes to make teriyaki chicken noodle bowls. You can cook the noodles in just 4-5 minutes. The chicken and veggies cook quickly in a skillet. This makes it perfect for a busy weeknight meal. Yes, you can prepare some parts in advance. Cook the chicken and veggies ahead of time. You can also make the teriyaki sauce and store it in the fridge. Just reheat everything when you're ready to eat. If you can't use soy sauce, try tamari or coconut aminos. Both have a similar flavor. You can also use a mix of balsamic vinegar and water for a different taste. To add spice, include red pepper flakes or sriracha. You can also use spicy sesame oil in place of regular sesame oil. Start with a little, then add more to taste. Yes, you can make a low-carb version. Use zucchini noodles or shirataki noodles instead of rice noodles. You can keep the chicken and veggies the same for a tasty meal. This blog post guides you through making delicious teriyaki chicken noodle bowls. We covered key ingredients, preparation steps, and storage tips. I shared cooking tricks to help you avoid common mistakes and variations to suit your taste. In the end, making this dish is fun and rewarding. You can create a tasty meal your whole family will love. Enjoy experimenting with flavors and ingredients to make it your own!

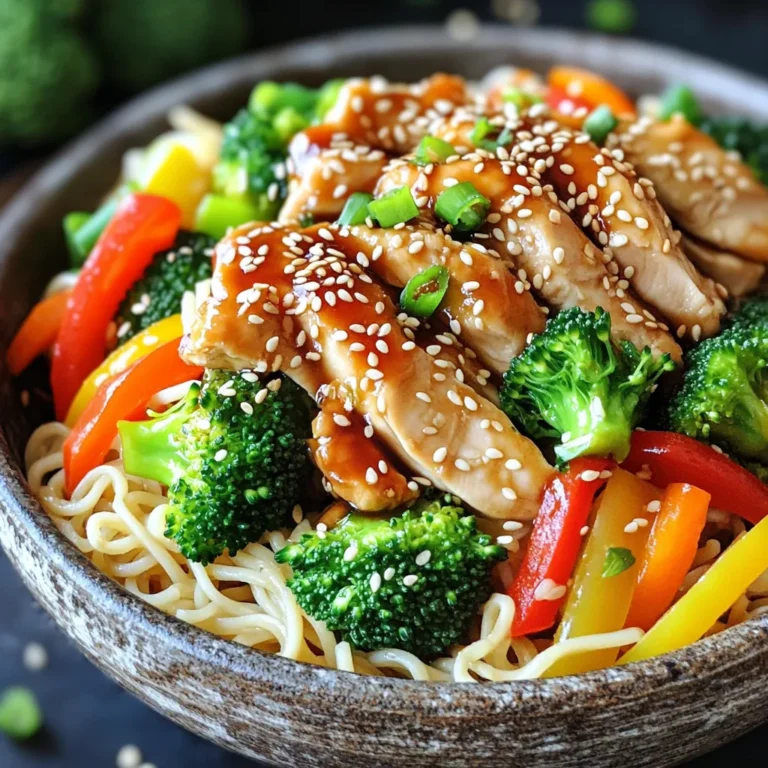
Teriyaki Chicken Noodle Bowls Quick and Flavorful Meal

- 12 oz fettuccine or spaghetti - 3 tablespoons olive oil - 4 cloves garlic, minced - Zest of 1 lemon - Juice of 2 lemons - 1 cup vegetable broth - 1 cup heavy cream - 1 cup freshly grated Parmesan cheese - 1 teaspoon red pepper flakes (optional) - Salt and freshly cracked black pepper to taste - 2 tablespoons chopped fresh parsley, for garnish Gather these ingredients before you start cooking. The fettuccine or spaghetti forms the base of the dish. Olive oil adds richness and flavor. Minced garlic gives that great aroma. Lemon zest and juice will brighten everything up. Next, you need vegetable broth to cook the pasta. Heavy cream makes the sauce rich and smooth. Parmesan cheese adds a savory touch. For seasoning, red pepper flakes give a bit of heat, but you can skip them if you want. Salt and pepper enhance all the flavors. Fresh parsley adds a nice pop of color and freshness as a garnish. These simple ingredients come together for a creamy, delicious meal in just one pot! 1. Start by heating 3 tablespoons of olive oil in a large pot over medium heat. 2. Add 4 cloves of minced garlic and, if you like heat, a teaspoon of red pepper flakes. Sauté for about 1-2 minutes until the garlic smells fragrant but not browned. 3. Next, stir in the zest of one lemon and the juice of two lemons. Mix well to blend the flavors. 1. Now, add 12 ounces of uncooked fettuccine or spaghetti to the pot. 2. Pour in 1 cup of vegetable broth and 1 cup of heavy cream. Stir everything together to ensure the pasta is well submerged in the liquid. 3. Bring this mixture to a gentle boil. Then, lower the heat and cover the pot. Cook for about 10-12 minutes, stirring occasionally, until the pasta is al dente and has absorbed most of the liquid. 1. Once the pasta is cooked, take the pot off the heat. Stir in 1 cup of freshly grated Parmesan cheese. Mix until the sauce is creamy and smooth. 2. Taste and adjust with salt and freshly cracked black pepper. 3. Let it sit for a couple of minutes to thicken slightly. Serve it hot, garnished with extra Parmesan, a sprinkle of chopped fresh parsley, and a lemon slice for a bright touch. To cook pasta perfectly, use a big pot. Fill it with water and add salt. Bring it to a boil before adding the pasta. Stir it often to avoid sticking. For this recipe, cook the pasta for 10-12 minutes. Check if it’s al dente, which means it should be firm but not hard. If you want a creamier dish, add more heavy cream. You can also let it sit longer after cooking. This helps thicken the sauce. For extra flavor, try adding fresh herbs. Basil or thyme can add a nice touch. You can also use dried herbs if you don't have fresh ones. If you like spice, increase the red pepper flakes. Start with a little, then taste and add more if needed. Presentation matters, so serve the pasta in nice bowls. Top it with extra Parmesan cheese for a rich look. Adding a sprinkle of parsley gives it color. You can also add a lemon slice on the side. It looks great and adds flavor when squeezed on top. Enjoy your beautiful, creamy lemon garlic pasta! {{image_2}} For a gluten-free option, use gluten-free pasta. Many brands offer great taste and texture. You can find rice or corn-based pasta at most stores. If you want a vegan twist, substitute heavy cream with coconut cream or cashew cream. These will still give you that rich, creamy texture. Add protein to make your meal heartier. Cooked chicken, shrimp, or even tofu work well. Just toss them in with the pasta to heat through. You can also add fresh vegetables. Spinach and peas are great choices. They add color, flavor, and nutrition. Just stir them in during the last few minutes of cooking. Serve your creamy lemon garlic pasta with a light side salad. A mix of greens and a simple vinaigrette works well. For drinks, pair this dish with a chilled white wine. Sauvignon Blanc or Pinot Grigio will enhance the lemon flavor. Enjoy! To store leftovers, let the pasta cool down first. Then, place it in an airtight container. Make sure to seal it tightly to keep it fresh. You can store it in the fridge for up to three days. When reheating, use a skillet for the best results. Add a splash of water or broth to help it heat evenly. Stir gently to avoid sticking. You can also use the microwave, but cover it to keep moisture in. Yes, you can freeze creamy pasta! Just make sure it cools completely before freezing. Use a freezer-safe container and leave some space for expansion. It can last up to two months in the freezer. To thaw, move it to the fridge overnight. When ready to eat, reheat in a pot over low heat. Add a bit of cream or broth to restore the creamy texture. In the fridge, creamy lemon garlic pasta lasts about three days. If you see any mold or notice an off smell, it’s best to throw it away. Always trust your senses when checking food safety. How long does it take to make creamy lemon garlic pasta? It takes about 25 minutes to make creamy lemon garlic pasta. You’ll spend 10 minutes prepping the ingredients and 15 minutes cooking. Can I make it ahead of time? Yes, you can make it ahead of time. Just cook the pasta and sauce, then store it in the fridge. Reheat it gently when ready to serve. What can I use instead of heavy cream? You can use half-and-half or coconut cream instead of heavy cream. These will give you a creamy texture without being too heavy. Is there a substitute for Parmesan cheese? Yes, you can use nutritional yeast for a dairy-free option. Grated Pecorino Romano also works well if you want a different flavor. Can I cook pasta in the sauce? Yes, you can cook pasta in the sauce. This method helps the pasta absorb all the flavors as it cooks. Just ensure there’s enough liquid. How do I prevent the pasta from getting mushy? To prevent mushy pasta, cook it until it’s al dente. Stir it occasionally while cooking to keep it from sticking together. You learned how to make creamy lemon garlic pasta with simple steps and fresh ingredients. We explored cooking tips, flavor variations, and storage options to enhance your meal. You can adjust the recipe to fit your taste, whether adding veggies or changing the pasta type. Remember to store leftovers properly for the best freshness. Enjoy making this dish and impressing your friends and family with your skills. Happy cooking!

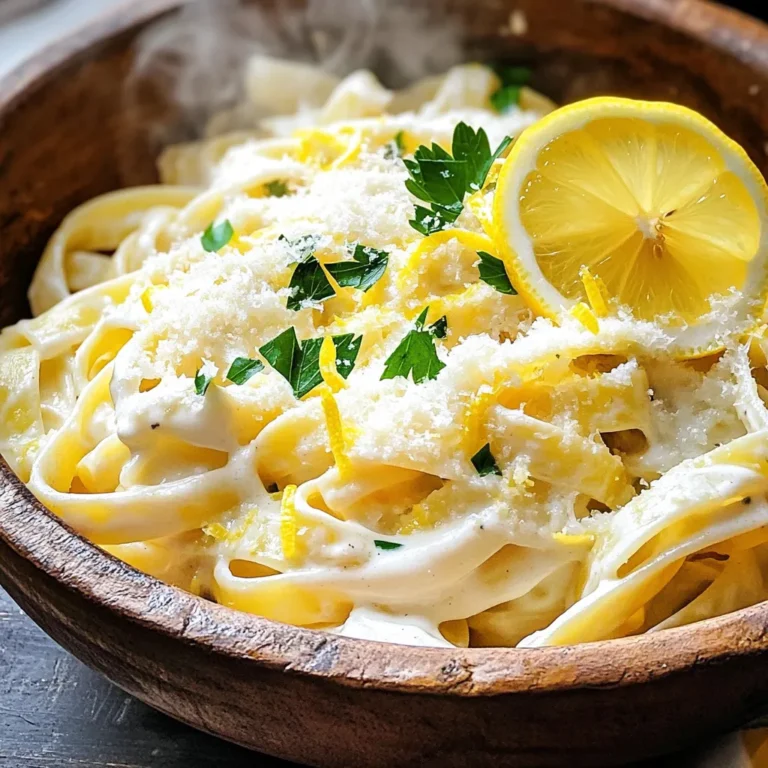
Creamy Lemon Garlic Pasta One Pot Easy Recipe

- 1 lb (450g) thinly sliced beef sirloin - 1/4 cup soy sauce - 2 tablespoons brown sugar - 1 tablespoon sesame oil - 1 tablespoon grated ginger - 3 cloves garlic, minced - 2 tablespoons green onions, chopped - 1/2 medium onion, thinly sliced - 1 carrot, julienned - 1/2 bell pepper, sliced (any color) - 1 tablespoon gochujang (Korean chili paste) - 1 tablespoon sesame seeds - 1 tablespoon vegetable oil (for cooking) - Cooked jasmine rice (for serving) - Fresh lettuce leaves (optional, for wrapping) Using high-quality ingredients makes a big difference in flavor. Fresh beef brings tenderness and richness. Choose sirloin for its balance of taste and texture. Fresh veggies add crunch and color. Quality soy sauce enhances the umami flavor of the dish. Opt for low-sodium options to control saltiness. Good sesame oil adds a nutty aroma. These choices elevate your bulgogi beyond takeout. You can swap out beef sirloin for other meats like chicken or pork. Use tamari if you're gluten-free. For sweetness, honey or maple syrup works well instead of brown sugar. You can replace gochujang with sriracha for heat, but adjust the amount to taste. If you don't have sesame oil, olive oil is a decent substitute. Always feel free to get creative with your ingredient choices! To start, gather a large bowl. In the bowl, mix together: - 1/4 cup soy sauce - 2 tablespoons brown sugar - 1 tablespoon sesame oil - 1 tablespoon grated ginger - 3 cloves garlic, minced - 2 tablespoons green onions, chopped - 1 tablespoon gochujang Stir these ingredients until they blend well. This marinade gives the beef its rich flavor. Don't rush this step; a great marinade makes all the difference. Next, take 1 pound of thinly sliced beef sirloin. Add it to the marinade. Make sure each piece gets coated completely. Cover the bowl and let it sit for at least 30 minutes. For best results, let it marinate overnight in the fridge. This deepens the flavor and makes the beef tender. Now, heat 1 tablespoon of vegetable oil in a large skillet over medium-high heat. Once hot, add the marinated beef to the skillet. Be careful not to overcrowd the pan; cook in batches if needed. Stir-fry the beef for 3-4 minutes until it turns brown and slightly caramelized. Next, add: - 1/2 medium onion, thinly sliced - 1 carrot, julienned - 1/2 bell pepper, sliced Continue to stir-fry for another 2-3 minutes. You want the veggies to stay crisp and colorful. Finally, sprinkle 1 tablespoon of sesame seeds over the dish and mix everything well. Serve your beef bulgogi hot over jasmine rice or in fresh lettuce leaves for a tasty wrap. Enjoy your meal! To get the best bulgogi, use high heat. This helps caramelize the beef quickly. Always slice your beef thinly against the grain. This keeps it tender. When cooking, do not overcrowd the pan. Cook in batches if needed. This ensures even cooking and browning. Stir-fry for about 3-4 minutes. You want the beef to be juicy and flavorful. The marinade is key for flavor. Use soy sauce, brown sugar, sesame oil, grated ginger, and minced garlic. Don’t forget gochujang for a spicy kick. Marinate the beef for at least 30 minutes. For the best taste, marinate overnight. The longer it sits, the deeper the flavors become. Use fresh green onions and sesame seeds for added taste. They bring a nice crunch and aroma. Avoid using thick beef slices. They will be tough and chewy. Do not skip the marinating step. This is what makes bulgogi special. Also, be careful not to overcook the beef. It should be cooked through but still juicy. Lastly, don’t forget to add the veggies. They add color and nutrition. If you forget, your dish will not be as vibrant. {{image_2}} You can easily boost your bulgogi's health with veggies. Adding vegetables gives color and taste. Try thinly sliced mushrooms, zucchini, or snap peas. These add crunch and fiber. You can also add leafy greens like spinach or bok choy. Cook these with the beef for just a few minutes. This way, they keep their nutrients and flavor. Bulgogi is not just for beef. You can use chicken, pork, or tofu as protein. For chicken, use boneless thighs for a juicy bite. Pork tenderloin works well too. Slice it thin like beef. If you prefer tofu, use firm or extra-firm tofu. Press it to remove water, then marinate and fry until golden. Each option gives a new twist to the classic dish. While rice and lettuce wraps are great, there are other fun ways to serve bulgogi. You can make bulgogi tacos using soft tortillas. Top them with fresh salsa and avocado. Another idea is to serve it over a crispy salad. Use mixed greens, carrots, and sesame dressing. For a hearty dish, try bulgogi over noodles. It pairs well with soba or rice noodles. Each option makes the meal exciting and delicious! To keep your beef bulgogi fresh, place it in an airtight container. Make sure it cools down first. Store it in the fridge for up to three days. If you want to keep it longer, freezing is a great option. When reheating bulgogi, use a skillet for best results. Heat it over medium heat. Add a splash of water or broth to keep it moist. Stir often until it's warmed through. You can also use the microwave, but be careful not to overcook it. If you freeze bulgogi, divide it into portions. Use freezer bags or containers to save space. Squeeze out as much air as possible. When ready to eat, thaw it overnight in the fridge. This helps maintain the flavor and texture. Reheat it like fresh bulgogi for a tasty meal. Bulgogi is a Korean dish made from marinated beef. The beef is thinly sliced and grilled or stir-fried. It has a sweet and savory flavor thanks to the marinade. Traditionally, it is served with rice, lettuce, and various banchan, which are small side dishes. You can wrap the beef in lettuce for a tasty bite. Yes, you can use other meats for Bulgogi. Chicken, pork, or tofu work well too. Just adjust the marinade time based on the meat you choose. For chicken, about 30 minutes is enough. Pork may need a bit longer for flavor. The spice level in this recipe is mild to medium. The gochujang adds a nice kick, but it is not overpowering. If you prefer less spice, you can reduce the amount of gochujang. For more heat, add extra chili paste or fresh peppers. Many sides go great with Beef Bulgogi. Here are some popular options: - Steamed jasmine rice - Kimchi - Pickled vegetables - Cucumber salad - Grilled zucchini or eggplant These sides add balance and depth to the meal, making it more enjoyable. Korean Beef Bulgogi is a tasty dish that’s easy to make. We covered the key ingredients, marinade steps, and cooking methods. Choosing fresh ingredients is vital for great flavor. Remember to avoid common mistakes to get the best results. You can also try fun variations, like adding veggies or using different proteins. Store leftovers well to keep that delicious taste. This recipe brings a delightful Korean meal to your table. Enjoy making it your own!

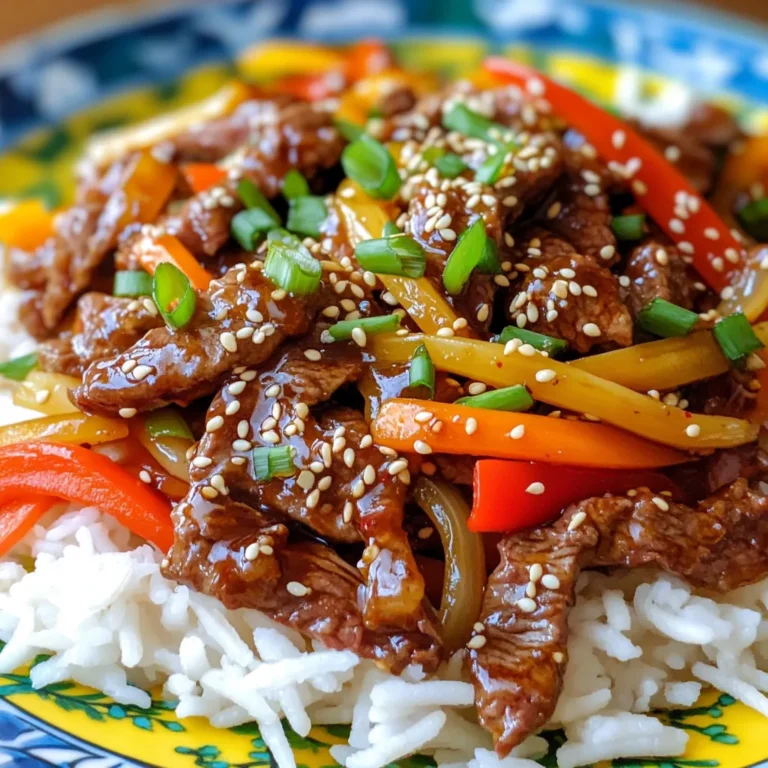
Korean Beef Bulgogi Tasty and Better Than Takeout

- 1 pound boneless, skinless chicken breasts - 4 cups chicken broth - 1 cup heavy cream - 1 medium onion, diced - 3 cloves garlic, minced - 3 medium carrots, diced - 2 celery stalks, diced For this creamy chicken gnocchi soup, the main ingredients are simple yet essential. First, I use boneless, skinless chicken breasts. They stay tender and juicy as they cook. Next, I like to add chicken broth for a rich base. Heavy cream adds that luscious creaminess we all love. Fresh vegetables bring color and nutrition. Diced onion provides great flavor. Minced garlic gives it a lovely aroma. Diced carrots and celery add sweetness and texture. - 1 teaspoon dried thyme - 1 teaspoon dried oregano - 1 bay leaf - Salt and pepper to taste - 2 cups fresh spinach - Fresh parsley for garnish Seasonings bring life to this dish. I use dried thyme and oregano for earthy notes. A bay leaf adds depth. Salt and pepper enhance all the flavors. Fresh spinach is a must at the end. It wilts beautifully and adds a pop of color. Finally, I sprinkle fresh parsley on top for a fresh finish. This combination makes the soup not only tasty but also visually appealing. Start by placing the boneless, skinless chicken breasts at the bottom of the slow cooker. This is the base of your soup. Next, add the diced onion, minced garlic, diced carrots, and diced celery on top of the chicken. These vegetables bring great flavor and texture. Now, pour in the chicken broth. It adds moisture and depth to the soup. After that, sprinkle in the dried thyme, oregano, and bay leaf. Season with salt and pepper to taste. These spices boost the flavor of the soup. Now it’s time to set the slow cooker. You can choose to cook it on low for about 6 hours or on high for 3 hours. I prefer low, as it allows all the flavors to meld together beautifully. The chicken should be cooked through by the end of this time. Once the chicken is done, take it out and shred it with two forks. This makes it easier to mix back into the soup. Return the shredded chicken to the slow cooker. Next, stir in the heavy cream and the potato gnocchi. This gives the soup its creamy texture. Cook on high for an additional 30 minutes. This step makes sure the gnocchi are tender. In the last 5 minutes, add the fresh spinach and stir until it's wilted. It adds a nice pop of color and nutrients. Taste your soup and adjust the seasoning with more salt and pepper if needed. Serve hot, garnished with fresh parsley. This adds a lovely finish to your creamy chicken gnocchi soup. To make your soup really shine, adjust the seasonings to your taste. I like to start with the basics: salt and pepper. Taste the soup before serving. You can easily add more salt or pepper if needed. For extra depth, try adding a pinch of garlic powder or a splash of lemon juice. Enhancing creaminess is also key. Use heavy cream for a rich texture. If you want an even silkier feel, whisk in a bit of cream cheese or sour cream at the end. This small step makes a big difference. Cooking time is important for tender gnocchi. I recommend adding the gnocchi during the last 30 minutes of cooking. This keeps them soft and flavorful. If you add them too early, they might get mushy. To avoid overcooking, keep an eye on the clock. Once you add the gnocchi, stir gently. Check for doneness after 15 minutes. They should be soft but still hold their shape. This balance is what makes your soup perfect. {{image_2}} You can change the soup by using different vegetables. Try adding bell peppers or zucchini for a fresh twist. Sweet potatoes can add a touch of sweetness too. You can even use frozen veggies if you want quick prep. For protein options, you can swap chicken for turkey or shrimp. Cooked sausage can add a nice kick. If you want, you can also use tofu for a vegetarian option. Each swap changes the flavor, so have fun with it! To enhance the taste, you can add cheese or spices. Grated Parmesan or mozzarella melts beautifully into the soup. A sprinkle of red pepper flakes adds warmth and depth. Using homemade broth instead of store-bought can make a big difference. Homemade broth usually has richer flavors. If you’re short on time, store-bought works great too. Just check the label for quality. To keep your creamy chicken gnocchi soup fresh, cool it down fast. Let it sit at room temperature for no more than two hours. Transfer the soup into airtight containers. I recommend glass jars or plastic containers that seal well. Label each container with the date. This way, you can easily track how long it has been stored. The soup stays good for about three to four days in the fridge. If you want to save some soup for later, freezing is a great option. First, let the soup cool completely. This prevents ice crystals from forming. Pour the soup into freezer-safe bags or containers. Leave some space at the top to allow for expansion. Seal them tightly and label with the date. The soup can last up to three months in the freezer. When you're ready to enjoy it again, thaw the soup overnight in the fridge. For quick thawing, you can place the bag under cold running water. Once thawed, reheat the soup in a pot over medium heat. Stir it well to mix, and enjoy your creamy chicken gnocchi soup! This soup lasts about 3 to 4 days in the fridge. Make sure to cool it down first. Store it in an airtight container. This keeps it fresh and tasty. Yes, you can use frozen gnocchi! Just add them straight to the slow cooker. You don't need to thaw them first. They will cook well during the last 30 minutes. If you want a lighter option, use half-and-half or whole milk. For a dairy-free choice, try coconut milk. Each option changes the taste a bit, so pick what you like best. The soup is not gluten-free due to the gnocchi. However, you can find gluten-free gnocchi in stores. Just check the labels. This way, you can enjoy the soup without gluten! This blog post covered a tasty chicken soup made in a slow cooker. We discussed the main ingredients, like chicken and veggies. I shared step-by-step instructions, cooking tips, and ideas for variations. Remember, you can swap in your favorite veggies or proteins. Proper storage is key for leftovers, making sure you enjoy every bite. This soup is simple and flexible, perfect for any meal. Now, grab your slow cooker and get cooking! You'll love this warm and cozy dish.

Creamy Chicken Gnocchi Soup Slow Cooker Delight

PREV 1 … 13 14 15 … 57 NEXT
meal twig

explore

DessertsDinnerAppetizersDrinks

Our Policies

  • Cookie Policy
  • Copyright Policy
  • Disclaimer
  • GDPR Policy
  • Terms Of Use
Back to Top
  • About
  • Contact Us
  • Privacy Policy
© 2025 meal twig