FREE DINNER EBOOK! Get your copy!
  • Cookie Policy
  • GDPR Policy
  • Disclaimer
  • Terms Of Use
  • Visit my other site: Fun Cookie Recipes
meal twig
  • Home
  • Dinner
  • Desserts
  • Drinks
  • Appetizers
  • Contact
  • About
  • Privacy Policy
  • Home
  • Dinner
  • Desserts
  • Drinks
  • Appetizers
  • Contact
  • About
  • Privacy Policy
  • Cookie Policy
  • GDPR Policy
  • Disclaimer
  • Terms Of Use
Visit my other site: Fun Cookie Recipes

HOME / CATEGORIES /

Latest

- 1 cup fresh blackberries - 6-8 fresh sage leaves - 2 tablespoons freshly squeezed lemon juice To start, you need fresh blackberries. They bring a sweet, tangy flavor. Next, grab sage leaves. Their earthy taste pairs well with blackberries. Finally, use fresh lemon juice. It adds a bright, zesty kick. - 2 tablespoons honey - 2 tablespoons agave syrup For sweetness, you can choose honey or agave syrup. Honey gives a rich flavor. Agave syrup offers a lighter sweetness. Both work great in this mocktail. - 2 cups sparkling water - Ice cubes - Extra blackberries and sage leaves for garnish You’ll need sparkling water to make it bubbly. Ice cubes chill the drink and keep it refreshing. For garnish, use extra blackberries and sage leaves. They add a nice touch to the drink. {{ingredient_image_1}} - Blending Ingredients First, gather your fresh blackberries and sage leaves. Place them in a blender. Add honey or agave syrup and lemon juice. Blend until smooth. This step mixes all the flavors well. - Straining the Mixture Next, take a fine mesh sieve and place it over a bowl or pitcher. Pour the blended mixture into this sieve. Use a spatula to press down the mixture. This helps separate the juice from the solid parts. Discard the solids and keep the smooth liquid. - Filling Glasses with Ice Now, grab some glasses and fill them with ice cubes. This keeps your drink cold and refreshing. Make sure to leave some space for the liquid. - Combining the Mixture and Sparkling Water Pour the strained blackberry-sage mixture over the ice in each glass. Fill them about halfway. Next, top each glass with sparkling water. Stir gently to mix everything. This creates a nice fizz in your drink. - Presentation Suggestions For an elegant touch, add extra blackberries and a sage leaf on top of each drink. This makes your mocktail look pretty and inviting. - Serving Tips Serve the mocktail right away to enjoy its freshness. You can also provide straws or stirrers for guests. This drink is perfect for gatherings or a relaxing day at home. Adjusting Sweetness You can change how sweet your drink is. Use more honey or agave syrup for a sweeter taste. If you want less sweetness, add more lemon juice. Taste as you mix to find the right balance for you. Selecting High-Quality Ingredients Fresh blackberries and sage leaves make a big difference. Look for ripe, juicy blackberries. They should be dark and plump. Choose bright green sage leaves that smell strong. Good ingredients bring out the best flavors in your mocktail. Using Crystal Clear Ice Clear ice looks fancy and makes your drink shine. To make clear ice, boil water first, then freeze it. This way, it won't have bubbles. It keeps your drink cold without watering it down too fast. Choosing Stylish Glassware Pick glasses that match your style. Tall glasses show off the drink's color. Shorter glasses can feel cozy. Add a fun straw for a playful touch. Presentation can make your drink feel extra special. Make-Ahead Tips You can prepare the blackberry mixture a few hours before serving. Just blend and strain, then store in the fridge. When ready, pour it over ice and add sparkling water. This saves time and lets you enjoy the party. Storage Precautions Keep any leftover mixture in an airtight container. Store it in the fridge for up to two days. If you wait too long, the flavors may fade. Make sure to stir well before serving again. Pro Tips Use Fresh Ingredients: For the best flavor, always opt for fresh blackberries and sage leaves. They enhance the taste and aroma of your drink. Adjust Sweetness: Feel free to adjust the amount of honey or agave syrup according to your taste preference. You can start with less and add more if needed. Chill Your Ingredients: For a refreshing sparkler, chill the sparkling water and your glassware beforehand to keep your drink cool longer. Experiment with Flavors: Try adding other herbs like mint or basil for a unique twist on this mocktail. Each herb brings its own character to the drink! {{image_2}} You can change the flavor of your mocktail with ease. Try using other berries like raspberries or blueberries. These fruits add their own unique taste. You can mix and match to find your favorite blend. Herbal infusions can also change the drink's profile. Mint or basil can replace sage. Each herb brings a different twist. Experiment with these herbs to see what you enjoy most. You don’t have to use just plain sparkling water. Club soda makes a great substitute. It adds a bit more fizz without changing the taste too much. Flavored sparkling water is another fun option. You can find many flavors, like lime or berry. These can add even more depth to your mocktail. If you want to try a different sweetener, maple syrup can be a delicious choice. It adds a rich flavor that pairs well with blackberries. Organic sweeteners are also a great fit. They can provide a more natural taste. Look for options like coconut sugar or agave syrup. Each sweetener can change the drink’s overall character. To keep your blackberry sage mocktail fresh, store any leftovers in the fridge. Use a clean glass jar with a tight lid. This helps keep the flavors strong. Avoid using plastic containers, as they can hold onto smells. You should drink your mocktail within two days. After that, the flavor may fade. If you see any bubbles gone from your drink, it's time to toss it. A flat drink isn’t fun to sip. If the color changes or it smells off, do not drink it. You can get creative with leftover blackberries. Use them in yogurt, oatmeal, or smoothies. They add a sweet touch. For sage, try it in soups or salads. Sage pairs well with meats and adds depth to many dishes. A Blackberry Sage Mocktail is a tasty non-alcoholic drink. It mixes fresh blackberries and sage leaves. The drink is sweetened with honey or agave syrup. Fresh lemon juice adds a zesty kick. Finally, sparkling water gives it a fizzy finish. This mocktail is perfect for warm days or special gatherings. It looks pretty and tastes refreshing. Yes, you can prepare some parts ahead of time. You can blend the blackberries, sage, honey, and lemon juice a day early. Store the mixture in the fridge in a sealed container. Just remember to strain it before serving. Add sparkling water and ice when you are ready to drink. This keeps the fizz nice and fresh. Absolutely! This mocktail is great for kids. It has no alcohol, making it a safe choice. The sweet blackberries and honey appeal to young taste buds. Plus, the fizzy water adds fun. It’s a colorful drink that kids will love at parties or family meals. Enjoying this mocktail can be a delightful experience for all ages. This post covered how to make a tasty blackberry sage mocktail. We looked at fresh ingredients, sweeteners, and extra items needed. You learned the steps to blend, assemble, and serve the drink. Tips helped you enhance flavor and presentation. We also explored fun variations and storage methods. Enjoy making this drink for any occasion. Share it with family and friends. It’s simple, fun, and sure to impress!

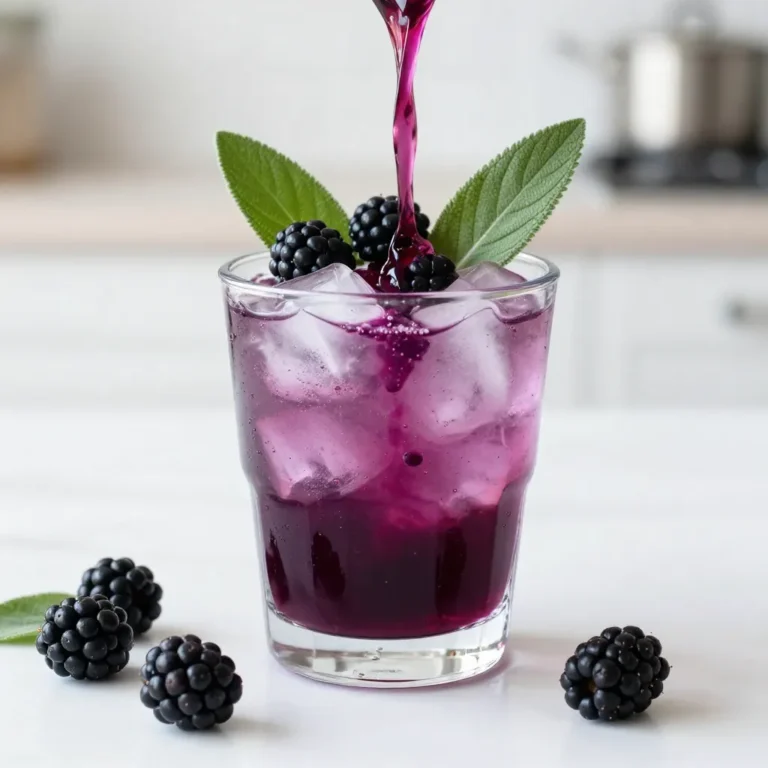
Blackberry Sage Mocktail Refreshing Non-Alcoholic Drink

Here is what you will need for classic deviled eggs: - 6 large eggs - 3 tablespoons mayonnaise - 1 teaspoon Dijon mustard - 1 teaspoon apple cider vinegar - 1/2 teaspoon garlic powder - 1/2 teaspoon smoked paprika - 1/4 teaspoon cayenne pepper - Salt, to taste - Fresh chives or parsley, for garnish These ingredients create a rich and tasty filling. The eggs serve as the perfect base. The mayonnaise adds creaminess. Dijon mustard gives it a nice tang. Apple cider vinegar adds brightness to the flavor. Garlic powder and smoked paprika bring depth. Cayenne pepper adds some heat, but you can adjust it to your taste. Finally, fresh herbs add color and freshness. This simple list makes the process easy. You likely have some of these items at home. Gather everything before you start. It helps to be organized in the kitchen. Trust me, these deviled eggs will be a hit! {{ingredient_image_1}} - Place the eggs in a pot and cover them with cold water. - Bring the water to a boil over medium-high heat. - Once boiling, cover the pot and turn off the heat. Let the eggs sit for 12 minutes. Boiling eggs can be tricky. The key is to start with cold water. This helps cook the eggs evenly. Turning off the heat keeps them from overcooking. - Carefully transfer the eggs to a bowl filled with ice water. - Let them cool for about 5 minutes. - Peel the eggs under running water for easier shell removal. Cooling the eggs quickly helps stop the cooking process. The ice water makes peeling easier. Running water helps remove any stubborn bits of shell. - Cut the eggs in half lengthwise. - Gently scoop the yolks into a mixing bowl. - Add mayonnaise, Dijon mustard, apple cider vinegar, garlic powder, smoked paprika, cayenne pepper, and salt. - Use a fork to mix until smooth and creamy. This step is where the magic happens. Mixing the yolks with the other ingredients creates a rich filling. Adjust the cayenne pepper for your spice level. - Spoon or pipe the yolk mixture back into the egg whites. - Garnish with smoked paprika and fresh chives or parsley. Filling the whites can be fun! Use a piping bag for a fancy look. The garnish adds flavor and color, making them pop on the plate. To avoid gray rings around yolks, start with cold water. Place your eggs in a pot and cover them with water. Bring it to a boil over medium-high heat. Once it boils, turn off the heat but keep the pot covered. Let the eggs sit for about 12 minutes. This method cooks the eggs gently and prevents the gray ring. For a creamy consistency in your filling, mash the yolks well. Use a fork to break them up. Add mayonnaise, Dijon mustard, and the other spices. Mix it all together until it is smooth. If you want an even creamier texture, use a hand mixer. This makes spreading or piping much easier. To beautifully plate your deviled eggs, use a piping bag. Pipe the filling into the egg whites for a fun look. You can also sprinkle smoked paprika on top for color. For a fresh touch, add chopped chives or parsley. Arrange the eggs on a nice platter to impress your guests. Pro Tips Fresh Eggs for Best Results: Use eggs that are a week or two old for easier peeling. Fresh eggs tend to stick to the shell more. Customize the Heat: Adjust the cayenne pepper according to your spice preference. You can also add hot sauce for an extra kick! Perfectly Smooth Filling: For an ultra-smooth yolk filling, use a food processor instead of a fork to blend the ingredients. Garnish Variations: Experiment with different garnishes like paprika, bacon bits, or pickled jalapeños to add unique flavors and visual appeal. {{image_2}} For a kick, you can adjust the cayenne pepper. Start with the 1/4 teaspoon listed. If you want more heat, add a dash of hot sauce. This change makes the eggs lively and fun. You can try different hot sauces to find your favorite blend. Adding crispy bacon bits is a great way to change the flavor. Cook your bacon until it's nice and crunchy. Then, chop it into small pieces. Mix it into the yolk filling for a savory twist. The bacon adds a smoky taste that many people love. You can enhance your deviled eggs with herbs and veggies. Fresh chives or parsley work well. You can also try dill or cilantro for a fresh flavor. If you like crunch, add finely chopped celery or bell peppers. These choices make your deviled eggs stand out and taste amazing. To keep leftover deviled eggs fresh, place them in an airtight container. Cover the container tightly to prevent air from spoiling the eggs. You can also use plastic wrap to cover the eggs if you don't have a container. This helps maintain their flavor and texture. Store them in the fridge for best results. I do not recommend freezing deviled eggs. Freezing changes the texture of the eggs and filling. When thawed, they can become watery and unappetizing. Instead, try to make just enough so you don’t have leftovers. Deviled eggs last in the fridge for about 3 to 4 days. After that, they may lose their taste and quality. Always check for any off smell or discoloration before eating them. If you follow these tips, your deviled eggs will stay tasty! To stop eggs from cracking, follow these tips: - Use eggs at room temperature. Cold eggs crack more easily. - Place eggs gently in the pot. Avoid dropping them in. - Cover eggs with cold water before boiling. This helps them heat slowly. - Add a bit of salt or vinegar to the water. This can help seal cracks. By using these steps, you can ensure your eggs stay intact. Cracked eggs can leak and create a mess. Keeping the eggs whole results in a better final dish. Yes, you can use Greek yogurt in place of mayonnaise. Greek yogurt adds a creamy texture with less fat. It also gives a tangy flavor that some people love. If you want to make your deviled eggs healthier, try Greek yogurt. You can use a 1:1 ratio, meaning equal amounts of yogurt and mayo. This swap works great for those who want a lighter option. Deviled eggs are tasty on their own but pair well with other foods. Here are some ideas: - Serve with fresh veggies like carrots and celery. - Offer crackers or toast points for crunch. - Pair with a light salad for a complete meal. - Include cheese or meat platters for variety. These pairings enhance the flavors of your deviled eggs. They also make your spread more appealing and fun for guests. In this post, we learned how to make deviled eggs. We covered the best ingredients, step-by-step instructions, and useful tips. You can even try different variations, like spicy or bacon-infused. Storing leftovers is simple, too. Remember, deviled eggs are fun to make and share. They’re tasty, easy, and perfect for any occasion. So gather your ingredients and start cooking! Enjoy your delicious creations!

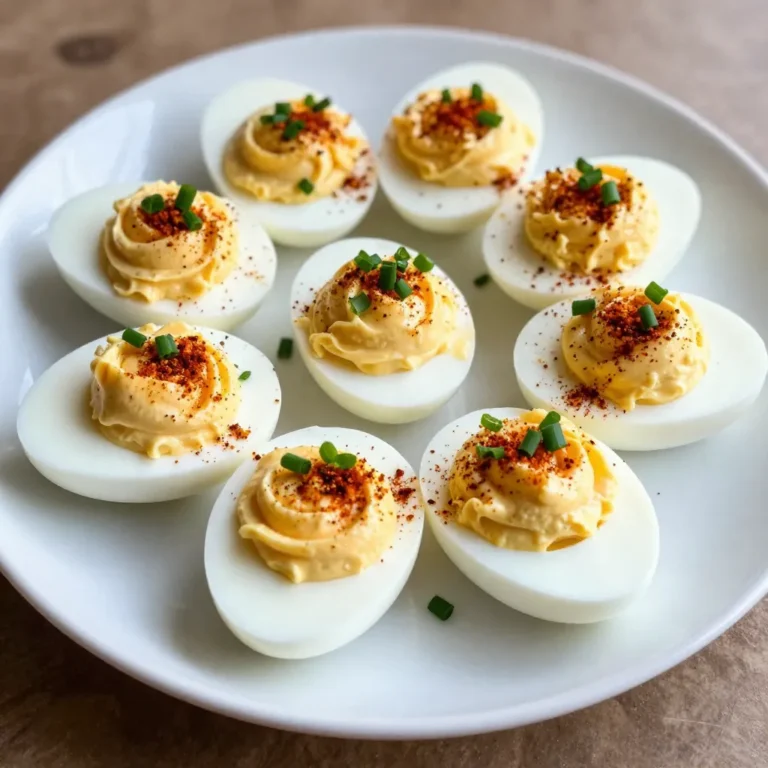
Classic Deviled Eggs Tasty and Simple Recipe Guide

- 1 cup all-purpose flour - 1/2 teaspoon baking soda - 1 teaspoon ground ginger - 1 teaspoon ground cinnamon - 1/4 teaspoon ground cloves - 1/4 teaspoon nutmeg - 1/4 teaspoon salt The dry ingredients are key to the cake's structure and flavor. All-purpose flour gives the cake its base. Baking soda adds lift, making the cake light. The spices—ginger, cinnamon, cloves, and nutmeg—bring warmth and depth to the gingerbread flavor. Salt enhances the sweetness and balances the spices. - 1/2 cup unsalted butter, softened - 3/4 cup brown sugar, packed - 2 large eggs - 1/2 cup molasses - 1 teaspoon vanilla extract The wet ingredients create a rich and moist cake. Unsalted butter adds creaminess and flavor. Brown sugar brings moisture and a hint of caramel. Eggs help bind everything and add richness. Molasses is the star here, giving the cake its classic gingerbread taste. Vanilla extract rounds out the flavor profile. - 8 oz chocolate melts (dark or white chocolate) - Sprinkles for decoration Coating the cake pops is where the fun begins! You can use dark or white chocolate melts, depending on your taste. Melt the chocolate to create a smooth coating. Sprinkles add a festive touch and make each pop look appealing. The chocolate and sprinkles make these treats perfect for any celebration. {{ingredient_image_1}} - Preheat your oven to 350°F (175°C). - Line an 8x8 inch baking dish with parchment paper. - In a medium bowl, whisk together: - 1 cup all-purpose flour - 1/2 teaspoon baking soda - 1 teaspoon ground ginger - 1 teaspoon ground cinnamon - 1/4 teaspoon ground cloves - 1/4 teaspoon nutmeg - 1/4 teaspoon salt Set this bowl aside for later. - In a large bowl, cream together: - 1/2 cup unsalted butter, softened - 3/4 cup brown sugar, packed - Mix until light and fluffy. - Add in 2 large eggs, one at a time. Beat well after each egg. - Then mix in: - 1/2 cup molasses - 1 teaspoon vanilla extract - Gradually add the dry mixture to the wet ingredients. Stir until just combined. - Pour the batter into your prepared baking dish. Smooth the top. - Bake for 25-30 minutes. Use a toothpick to check if it comes out clean. - Allow the cake to cool completely in the pan. - Once cool, crumble the cake into fine crumbs in a large bowl. - Roll small balls, about 1 inch in size, from the cake crumbs. - Place the balls on a baking sheet lined with parchment paper. - Insert lollipop sticks into each ball to form cake pops. - Melt 8 oz of chocolate melts according to the package instructions. - Dip the end of each stick into the melted chocolate. - Insert the stick into each cake ball. - Place the cake pops in the fridge for 15-20 minutes to set. - After setting, coat each cake pop completely in melted chocolate. - Place them back on the baking sheet. - While the chocolate is still wet, add sprinkles on top. - Let the cake pops cool and harden at room temperature or in the fridge. - Ensure Ingredients are at Room Temperature Start with butter, eggs, and molasses at room temperature. This helps them mix well. When ingredients are warm, your batter becomes smooth and fluffy. - Proper Mixing Techniques Mix butter and sugar until light and fluffy. This adds air to your cake. When adding eggs, beat them in one at a time. This step keeps your batter smooth and prevents lumps. - Fun Sprinkling Varieties Use colorful sprinkles to make your cake pops pop! You can choose festive colors like red, green, or gold. Mix different shapes for a fun look. - Using Chocolate Drizzle After coating your pops, drizzle melted chocolate on top. This adds a nice touch and makes them look gourmet. You can use dark or white chocolate for contrast. - Presentation Tips for Festive Occasions Arrange your cake pops in a decorative stand. You can also use a styrofoam block. This keeps them upright and looks great on a table. - Ideas for Gifting Cake Pops Wrap each cake pop in clear cellophane. Tie them with a festive ribbon. This makes a sweet gift for friends and family. Pro Tips Use Room Temperature Ingredients: Make sure your butter and eggs are at room temperature for better mixing and a fluffier cake texture. Don’t Overmix the Batter: When combining wet and dry ingredients, mix just until incorporated to keep the cake light and tender. Chill for Better Coating: Chilling the cake pops after inserting the sticks helps the chocolate coating adhere better and makes dipping easier. Experiment with Flavors: Try adding a splash of orange zest or a dash of espresso powder to the cake for a unique flavor twist! {{image_2}} You can switch up the spices in your cake pops. Try using allspice or cardamom for a new twist. You can also add a pinch of cayenne for a little heat. For a chocolate version, replace some flour with cocoa powder. This gives you a rich chocolate gingerbread blend. If you prefer vanilla, use vanilla extract instead of molasses. You can also add white chocolate melts for a sweeter treat. Want gluten-free cake pops? Use almond flour or a gluten-free flour blend. This keeps the texture light and tasty. For vegan cake pops, swap the eggs for flax eggs. Mix one tablespoon of ground flaxseed with three tablespoons of water. Let it sit until it thickens. Use a plant-based butter and a vegan chocolate melt. These changes keep the flavor while meeting dietary needs. Get creative with your decorations! For winter, use blue and silver sprinkles. You can even add edible glitter for a fun touch. For a holiday party, use red and green sprinkles or candy canes. You can customize the pops for birthdays or events with themed colors. Wrap each cake pop in colored cellophane for gifts. It makes each pop look extra special and festive. Keep your gingerbread cake pops fresh by refrigerating them. Place them in an airtight container. This prevents moisture loss and keeps them tasty. You can store them in the fridge for up to five days. If you're hosting a party, this short-term storage works great! Just take them out about 30 minutes before serving. This way, they can warm up slightly. For longer storage, you can freeze your cake pops. First, let them cool completely and then place them on a baking sheet. Freeze them for about an hour until firm. After that, wrap each pop in plastic wrap. You can also place them in a freezer-safe container. They can last in the freezer for about three months. Just remember to label them with the date! How long do cake pops last? Freshly made gingerbread cake pops last up to five days in the fridge. If you freeze them, they stay good for about three months. After that, they may lose flavor and texture. Always check for any signs of freezer burn when you thaw them. Enjoy your festive treats while they’re fresh for the best taste! Gingerbread cake pops are small, round treats made from gingerbread cake. They are fun to eat and perfect for festive events. The cake is crumbled and mixed with frosting. Then, it is shaped into balls and dipped in chocolate. These treats are popular during winter holidays, especially Christmas. Their spicy, sweet flavor makes them a favorite for many. Yes, you can make gingerbread cake pops ahead of time. Here are some tips: - Bake the gingerbread cake a day or two before. Let it cool completely. - Crumble the cake and shape the pops in advance. Store them in the fridge. - Dip the cake pops in chocolate when you are ready to serve. This way, you save time on busy days and still enjoy fresh treats. You can find gingerbread cake pops at local bakeries during the holiday season. Many shops offer seasonal treats. You may also find them online from specialty dessert stores. Make sure to check reviews to find the best places. If you want a fun project, consider making them at home for a personalized touch. This blog post covered how to make delicious gingerbread cake pops. We discussed key ingredients, important steps, helpful tips, and fun variations. You learned how to mix, bake, and decorate these treats for any occasion. Remember, you can personalize flavors and make dietary adjustments. Whether you're serving them at parties or gifting them to friends, these cake pops are sure to impress. Enjoy the process and have fun creating something special.

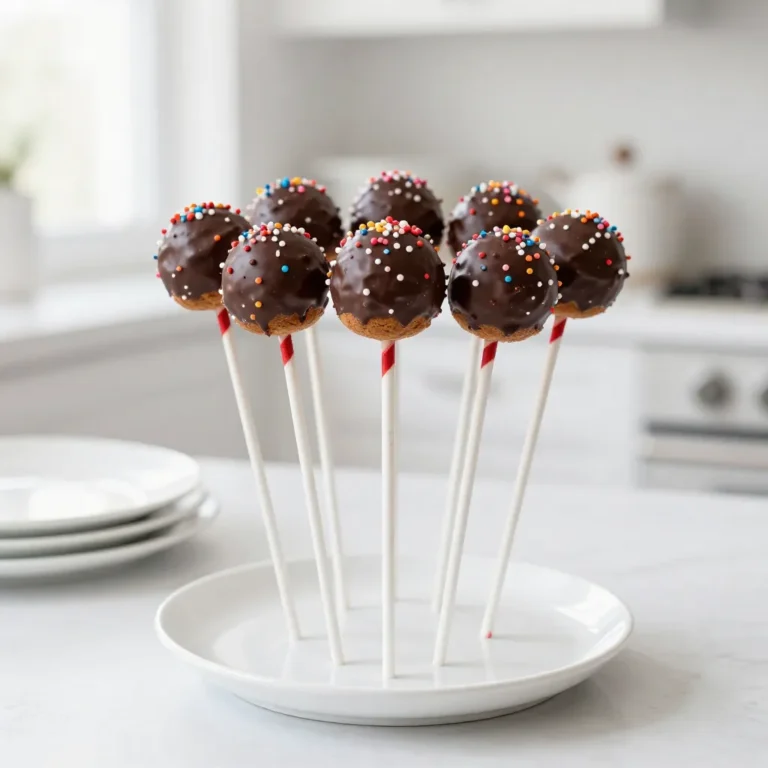
Gingerbread Cake Pops Festive and Delicious Treat

- 6 large eggs - 3 tablespoons mayonnaise - 1 teaspoon Dijon mustard - 1 teaspoon apple cider vinegar - 1/4 teaspoon smoked paprika - Salt and pepper to taste - 2 green onions, finely chopped (for garnish) - 1 teaspoon capers, rinsed and minced (for an extra kick) For classic deviled eggs, start with fresh large eggs. They form the base of this dish. You will need three tablespoons of mayonnaise to create a rich and creamy filling. Dijon mustard adds a nice tangy flavor, so use one teaspoon. Apple cider vinegar brings brightness, so don't skip it. Smoked paprika gives your eggs a nice smoky taste. Use a quarter teaspoon for a subtle kick. Salt and pepper balance the flavors, so add them to your liking. For garnishes, chop two green onions finely. They add a fresh crunch. If you want more flavor, mince one teaspoon of rinsed capers. They add a zesty surprise to your deviled eggs. These simple ingredients come together to create a classic appetizer that everyone loves. {{ingredient_image_1}} Boiling the Eggs Start by placing six large eggs in a saucepan. Cover the eggs with water, ensuring they are fully submerged. Set your heat to medium and bring the water to a boil. When the water boils, cover the pan and remove it from the heat. Let the eggs sit for 12 minutes. This method cooks the eggs gently, making them easier to peel. Cooling and Peeling After 12 minutes, carefully transfer the eggs to an ice bath. This cools them down and stops the cooking process. Leave the eggs in the ice bath for at least five minutes. Next, peel the eggs under cool running water. This helps remove the shell more easily and keeps the whites intact. Combining Ingredients Slice each egg in half lengthwise. Gently scoop out the yolks and place them in a mixing bowl. Add three tablespoons of mayonnaise, one teaspoon of Dijon mustard, one teaspoon of apple cider vinegar, and 1/4 teaspoon of smoked paprika to the yolks. Season with salt and pepper to taste. Mash everything together until the mixture is smooth and creamy. Folding in Optional Ingredients For a fun twist, fold in one teaspoon of rinsed and minced capers. This adds a zesty kick to your filling. Make sure the capers are well mixed, but don’t overdo it. You want to keep that creamy texture. Filling Egg Whites Now, it’s time to fill the egg white halves. You can use a spoon or a piping bag for a neat look. Make sure to fill each egg white generously with the yolk mixture. Garnishing To finish, garnish the deviled eggs with finely chopped green onions. A sprinkle of smoked paprika on top adds a nice pop of color. These simple touches make your deviled eggs look as great as they taste! To avoid overcooking, start by placing eggs in a saucepan. Cover them with cold water. Use enough water to cover the eggs by an inch. Heat the water on medium until it boils. Once it bubbles, cover the pan and take it off the heat. Let the eggs sit for exactly 12 minutes. This method ensures they stay tender and bright yellow inside. For a creamy texture, mash the yolks well in a bowl. Add the mayonnaise, Dijon mustard, apple cider vinegar, and spices. Use a fork to mix everything smoothly. The goal is to blend until there are no lumps. This step is important for that perfect, creamy bite. If you like a touch of tang, add more vinegar or mustard. To boost flavor, consider adding capers to the yolk mix. Rinse and mince them well before mixing. Capers bring a briny zing that elevates the dish. You can also try different spices like garlic powder or cayenne pepper for heat. Just be careful with extra ingredients. Too many can drown out the classic taste. Pro Tips Perfect Hard-Boiled Eggs: To achieve perfectly cooked eggs, use the “steam method” by placing a steaming basket in a pot of boiling water. This ensures even cooking without the risk of overcooking. Chill Before Peeling: After cooking, immediately placing eggs in an ice bath not only cools them down but also helps in loosening the shell, making peeling much easier. Customize Your Filling: Experiment with different additions like sriracha for heat or pickle relish for sweetness to give your deviled eggs a unique twist that suits your taste. Presentation Matters: Use a piping bag to fill the egg whites with the yolk mixture for a more elegant presentation. You can also sprinkle additional toppings like bacon bits or microgreens for added flair. {{image_2}} Classic deviled eggs focus on simple flavors. They use eggs, mayonnaise, mustard, and spices. The taste is creamy and tangy. You can add smoked paprika for a nice kick. Modern recipes mix in fun ingredients. You might find bacon bits, avocado, or even sriracha. These flavors add a new twist that many love. Try mixing things up to find your favorite. You can easily make deviled eggs fit many diets. For a vegan option, swap the eggs with chickpeas. Mash the chickpeas and mix with vegan mayo. Add mustard and spices for flavor. For low-carb fans, skip the yolks and use avocado. This keeps the creamy texture while cutting carbs. These tasty changes let everyone enjoy this dish. Deviled eggs pair well with many dishes. Serve them at parties with chips and dip. They also go great with a fresh salad. If you have a picnic, bring them along. They are easy to transport and always a hit. For brunch, serve them alongside quiche or muffins. Mixing and matching makes your meal special. To keep your deviled eggs fresh, store them in the fridge. Use an airtight container. This helps prevent the eggs from absorbing other odors. Place a damp paper towel over the eggs to maintain moisture. If you have leftovers, try to eat them within a few days. Deviled eggs stay fresh for about 2 to 3 days in the fridge. After that, they may lose flavor and texture. Always check for any off smells or a change in color before eating. If they look or smell weird, toss them out. Safety first! You should not freeze deviled eggs. Freezing changes the texture of eggs and filling. When you thaw them, they may become watery and rubbery. Instead, make them fresh for the best taste and texture. Enjoy them right after you prepare them for the best experience! You can skip mustard in deviled eggs by using alternatives. Some great options include: - Horseradish: Adds a spicy kick. - Hot sauce: For a bold flavor. - Relish: Gives a sweet and tangy taste. Using these can change up the flavor while still keeping it tasty. Yes, Greek yogurt is a good swap for mayonnaise. It adds creaminess with less fat. It also gives a nice tang. Here’s how you can use it: - Replace all or part of the mayo with Greek yogurt. - Mix in a bit of lemon juice for extra flavor. This can make your deviled eggs lighter and healthier. Garnishing your deviled eggs can make them pop. Here are some fun ideas: - Chopped herbs: Use fresh chives or dill for color. - Bacon bits: Add crunch and a savory touch. - Cherry tomatoes: Place halves on top for a fresh look. These garnishes can enhance both the taste and the look of your dish. Deviled eggs are simple and fun to make. We explored ingredients, steps, and tips to create the best deviled eggs. You learned how to boil eggs, make tasty fillings, and add unique twists. Remember, you can adjust recipes to fit your diet. Store them correctly to keep them fresh and safe. With these insights, you can impress your friends and family with delicious deviled eggs. Enjoy experimenting with flavors and garnishes to make your own perfect version!

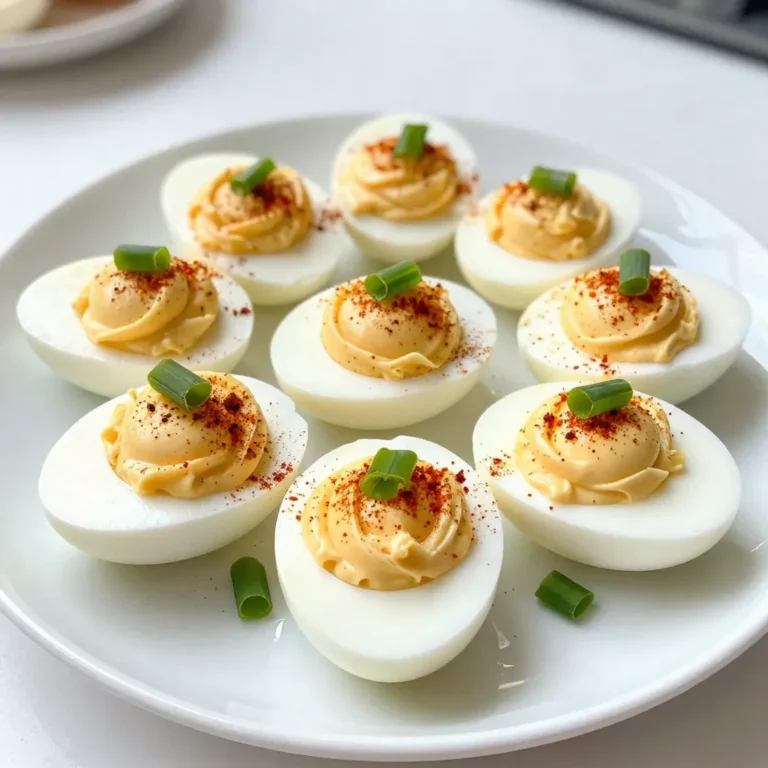
Classic Deviled Eggs Tasty Party Appetizer Recipe

- 1 large baguette, sliced in half lengthwise - 4 tablespoons unsalted butter, softened - 4 cloves garlic, minced - 1 cup fresh mozzarella cheese, sliced - 2 cups cherry tomatoes, halved - 1/4 cup fresh basil leaves, chopped - 1 tablespoon balsamic glaze - Salt and pepper, to taste For this Caprese Garlic Bread, you need simple yet fresh ingredients. Start with a large baguette. The baguette gives a great crunch and flavor. You will also need unsalted butter to make the garlic spread. Choose four cloves of garlic to add a strong taste. Fresh mozzarella cheese is key. It melts nicely and pairs well with the tomatoes. Use about one cup of sliced mozzarella. For sweetness, gather two cups of halved cherry tomatoes. They burst with flavor in every bite. Fresh basil leaves add a nice touch. You will want about a quarter cup, chopped. A drizzle of balsamic glaze brings everything together. Don't forget to season with salt and pepper to taste. This mix of ingredients makes Caprese Garlic Bread a delight! {{ingredient_image_1}} 1. Preheat the oven: First, set your oven to 400°F (200°C). This heat will crisp the bread nicely. 2. Make the garlic butter spread: Take a small bowl. Mix 4 tablespoons of softened butter with 4 minced garlic cloves. Blend until smooth. 3. Prepare the baguette: Slice one large baguette in half, lengthwise. Spread the garlic butter evenly on the cut sides. 1. Bake the garlic bread halves: Place the baguette halves on a baking sheet. Bake them for about 10 minutes. Look for edges that are crispy. 2. Add mozzarella and tomatoes: Take the bread out of the oven. Layer 1 cup of sliced mozzarella on top, then add 2 cups of halved cherry tomatoes. 3. Final bake for melting cheese: Return the bread to the oven. Bake for an additional 5-7 minutes. The cheese should melt and look bubbly. 1. Add basil and balsamic glaze: Once out of the oven, sprinkle 1/4 cup of chopped fresh basil on top. Drizzle 1 tablespoon of balsamic glaze over the bread. 2. Season and serve: Finish by adding salt and pepper to taste. Slice the bread into pieces and serve warm. Enjoy your Caprese Garlic Bread! To achieve the perfect crisp, start with a good baguette. Slice it in half lengthwise. Spread the garlic butter evenly over the cut sides. Bake it at 400°F for about 10 minutes. You want the edges to get golden brown. This step creates a nice crunch. To ensure cheese melts properly, layer the mozzarella on the warm bread. The heat helps it melt better. Bake it again for 5-7 minutes. Keep an eye on it until it bubbles. You can add spices to the garlic butter for extra flavor. Try mixing in a pinch of red pepper flakes or Italian herbs. These spices will elevate the taste. Using different types of cheese can also change the flavor. You might try provolone or feta for a twist. Each cheese brings its unique taste to the bread. For serving suggestions, slice the bread into pieces after baking. Arrange it on a nice platter. This makes it easy for guests to grab. Ideal pairings include a fresh salad or a bowl of soup. The bright flavors of the Caprese Garlic Bread complement many dishes. You can also serve it with a glass of wine for a lovely touch. Pro Tips Use Fresh Ingredients: Fresh mozzarella and basil will elevate the flavors of your Caprese garlic bread, making it taste vibrant and delicious. Customize Your Toppings: Feel free to add other toppings like sliced olives, roasted red peppers, or even a sprinkle of crushed red pepper for some heat. Perfect the Garlic Butter: For extra flavor, consider adding a pinch of Italian seasoning or a squeeze of lemon juice to your garlic butter spread. Serve Immediately: This dish is best enjoyed fresh out of the oven while the cheese is still gooey and the bread is warm and crispy. {{image_2}} You can change the cheese to fit your taste. Try using feta or goat cheese for a tangy kick. Both options add a new layer of flavor. You can also use provolone or fontina for a rich, creamy texture. Consider different bread options too. A sourdough loaf gives a nice tangy flavor. Ciabatta is another great choice with its airy texture. You can even use whole grain bread for added nutrition. If you need a gluten-free version, use gluten-free baguette or bread. Many brands offer great alternatives. Just make sure to check the labels for cross-contamination. For a vegan version, swap the butter for a plant-based spread. Use almond or cashew cheese instead of mozzarella. You can still enjoy the flavors without dairy. Adding seasonal vegetables can make this dish special. In summer, try zucchini or bell peppers. In the fall, roasted butternut squash adds sweetness. Incorporating holiday flavors can be fun too. For a festive touch, add cranberries or nuts. They can give a unique taste to your garlic bread. Don’t be afraid to experiment with flavors! To keep your Caprese garlic bread fresh, wrap it tightly in foil or plastic wrap. Store it in the fridge for up to three days. When you are ready to eat, preheat your oven to 350°F (175°C). Place the bread on a baking sheet and reheat it for about 10 minutes. This method helps the bread regain some of its crispiness. If you want, you can also sprinkle a little extra cheese on top before reheating. You can freeze Caprese garlic bread for longer storage. First, let it cool completely. Wrap each half in plastic wrap and then in aluminum foil. This keeps the bread fresh and prevents freezer burn. When you want to enjoy it, take it out of the freezer. Let it thaw in the fridge overnight. To reheat, preheat your oven to 400°F (200°C). Bake the bread for about 15-20 minutes until it is hot and the cheese is melted. This way, you keep all the delicious flavors intact. Can I use pre-made garlic butter? Yes, you can use pre-made garlic butter. This can save time. Just spread it on the baguette, and you’re ready to bake. However, fresh garlic adds a stronger flavor. What can I substitute for mozzarella? You can use other cheeses like provolone or fontina. These cheeses melt well too. If you want a vegan option, try cashew cheese or a plant-based mozzarella. How long does Caprese Garlic Bread last? Caprese Garlic Bread lasts about 2 days at room temperature. Store it in an airtight container. For longer storage, keep it in the fridge for up to a week. What goes well with Caprese Garlic Bread? This bread pairs well with salads or soups. A fresh arugula salad adds a nice crunch. Tomato soup also makes a great match. Is it suitable for meal prep? Yes, it is great for meal prep. You can prepare the garlic butter and slice the baguette in advance. Just bake it fresh when you want to serve. Can I prepare it in advance? Absolutely! You can make the garlic butter and slice the baguette a day ahead. Just cover them well and store in the fridge. Best way to store before baking? Wrap the prepared bread in plastic wrap. You can also place it in a sealed container. This keeps it fresh until you're ready to bake. Caprese garlic bread is a delicious dish that uses simple ingredients. This bread combines the rich taste of garlic butter, fresh mozzarella, and vibrant cherry tomatoes. You can easily adapt it with different cheeses or bread. Follow the steps to bake it perfectly, and don't forget the fresh basil and balsamic glaze for the final touch. With these tips, you can make a tasty meal or snack that impresses every time. Get ready to enjoy a delightful treat that everyone will love!

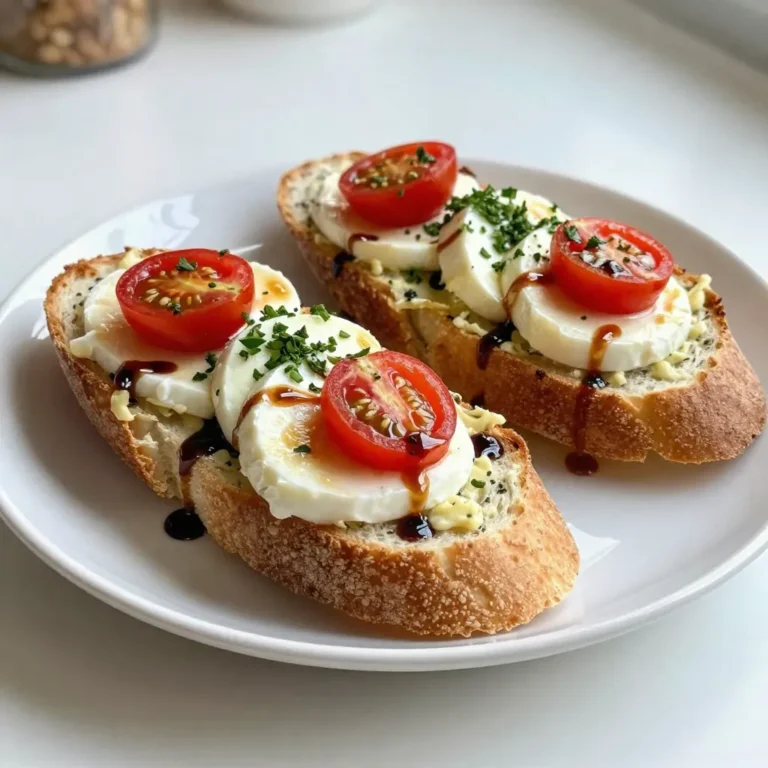
Caprese Garlic Bread Delicious and Easy Recipe

To make Honey Sriracha Chicken Skewers, gather these main ingredients: - 1 lb boneless chicken breast, cut into 1-inch cubes - 1/2 cup honey - 1/4 cup Sriracha sauce - 2 tablespoons soy sauce - 2 tablespoons rice vinegar - 2 cloves garlic, minced - 1 teaspoon ginger, grated - 1 tablespoon sesame oil - Salt and pepper to taste - Skewers (if using wooden skewers, soak them in water for 30 minutes) The marinade is key to great flavor. It combines sweet, spicy, and savory notes. Here’s what you use: - Honey adds sweetness and helps caramelize the chicken. - Sriracha gives a spicy kick. Adjust this to your taste. - Soy sauce offers umami, enhancing the chicken’s flavor. - Rice vinegar brings a tangy balance. - Minced garlic and grated ginger add depth and warmth. - Sesame oil provides a nutty flavor. - Salt and pepper round out the seasoning. Garnishes make your skewers look appealing and add fresh taste. Here are some ideas: - Fresh cilantro, chopped, adds color and a fresh touch. - Lime wedges provide a zesty squeeze that brightens the dish. - Serve the skewers on lettuce leaves for a crisp base. - Pair with rice or salad for a hearty meal. These additions make your Honey Sriracha Chicken Skewers not just tasty but also inviting! {{ingredient_image_1}} To start, grab a medium bowl. In this bowl, mix together the following: - 1/2 cup honey - 1/4 cup Sriracha sauce - 2 tablespoons soy sauce - 2 tablespoons rice vinegar - 2 cloves garlic, minced - 1 teaspoon ginger, grated - 1 tablespoon sesame oil - Salt and pepper to taste Whisk these ingredients well. This marinade will bring a sweet and spicy kick to your chicken. Now, take 1 pound of boneless chicken breast and cut it into 1-inch cubes. Place the chicken in a large resealable plastic bag or a shallow dish. Pour the marinade over the chicken. Make sure all pieces are coated. Seal the bag or cover the dish. Refrigerate for at least 1 hour. For best results, marinate overnight. This allows the flavors to soak in deeply. When ready to grill, preheat your grill to medium-high heat. While waiting, thread the marinated chicken pieces onto skewers. Leave a little space between each piece for even cooking. Once the grill is hot, place the skewers on it. Cook for about 4 to 5 minutes on each side. Look for nice grill marks and ensure the chicken is cooked through. After grilling, remove the skewers and let them rest for a few minutes. To finish, drizzle any leftover marinade over the skewers. Garnish with fresh chopped cilantro. Enjoy your delicious Honey Sriracha Chicken Skewers! To make the best Honey Sriracha Chicken Skewers, focus on the marinade. Use fresh ingredients like garlic and ginger for a bright taste. Honey gives sweetness, while Sriracha adds heat. Adjust the Sriracha to match your taste. More Sriracha means spicier skewers. Let the chicken soak in the marinade for at least one hour. For even better flavor, marinate overnight. This makes the chicken juicy and full of flavor. Grilling the chicken properly is key. Preheat your grill to medium-high heat. This helps get nice grill marks. When threading the chicken on skewers, leave space between each piece. This allows heat to circulate, cooking evenly. Cook the skewers for about 4-5 minutes on each side. Look for clear juices and a firm texture. Use a meat thermometer for best results. The chicken should reach 165°F (75°C) to ensure it’s safe to eat. Resting the skewers is important. Let them sit for a few minutes after grilling. This helps the juices settle, making the chicken even juicier. For serving, drizzle any leftover marinade over the skewers. This boosts flavor and adds a nice glaze. Garnish with fresh cilantro for color and taste. Serve on a large platter with lettuce leaves. Lime wedges add a zesty touch, perfect for squeezing over your skewers. Enjoy this flavorful dish with family and friends. Pro Tips Marinate Longer for Flavor: For the best flavor, marinate the chicken overnight. This allows the flavors to penetrate the meat, making it more delicious. Skewer Safety: If using wooden skewers, always soak them in water for at least 30 minutes before grilling. This prevents them from burning on the grill. Check Chicken Doneness: Use a meat thermometer to ensure the chicken is cooked through; the internal temperature should reach 165°F (75°C). Garnish for Freshness: Fresh cilantro adds a burst of color and flavor. Consider adding other garnishes like sliced green onions or sesame seeds for extra flair. {{image_2}} You can switch out chicken for other meats. Try shrimp for a quick cook. Beef adds a nice, rich flavor. Pork works well too and pairs nicely with the honey. If you prefer plant-based options, use firm tofu or tempeh. Both soak up flavors well and grill nicely. Mixing the marinade can give your skewers a new twist. Add lime juice for a tangy kick. If you want more heat, use chili paste or extra Sriracha. Consider adding herbs like basil or parsley for freshness. You can also swap honey for maple syrup for a unique flavor. Adding vegetables makes your skewers colorful and healthy. Bell peppers, zucchini, and red onion work great. Cherry tomatoes add sweetness and juiciness. You can also include mushrooms for a meaty texture. Just be sure to cut veggies into similar sizes for even cooking. To store leftover Honey Sriracha chicken skewers, first let them cool down. Place the skewers in an airtight container. You can keep them in the fridge for up to three days. Wrapping them in plastic wrap before placing them in the container helps keep them fresh. When you want to eat the leftovers, reheating is simple. You can use a microwave or an oven. For the microwave, heat on medium for about 1-2 minutes. For the oven, preheat it to 350°F (175°C) and heat the skewers for about 10 minutes. Make sure they are hot all the way through before serving. If you want to freeze the skewers, place them in a freezer-safe bag after they cool. They can last up to three months in the freezer. When you're ready to eat, take them out and thaw in the fridge overnight. You can also reheat them directly from frozen, but it will take longer. You should marinate the chicken for at least 1 hour. For best results, let it sit overnight. This gives the chicken time to soak up all the tasty flavors. A good marinade makes the meat juicy and full of flavor. Yes, you can! Preheat your oven to 400°F (200°C). Place the skewers on a baking sheet. Bake for about 15 to 20 minutes. Flip them halfway through for even cooking. The oven gives you a nice, cooked texture if you can't grill outside. These skewers taste great with many sides. Here are some ideas: - Steamed rice - Grilled vegetables - Fresh salad - Garlic bread - Corn on the cob These sides will balance the sweet and spicy flavors of the chicken. To make it milder, use less Sriracha sauce. You can also add more honey for sweetness. If you want more heat, add more Sriracha or some red pepper flakes. Taste as you go to find the perfect balance for you. Honey Sriracha chicken skewers are tasty and easy to make at home. We covered key ingredients, a step-by-step guide, helpful tips for cooking, and fun variations. Always marinate for the best flavor and try different proteins or veggies. Storing leftovers is simple, and reheating is easy. This dish will impress friends and family. Enjoy grilling and experimenting with flavors!

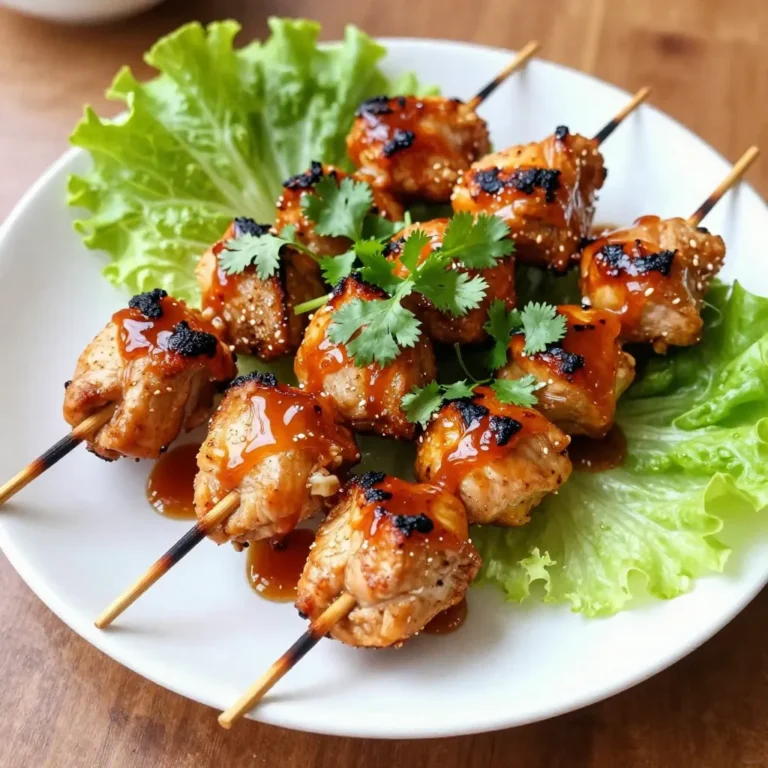
Honey Sriracha Chicken Skewers Flavorful Grilling Recipe

- 2 cups fresh strawberries, hulled and sliced - 1 cup freshly squeezed lemon juice - 1/2 cup honey or agave syrup (adjust to taste) - 1 cup water - Zest of 1 lemon - A pinch of salt - Fresh mint leaves for garnish (optional) Fresh strawberries bring bright flavor to your popsicles. If strawberries are out of season, you can use frozen ones. Just let them thaw first. Fresh lemon juice gives a zesty taste. Store-bought lemon juice works, but fresh is better for flavor. For sweetness, honey is my go-to, but agave syrup is a great vegan choice. You can reduce the amount of sweetener if you prefer less sugar. The pinch of salt balances the flavors. You can switch sweeteners easily. Use maple syrup for a unique taste. For a low-calorie option, consider stevia. Each sweetener changes the flavor a bit, so taste as you go. Adjust to your liking! {{ingredient_image_1}} First, gather your ingredients. You need fresh strawberries, lemon juice, honey, water, lemon zest, and salt. Hull and slice the strawberries. This step makes blending easier. Next, put all your ingredients in a blender. Blend on high until smooth. The mix should be well combined and vibrant. Taste it. If it needs more sweetness, add more honey or agave syrup. Blend again if you add anything. To get the best texture, make sure your strawberries are ripe. Ripe berries blend better. If you want a thicker popsicle, use less water. For a thinner mix, add more water. Try not to over-blend. You want a smooth mix, not a juice. A few small chunks of strawberry add texture and flavor. Once your mixture is ready, grab your popsicle molds. Pour the strawberry lemonade mix into each mold, filling them about 3/4 full. This space allows for expansion as they freeze. Insert the popsicle sticks into the molds. Make sure they stand straight. Freeze for at least 6 hours or until they are solid. When ready to eat, run warm water over the molds for a few seconds. This helps release the popsicles. Gently pull them out and enjoy! To make the best Strawberry Lemonade Popsicles, freeze them properly. Fill your molds about 3/4 full. This space helps the popsicles expand without spilling. If you want to add layers, freeze each layer for one hour before adding the next. This way, you get a beautiful striped look. Freeze your popsicles for at least six hours. This ensures they are solid and won't melt too fast. If your popsicles stick to the mold, try running warm water over the outside. This helps loosen them. If they are too icy, adjust your blend. Adding more honey can help create a creamier texture. If the popsicles are too sweet, add a little more lemon juice in your mix. Always taste your mixture before freezing to get it just right. Serve your popsicles right after taking them out of the mold. They taste best when fresh! You can garnish with fresh mint leaves for a nice look. If you want to get creative, serve them with a splash of soda for a fizzy treat. These popsicles are great for summer parties or family gatherings. Kids and adults will love them! Pro Tips Choose Ripe Strawberries: For the best flavor, use ripe, sweet strawberries. Look for bright red berries with no white or green spots. Adjust Sweetness: The sweetness of strawberries can vary. Always taste the mixture before freezing and adjust the honey or agave syrup to your liking. Experiment with Flavors: Try adding other fruits like blueberries or raspberries to the mixture for a mixed berry popsicle. Just blend them in with the strawberries! Cool Down the Mixture: For a quicker freezing time, chill the blended mixture in the refrigerator before pouring it into the molds. {{image_2}} You can change the flavor of your strawberry lemonade popsicles by using other fruits. Here are some tasty options: - Raspberries: They add a tangy twist. - Peaches: Sweet and juicy, they mix well with lemon. - Mangoes: This fruit gives a tropical vibe. - Blueberries: They match well with strawberries. Mix and match these fruits for fun flavors. Just keep the same amounts to keep it simple. Adding herbs or spices can take your popsicles to the next level. Here are some ideas: - Fresh Mint: It adds a cool taste. You can mix it in or use it as a garnish. - Basil: This herb gives a unique flavor. Blend a few leaves into the mixture. - Ginger: A small amount of fresh ginger adds a nice kick. Experiment to find what you like best. Herbs can make your popsicles special and fresh. If you want to make a grown-up version, add some alcohol. Here are some ideas: - Vodka: It mixes well and keeps the flavor bright. - Rum: This adds a tropical twist. - Prosecco: A splash gives a bubbly touch. Make sure to keep the alcohol amount low, so the popsicles will freeze properly. Enjoy your refreshing treat with a twist! Storing your popsicles is easy. First, ensure they are completely frozen. Once fully frozen, remove them from the molds. Wrap each popsicle in plastic wrap or place them in an airtight container. This keeps them fresh and avoids freezer burn. Store them in the freezer for best results. Strawberry lemonade popsicles last about 2 to 3 months in the freezer. After that, they may lose flavor and texture. To enjoy their best taste, eat them within this time frame. If you notice ice crystals forming, it means they might be past their prime. You can reuse popsicle molds many times. After using them, wash the molds with warm soapy water. Rinse well to remove any soap. Let them dry before using again. This way, you can make more delicious popsicles whenever you want! Strawberry Lemonade Popsicles can last up to two months in the freezer. Store them in an airtight container or wrap them well in plastic wrap. This keeps them fresh and prevents freezer burn. When you want a treat, just take one out and enjoy! Yes, you can make these popsicles without sugar. Use fruit to sweeten instead. Ripe strawberries add natural sweetness. You can also use mashed bananas or applesauce for extra flavor. Adjust the amount of lemon juice to balance the taste. This way, you have a healthy treat! If you lack popsicle molds, use small cups or ice cube trays. Pour the mixture into these and insert wooden sticks. For cups, freeze until solid, then gently pull the popsicle out. You can run warm water over the cup for a few seconds to help release them. Enjoy your popsicles in any shape! You now have all the tools to make amazing popsicles. We covered the right ingredients, step-by-step prep, and fun variations. Remember to experiment with flavors and enjoy the process. Proper freezing and storage will keep your popsicles fresh and tasty. Don't be afraid to get creative with herbs or even alcohol! Dive in, make your own tasty treats, and share them with friends and family. Enjoy every bite of your homemade popsicles.

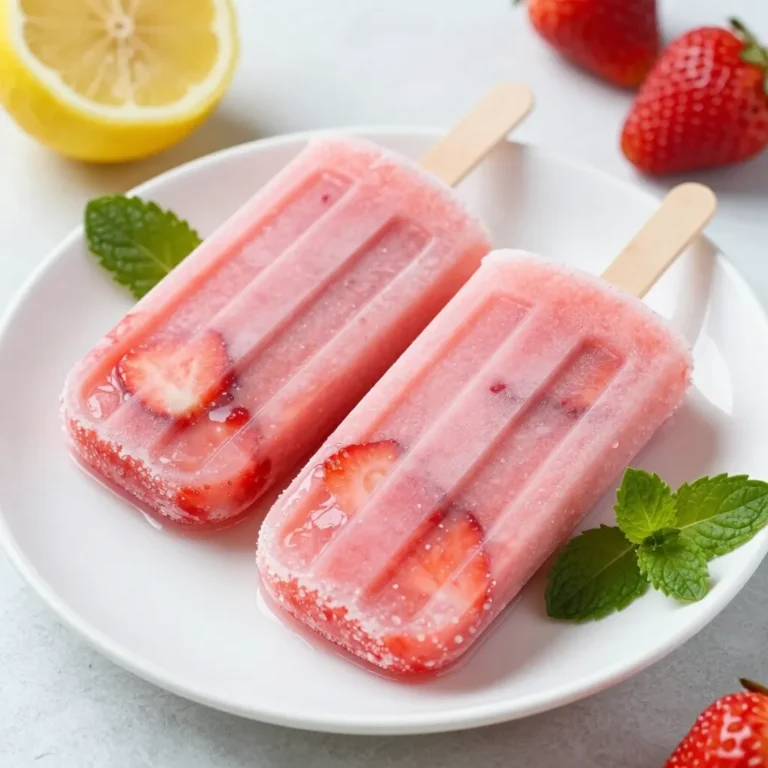
Strawberry Lemonade Popsicles Refreshing Summer Treat

To make these tasty snacks, you need some key ingredients: - 1 cup natural peanut butter - 1/2 cup rolled oats - 1/4 cup honey or maple syrup - 1/4 cup mini dark chocolate chips - 1/4 cup ground flaxseed - 1/2 teaspoon vanilla extract - A pinch of sea salt Each of these ingredients adds flavor and nutrition. The peanut butter gives protein and healthy fats. The oats provide fiber, keeping you full longer. Honey or maple syrup adds sweetness and binds everything together. The dark chocolate chips give a nice touch of sweetness and fun. Flaxseed adds omega-3 fatty acids, great for heart health. Lastly, vanilla and sea salt enhance the overall taste. You can mix things up with optional ingredients. Try adding: - Chopped nuts for crunch - Dried fruit for natural sweetness - Protein powder for extra boost - Coconut flakes for a tropical twist These options let you personalize your energy balls. Get creative and make them your own! Here’s what each main ingredient brings to the table: - Peanut Butter: Rich in protein and healthy fats. - Rolled Oats: Good source of fiber and energy. - Honey/Maple Syrup: Natural sweeteners with some vitamins. - Mini Dark Chocolate Chips: Antioxidants and a little joy. - Ground Flaxseed: High in omega-3s and fiber. - Vanilla Extract: Adds flavor with few calories. - Sea Salt: Enhances taste and balances flavors. This mix makes for a balanced snack that fuels your day. Enjoy your energy balls knowing they are both tasty and good for you! {{ingredient_image_1}} Making peanut butter energy balls is quick and easy. You will need about 15 minutes to prep. Gather all your ingredients first. This makes mixing faster. 1. Start with a mixing bowl. Add 1 cup of natural peanut butter. 2. Pour in 1/4 cup of honey or maple syrup. 3. Add 1/2 teaspoon of vanilla extract. Mix until smooth. 4. Next, include 1/2 cup of rolled oats. 5. Add 1/4 cup of ground flaxseed and a pinch of sea salt. 6. Finally, stir in 1/4 cup of mini dark chocolate chips. 7. Once mixed, take a small amount and roll it into a ball. Each ball should be about 1 inch wide. 8. If the mix is sticky, wet your hands slightly. 9. Place the balls on a parchment-lined baking sheet. After rolling, put the baking sheet in the fridge. Let the energy balls chill for about 30 minutes. This helps them firm up. After chilling, transfer them to an airtight container. You can keep them in the fridge for up to a week. Enjoy your snacks anytime! To get the right texture, use natural peanut butter. This type is creamy and smooth. It makes mixing easy. If your mixture feels too dry, add a bit more honey or maple syrup. For a firmer ball, add more oats or flaxseed. Don’t skip the chilling step! This helps the balls firm up. If you skip this, they may fall apart. Also, avoid using sweetened peanut butter. It can make the balls too sweet. Finally, make sure to mix all ingredients well. Uneven mixing leads to some balls being dry. Rolling can be messy! To make it easier, dampen your hands slightly. This stops the mixture from sticking. You can also use a small cookie scoop to measure out the mixture. This helps keep the balls even in size. If you want to get creative, try rolling them in shredded coconut or crushed nuts for a fun touch! Pro Tips Storage Solution: For longer shelf life, consider freezing the energy balls. They can stay fresh for up to three months in the freezer. Flavor Variations: Experiment with different nut butters, such as almond or cashew, for a unique twist on the flavor profile. Boost the Nutrition: Add in some chia seeds or protein powder to increase the nutritional value of your power bites. Make It Fun: Get kids involved in rolling the balls; it's a fun activity that encourages them to help in the kitchen! {{image_2}} If you need a nut-free version of these energy balls, I have great ideas. You can swap peanut butter for sunflower seed butter. This option gives a similar texture and taste. You can also use pumpkin seed butter. Both choices are safe for kids with nut allergies. They are tasty and keep the energy up! Want to change the flavor? You can add spices like cinnamon or cocoa powder. Just a teaspoon of cinnamon can make a big difference. Cocoa powder gives a rich chocolate taste. You can also mix in dried fruits, like cranberries or raisins. These add sweetness and chewiness to the balls. For a tropical twist, try adding shredded coconut. Each option brings its own fun flavor! To make your energy balls even more interesting, try adding different mix-ins. Chopped nuts, like almonds or walnuts, add a nice crunch. You can also add seeds, like chia or hemp seeds, for extra nutrition. They give a great texture and boost the health benefits. If you like a chewy texture, add more oats or some puffed rice. These mix-ins let you create your perfect snack! To keep your peanut butter energy balls fresh, store them in an airtight container. Place them in the fridge right after they chill. This helps them stay firm and tasty. You can stack them, but use parchment paper between layers. This prevents them from sticking together. If you want to save energy balls for later, freezing is a great option. First, place them in a single layer on a baking sheet. Freeze them for about an hour until firm. Then, transfer them to a freezer bag. They can last up to three months in the freezer. Just thaw them in the fridge before you enjoy them. Fresh peanut butter energy balls should smell nutty and sweet. If they develop an off smell or taste, it’s time to toss them. Look for any mold or changes in texture. If they feel too hard or dry, they may not be good anymore. Always trust your senses; it’s the best guide! Peanut Butter Energy Balls last up to a week in the fridge. Store them in an airtight container to keep them fresh. You can also freeze them. If you freeze them, they can last for up to three months. Just remember to thaw them before you eat. Yes, you can substitute many ingredients in this recipe. If you need a nut-free option, use sun butter instead of peanut butter. You can swap honey for maple syrup if you prefer. Use different types of oats or add seeds for added crunch. Get creative with flavors and textures that you enjoy. Peanut Butter Energy Balls are perfect for meal prep. They are easy to make and quick to grab when you're hungry. You can make a big batch and store them in the fridge or freezer. This way, you always have a healthy snack on hand. Peanut butter energy balls are simple and fun to make. We covered essential and optional ingredients, nutritional details, and step-by-step instructions. You learned tips to get the right texture and avoid mistakes. We explored nut-free options and fun flavors. Don't forget storage tips for freshness. These energy balls are tasty, healthy snacks perfect for any time. With practice, you'll master them in no time. Enjoy making your own unique blends!

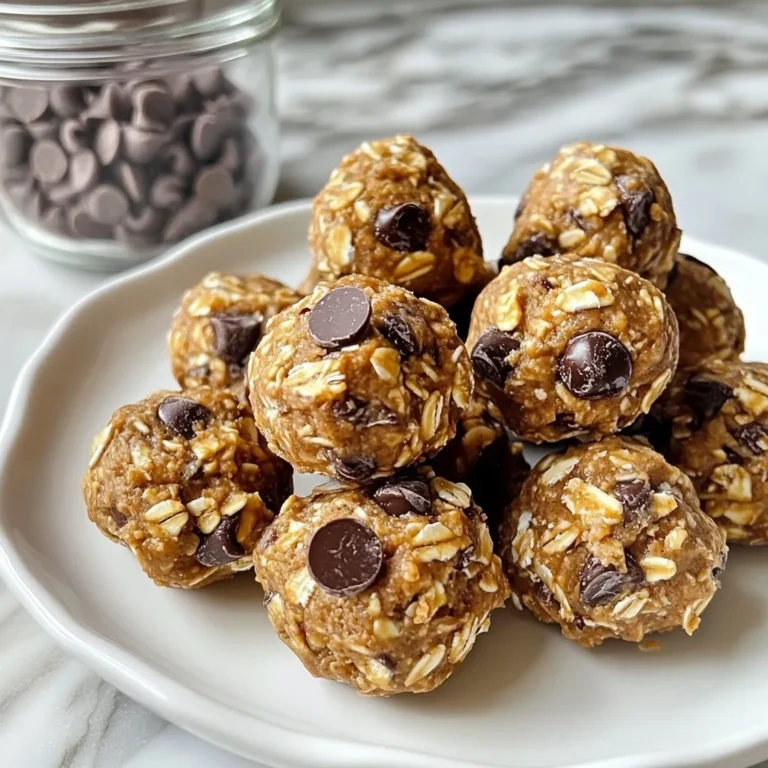
Peanut Butter Energy Balls Nutritious Snack Idea

- 1.5 pounds baby potatoes, halved - 4 cloves of garlic, minced - 1/2 cup grated Parmesan cheese - 3 tablespoons olive oil - 1 teaspoon dried oregano - 1 teaspoon smoked paprika - Salt and pepper to taste - Fresh parsley, chopped for garnish Gathering ingredients is the first step to making Garlic Parmesan Roasted Potatoes. Start with baby potatoes. Their small size makes them perfect for roasting. Halve them for even cooking. Next, you'll need garlic. Four cloves, minced, gives a strong flavor. Parmesan cheese adds a rich taste and crispy texture. Use half a cup for the best results. Olive oil is key for a golden finish. Three tablespoons will coat the potatoes well. Dried oregano brings an earthy note. One teaspoon is enough to enhance the dish. Smoked paprika adds warmth and depth. Just one teaspoon will do the trick. Don't forget salt and pepper. They are crucial for taste. Add them to your liking. Lastly, fresh parsley will brighten the dish. Chop some for garnish. These ingredients come together to create a crispy and flavorful side dish. {{ingredient_image_1}} - Preheat the oven to 425°F (220°C). - In a large mixing bowl, combine the halved baby potatoes, minced garlic, olive oil, dried oregano, smoked paprika, salt, and pepper. - Toss the baby potatoes in the seasoning mixture until they are well coated. When you mix the ingredients, be sure to cover each potato piece. This step is key for great flavor. Use your hands or a spatula to mix. The more even the coating, the better the taste. - Spread the potatoes on a baking sheet lined with parchment paper. - Roast in the preheated oven for 25 minutes. - After 25 minutes, take the baking sheet out and sprinkle grated Parmesan cheese over the potatoes. - Return the baking sheet to the oven and roast for another 10-15 minutes, or until the potatoes are golden brown and crispy. Watch the potatoes closely. The cheese should melt and form a nice crust. The goal is crispy edges and soft insides. You can also flip the potatoes halfway through if you want even browning. - Garnish with freshly chopped parsley before serving. For a beautiful presentation, serve the roasted potatoes on a platter. Add extra parsley and a sprinkle of Parmesan on top. This adds color and makes the dish pop. Enjoy the delicious, crispy, and flavorful garlic Parmesan roasted potatoes! To make your Garlic Parmesan Roasted Potatoes extra crispy, start by cutting the baby potatoes in half. This increases the surface area for crispiness. You want to preheat your oven to 425°F (220°C) before cooking. A hot oven helps create that golden crust. If you want to try an alternate cooking method, consider using an air fryer. This will give you that same crispy texture with less oil. Cook them at 400°F (200°C) for about 20 minutes. Shake the basket halfway through to ensure even cooking. While the garlic and Parmesan are great, you can enhance the flavor even more. Add a pinch of red pepper flakes for some heat. Fresh rosemary or thyme can also bring a nice herbal note. For cheese variations, you might swap Parmesan for Pecorino Romano. This cheese adds a salty kick. You could even try a mix of cheeses for a richer taste. Experimenting with these additions can make your dish unique. Pro Tips Choose the Right Potatoes: Opt for waxy baby potatoes for a creamy texture inside and crispy exterior. Don't Skip the Garlic: Fresh minced garlic enhances the flavor; consider adding whole cloves for a milder taste. Even Cooking: Make sure potatoes are in a single layer on the baking sheet to ensure even roasting. Check for Doneness: Potatoes should be fork-tender and golden brown for the best texture and flavor. {{image_2}} You can change the type of potato you use. Try Yukon Gold or fingerling potatoes. Each type brings its own taste and texture. You can also use sweet potatoes for a twist. They add a nice sweetness and color. If you want a vegan or dairy-free option, skip the Parmesan. Use a dairy-free cheese instead. Nutritional yeast is another great choice for a cheesy flavor without dairy. Just sprinkle it on before serving. Garlic Parmesan Roasted Potatoes pair well with many dishes. Serve them alongside grilled chicken or fish for a balanced meal. They also go great with roasted veggies or a fresh salad. This dish is perfect for many occasions. Serve it at family dinners or holiday gatherings. They also make a great side for weekend barbecues. Enjoy them as a snack while watching a movie, too! To keep your Garlic Parmesan Roasted Potatoes fresh, store them in an airtight container. This helps lock in the flavor and keep them crispy. Let the potatoes cool completely before you seal them up. This prevents moisture build-up, which can make them soggy. Leftovers last for about 3-5 days in the fridge. Always check for any off smells or unusual textures before eating them. When it’s time to enjoy your leftovers, reheating is key for that crispy texture. The oven is the best method. Preheat your oven to 400°F (200°C). Spread the potatoes in a single layer on a baking sheet. Bake for about 10-15 minutes until they are hot and crispy again. If you’re short on time, you can use the microwave. Just be aware it won’t get them crispy. Heat them in short bursts of 30 seconds, checking in between. Enjoying these potatoes again is easy with the right reheating! What type of potatoes are best for roasting? I find that baby potatoes are great for roasting. They cook evenly and have a nice creamy texture. You can also use Yukon Gold or red potatoes. Both types work well, giving that crispy outside and soft inside. Can I make Garlic Parmesan Roasted Potatoes ahead of time? Yes, you can prepare them ahead of time. Just follow the recipe up to the roasting step. Then, store the tossed potatoes in the fridge. When you are ready to bake them, just spread them on a baking sheet and roast. They will taste fresh and delicious. How do I know when the potatoes are done roasting? Potatoes are done when they are golden brown and crispy. You can also poke one with a fork. If it goes in easily, they are ready. The cheese should be melted and bubbly on top. Why are my potatoes not crispy? If your potatoes are not crispy, check a few things. First, make sure you spread them out in a single layer. Crowding the pan can trap steam. Also, make sure you used enough oil. This helps them crisp up nicely. What can I do if I don't have Parmesan cheese? If you don’t have Parmesan cheese, you can use other cheese types. Grated Pecorino Romano or aged cheddar can work well. For a dairy-free option, try nutritional yeast. It adds a cheesy flavor without the dairy. Garlic Parmesan roasted potatoes are simple and packed with flavor. We covered the key ingredients, preparation steps, and cooking tips for perfect potatoes. You now have great ideas for variations and best practices for storage. Remember, crispiness is key, and feel free to switch up ingredients to suit your taste. With these tips, you can impress at any gathering or enjoy a cozy meal at home. Now, get ready to enjoy a tasty treat that everyone will love!

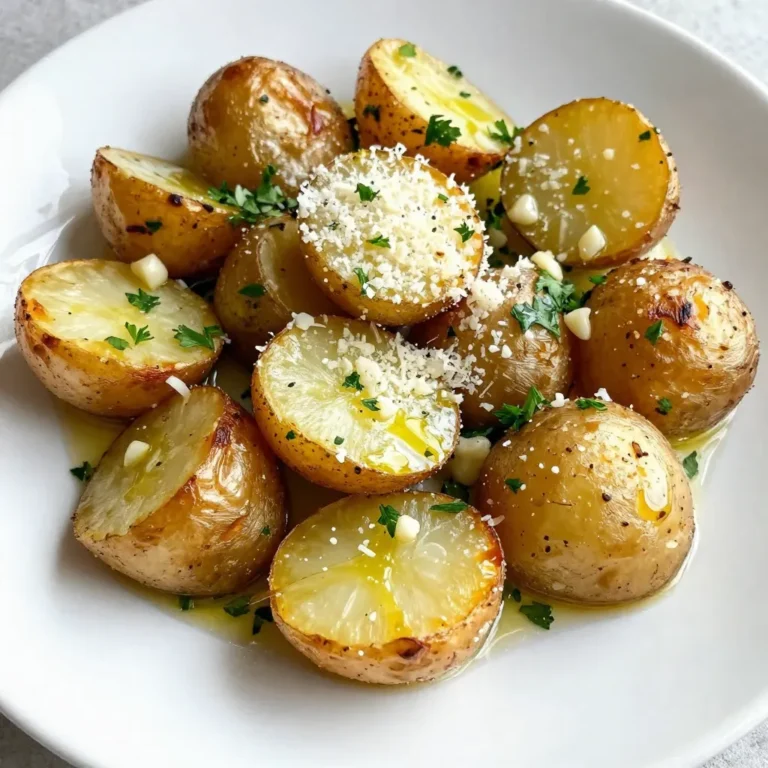
Garlic Parmesan Roasted Potatoes Crispy and Flavorful

To make delicious Banana Nutella Swirl Muffins, you need some simple ingredients. Here’s what you will need: - 3 ripe bananas, mashed - 1/3 cup melted butter - 1/2 cup sugar - 1 large egg, beaten - 1 teaspoon vanilla extract - 1 teaspoon baking soda - Pinch of salt - 1 cup all-purpose flour - 1/3 cup Nutella - Optional: 1/4 cup chopped walnuts or pecans Each ingredient plays a key role. The ripe bananas add sweetness and moisture. The butter helps create a rich flavor. Sugar sweetens the muffins while the egg binds everything together. Vanilla adds warmth, and baking soda helps them rise. You can add walnuts or pecans for a nice crunch. This step is optional, but it adds great taste. Make sure you have everything ready before you start baking. Gather these ingredients, and you are set to create something wonderful! {{ingredient_image_1}} First, preheat your oven to 350°F (175°C). Grease a muffin tin or line it with paper liners. This step is key for easy muffin removal. In a large bowl, mash the three ripe bananas. Add 1/3 cup melted butter and mix well. Then, stir in 1/2 cup sugar and 1 large beaten egg. Finally, add 1 teaspoon of vanilla extract to give it a nice flavor boost. Next, sprinkle 1 teaspoon baking soda and a pinch of salt into the mix. Stir well to combine these dry ingredients. Gradually fold in 1 cup of all-purpose flour until no dry flour is visible. Remember, do not overmix! If you like, fold in 1/4 cup of chopped walnuts or pecans. This adds a nice crunch and flavor. It’s an option, but I highly recommend it! Now comes the fun part! Divide the batter evenly among the muffin cups, filling each about 2/3 full. Use a teaspoon to drop dollops of Nutella on top. Take a toothpick or skewer and swirl the Nutella into the batter. This creates a lovely marbled effect. Bake the muffins for 18-20 minutes. Check if they are done by inserting a toothpick in the center. If it comes out clean, they are ready! Let the muffins cool in the pan for 5 minutes. Then, transfer them to a wire rack to cool completely. Enjoy the rich smell while they cool! Overmixing can ruin your muffins. It makes them tough instead of soft. To avoid this, mix your batter gently. When adding flour, fold it in carefully. Stop mixing as soon as you no longer see dry flour. A few lumps are okay! This keeps your muffins light and fluffy. Swirling Nutella makes your muffins look great and taste amazing. After you fill the muffin cups, drop small spoonfuls of Nutella on top. Then, take a toothpick or skewer. Gently swirl it into the batter. Don’t mix too much! You want to see the Nutella in the muffins. How you serve muffins can make them even better. Try serving them warm. Dust the tops with powdered sugar for a sweet touch. Add a small bowl of Nutella for dipping. You can also place banana slices around the muffins on a nice plate. This makes a pretty display and adds flavor, too! Pro Tips Use Overripe Bananas: The softer and more speckled the bananas, the sweeter your muffins will be. This adds natural sweetness and enhances flavor. Don’t Overmix: When adding the flour, mix just until combined to ensure your muffins are light and fluffy. Overmixing can lead to dense muffins. Nutella Swirl Technique: For a beautiful swirl, use a toothpick or skewer to gently fold the Nutella into the batter without fully blending it. Storage Tips: Store muffins in an airtight container at room temperature for up to 3 days, or freeze them for longer storage. Reheat in the microwave for a warm treat. {{image_2}} If you want a nut-free option, try using sunflower seed spread instead of Nutella. It gives a similar creamy texture. You can also use other chocolate spreads that are nut-free. Look for brands that use safe ingredients for allergy concerns. This way, everyone can enjoy the muffins! Spice up your muffins by adding a pinch of cinnamon or nutmeg. These spices bring warmth and depth to each bite. You can also mix in some mini chocolate chips for extra sweetness. If you like fruit, try adding chopped strawberries or blueberries for a fruity twist. Each flavor can make your muffins unique! To make these muffins healthier, swap some ingredients. Use whole wheat flour instead of all-purpose flour. This adds more fiber to the muffins. You can also cut the sugar down by half or use honey as a natural sweetener. For a lighter version, replace butter with unsweetened applesauce. These swaps keep the muffins tasty while making them better for you! To keep your Banana Nutella swirl muffins fresh, store them in an airtight container. Place a piece of parchment paper between layers if you stack them. This helps avoid sticking. Keep the container at room temperature for the best taste. Enjoy them within a few days for maximum flavor. You can freeze these muffins for longer storage. First, let them cool completely. Then, wrap each muffin tightly in plastic wrap or foil. Place the wrapped muffins in a freezer bag. Label the bag with the date. To reheat, remove a muffin and let it thaw at room temperature. You can warm it in the microwave for about 15-20 seconds, or bake it at 350°F for 10 minutes. Banana Nutella swirl muffins last about 2-3 days at room temperature. If you refrigerate them, they stay fresh for about a week. Freezing extends their life up to three months. Always check for any signs of spoilage before enjoying them. Yes, you can use frozen bananas. They work great in muffins. Just thaw them first. Drain any extra liquid before mashing. This way, your muffins stay moist and tasty. Fresh bananas are ideal, but frozen ones are a good backup. To check if your muffins are ready, use the toothpick method. Insert a toothpick into the center of a muffin. If it comes out clean, the muffins are done. If it has batter on it, bake a few more minutes. Keep an eye on them to avoid overbaking. Yes, you can make gluten-free muffins. Use a gluten-free flour blend in place of all-purpose flour. Look for blends that have xanthan gum for best results. This helps mimic the texture of regular flour. Your muffins will still turn out soft and delicious. You now have all the details for making Banana Nutella Swirl Muffins. Start with ripe bananas and melt butter, then mix in sugar, egg, and vanilla. Add the dry ingredients and make those tasty Nutella swirls. Remember to avoid overmixing for the best texture. These muffins are fun to customize with nuts or spices. Store them well for lasting freshness. Enjoy your baking! These muffins are a treat worth savoring.

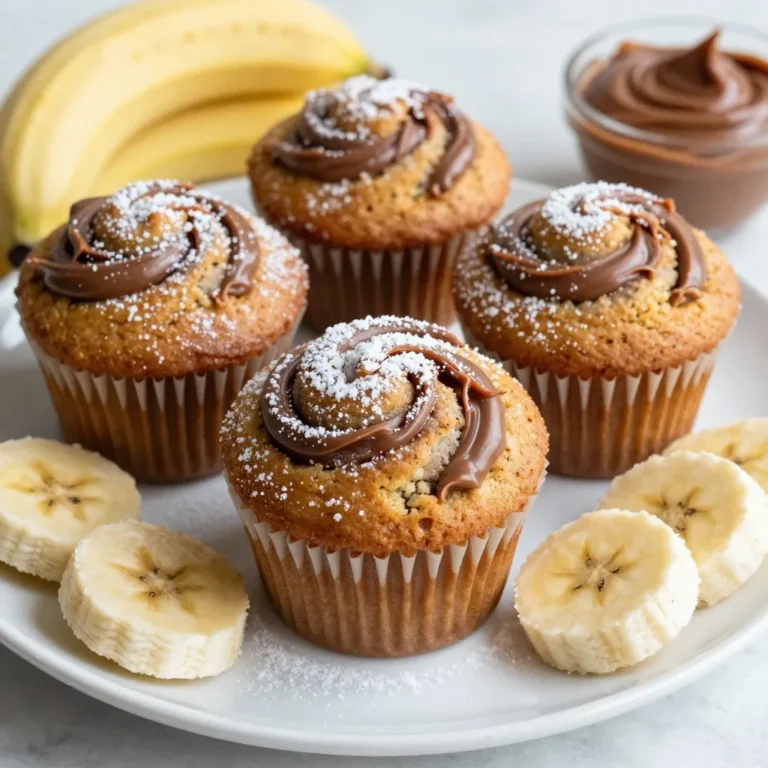
Delicious Banana Nutella Swirl Muffins Recipe Now

1 2 … 86 NEXT
meal twig

explore

DessertsDinnerAppetizersDrinks

Our Policies

  • Cookie Policy
  • Copyright Policy
  • Disclaimer
  • GDPR Policy
  • Terms Of Use
Back to Top
  • About
  • Contact Us
  • Privacy Policy
© 2026 meal twig