If you’re craving an easy dessert that’s rich and creamy, look no further! These No-Bake Biscoff Cheesecake Bars are a dream come true. With a simple list of ingredients, you can whip up this delicious treat in no time. Perfect for any occasion, they pair wonderfully with coffee or tea. In this guide, I’ll walk you through the steps to create a show-stopping dessert that’s sure to impress. Let’s dive in!

Ingredients
To make No-Bake Biscoff Cheesecake Bars, you need simple ingredients that create a rich flavor. Here’s what you’ll need:
– 200g Biscoff cookies, crushed
– 100g unsalted butter, melted
– 300g cream cheese, softened
– 250ml heavy whipping cream
– 100g powdered sugar
– 100g Biscoff spread
– 1 teaspoon vanilla extract
– A pinch of salt
– Extra Biscoff cookies for garnish (optional)
Each ingredient plays a key role in the final dish. The Biscoff cookies give a crunchy and sweet base. The melted butter helps bind the crust together. Cream cheese adds a creamy texture, while heavy whipping cream makes it light and fluffy. Powdered sugar sweetens the mix, and Biscoff spread adds that unique flavor we love. A pinch of salt balances it all out.
If you want to make it extra special, add crushed Biscoff cookies on top for garnish. This treat is easy to make and tastes amazing!
Step-by-Step Instructions
Preparing the Crust
To make the crust, start by mixing the crushed Biscoff cookies with melted butter. Use a bowl and blend them until they look like wet sand. This step is key for a good base.
Next, take the mixture and press it firmly into an 8×8-inch square baking pan. Make sure it’s even and packed tight. This helps the crust hold together. Chill the pan in the fridge while you prepare the cheesecake filling.
Making the Cheesecake Filling
Now, let’s make the cheesecake filling. In a clean bowl, beat the softened cream cheese with an electric mixer until it’s smooth. This should take about 2-3 minutes.
Add the powdered sugar, Biscoff spread, vanilla extract, and a pinch of salt to the cream cheese. Mix until everything combines well and the filling is creamy. This mixture is where the magic happens!
In another bowl, whip the heavy cream until stiff peaks form. This means it should hold its shape when you lift the whisk. Gently fold the whipped cream into the cream cheese mixture. Be careful not to deflate the whipped cream. Keep folding until there are no streaks left.
Assembling and Chilling
Now it’s time to pour the creamy filling over the chilled crust. Use a spatula to smooth the top. This makes it look nice and even.
Cover the pan and chill it in the refrigerator for at least 4 hours. For the best results, let it set overnight. This helps the cheesecake firm up properly.
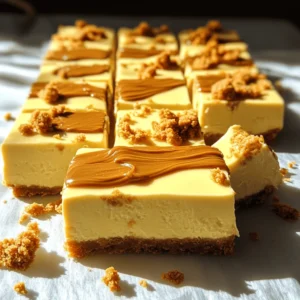
Once set, carefully remove the cheesecake from the pan and cut it into bars. If you want, you can drizzle extra Biscoff spread on top and sprinkle crushed cookies for a fun finish. Enjoy your delicious creation!
Tips & Tricks
Perfecting the Texture
To get the best texture in your cheesecake bars, start with room temperature cream cheese. This makes it easy to blend. If the cream cheese is cold, it can stay lumpy. Let it sit out for about 30 minutes before mixing.
Next, let’s talk about the whipped cream. To achieve stiff peaks, beat the heavy cream until it holds its shape. Use a clean bowl and beaters for best results. This step is key, as it gives your cheesecake a light and airy feel.
Serving Suggestions
When serving your cheesecake bars, presentation is key. Place them on a nice platter. Sprinkle extra crushed Biscoff cookies around the bars for a lovely touch. You can also drizzle more Biscoff spread on top for added flavor.
Pair these bars with a nice cup of coffee or tea. The rich flavors of Biscoff enhance the drinks, making each bite even better.
Common Mistakes to Avoid
One common issue is a crumbly crust. If your crust falls apart, try adding a bit more melted butter. This helps bind the crumbs together.
Another mistake is not letting the cheesecake set long enough. Chill the bars for at least four hours, but overnight is best. This ensures they firm up nicely before you cut them.

Variations
Flavor Variations
You can switch up the Biscoff spread to add fun flavors. Try the chocolate Biscoff spread for a richer taste. You can also use the crunchy version for a bit of texture. Mixing in other cookies is another great way to change the flavor. Oreos or vanilla wafers can make a tasty crust. Just crush them and follow the same steps.
Dietary Adaptations
If you need gluten-free options, use gluten-free cookies for the crust. Many brands offer gluten-free Biscoff cookies. For the filling, you can swap regular cream cheese for a dairy-free cream cheese. This way, those with dairy issues can enjoy the bars too. Just check that your heavy cream is dairy-free as well.
Seasonal Twists
Adding seasonal flavors can make these bars extra special. For fall, try mixing in pumpkin spice. A little cinnamon and nutmeg can bring warmth to the flavor. In winter, peppermint extract can add a festive touch. Just a few drops will brighten the taste and make it more holiday-themed.
Storage Info
Best Storage Practices
To keep your No-Bake Biscoff Cheesecake Bars fresh, store them in the fridge. First, place the bars in an airtight container. This helps prevent drying out and keeps them tasty. You can also cover the pan tightly with plastic wrap if you don’t have a container.
– Use a glass or plastic container with a lid.
– Make sure they are completely cool before storing.
– Keep them in the fridge for up to five days.
Freezing Instructions
If you want to save some for later, freezing is a great option. You can freeze the bars for up to three months. To do this, follow these tips:
– Cut the cheesecake into bars before freezing. This makes it easy to grab one when you want it.
– Wrap each bar in plastic wrap, then place them in a freezer-safe container.
– Label the container with the date to keep track.
When you want to enjoy a frozen cheesecake bar, take it out and let it thaw in the fridge for a few hours. You can also leave it at room temperature for about 30 minutes. Serve it chilled and enjoy its creamy texture!
FAQs
How long do No-Bake Biscoff Cheesecake Bars last in the fridge?
No-Bake Biscoff Cheesecake Bars stay fresh for about 5 days in the fridge. Make sure to keep them covered. I recommend using plastic wrap or an airtight container. This helps keep them moist and tasty.
Can I use other types of cookies for the crust?
Yes, you can use other cookies for the crust. Try using Oreos, graham crackers, or even ginger snaps. Each cookie will give a unique flavor. Just crush them the same way you would with Biscoff cookies.
What can I substitute for cream cheese in this recipe?
If you want a cream cheese substitute, try mascarpone cheese or Greek yogurt. Both options will change the taste a bit but still make a delicious cheesecake. You can also use silken tofu for a dairy-free option.
Is it necessary to chill the bars overnight?
Chilling the bars overnight gives the best results. It helps them set firm and enhances the flavor. If you are in a hurry, chilling them for at least 4 hours will still work. Just know that overnight chilling is preferred.
This blog covered all you need to make No-Bake Biscoff Cheesecake Bars. We looked at key ingredients like Biscoff cookies and cream cheese. I shared step-by-step instructions for the crust and filling. Tips helped you avoid common mistakes, and variations showed fun ways to change flavors. Remember, chilling is key for the best taste. Enjoy these treats as is, or try them with twists. Your cheesecake journey can be as creative as you wish!